Skip to product information
1 of 13

MARY-LOU TOTE

MARY-LOU TOTE

Filled Circle
Filled Circle
Empty Circle
Empty Circle
Empty Circle
Regular price €4,95 EUR
Regular price Sale price €4,95 EUR
Sale Sold out

Mary‑Lou is a cheerful little companion who insists on tagging along for school runs, breakfast outings, and every day in between. The girls tote bag sewing pattern features sturdy purse feet, optional zip closure and a darling flap secured with a magnetic clasp, she’s always put together — even when her sewist is still in pajamas.

Marina’s step‑by‑step video tutorial means you won’t be guessing how to sew a tote bag, you will know!

Pattern Download Includes

  • Instant Download
  • DIN A4 & US Letter Size
  • Detailed eBook
  • Video Tutorials

Design Options

• Fold over front flap with magnetic snap closure
• The bag can be made with or without a zip 
• Integrated handles
• Optional Recessed zipper
• Fully lined beginner pattern

Fabric Requirements

BEST FABRIC CHOICE
Decor fabric, oilcloth or similar. Quilting fabric can also be used but you will need two layers of volume fleece.

FABRIC REQUIREMENTS

  • Shell : 18” (50 cm) wide heavyweight Home Decor fabric like Oilcloth
  • Lining: 16” (40 cm) wide coordinating medium weight cotton

NOTIONS

  • Zip: 1 x 8 inches (22cm)
  • Decorative ring for the tab: 1 x
  • Lightweight iron-on interfacing
  • Slim elastic: 10 inches (30cm)
  • Optional iron on vinyl: 18 inches (50cm)
  • Volume fleece: 16 inches (40cm)
  • Magnetic snap fastening: 1 x

Available Sizes

DIMENSIONS

Width: 7 inches (18 cm)
Height: 6.7 inches (17 cm)
Depth:  2.8 inches (Base) (7 cm)

Please Read

  1. This is a digital pattern or PDF file, not a physical product. It will be delivered electronically via a download link delivered to the email used for the purchase.
  2. To ensure the pattern prints at its actual size, it's recommended that you use Adobe Acrobat Reader.
  3. The pattern creator, Frocks & Frolics, welcomes small-scale production using their patterns. 

Customers are encouraged to tag Frocks & Frolics when sharing projects made using their patterns on social media.

@frocksandfrolics #frocksandfrolics

View full details

STEP-BY-STEP VIDEO TUTORIALS

Thumbnail
INTRODUCTION TO THE PROJECT
Thumbnail
MARY-LOU BASE VIDEO
Thumbnail
BEGINNER: VINYL APPLIQUE
Thumbnail
INTERMEDIATE: RECESSED ZIPPER

VIDEO TEXT

Introduction to the Mary Lou Bag Project

Transcript for the Video: Mary-Lou Tote - Introduction to the Project

Overview of the Mary Lou Bags

Hello and welcome to the Mary Lou bag project. In this course, we will explore five different versions of the Marylu bag, each with increasing levels of complexity and different techniques.

Before starting, let’s look at the materials used. A variety of fabrics are featured, including laminated materials and quilting cotton, depending on the bag design.

The Easiest Mary Lou Bag (Beginner Version)

This first version is the simplest of all. It is made from full leather sourced from Mood in New York.

This bag is designed for beginners because:

  • It has no zip fastening
  • It uses a simple construction method
  • It focuses on clean assembly rather than complex techniques

Laminating Handles and Flaps

For this version, the handles and flaps are laminated using heat and bond.

Heat and bond is an iron-on product that:

  • Bonds fabric layers together
  • Improves durability
  • Makes the material washable and more stable

Second Mary Lou Bag (Intermediate Version)

The second bag builds on the first by adding more detail and structure.

Key upgrades include:

  • Laminated handles using heat and bond
  • Appliqué placed between vinyl and fabric layers
  • Added purse feet at the base of the bag

Purse feet are attached between the lining and outer shell layers and help protect the base of the bag.

A decorative bow is also introduced, with separate tutorials available for that technique.

Monster Bag (Themed Design)

This version uses standard quilting fabric and introduces creative customization.

Key features:

  • Appliqué designs (monsters, letters, or themed images)
  • Designs sandwiched between vinyl and fabric
  • A focus on personalization and themed storytelling

This method can also be used for custom name bags or character-themed designs.

A practical tip is to use inexpensive laminated fabric combined with printed or cut-out designs to create budget-friendly themed bags.

Structural Improvements in the Monster Bag

This version also introduces:

  • A structured base for stability
  • Fusible fleece (such as Pellon 987F) for added firmness
  • Double-layer fleece for extra support

The base is often a contrasting color to the lining for visual interest.

Elephant Bag (Intermediate Zip Version)

The elephant bag introduces a zip closure while keeping the construction relatively simple.

Key points:

  • No laminating used on the outer fabric
  • Includes a structured base
  • No purse feet for a simpler finish
  • Contrast base design for visual separation

This version is ideal for learners who want to progress without tackling advanced finishing techniques yet.

Fully Laminated Advanced Bag

This is the most complex version in the series.

It includes:

  • Full bag lamination for durability and water resistance
  • Heavy interfacing for structure
  • Zip closure
  • Purse feet for a professional base finish

Construction method differs:

  • One version builds from the bottom up
  • Another assembles panels first, then inserts the zip and closes the base

The sequencing affects difficulty and finish, especially when working with heavy topstitching.

Working With Vinyl and Heat Transfer Lamination

Vinyl has two sides:

  • A shiny side
  • A gridded or textured adhesive side

To apply:

  1. Place pattern pieces and trace onto the correct side
  2. Cut fabric approximately 50 cm (half a yard) for a full bag
  3. Position vinyl sticky side down onto fabric
  4. Cover and press with iron for about 8 seconds per section
  5. Press from the other side for an additional 4 seconds

A correct application will appear:

  • Smooth and shiny
  • Fully bonded
  • Color-enhanced through the vinyl layer

If it appears milky or lifts easily, it has not bonded correctly and should be re-ironed.

Printing and Pattern Setup

When printing the pattern:

  • Use 100% scale (actual size)
  • Disable “fit to frame”
  • Use correct paper size (US Letter or A4 depending on region)
  • Confirm accuracy using the inch test marker

Once printed, assemble pattern pieces:

  • Lining A and B overlap to form full pieces
  • Ensure alignment along dashed guide lines

Fabric Requirements and Cutting Layout

Recommended fabric amounts:

  • 50 cm outer fabric
  • 50 cm lining fabric

More may be needed depending on fabric layout or design variation.

The bag consists of:

  • Upper and lower outer panels
  • Lining panels (slightly smaller for better fit)
  • Handles that are folded and reinforced

The smaller lining ensures:

  • A snug internal fit
  • No excess bulk at the base
  • A more professional finished shape

Construction Overview

Key assembly points:

  • Handles attach at marked arrows
  • Flap includes a marked square for magnetic fastener placement
  • Do not cut out the magnetic fastener marking
  • Volume fleece is applied to reinforce the flap

Assembly flow:

  • Attach flap and handles
  • Sew upper panels together
  • Close lower seam
  • Insert lining
  • Complete finishing steps

Zip Version Notes

For zip versions:

  • A separate pattern piece is used for zipper insertion
  • If not using a zip, this piece is not required

Final Notes

This project is designed to help you progress through multiple skill levels, from beginner-friendly construction to more advanced techniques like lamination, appliqué, and zip installation.

Explore the project pages and tutorials to build each version step by step.

Thank you for watching.

Mary Lou Bag Project Introduction

Transcript for the Video: Mary-Lou Tote - Mary-Lou Base Video

Welcome to the Mary Lou Bag

Hello everyone and welcome to another project with Frogs and Frolics. Today we are making a small girl's bag called the Mary Lou Bag.

There are five different construction versions:

  • Two versions include a zip insertion
  • Three versions do not include a zip

To choose the right version, it is recommended to watch the introductory overview video linked at the end of this lesson.

Overview of This Version (Fully Laminated Bag)

This is the first Mary Lou bag in the series.

Key features of this version:

  • Fully laminated construction (except the flap)
  • Structured base
  • Purse feet added for support

A note from experience: laminating the handles would improve durability, and this is adjusted in later versions.

Materials Needed

For this project you will need:

  • Iron-on volume fleece
  • Flexible cutting board (for base reinforcement)
  • Iron-on vinyl (Heat and Bond recommended)
  • Shell fabric (outer fabric)
  • Lining fabric
  • Zip (approximately 14 cm or longer recommended)
  • Purse feet
  • Magnetic snap fastener
  • Matching thread

Applying Vinyl to Fabric

Start by preparing the vinyl:

  1. Remove vinyl from backing paper completely
  2. Place sticky side down onto fabric
  3. Cover again with backing paper (shiny side facing up)
  4. Iron for approximately 8 seconds per section
  5. Press again from the reverse side for about 4 seconds

Checking Proper Adhesion

The vinyl is correctly applied if:

  • It appears smooth and glossy
  • It cannot be easily peeled off
  • Colours appear vivid and clear

If the vinyl looks milky or lifts easily, it needs more heat pressing.

Preparing the Flap

One side of the flap is laminated with vinyl.

The opposite side is reinforced with volume fleece:

  • Place fleece sticky side down on wrong side of fabric
  • Apply heat and steam thoroughly until fully bonded

Installing the Magnetic Fastener

Use the provided pattern marking (small square) to position the fastener.

Do not cut out the square from the fabric itself. It is only a placement guide.

Insert the magnetic snap and secure the prongs on the back.

Reinforcing and Stitching the Flap

Lightly snip the indicated points for purse feet placement (small controlled cuts only).

Attach reinforcement plates, fold prongs, and secure the fastener.

Then stitch around the flap using the fleece edge as a guide.

Trim seam allowance after stitching for a cleaner finish.

Making the Handles

Handles are constructed by:

  • Folding edges toward the center
  • Folding again to enclose raw edges
  • Topstitching along both sides

A key improvement: laminating the handles would increase durability.

Assembling Top Section

  • Position handles into marked snip points
  • Place flap centrally between handles
  • Align upper bag panel on top

Sew across using a 1 cm seam allowance.

Because multiple layers are involved, ease the fabric carefully to prevent shifting.

Topstitching for Structure

Press seam allowance downward toward the lower bag section.

Topstitch across the seam using a longer stitch length (around 3.5 mm recommended) to create a structured, professional finish.

This step is essential for achieving a store-bought appearance.

Reinforcing with Volume Fleece

Trim volume fleece slightly to reduce bulk in seam allowances.

Fuse fleece onto fabric using steam and careful pressing.

Ensure even adhesion before continuing construction.

Sewing the Bag Base

Join base panels by stitching across seams.

Press seams open and reinforce stitching where needed.

This step may feel slow when working with thick or laminated materials.

Attaching the Base and Marking Purse Feet

Use the pattern template to mark purse feet positions.

Punch or mark holes carefully where indicated.

These will be used later during final assembly.

Closing Side Seams

Close side seams on both:

  • Outer shell
  • Lining

Leave an opening in the base seam to allow turning later.

Press seams open before assembling final shape.

Forming the Bag Shape

Align side seams and base seams together.

This creates a “fishmouth” shape.

Stitch across to form the structured base of the bag.

Installing Magnetic Fastener

Mark placement carefully on the opposite side.

Correct placement is important:

  • Centered between handles
  • Slightly above or below seam line

Incorrect placement will affect closure alignment.

Zip Installation

The zip is sandwiched between:

  • Outer shell fabric
  • Lining fabric

Sew close to zipper teeth using a standard foot or zipper foot.

Avoid adding unnecessary thickness near the zip area.

Assembling Inner and Outer Sections

  • Sew shell fabric side seams
  • Sew lining separately
  • Leave bottom open for turning
  • Press seams open

Insert lining into outer bag with wrong sides together.

Attaching Facing and Finishing Top Edge

Attach facing carefully:

  • Ensure correct right-side alignment
  • Sew around top edge
  • Avoid twisting layers

Mistake warning: incorrect alignment may require unpicking.

Understitching and Edge Finishing

Understitch seam allowances toward facing.

This helps the top edge roll cleanly and maintain shape.

Forming Boxed Corners

Align base and side seams.

Stitch across to create structured box corners inside the bag.

Repeat on both sides.

Final Assembly and Closing Opening

Ensure zip alignment is even before final stitching.

Stitch across remaining open sections.

Reinforce zip area with backstitching.

Turn bag right side out.

Final Base Insertion and Finishing Touches

Insert base through the opening left earlier.

Fit purse feet into marked positions.

Secure everything and close final opening.

Add decorative elements such as bows or keyrings if desired.

Final Result

The completed Mary Lou Bag is structured, laminated, and durable with professional finishing details.

Thank you for watching, and see you in the next project.

[Music]

Mary Lou Bag Project Introduction

Transcript for the Video: Mary-Lou Tote - Beginner Vinyl Applique

Hello everyone and welcome to another project with Frogs and Frolics. Today we are making a little girl’s bag called the Mary Lou Bag.

There are five different ways to construct this bag:

  • Two versions include zip insertion
  • Three versions do not include a zip

To choose the right version for your skill level, it is recommended to watch the introductory video. The link can be found at the end of this lesson.

Design Features and What You Will Learn

This beginner-friendly bag introduces several techniques that help elevate the final result, including:

  • Appliqué and contrast design elements
  • Structured base construction
  • Purse feet installation
  • Laminated handles
  • Decorative finishing details such as a bow

These small construction choices are what make the bag look more professional and polished.

Materials Needed

For this project, you will need:

  • Iron-on vinyl (firmer type recommended over soft vinyl)
  • Flexible cutting board (for base structure)
  • Shell fabric (outer fabric)
  • Lining fabric (soft cotton recommended)
  • Volume fleece (iron-on)
  • Magnetic snap fastener (various sizes available)
  • Four purse feet
  • Matching thread

Pattern Preparation and Cutting Guide

Before starting, check that your printed pattern is at the correct scale. An inch reference marker should measure accurately.

Cutting requirements:

  • Lower bag: 1x outer + 1x lining
  • Upper bag: 1x outer + 1x lining
  • Volume fleece: same pieces as outer bag (2 sets)
  • Flap: outer fabric + lining fabric + separate fleece piece
  • Handles: outer fabric + vinyl (2 strips each)
  • Base: includes marked placement for purse feet

If using zip version patterns, additional pieces will be required.

Making the Handles

Start by preparing the handles:

  • Apply vinyl to fabric (sticky side down)
  • Cover with protective sheet
  • Iron for around 8 seconds per section

Then fold:

  • Edges toward the center
  • Fold again to enclose raw edges
  • Clip or pin in place

Stitch along both sides using a longer stitch length (around 3.5 mm).

Press and shape the handles using heat to set them.

Flap Preparation and Decoration

Cut decorative elements such as letters (e.g., “Mary Lou”) and apply them to the flap.

You may also:

  • Layer vinyl over appliqué for sealing
  • Add contrast stitching for decoration

Volume fleece is fused to the wrong side of the flap for structure.

Installing the Magnetic Fastener

Use the pattern marking (small square) to position the fastener correctly.

Steps:

  • Mark position through template
  • Make small snips for prongs (do not enlarge)
  • Insert fastener from the outside
  • Attach backing plate and secure prongs

Keep unused fastener parts safe.

Attaching and Topstitching the Flap

You may choose between:

  • Simple right sides together construction, or
  • Decorative triple-stitch topstitching

The triple stitch creates a more structured, embroidered effect.

After assembling:

  • Sew flap pieces together
  • Trim seam allowance (3–4 mm)
  • Turn right side out
  • Press carefully
  • Topstitch around the edge

Sewing the Handles and Upper Bag

Handles are attached to the lower bag section at the marked snips.

Then:

  • Place flap centrally between handles
  • Align upper bag panel
  • Sew across using 1 cm seam allowance

When sewing multiple layers, ease fabric carefully to avoid shifting.

Topstitching for Structure

Press seam allowance downward and topstitch using a longer stitch length (3.5 mm recommended).

This step:

  • Strengthens the structure
  • Improves visual finish
  • Prevents a “handmade” look

Preparing and Reinforcing Panels

Reduce bulk by trimming fleece in seam areas.

Fuse fleece using steam and press carefully to secure it in place.

Constructing the Bag Base

Sew base panels together.

Press seams open and reinforce stitching where necessary.

Then attach base reinforcement piece and mark purse feet positions using the template.

Closing Side Seams

Close side seams on:

  • Outer shell
  • Lining (leave turning gap)

Press seams open for cleaner assembly.

Forming the Bag Shape

Align side seams with base seams to form a structured “fishmouth” shape.

Stitch across to create the boxed base structure.

Repeat on both sides.

Installing Magnetic Fastener on Body

Mark the correct central position between handles.

Make small snips and insert fastener carefully to avoid damaging lining.

Attaching the Lining

Place lining inside outer bag with right sides facing each other.

Pin evenly around the edge.

Sew around top edge, easing fabric as needed since lining is slightly smaller for a better fit.

Topstitching and Understitching

Understitch seam allowances toward lining to create a clean edge.

Then fold and topstitch around the opening for a professional finish.

Closing the Bag and Forming Corners

Close remaining openings at base and lining.

Form boxed corners by aligning side and base seams, then stitching across.

Repeat for both outer bag and lining.

Leave a small turning gap in the lining.

Installing Purse Feet and Base

Turn the bag right side out.

Insert base through the opening and align purse feet with pre-punched holes.

Secure feet by spreading prongs (use scissors, not fingers).

Closing the Turning Gap

Stitch the lining opening closed as close to the edge as possible.

This completes the internal finishing.

Optional Decorative Bow

A simple bow can be made by:

  • Sewing a fabric rectangle right sides together
  • Turning it through a small opening
  • Gathering at the center
  • Securing with thread or knot

Attach as a decorative finishing touch or keyring detail.

Final Result

The Mary Lou Bag is now complete, featuring structured construction, reinforced base, optional decoration, and professional finishing techniques.

This project includes multiple variations, so selecting the correct method based on fabric and skill level is important.

Thank you for watching.

Mary-Lou Tote Bag

Transcript for the video: Mary-Lou Tote - Intermediate Recessed Zipper

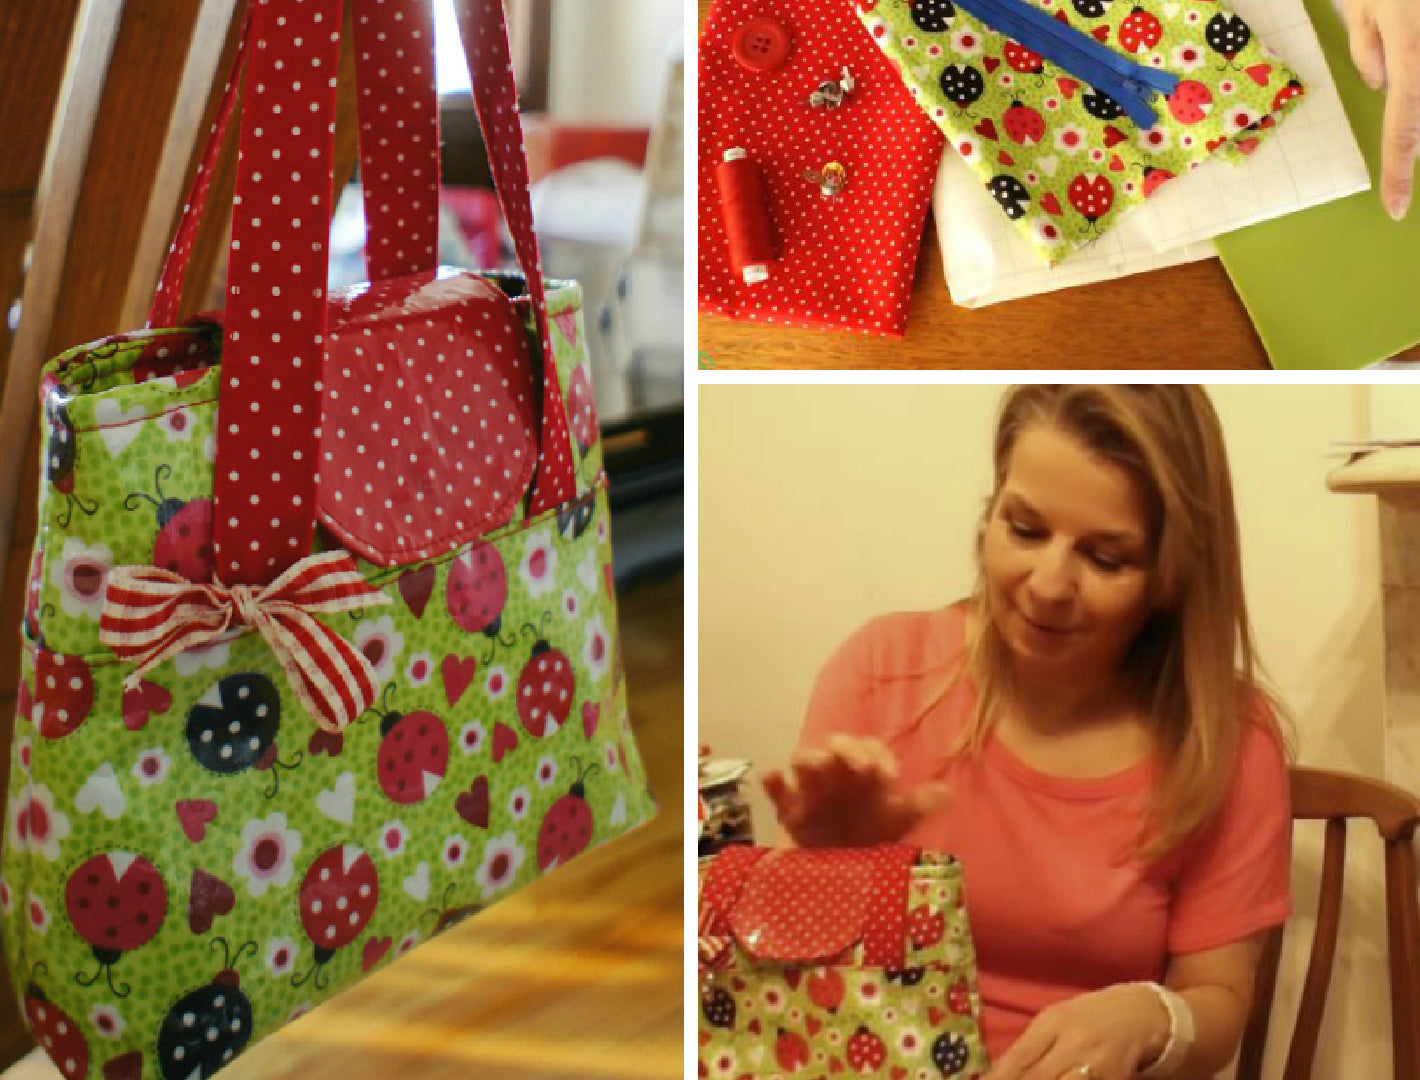
Hello everyone, and welcome to another project with Frocks and Frolics. Today we're going to sew a little girl's bag called the Mary-Lou Tote Bag.

There are five different ways to put the bag together. Two of them include zip insertions and three of them don't. In order to find the right bag for you, I would suggest that you watch the introductory video, and the link to that can be found at the end of this video.

If you've already made some bags, especially my bags or even this bag, and you say, "Ah yes, I want to make it with a zip and I want to learn something different," then this is great for you because it shows you a different method, working from the top down instead of from the bottom up.

We've got a contrast fabric for the flap, then we've got that lovely recessed zip this time, again different to the other bags I've made, and we've got a base. I used the same fabric as I did on the shell, and that's quite nice. But if you are a beginner, then this might not be the right thing for you. It adds to the confusion rather than making it easier, so I would then recommend the classic Mary-Lou Tote Bag first.

Materials and Pattern Pieces

What do you need for the bag? First of all, you need volume fleece to make the bag a little bit stiffer. Then I've chosen a really nice cotton for the lining, and we've got the shell fabric, obviously. A bit of fabric here for the little bow, matching thread, my magnetic fastener, which also works really well and is much nicer than a buttonhole. Of course, you can do a buttonhole if you like. Finally, you'll need an open zip.

Let's have a look at the fabric pieces you need:

  • Lower part of the bag ×2
  • Upper part of the bag ×2
  • Facing for the zip
  • Flap in contrast fabric and main fabric
  • Volume fleece for the flap
  • Volume fleece for the lining
  • Lining fabric
  • Lining fabric again ×2 for the facing
  • Handles ×2
  • Extra fabric to make the base
  • Magnetic fastener
  • Zipper

Making the Handles

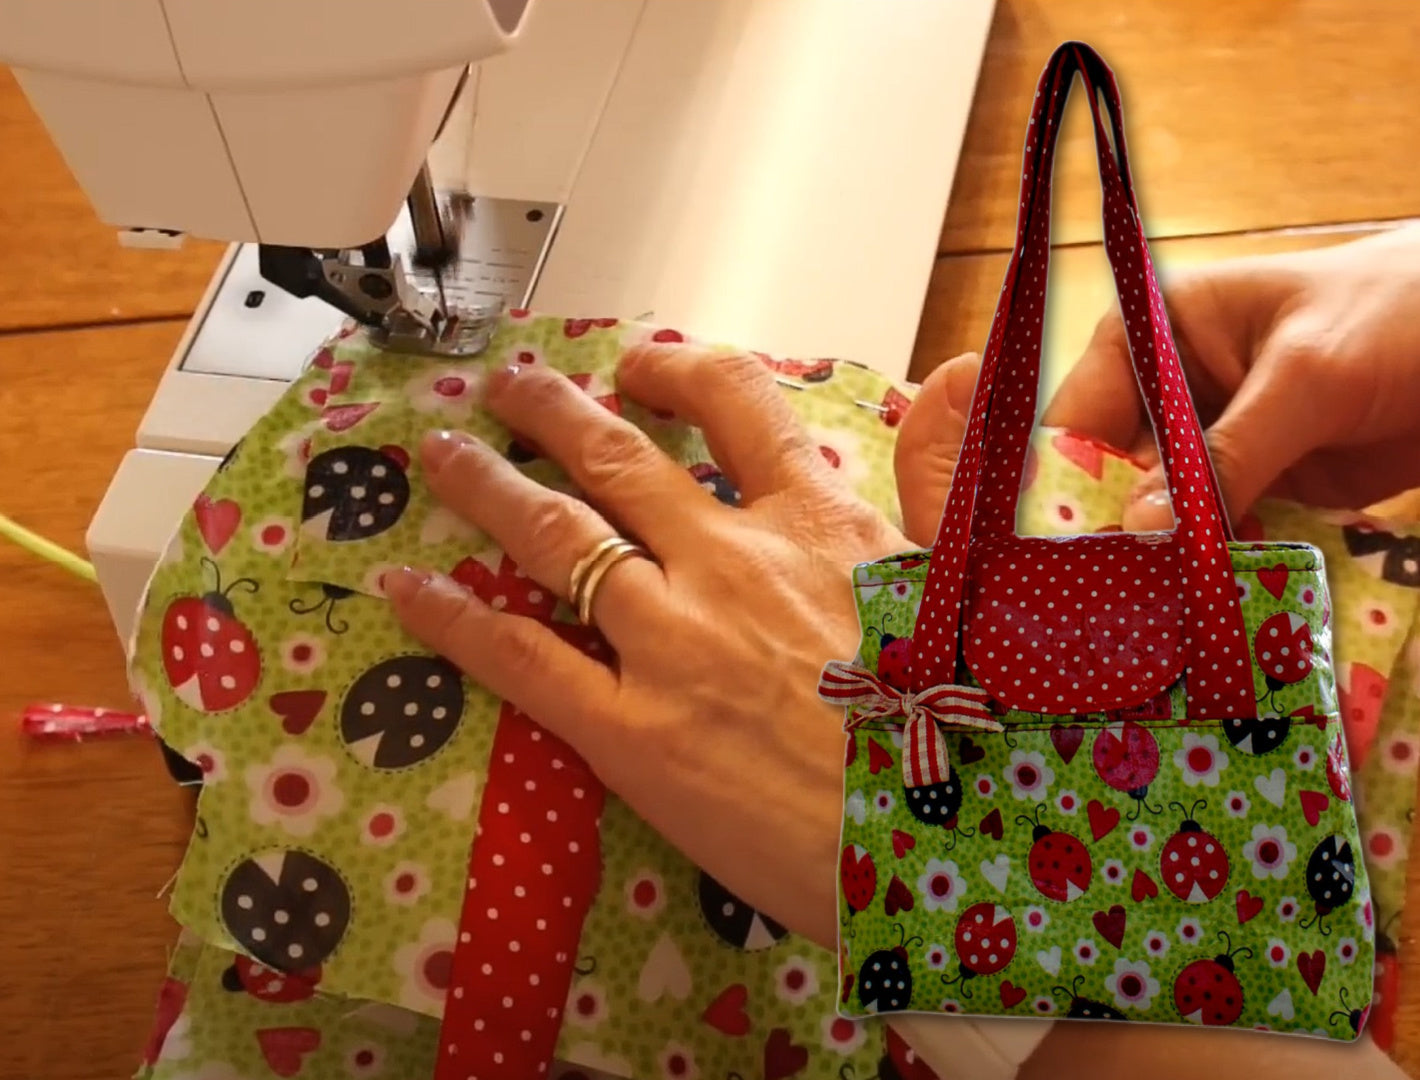
The first thing we're going to start with are the handles. You want to iron them over in half and then again from either side to the middle, leaving a slight little gap. Then iron them on top of each other and topstitch.

The topstitching should be quite wide, so choose a stitch length of 3.5 for this. Go all the way to the end and then, with the needle down, you can just turn and come back up the other side.

Making the Base

Now we can work on our base. Initially, I didn't have a pattern for the base. It was a bit of an afterthought, so you want to close those two base pattern pieces that are shorter and leave a gap in the middle. Then sew on the other side to the end.

Of course, yours is going to look much tidier because you've got a pattern piece and already have the shape in there. Iron the seam to one side and then place the other one over the top. In this case, I had to draw around it, etc., but you have got a pattern piece for this. All you have to do is sew around it all the way.

If you're ever making a base pattern for a cover, then this is the way to do it. You would just stitch on that pencil line. Go all the way around and now we can cut off the seam allowance. If you didn't have a base cover but wanted to add it to a different bag, this is how you do it.

Turn it and iron it really neatly, then just stick your base into this little cover. You can sew this shut or leave it. If you're like me, you just leave it because it's facing down.

Making the Flap

Next we're going to do our flap. Put your volume fleece on top with the sticky side facing the wrong side of the fabric and iron it on. Now we're going to mark our magnetic fastener and then, once we've marked that, put two snips in there so that our magnetic fastener arms can go through.

I'm marking exactly where those little arms are because all fasteners come in different sizes. You might have chosen a bigger one, and then my instructions wouldn't be quite in the right position, so check that first.

Fold the arms apart and that's it. Now we can put away the other side safely for later and put the other side of the flap on top, right sides facing. We're going to sew all the way around.

On this one I'm using my volume fleece as my guide. If you've cut this out really well, then that should work nicely. Cut it back, turn it, and really work out all the edges. Roll them until they're nice and round, press them, and your flap is finished.

I'm going to topstitch this using a triple stitch, which is commonly used for stretch materials. Anyone who knows me knows this is my stitch. I use it all the time. It makes everything look really structured.

Inserting the Zip

Next we're going to work on the zip. The zip is going to be cased in between the lining and the shell. What you need to do is sew as close as you can to your zipper.

I've changed my foot here and put my zipper foot on, and I also moved my needle all the way over to the left-hand side. Now that that's done, I've ironed it away from the zip and I'm doing the other side. On the other side, I have the side I've just done as a guide.

It makes good sense to have a zip that's a little bit longer than what you actually need because it's much easier to work with. I've sewn it on, ironed back one side and then the other side, and now I can topstitch this all the way along.

I use my standard foot for this because my presser foot actually lies on the teeth of the zipper. On the other side, I have to open my zip a little bit because otherwise it won't go in. I do a few stitches, close the zip, and continue to the end.

Make sure your stitch length is quite long, around 3.5.

Constructing the Bag

Now we're going to close the side seams. Sew those together on either side using a 1 cm seam allowance. Do the same on the opposite side and then iron those little seams apart. If you can't get it on your ironing board, you can finger press them first.

Now we've got our little boxed corner at the bottom. You can close it now or later. That's really preference. I'm doing it straight away, pinning and sewing across. I also backstitch here to make sure it can't rip out.

Cut it back and zigzag the edge. If you had an overlocker, you could overlock it instead.

Now it's easier if you sew together the lining and the outer shell part of the zip facing because otherwise it's harder to put in. Make very sure that you do it from the lining side. It's almost impossible from the other side because this fabric really pushes.

Preparing the Main Bag

Now we're going to cut our volume fleece so that we have it in two separate parts. The first one goes on the lower part and the second one on the upper part, leaving a 1 cm seam allowance all the way around.

We're working this separately because it's easier to get in and allows us to do topstitching. If you like topstitching like me, then this might be the method for you.

When that's done, close the side seams but leave the lower part open. Just sew the side seams with a 1 cm seam allowance.

Now we can topstitch either side. Do it from the inside, push the pieces apart, and stitch down, turn, and stitch back up. Do this on both the lower and upper parts of the bag.

Attaching the Flap and Handles

Now we're going to put our flap on. I'm starting with the handles and using two pins. That's definitely what you should do because they do slip out slightly.

The flap just goes into the middle. Make sure the contrast fabric is facing up. Use one pin on either side. Do the same on the back and stitch on your flap and handles so that they're nice and secure.

Adding the Lining and Facing

Now I'm going to do my lining. Again, I close the side seam and leave the lower part open.

I'm going to put my lining, wrong side to wrong side, inside here and attach it all the way around. Over the top of that, I place my facing for the zip, right sides facing each other.

I like working like this because I don't have the rest of the bag hanging on it already, which makes it easier. Sew around with a 1 cm seam allowance, pulling the fabric gently so the machine transports it evenly.

Next we're going to roll this out, turn it to the inside, give it a good press, and then topstitch all the way around. Turn it in, iron it, and topstitch it foot-width so it looks neat.

Attaching the Lower Section

Now I can put the lower part on. I'm sliding it, right sides together, onto this part. Then I can sew all the way around with a 1 cm seam allowance.

Pull it apart, topstitch again, and with my 3.5 stitch length, topstitch that seam.

Magnetic Fastener and Bow

Next I'm going to put on my magnetic button. I measure the middle, mark it, and place it just underneath my stitching line.

Put the little plate on the other side, pull the arms apart, and you've got a really nice magnetic fastener.

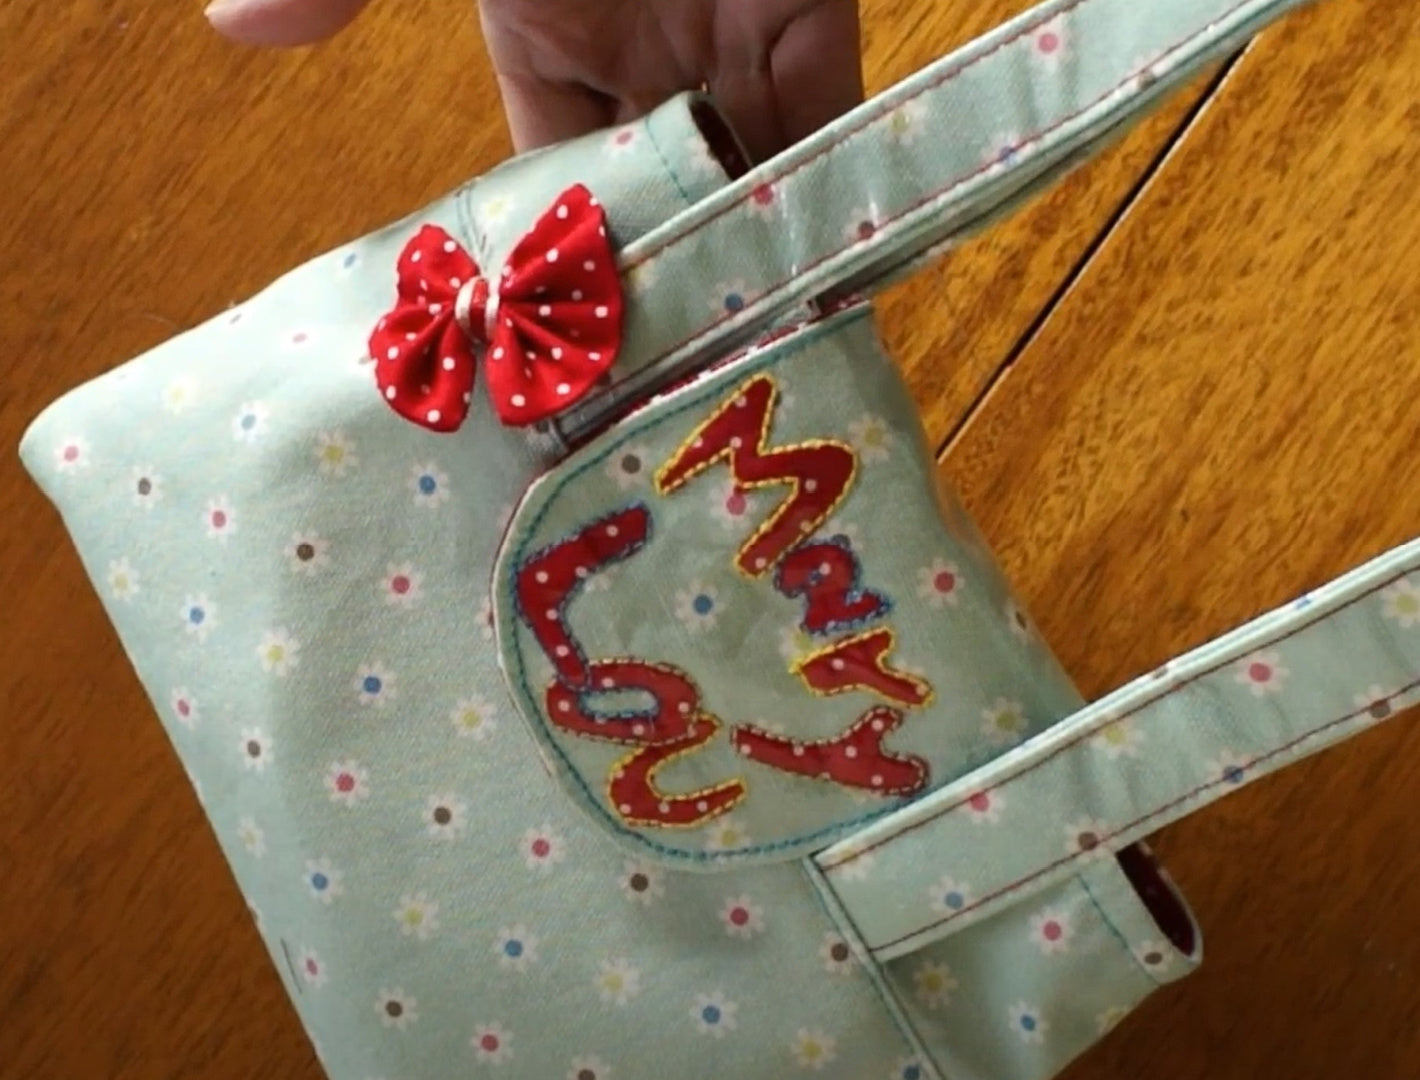
Now I'm going to put my little bow on. If you want to know how to make a bow, the instructions are on my project page. I'm just going to sew this through the shell fabric, not through the lining.

Finishing the Bag

Now we're ready to close our bag. Sew across the lining base, leaving a turning gap. That's really important. Then sew across the corners on both sides, making sure they're nice and straight.

Turn the inside out and close the lower part of the shell fabric. Then do the corners in exactly the same way.

Now I can turn my bag through and close the remaining opening. Turn it back in, put the base in, and the bag is finished.

Brilliant. There we are, all finished. That's the Mary-Lou Tote Bag.

There are, of course, four more bag variations with separate videos that you can watch. Some are explained in more detail on the Frocks and Frolics project page called Mary-Lou Tote Bag.

See you next time. Bye!

YOU MAY ALSO LIKE

Dungies

SHOP NOW

Lollipop

SHOP NOW

Bobby Dazzler

SHOP NOW

Jelly Bean

SHOP NOW

Bubble Gum

SHOP NOW