Safari Jacket for 18-Inch Dolls
Transcript for the video: The Safari Jacket - Project Introduction
Hello everyone. I’m back with another project for our American Girl dolls, or dolls measuring 18 inches (46 cm to 50 cm) in height. And this is a real stunner.
This is a safari jacket that has loads of details you can learn from. From little fake pockets to proper pockets with a box pleat, this project includes so many techniques. We’re also working with a front placket, a tunnel waist, and a collar. It’s really something you could make for a girl and it wouldn’t look out of place at all.
It really is absolutely fabulous, and I hope it doesn’t feel too scary because I think it’s glorious.
I’ve also made this jacket in a salmon pink version, and honestly, this has to be my favorite.
Now, I’m pairing this up with the Scarlet Skirt. So if you want to start sewing doll clothes with Frocks and Frolics and you don’t know where to begin, then get the Scarlet Skirt. It’s free, and you can also get it free for your girl.
I divide all these projects into two parts.
This is the first part where we:
- Look at the pattern
- Learn how to print it properly
- Go through what to watch out for
- Examine each individual pattern piece
- Review the cut-out pieces and markings
- Look through the instructions
This part is more theoretical.
In the second video, we sew the jacket together.
If you want to jump to the second video, you can find the link in the YouTube description. If you’re already on my website, just swipe over to the next video in the list.
If you’ve never been to Frocks and Frolics, go to the Doll Collection and find the Safari Jacket. Scroll down and you’ll find a tab with all the videos for this project.
You do not need to log in or sign up. You can watch everything for free and see if this style of sewing is for you.
I wouldn’t say this project is super easy, but if you want to learn how to make jackets and you feel a bit frightened about sewing for yourself or your daughter, this is a really good place to start. You learn a lot, and maybe afterward you’ll think, “Yeah, I can do this.”
So now we’re going to continue with all the main detail parts.
Ebook Overview
We’re going to start with the ebook and do a quick run-through.
First, you have the contents page so you can quickly find what you’re looking for.
The second page includes links to sewing courses you might be interested in, such as:
- Putting in sleeves
- Sewing zippers
Then we move on to the video links for this project.
After that, there are fabric recommendations. For this jacket, linen, chino, or denim work really well.
Next, you’ll find:
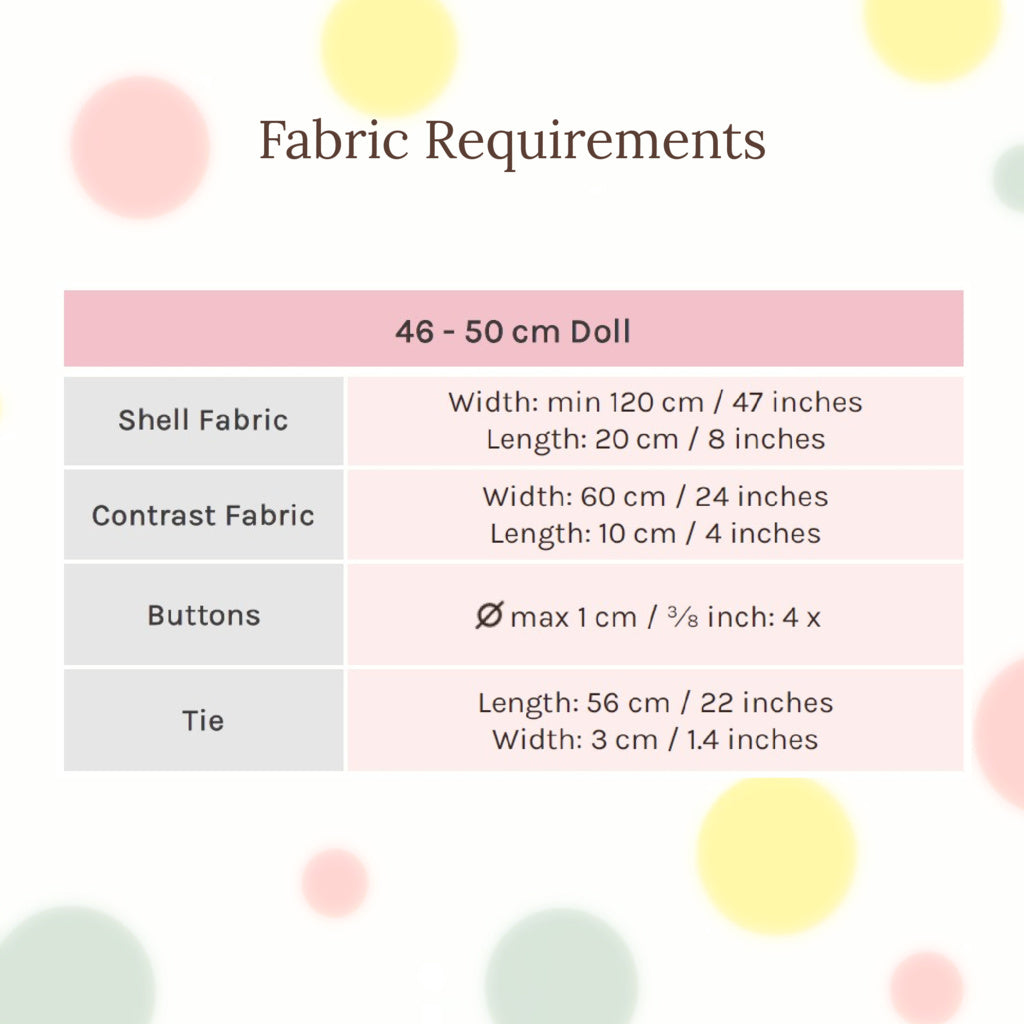
- Fabric requirements
- Printing instructions
- Information about adapting the pattern for different dolls
Then we look at each pattern piece individually.
The seam allowance is:
- 1 cm
- Already included in the pattern
Next, we have the layout plan.
We fold the fabric in a way that allows us to cut everything that needs to be cut twice. Then we use the remaining space for pieces that only need to be cut once.
There’s also a separate layout plan for the contrast fabric.
At the end of the photo guide, there’s a page with links to other projects you may enjoy.
Finally, there’s the Impressum page with:
- Amazon shop links
- Facebook group
- Instagram
- Email address
Printing the Pattern
Please measure first.
The test square should measure:
- 2.5 cm
- Or 1 inch
on all sides.
Usually, the pattern pieces do not fit onto a single sheet of paper, so there are little tabs to help with assembly.
You overlap the tabs to put the pieces together more easily.
The larger pieces include:
- The tie (A, B, C, and D)
- The tunnel (A and B)
On the last page, I always show exactly how everything fits together.
You’ll see:
- Tie = A, B, C, D
- Tunnel = A, B
Printing Tips
Use Adobe Acrobat Reader DC.
When printing:
- Print at “Actual Size”
- Set orientation to “Auto”
- Make sure “Fit to Page” is unticked
If you use Portrait orientation or fit-to-page settings, the pattern may shrink slightly, which means it won’t fit properly.
Printer Recommendation
If you print lots of sewing patterns and wonder which printer to use, I recommend the Epson EcoTank ET-3750.
I bought this printer around four or five years ago and I’m still using the same ink that came with it. I print loads of full-color patterns.
The printer itself is more expensive upfront, but the ink lasts an incredibly long time.
Pattern Assembly
Now we’re assembling the pattern.
I’ve got my tie pieces sorted into:
You’ll notice little diamond symbols that must line up. If the diamonds match correctly, you know the pieces belong together.
If the diamonds don’t align, those pieces are not supposed to connect.
Then we repeat the process for the tunnel pieces:
Again, line up the diamond shapes.
Pattern Pieces in Detail
Front Pieces
The front comes in:
We also have the front placket.
The placket is longer because the collar is attached first, then the placket goes on afterward.
Pocket Flaps
The small pocket flaps are inserted into the seam, which makes construction easier.
You can make them:
- In the same fabric
- In denim or chino
- In contrast fabric
For this sample, I used contrast fabric.
Box Pleat Pocket
The pocket has a box pleat created by sewing along the dotted line.
To place the pocket correctly:
- Remove the pocket section from the pattern
- Mark the corners directly onto the fabric
- Use those dots for placement
This makes positioning much easier than measuring repeatedly from the edges.
Back Pieces
The back also comes in two sections:
There are center back markings that need to line up.
You’ll also see markings for the tunnel.
You mainly need to mark the lower edge so you know where the tunnel placement goes.
Sleeves
The sleeves are not symmetrical.
So you must:
- Mark the front of the sleeve
- Mark the sleeve head
This helps avoid attaching the sleeves incorrectly.
Tunnel and Tie
The tunnel wraps all the way around the jacket.
The best method is:
- Find the center back of the jacket
- Find the center of the tie
- Match them together
- Work toward the front from there
The tie threads through the tunnel and looks beautiful from the inside as well.
Collar Details
For the collar, I used contrast fabric.
So you’ll cut:
- One collar piece in contrast fabric
- One collar piece in main fabric
I also used the same contrast fabric on the pockets.
The whole jacket is unlined, which keeps it much simpler to sew.
Cutting Out the Fabric
I folded the fabric so all mirrored pieces could be cut efficiently.
That left enough space for:
- The back
- The tunnel
- One collar piece
The contrast fabric was used for:
- The other collar piece
- Pocket flaps
- Tie
Cutting Guide
Tie
- Cut once in contrast fabric
Tunnel
Pockets
Pocket Flaps
- Cut twice in contrast fabric
- Cut twice in upper fabric
Back Yoke
Collar
- Cut once in contrast
- Cut once in upper fabric
Front
- Cut twice mirror image
- Don’t forget to cut out the pocket section
Back
Sleeves
Placket
Front Yoke
Markings and Snips
Now we snip all the markings where needed.
Sleeve
Mark:
Back
Mark:
Back Yoke
Mark:
Line up your fabrics carefully before marking.
Final Thoughts
I really hope I encouraged you to sew this jacket with me in the next video.
Don’t forget:
- You can get the pattern from Frocks and Frolics Doll Collection
- There are loads of patterns to choose from
- The Scarlet Skirt is free, so it’s a great place to start
I also forgot to mention that underneath the jacket is the Virginia Blouse.
Everything was made in coordinated fabrics:
- The blouse collar
- The tie
- The skirt details
All use the same matching fabric combination.
I hope you enjoy this project, and I’ll see you in the second video where we can start sewing.
Bye for now.