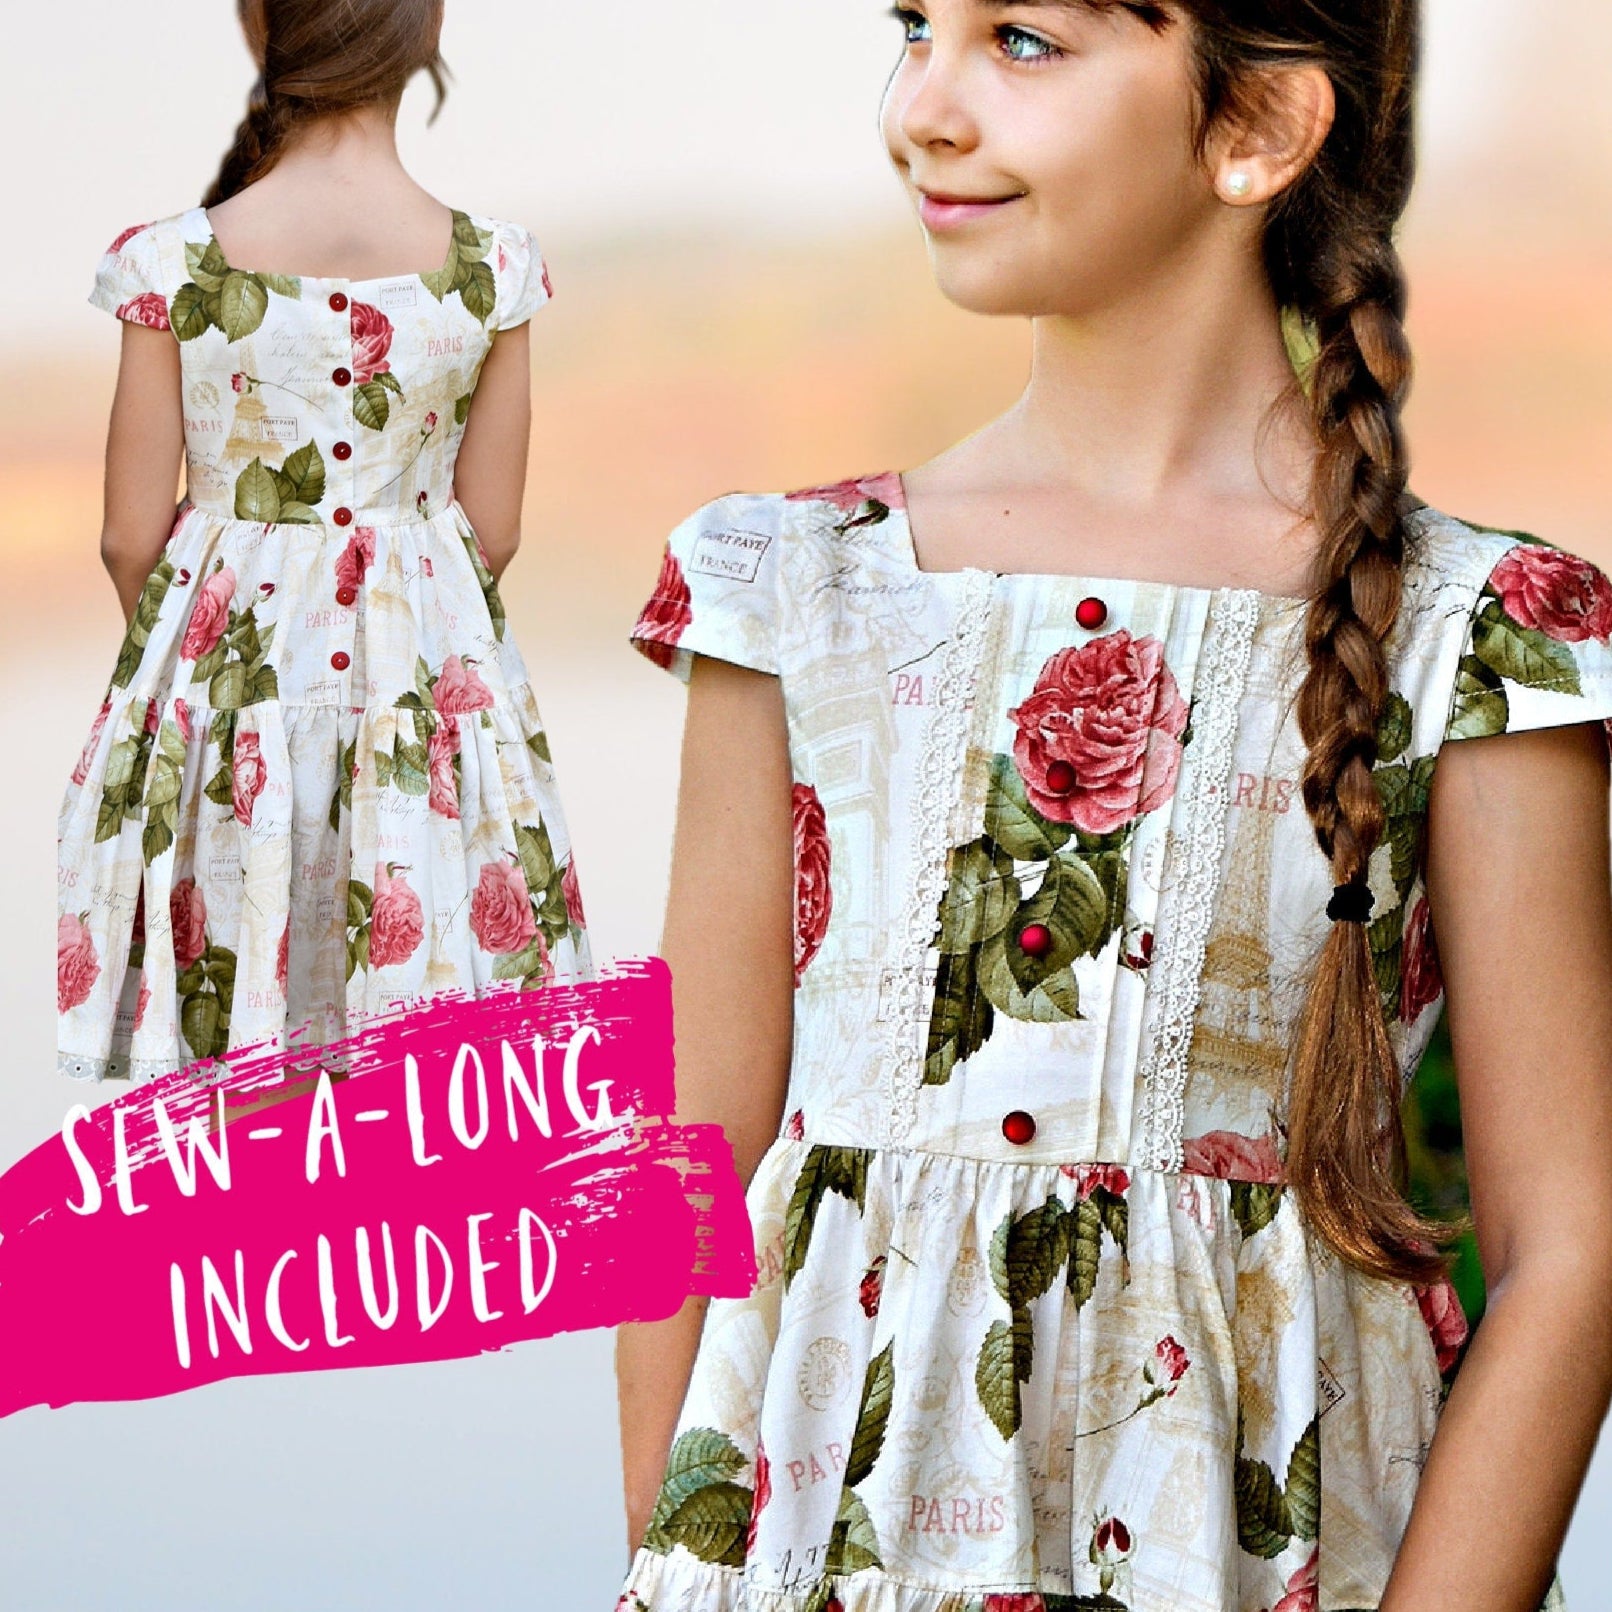
Skip to product information
1 of 13

ISABELLA DRESS

ISABELLA DRESS

Filled Circle
Filled Circle
Filled Circle
Empty Circle
Empty Circle
Regular price $8.50 USD
Regular price $10.50 USD Sale price $8.50 USD
Sale Sold out

The Isabella Dress is pure storybook sweetness — the perfect vintage‑inspired girls dress sewing pattern for Christmas mornings, flower girl moments, and everyday twirls. She features the prettiest square neckline, classic princess seams, and your choice of cap sleeves or puff sleeves.  

The high waistline flows into a dreamy tiered skirt, and the button‑down back closure plus lined bodice keep everything looking neat and timeless. Little details like pin tucks and a sweet faux collar make her feel truly special.

And you’re definitely not sewing this beauty alone — the digital pattern comes with clear instructions and video tutorials. Just scroll down and follow along with Marina as she walks you through every little detail.

Pattern Download Includes

  • Instant Download
  • DIN A4 & US Letter Size
  • Individual PDF files for every Size
  • All Sizes included
  • Detailed eBook
  • Video Tutorials

Design Options

  • Fully lined bodice
  • Optional pin tucks  
  • Square neckline
  • Back button closure
  • Cap sleeve

Fabric Requirements

BEST MATERIAL CHOICE
Cotton Sateen, Quilting fabrics, silk such a Dupion and most linens.

FABRIC REQUIREMENTS
• Shell Fabric: 3-4 yards (2.5–4.5m)
• Bodice Lining: 12–20 inches (30–50cm)
• Buttons for the back closure

Available Sizes

Sizes: 1-12 Years

Please Read

  1. This is a digital pattern or PDF file, not a physical product. It will be delivered electronically via a download link delivered to the email used for the purchase.
  2. To ensure the pattern prints at its actual size, it's recommended that you use Adobe Acrobat Reader.
  3. The pattern creator, Frocks & Frolics, welcomes small-scale production using their patterns. 

Customers are encouraged to tag Frocks & Frolics when sharing projects made using their patterns on social media.

@frocksandfrolics #frocksandfrolics

View full details

STEP-BY-STEP VIDEO TUTORIALS

Thumbnail
INTRODUCTION TO THE PROJECT
Thumbnail
THE PATTERN
Thumbnail
SKIRT OPTIONS
Thumbnail
CUTTING THE SKIRT OUT
Thumbnail
CUTTING OUT THE BODICE PIECES
Thumbnail
THE OPTIONAL COLLAR
Thumbnail
BODICE PIN TUCKS & LACE TRIM
Thumbnail
ADDING THE LINING TO THE BODICE
Thumbnail
THE NECKLINE
Thumbnail
THE CAP SLEEVE
Thumbnail
THE SIDE SEAMS
Thumbnail
THE SKIRT
Thumbnail
JOINING THE SKIRT & THE YOKE
Thumbnail
INSERTING THE BUTTONHOLES VERTICALLY
Thumbnail
INSERTING THE BUTTONHOLES HORIZONTALLY
Thumbnail
BONUS: THE PUFF SLEEVE 1
Thumbnail
BONUS: THE PUFF SLEEVE 2
Thumbnail
HOW TO DRAFT A BISHOP SLEEVE
Thumbnail
HOW TO SEW A BISHOP SLEEVE

VIDEO TEXT

Transcript for the video: Isabella Dress: Introduction to the Project

Hi everyone, and welcome to the Isabella sewing course. I hope you’ll enjoy this thoroughly.

There is a lot to go through in this introduction, so let’s get started.

Overview of the Dress Design

Here we have this beautiful dress in size 1–2 that I’ve made. You’ll immediately notice the pintucks at the front—two on each side of the center front.

In the middle, there is a 4 cm wide center panel where you can add lace if you want. We will look at an example of that later.

The Yoke and Skirt Volume

The yoke is slightly curved and not a full circle. Because of this, it creates a lot of fullness at the skirt.

If you choose the gathered option, you will need a very voluminous skirt with a lot of fabric. You can also leave the skirt flat if you prefer a simpler version.

Fabric Requirements

This dress requires a significant amount of fabric.

If you are cutting along the selvage, you can maximize fabric usage. You can also cut across the fabric, but for larger sizes (3–4 and up), you may need up to four panels.

Most quilting cottons, such as Michael Miller fabrics, are around 110–120 cm wide rather than 140 cm, so more yardage is often needed.

In total, you may need up to 4 meters of fabric for the skirt alone, depending on size and design choice.

Sleeve Options and Fabric Details

This version includes small cap sleeves. They are lightly gathered and inserted cleanly for a neat finish.

You can also use lace as a decorative element, either as trim or like a collar detail. This allows you to use materials from your stash creatively.

Back Closure and Buttons

On the smallest size, I used buttonholes only at the top. For sizes 1–2 and 2–3, this is usually sufficient.

For larger sizes, you should add buttonholes all the way down the back so the dress stays closed properly.

Cam snaps can also be used, but buttonholes tend to give a more adjustable and durable finish.

Example: Larger Size Dress

Here is the size 8 version made for Magdalena.

In this case, buttonholes run all the way down the back. This is essential for larger sizes to prevent gaping.

The same gathered cap sleeves are used, giving a very clean and professional finish.

Fabric Choice and Design Variations

For these dresses, I used fabrics from Michael Miller’s baby collection. It is soft, suitable for children’s clothing, and works well with cotton lining.

I would recommend avoiding satin linings. A soft cotton lining works much better for comfort and breathability.

Decorative Elements

On some versions, I added buttons and lace details for extra interest.

In some cases, I left out front trim because the dress already looked balanced without it, especially for summer versions.

Skirt Volume and Gathering

The gathered skirt requires a large amount of fabric.

For example, cutting four full-width panels can give nearly 4.8 meters of fabric, creating a very full skirt.

Using a gathering foot makes this process easier, and sometimes the gathered length matches the yoke perfectly, depending on your settings.

If needed, you can re-gather or adjust and try again until it fits correctly.

Construction Tips

When assembling the skirt, always avoid placing seams at the front.

Instead, divide the skirt evenly by marking between seams to ensure a balanced, professional finish.

Christmas Dress Examples

Here are some Christmas versions of the dress.

I used red lace and festive fabric details, including pintucks that are subtle but elegant.

For sleeves, I used puff sleeves with cuffs, which are simple but very effective.

Button Placement and Finishing Details

On larger buttons, horizontal buttonholes work best. Vertical buttonholes can look awkward with larger sizes.

Hand hemming was used for the Christmas versions to achieve a higher-end finish.

Although it takes longer, it gives a more refined look, especially for special occasion dresses.

Additional Outfit: Matching Jacket

I also made a matching Paris-style jacket.

It includes bound buttonholes and hand-finished details inside. Sleeves are left unlined for comfort and breathability.

This creates a complete outfit that looks boutique-quality.

Flower Girl Dress Variation

Another version uses checked fabric for the collar and details.

The collar is cut on the bias for better drape and shape.

Even small adjustments, like how seam allowance is handled, can change the final look significantly.

Design Adjustments and Learning Process

Some design elements evolved during sewing.

For example, a slight edge showing on the collar turned out to look better than expected, even though it was initially considered a mistake.

This shows that small imperfections can sometimes improve the final design.

Flat Skirt Option

The skirt can also be made without gathering.

This uses less fabric, reduces volume, and creates a smoother silhouette, which is often preferred for older children or more formal versions.

Conclusion

This is a versatile sewing course with many options and variations.

I hope you enjoy making your Isabella dresses, and I can’t wait to see your creations.

So let’s get started!

Pattern Printing

Transcript for the video: Isabella Dress - The Pattern

Checking the Test Square and Print Settings

Once you've cut out your pattern the first thing is always to check the test square and make sure it's 2.5 centimeters or an inch. It needs to be that in both directions, so you measure it and if it's fine, you know your pattern has printed off correctly.

You want to print all your patterns with Adobe Acrobat Reader DC. That will ensure they print correctly. Some people have had trouble when printing from anything other than a PC or laptop, for example from a phone, so I would recommend doing it from a laptop or PC just to be safe. Choose the option “100%” or “actual size” when printing.

Print off just the first page and check it. Once that’s okay, you can print everything else.

Pattern Format and Assembly System

My patterns do not come in multi-size. You’ve got one file per size, which means I can put a lot more onto the paper and make sure it’s really easy to stick everything together. I’ve got attachment lines here so that when you put another piece of paper on, it’s not difficult. It’s always very hard when you try to put paper edge to edge, especially if it’s been cut with scissors. That doesn’t work very well. That’s why you have the attachment lines, which makes it much easier.

You put everything together in alphabetical order, and we have different colors for different pieces. It’s always the same. For example, the front piece will always have a little white flower. The sleeve will always have a yellow flower. Once you’re done cutting everything out, create neat piles so you can see what’s what. This is the back bodice, and that always has a pink flower on it.

So the first thing to do now is to cut all this out, and then we’re going to put it together and talk about all the individual pattern pieces.

Assembling the Pattern Pieces

I’ve cut everything out, and here for example the trim, I’ve already put the two pieces together. Let’s have a look at all my sleeve pieces.

If you look at your layout plan, you can see you’ve got piece A, B, and C, and then we’ve got the turn-out, which just goes together A and B. It’s really simple. You just make sure you cover the attachment line, and then you just pop it together. That’s all it is really, it’s very simple.

With my sleeve here, we’ve got again the three pieces. You put these together, then I just overlap it with the other piece, and that’s basically how you put all of these together. I’m going to go away now and put everything together, and then we’re going to look at the pieces.

And there you go, first piece together.

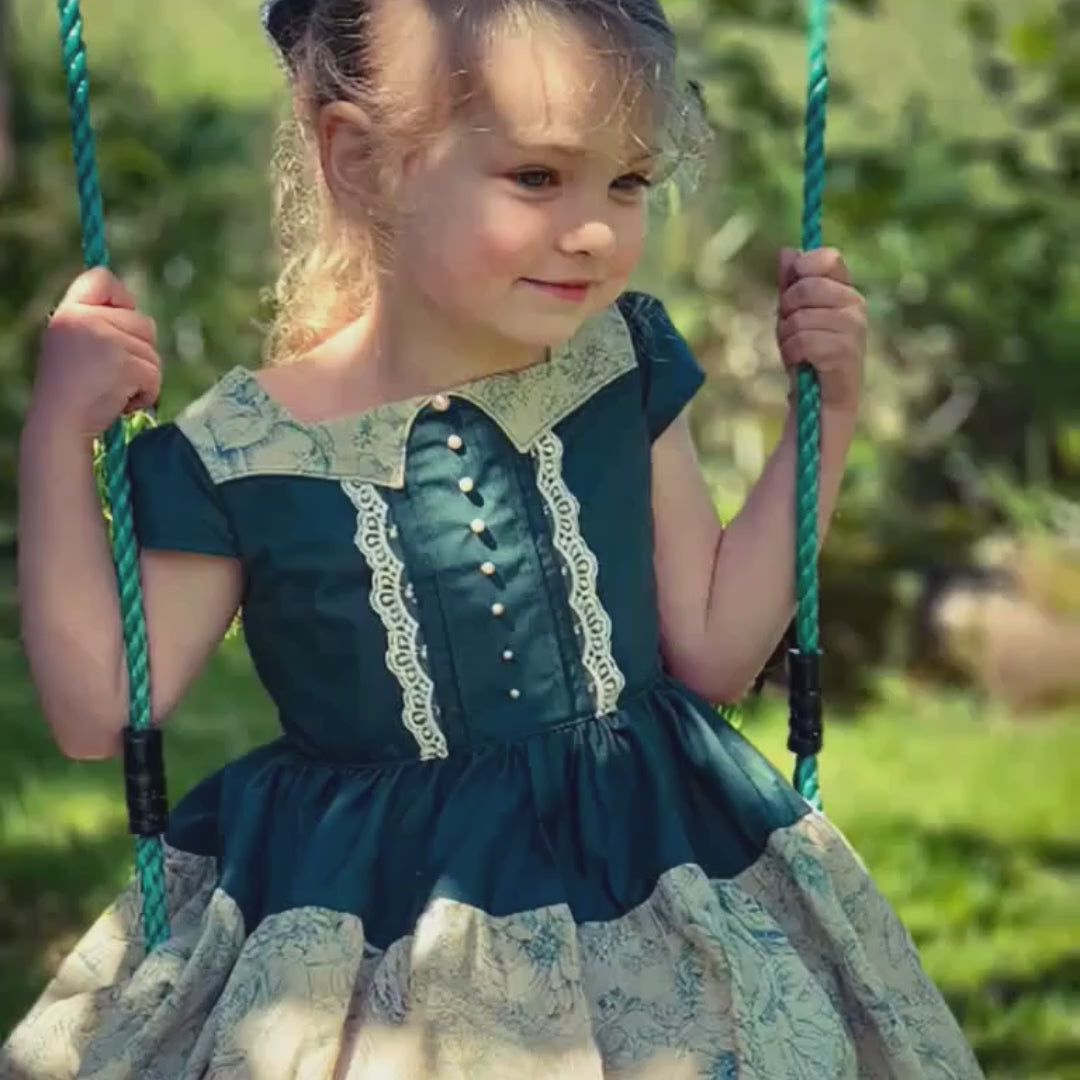
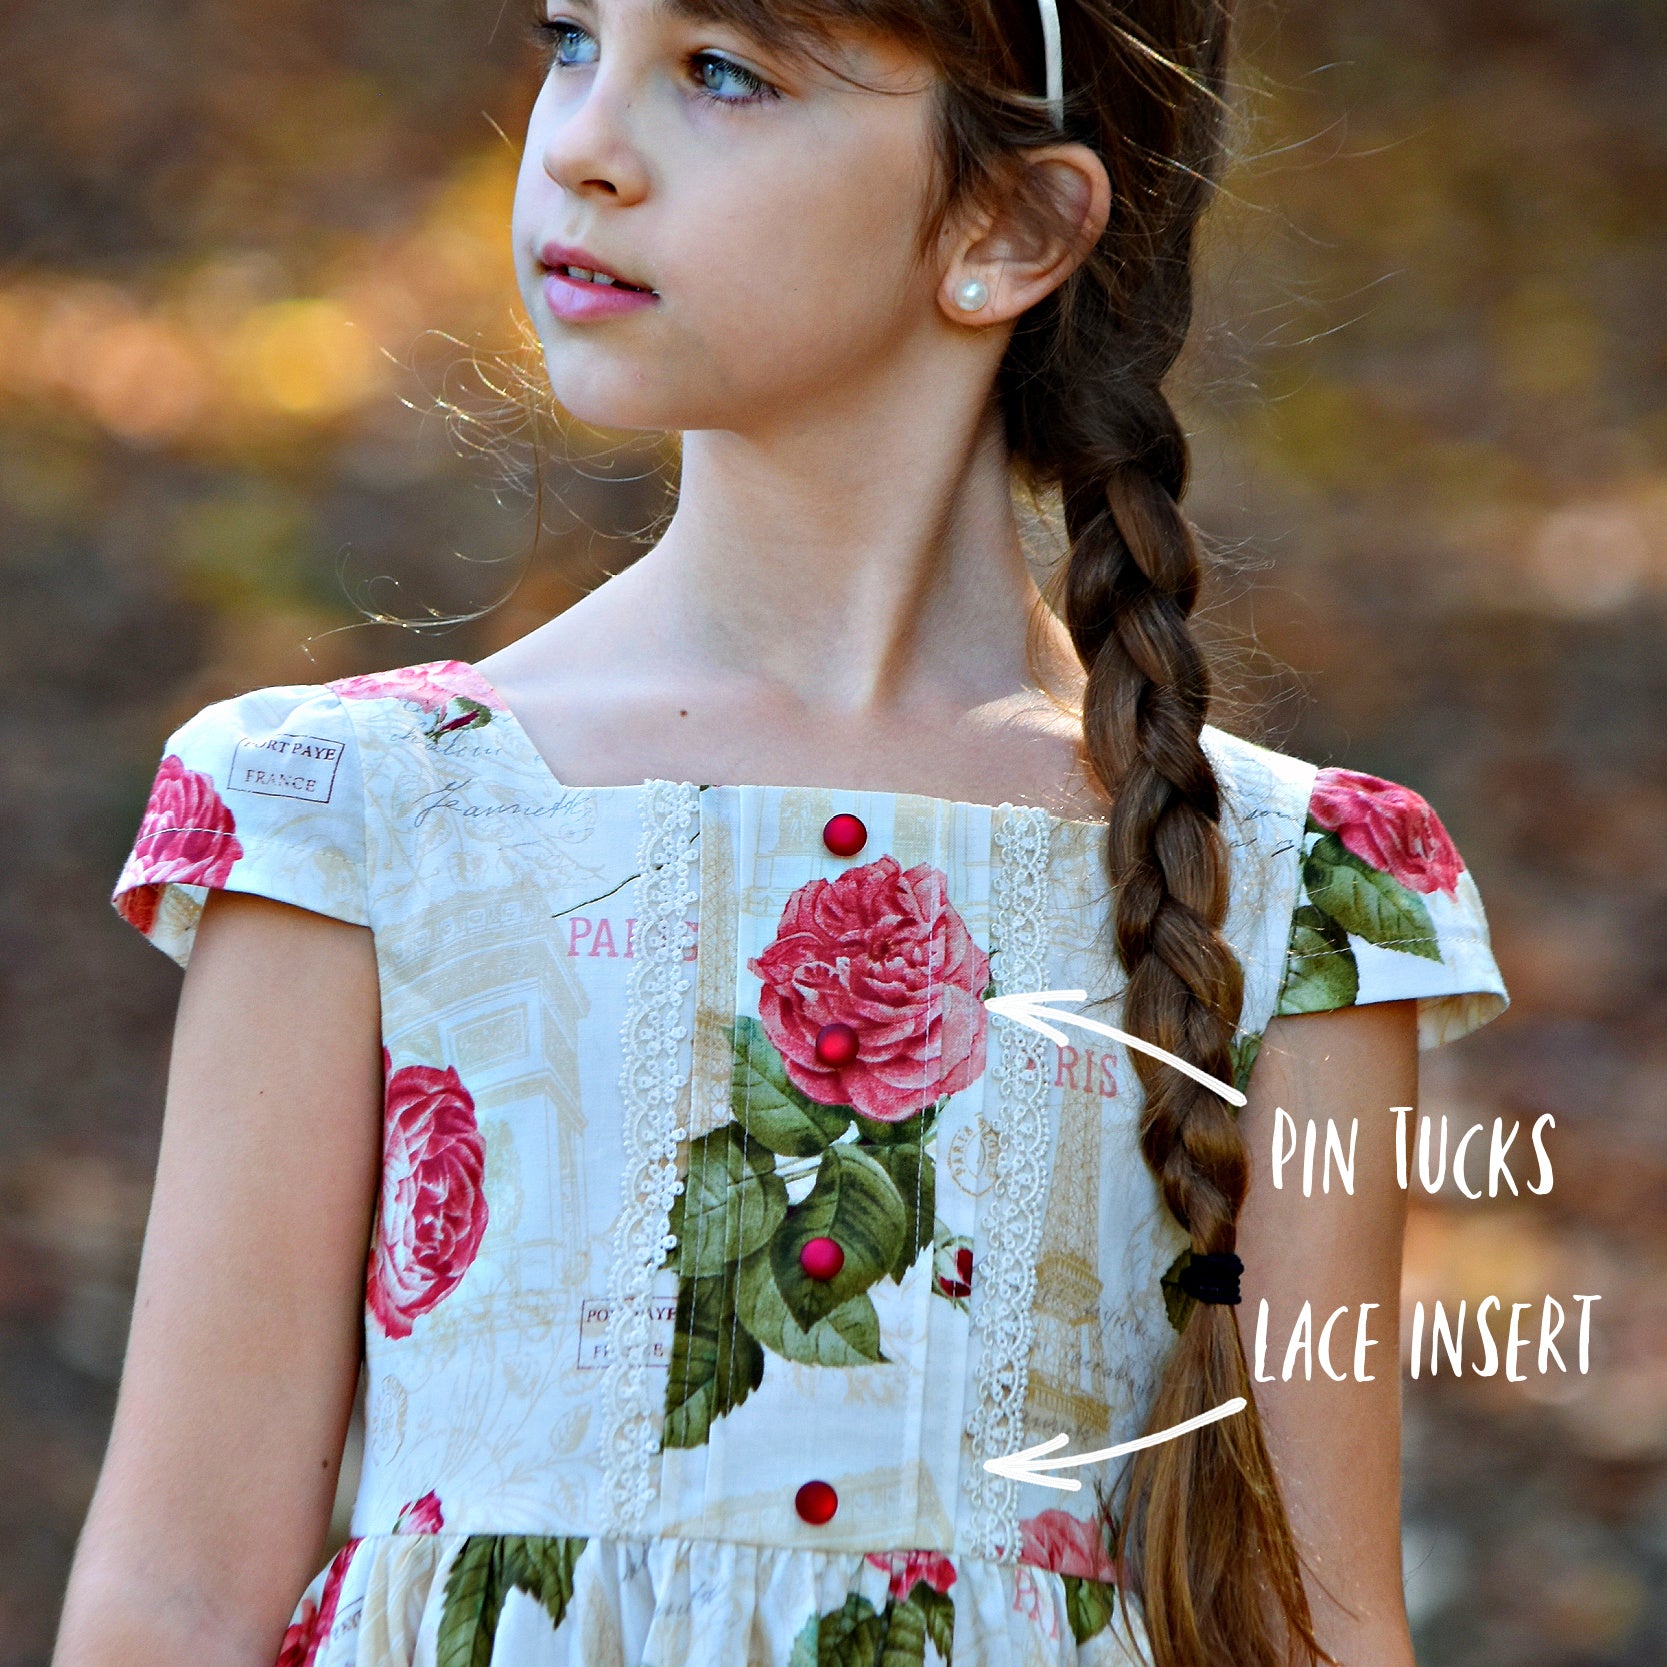
Front Bodice and Pintucks

Let’s have a look at our assembled pattern pieces now, and we’ll start off with the front bodice.

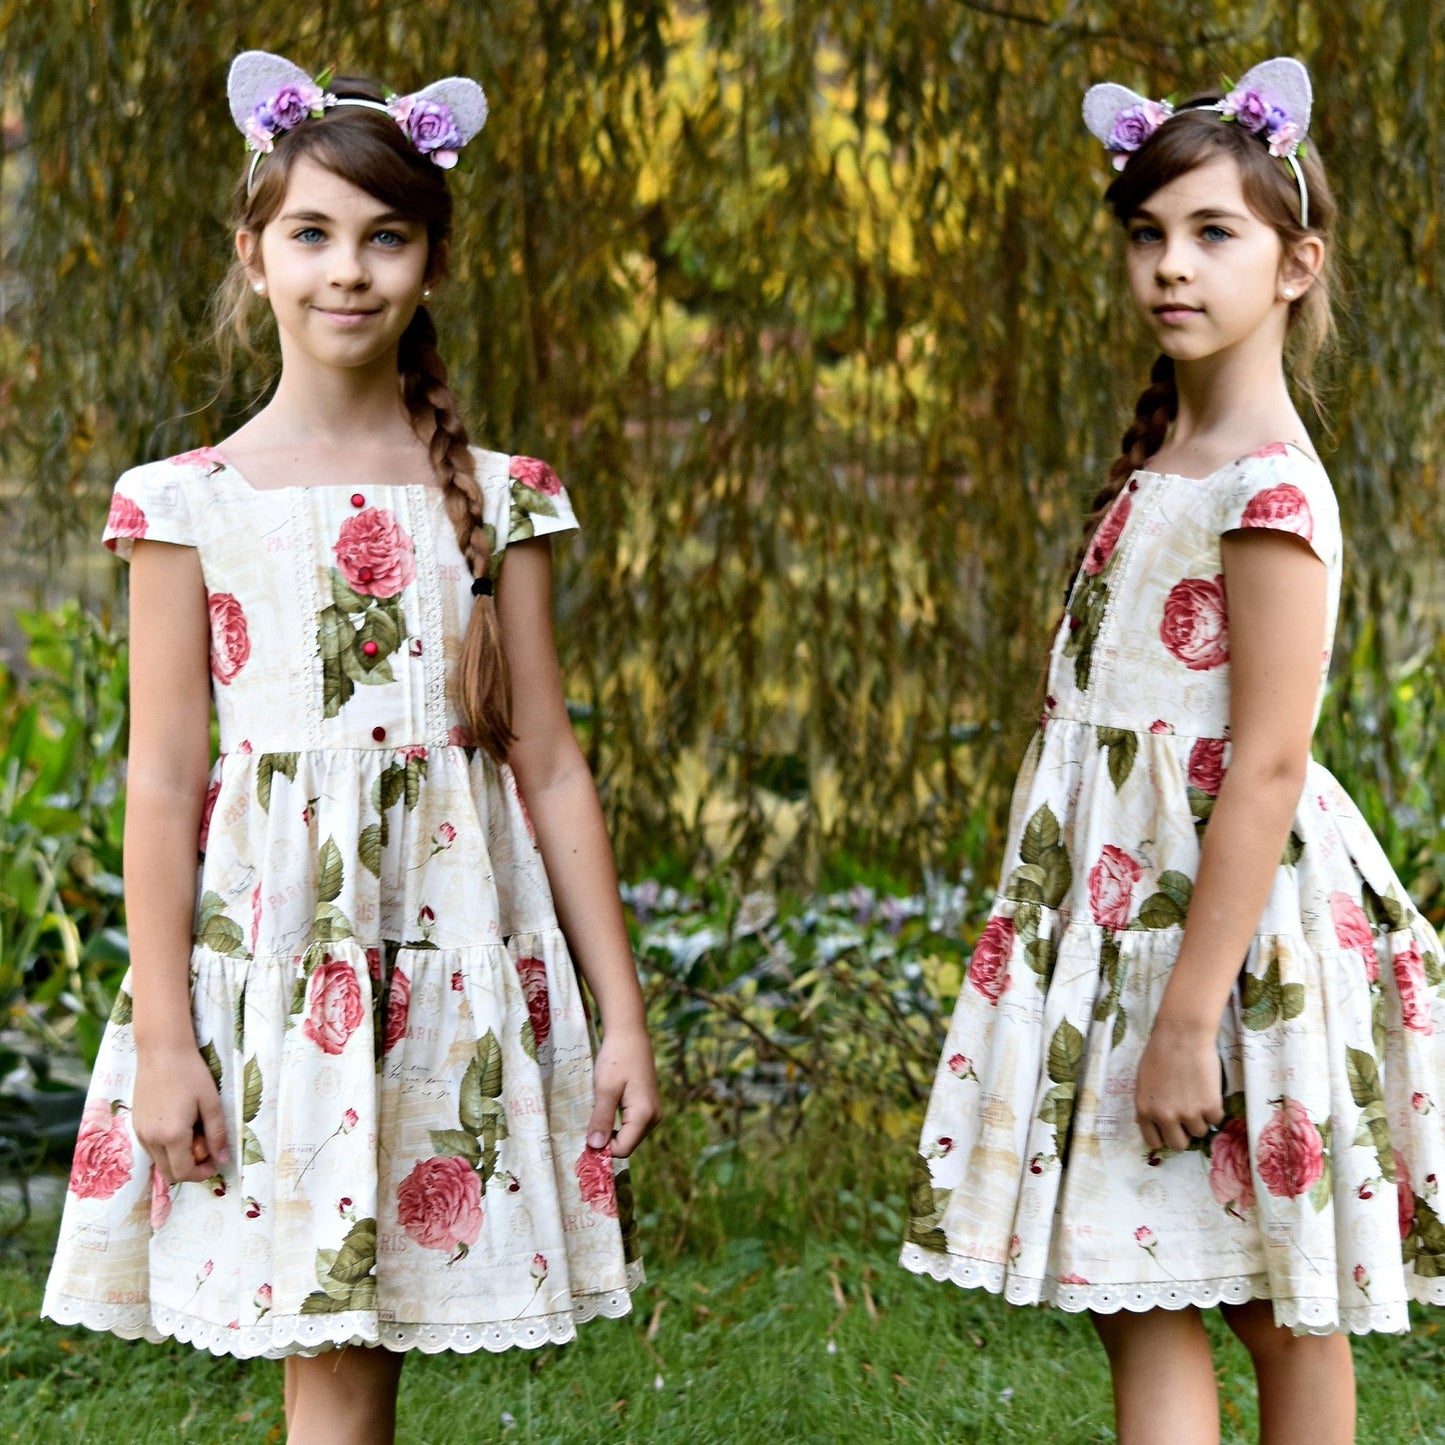
The front bodice here has got the pintucks marked. This area means we’re going to fold the center, and you just do that step by step. What you’re going to do is fold it in the center, iron it, and then stitch down on the second line to create the pintuck, which will then lie towards the back. It’s very simple and creates a really beautiful effect on your dress.

I’ve got my pintucks now.

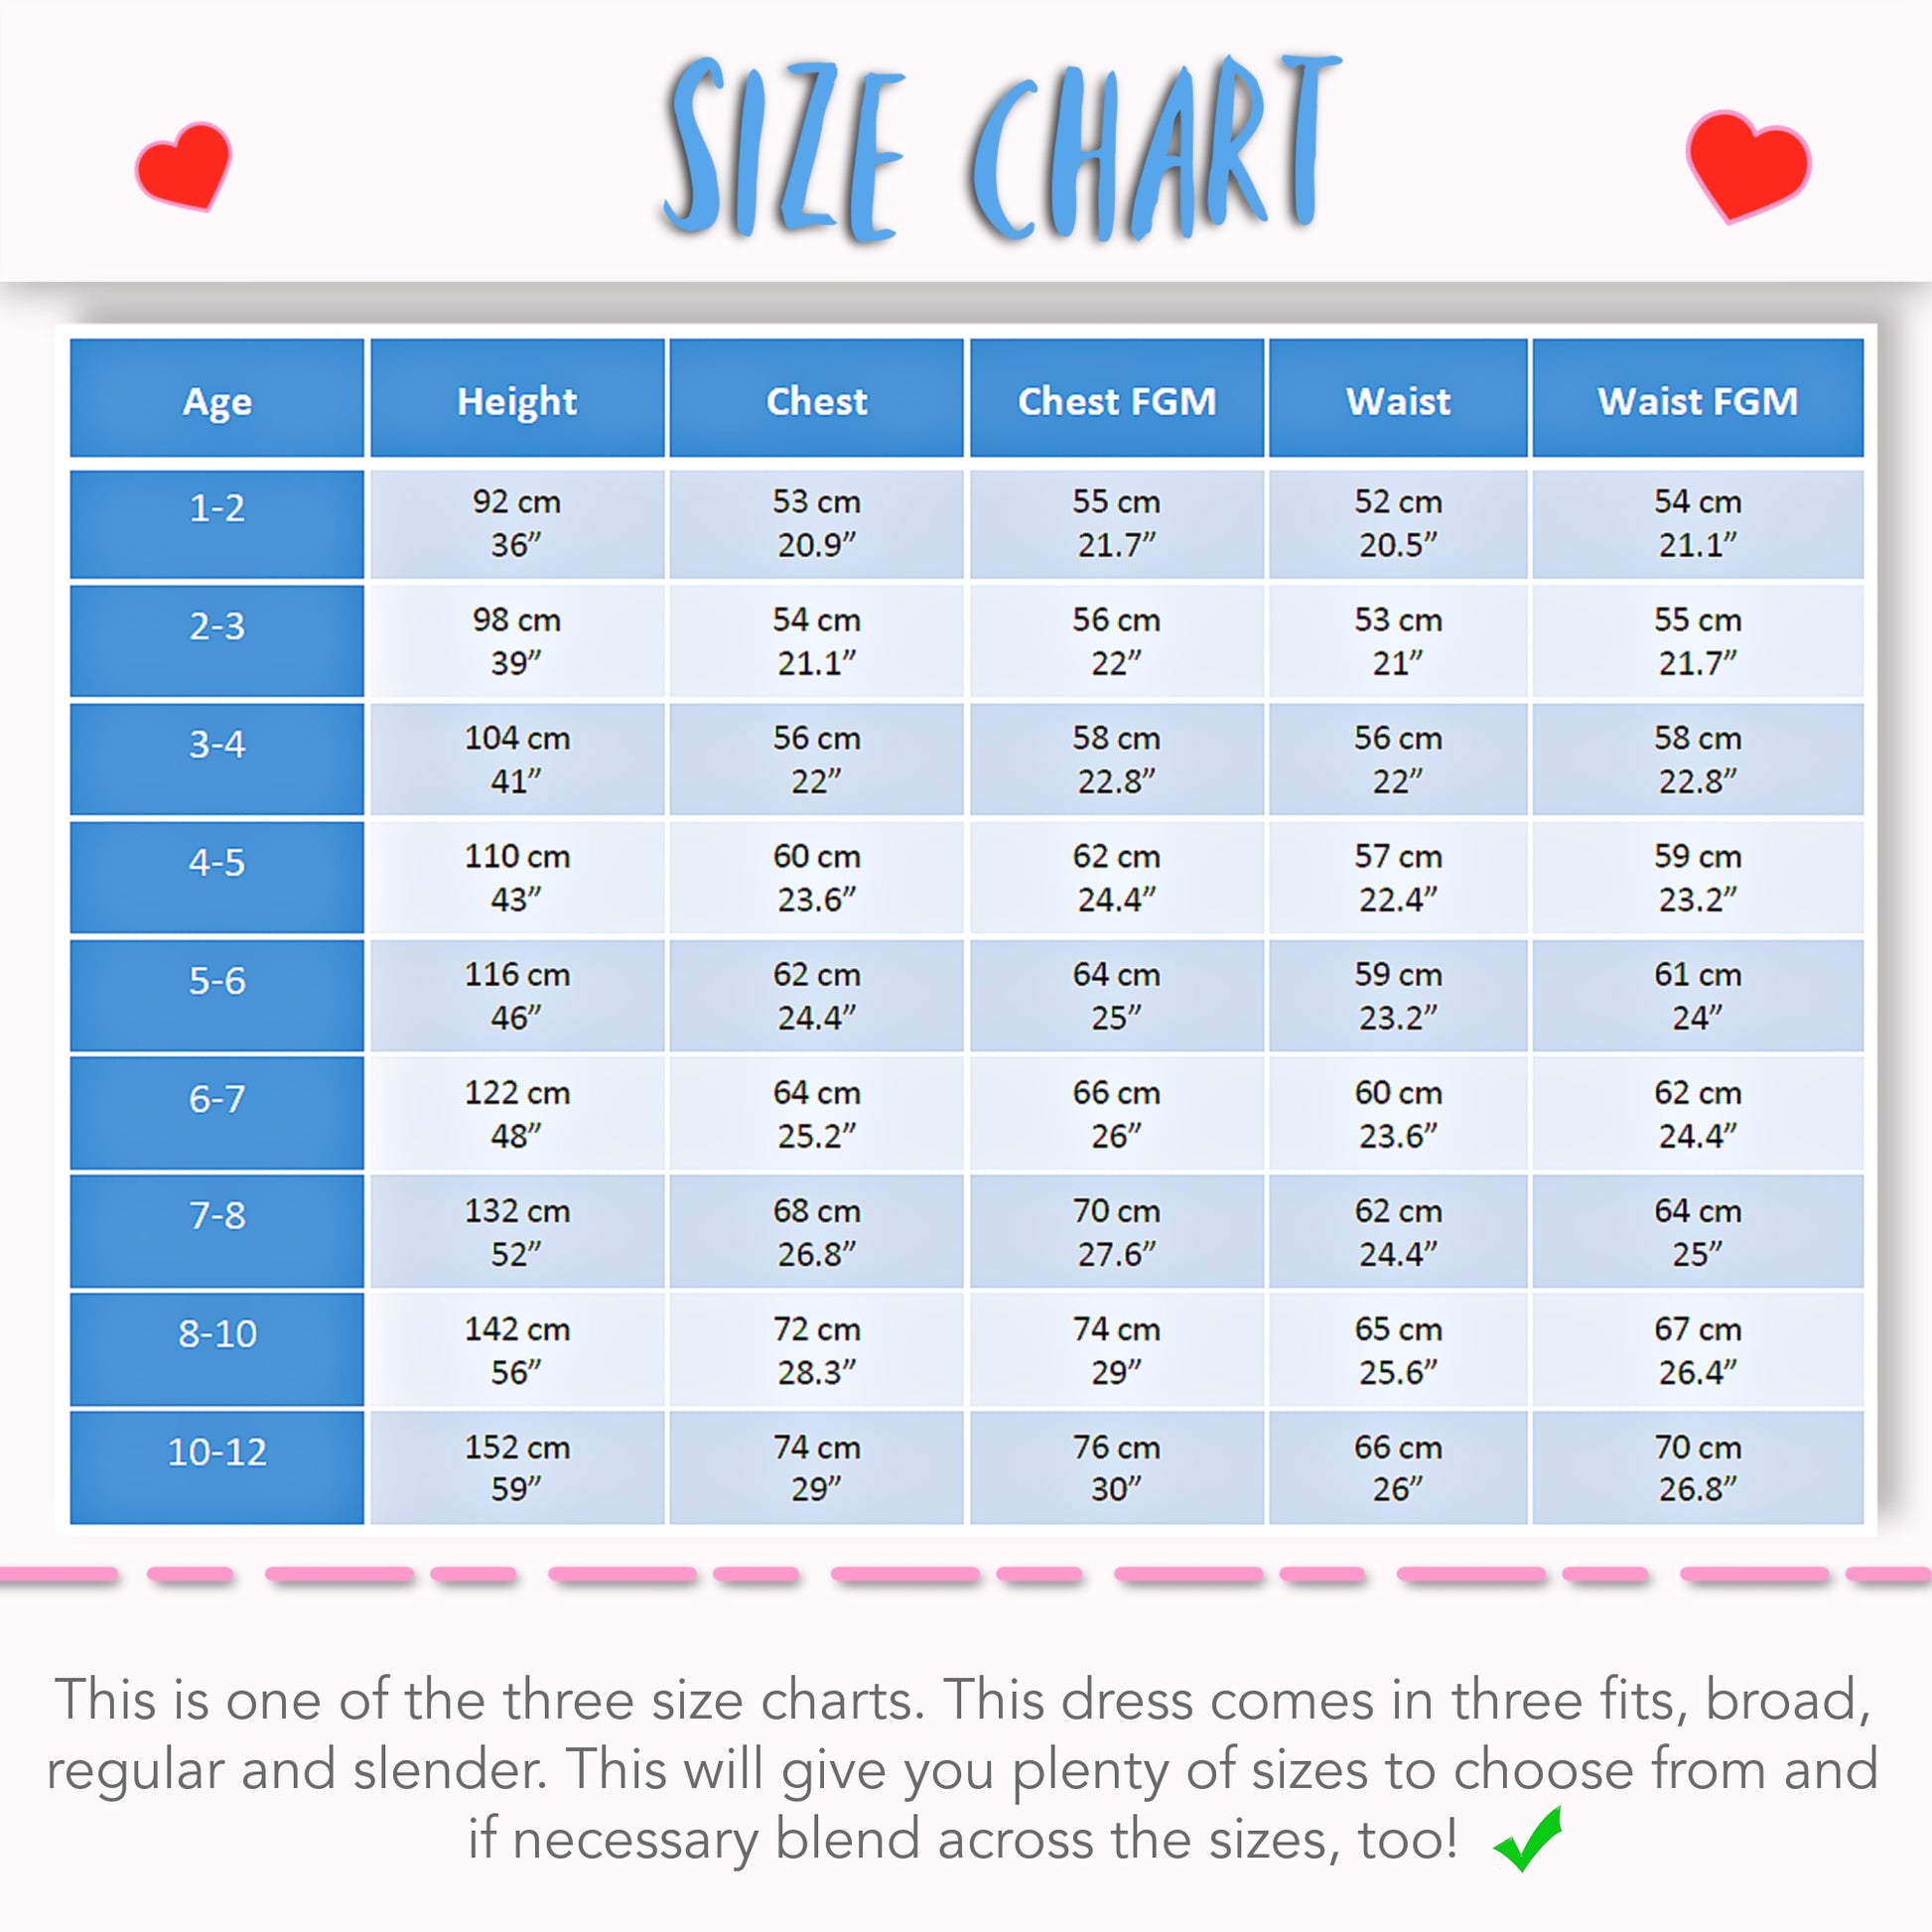
Size Lines, Fit Options, and Adjustments

The other thing you’ll notice here is you’ve got different lines. You’ve got a small dot, a medium dot, and then a solid line. Those represent different sizes: broad, regular, and slender. That means you can make alterations if needed. I’m going to show you exactly how to do that in a minute because I have a girl who is very tall and slender that I’m making this for, so I need to adjust it slightly.

You can blend between sizes easily. If you have the exact measurement for slender but need regular higher up, you can move from one line to another. That makes it easier.

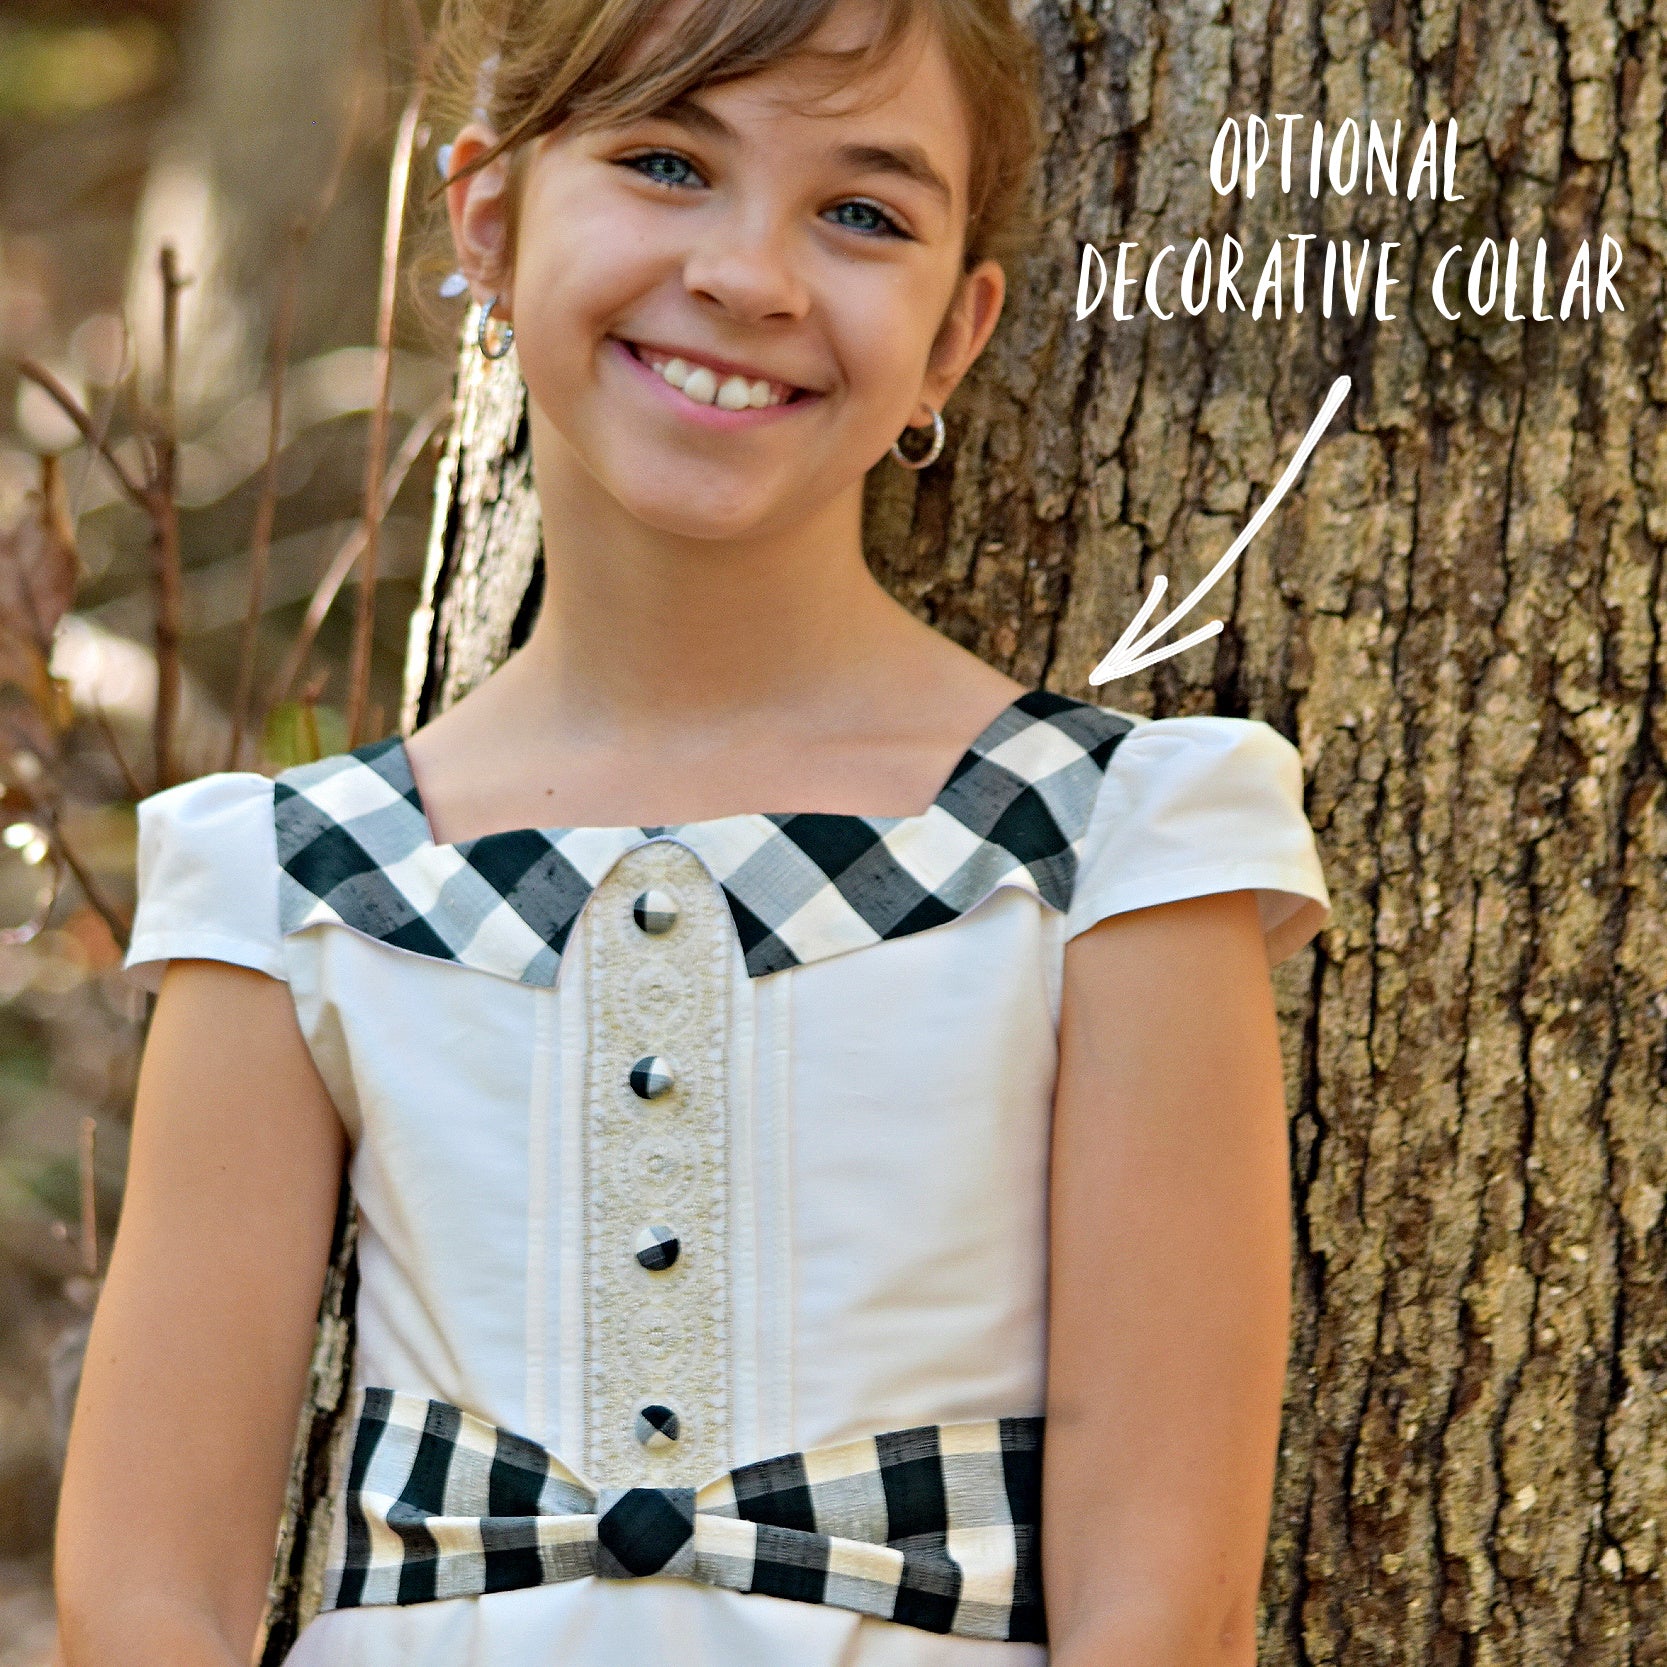
You also have those lines in the neckline area. If you prefer a wider neckline, you can choose that option. If your child or the person you’re making it for has narrow shoulders, you might choose the slender line. If they have broader shoulders but a slim body, you might choose the regular or broad line. In my case, I think I’m going to go for the outer line because Magdalena has nice shoulders but a very slim waist.

There is also a line that tells you where to attach the sleeve, especially if you are using the cap sleeve. You turn up your hem, and the sleeve is attached from this point. It is important to distribute gathers evenly. You come out about two centimeters to the front and two centimeters to the back to get a good distribution of gathers.

Then you gather from as low as you can and adjust until it fits. If you need to, you can let out or tighten the gathers. You’ve got a sleeve head marked here, which is the shoulder point.

When you put the lining and the front bodice on top of each other, they sit in exactly the same position. If you wanted to make the dress without pintucks, you could just use the bodice for both shell and lining.

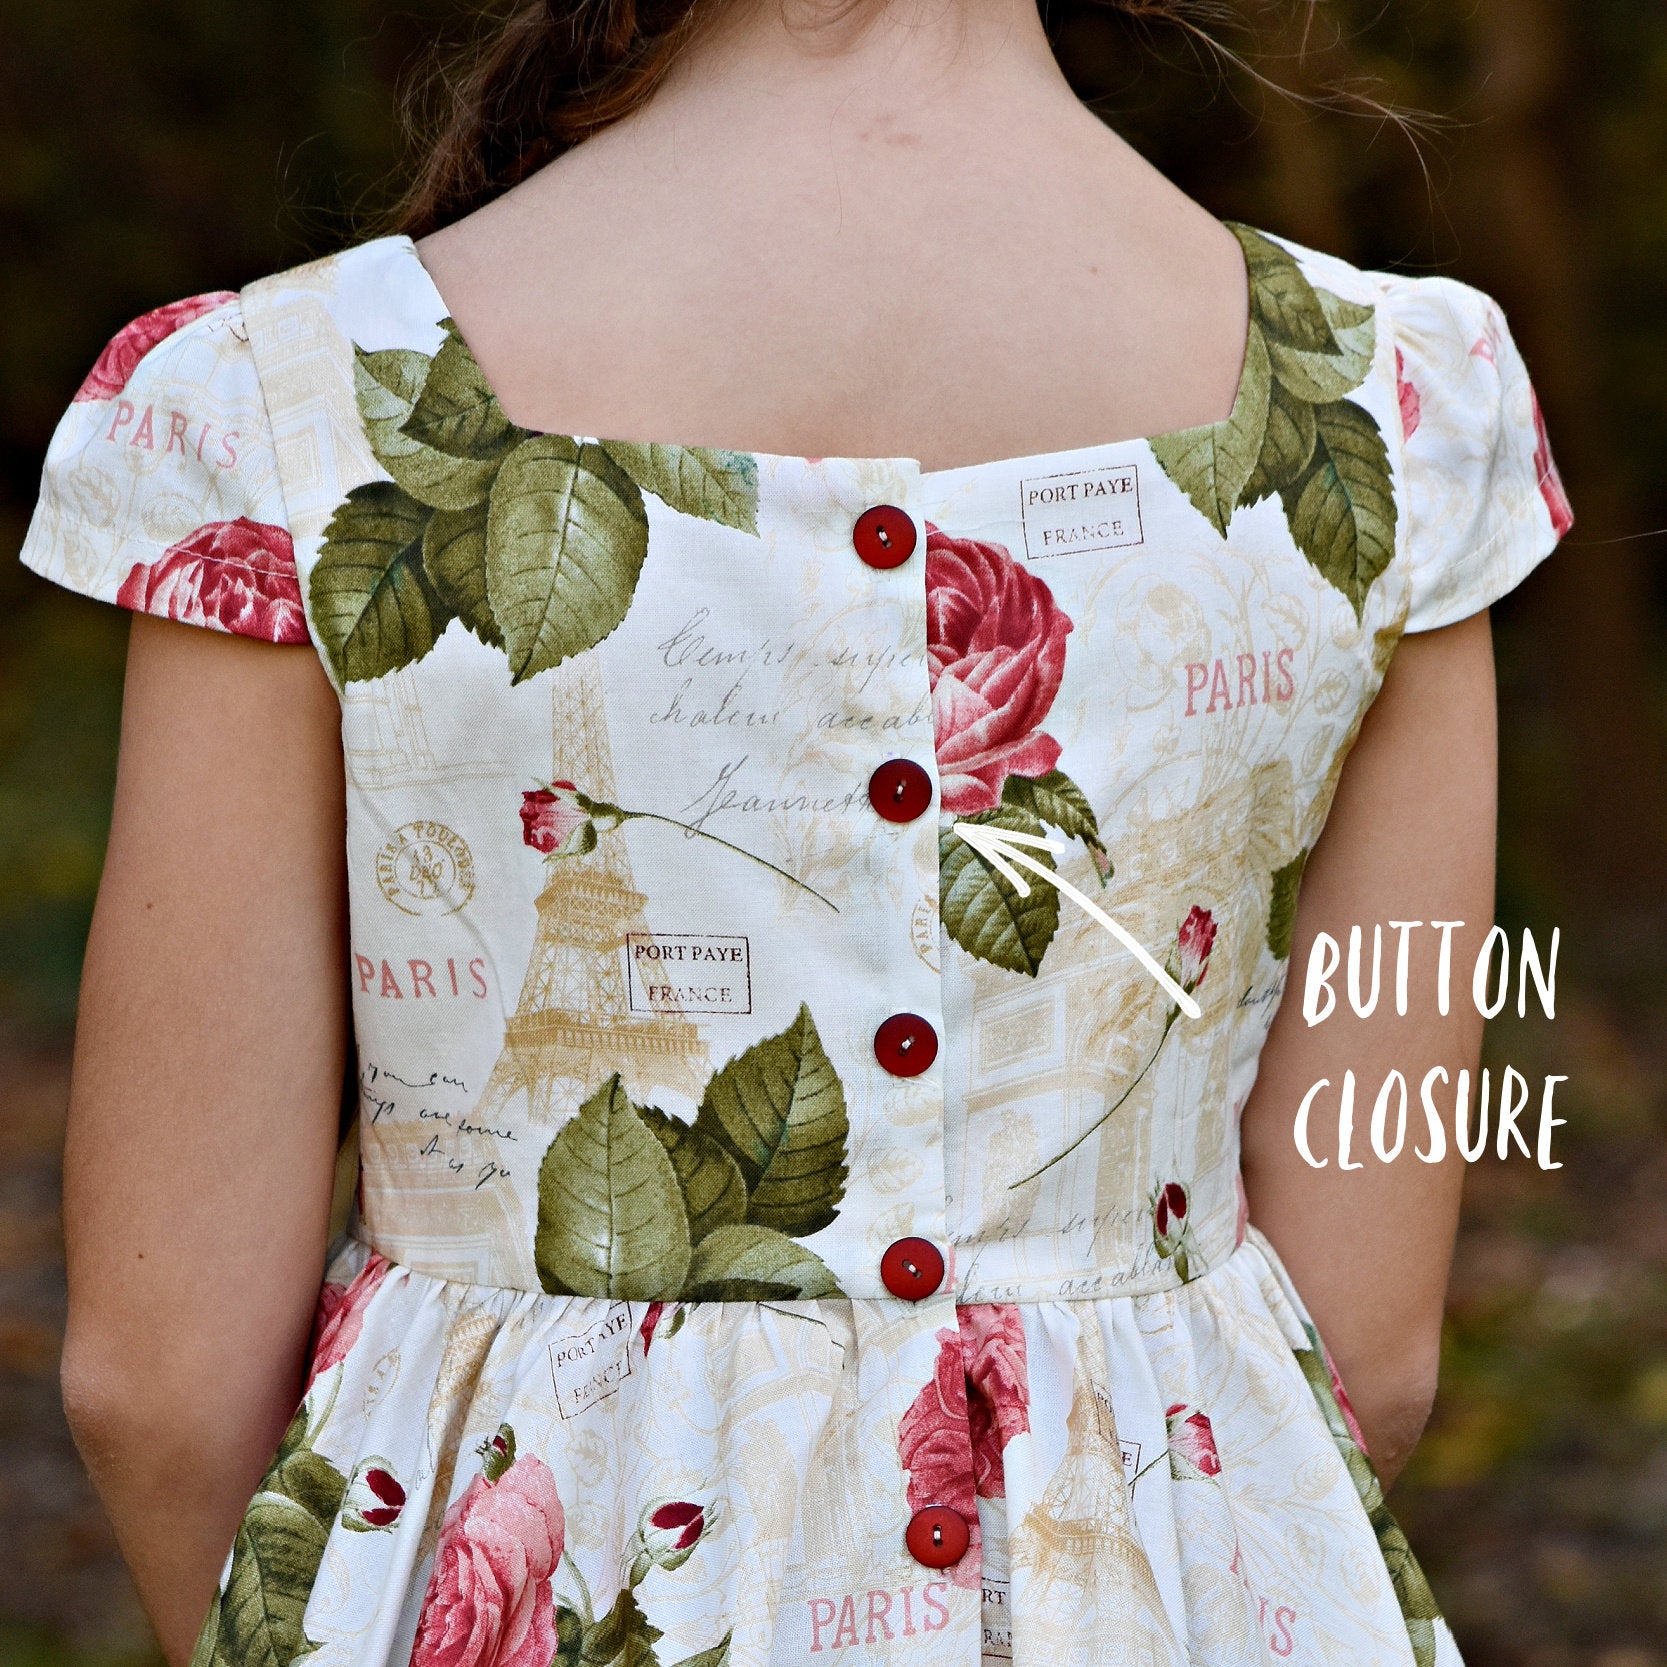
Back Bodice and Closure Details

Let’s look at the back bodice.

We’ve got a fold line here, which is the integrated placket where buttonholes or cam snaps will go. The buttonholes sit in the center of the placket.

If you decide early on to use cam snaps, remember the seam allowance will face a certain direction. If you place the snap too high, it may interfere with the seam allowance. You can trim the seam allowance in that area if needed. I will repeat this during sewing.

You’ve got the lining as well, which sits exactly over the back bodice. You sew lining and shell together with a one-centimeter seam allowance, which gives a clean finish on the inside.
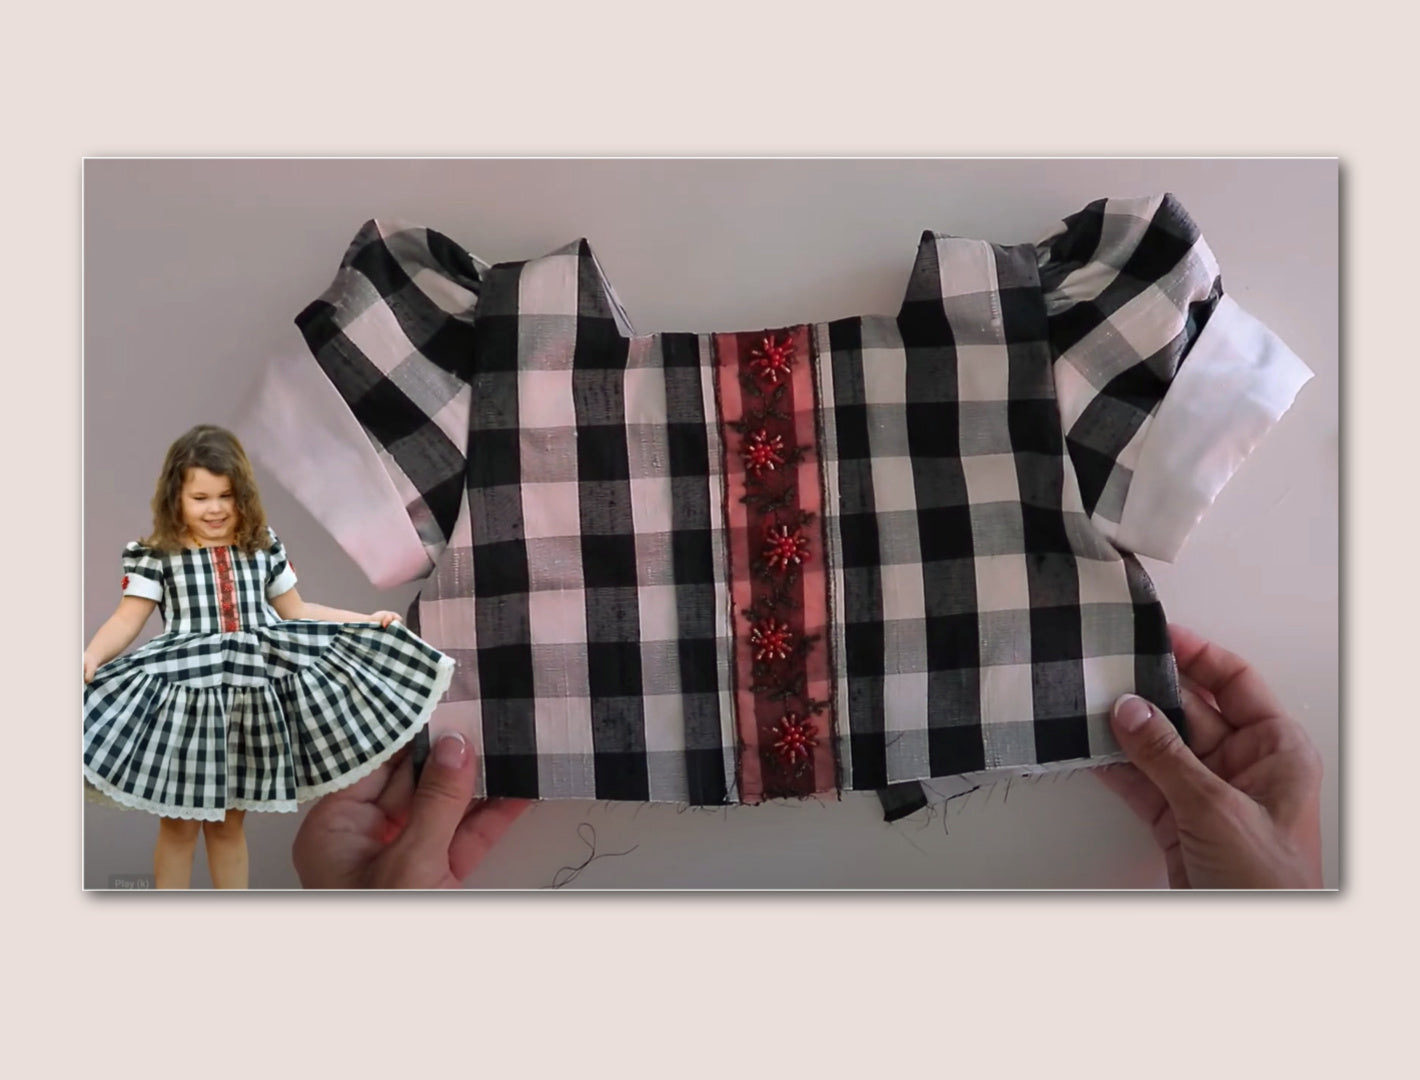
Sleeves Overview

The cap sleeve is very similar front and back. It’s not a big difference, so it’s not a disaster if you mix them up, though the sleeve head is slightly more forward.

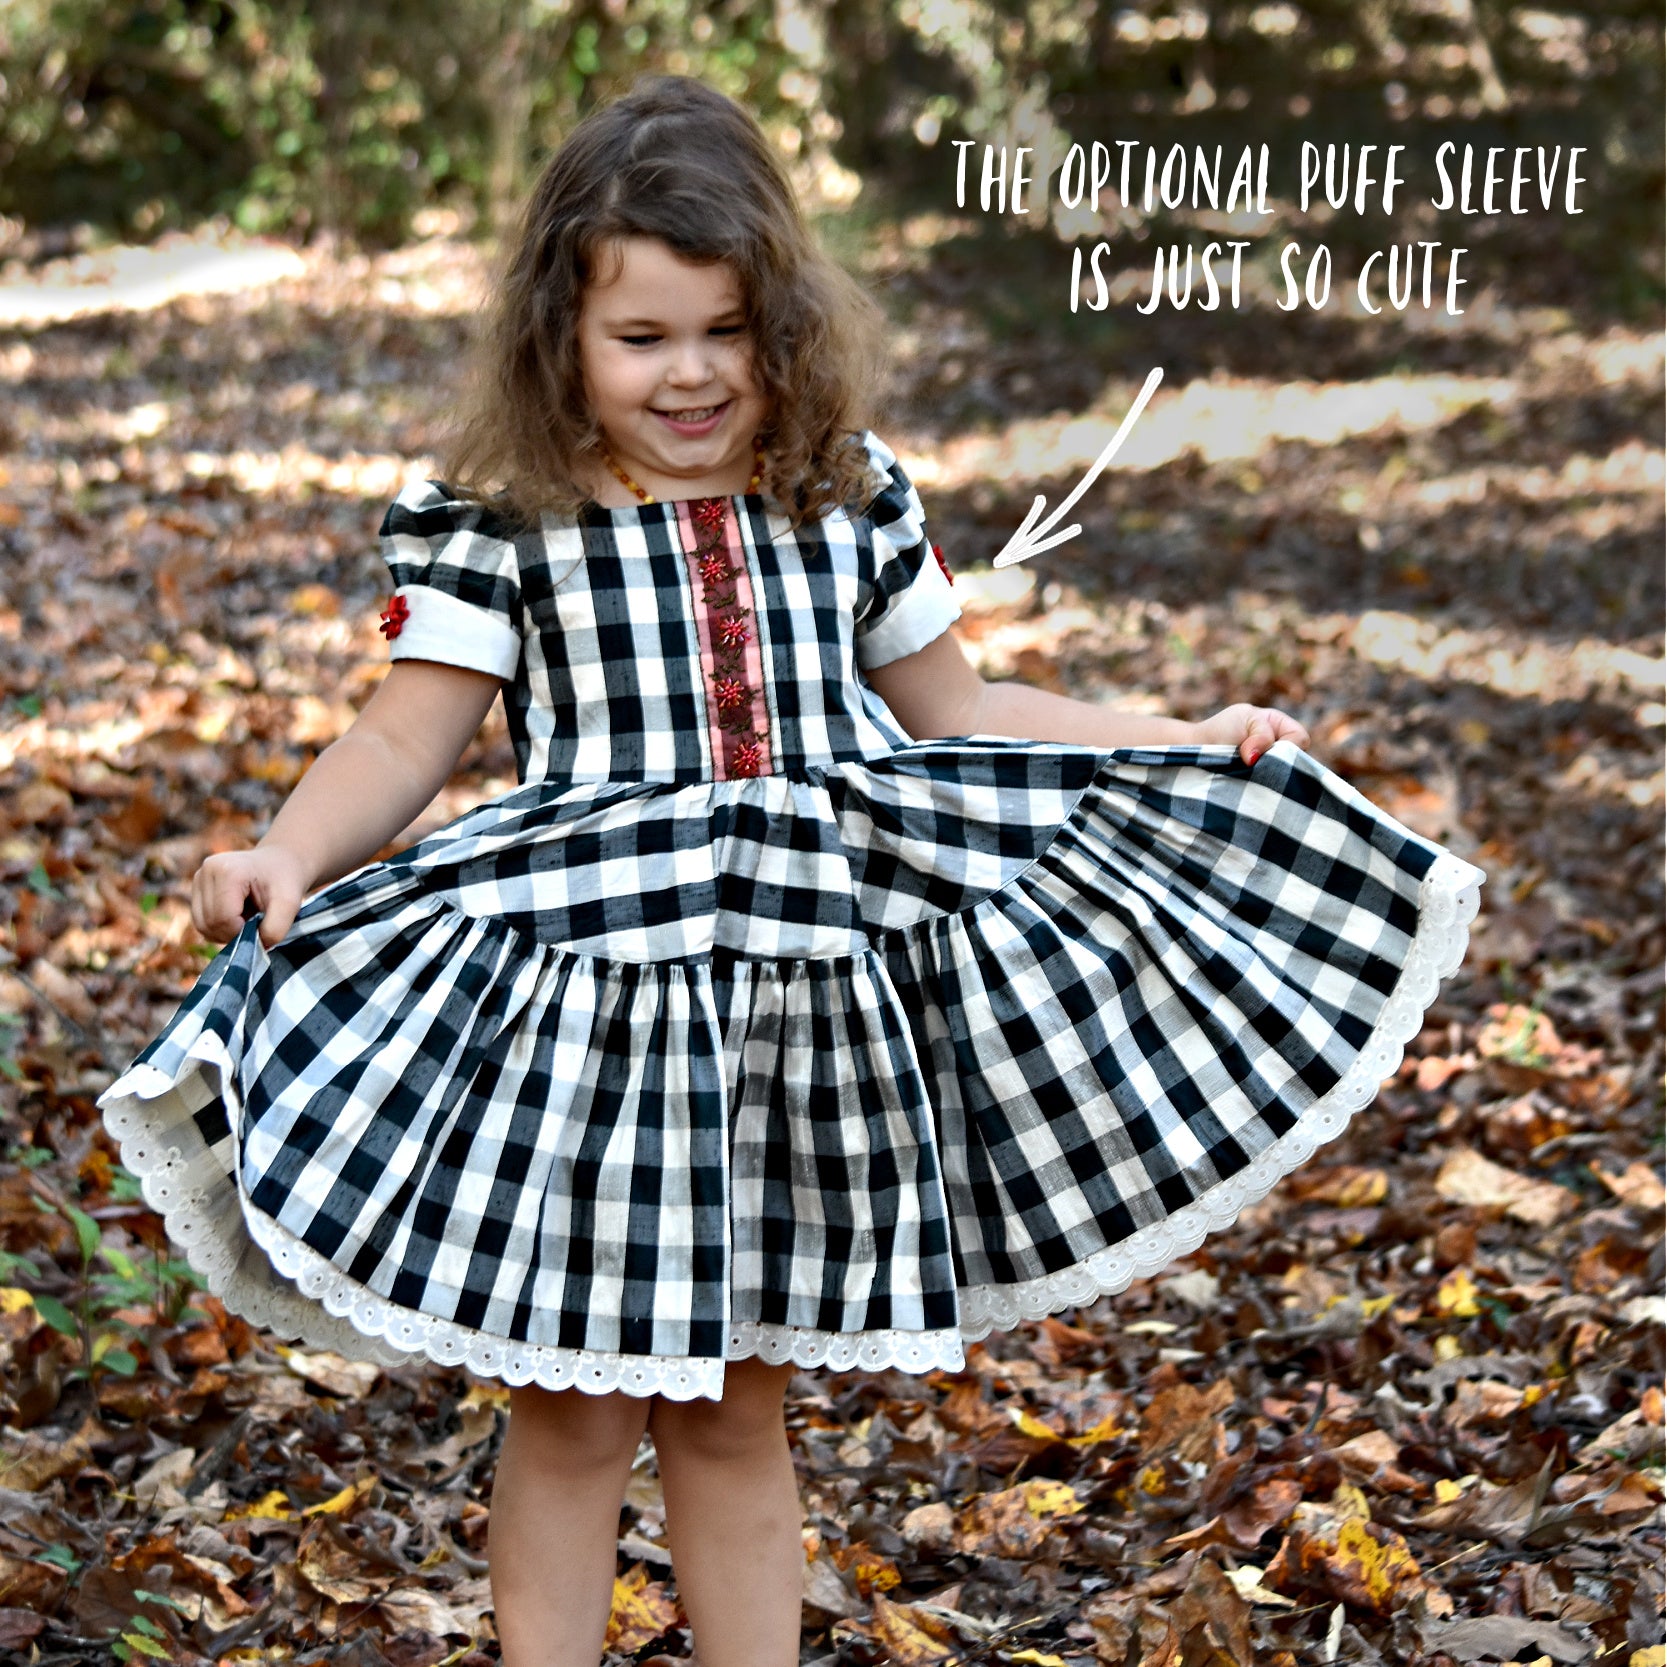
Then we have the puff sleeve, which is larger and gathered at the sleeve head and lower end. It has a turn-up that is sewn inside so the seam sits on the outside and is rolled up for a clean finish. You can also embroider this, use piping, or bias binding. There are many options.

You cut this piece twice in fabric and twice in lining. You can also use contrast fabric.

It is important not to confuse front and back sleeves because the front is cut differently and the gather start is further forward. Always mark sleeve heads and gather points.

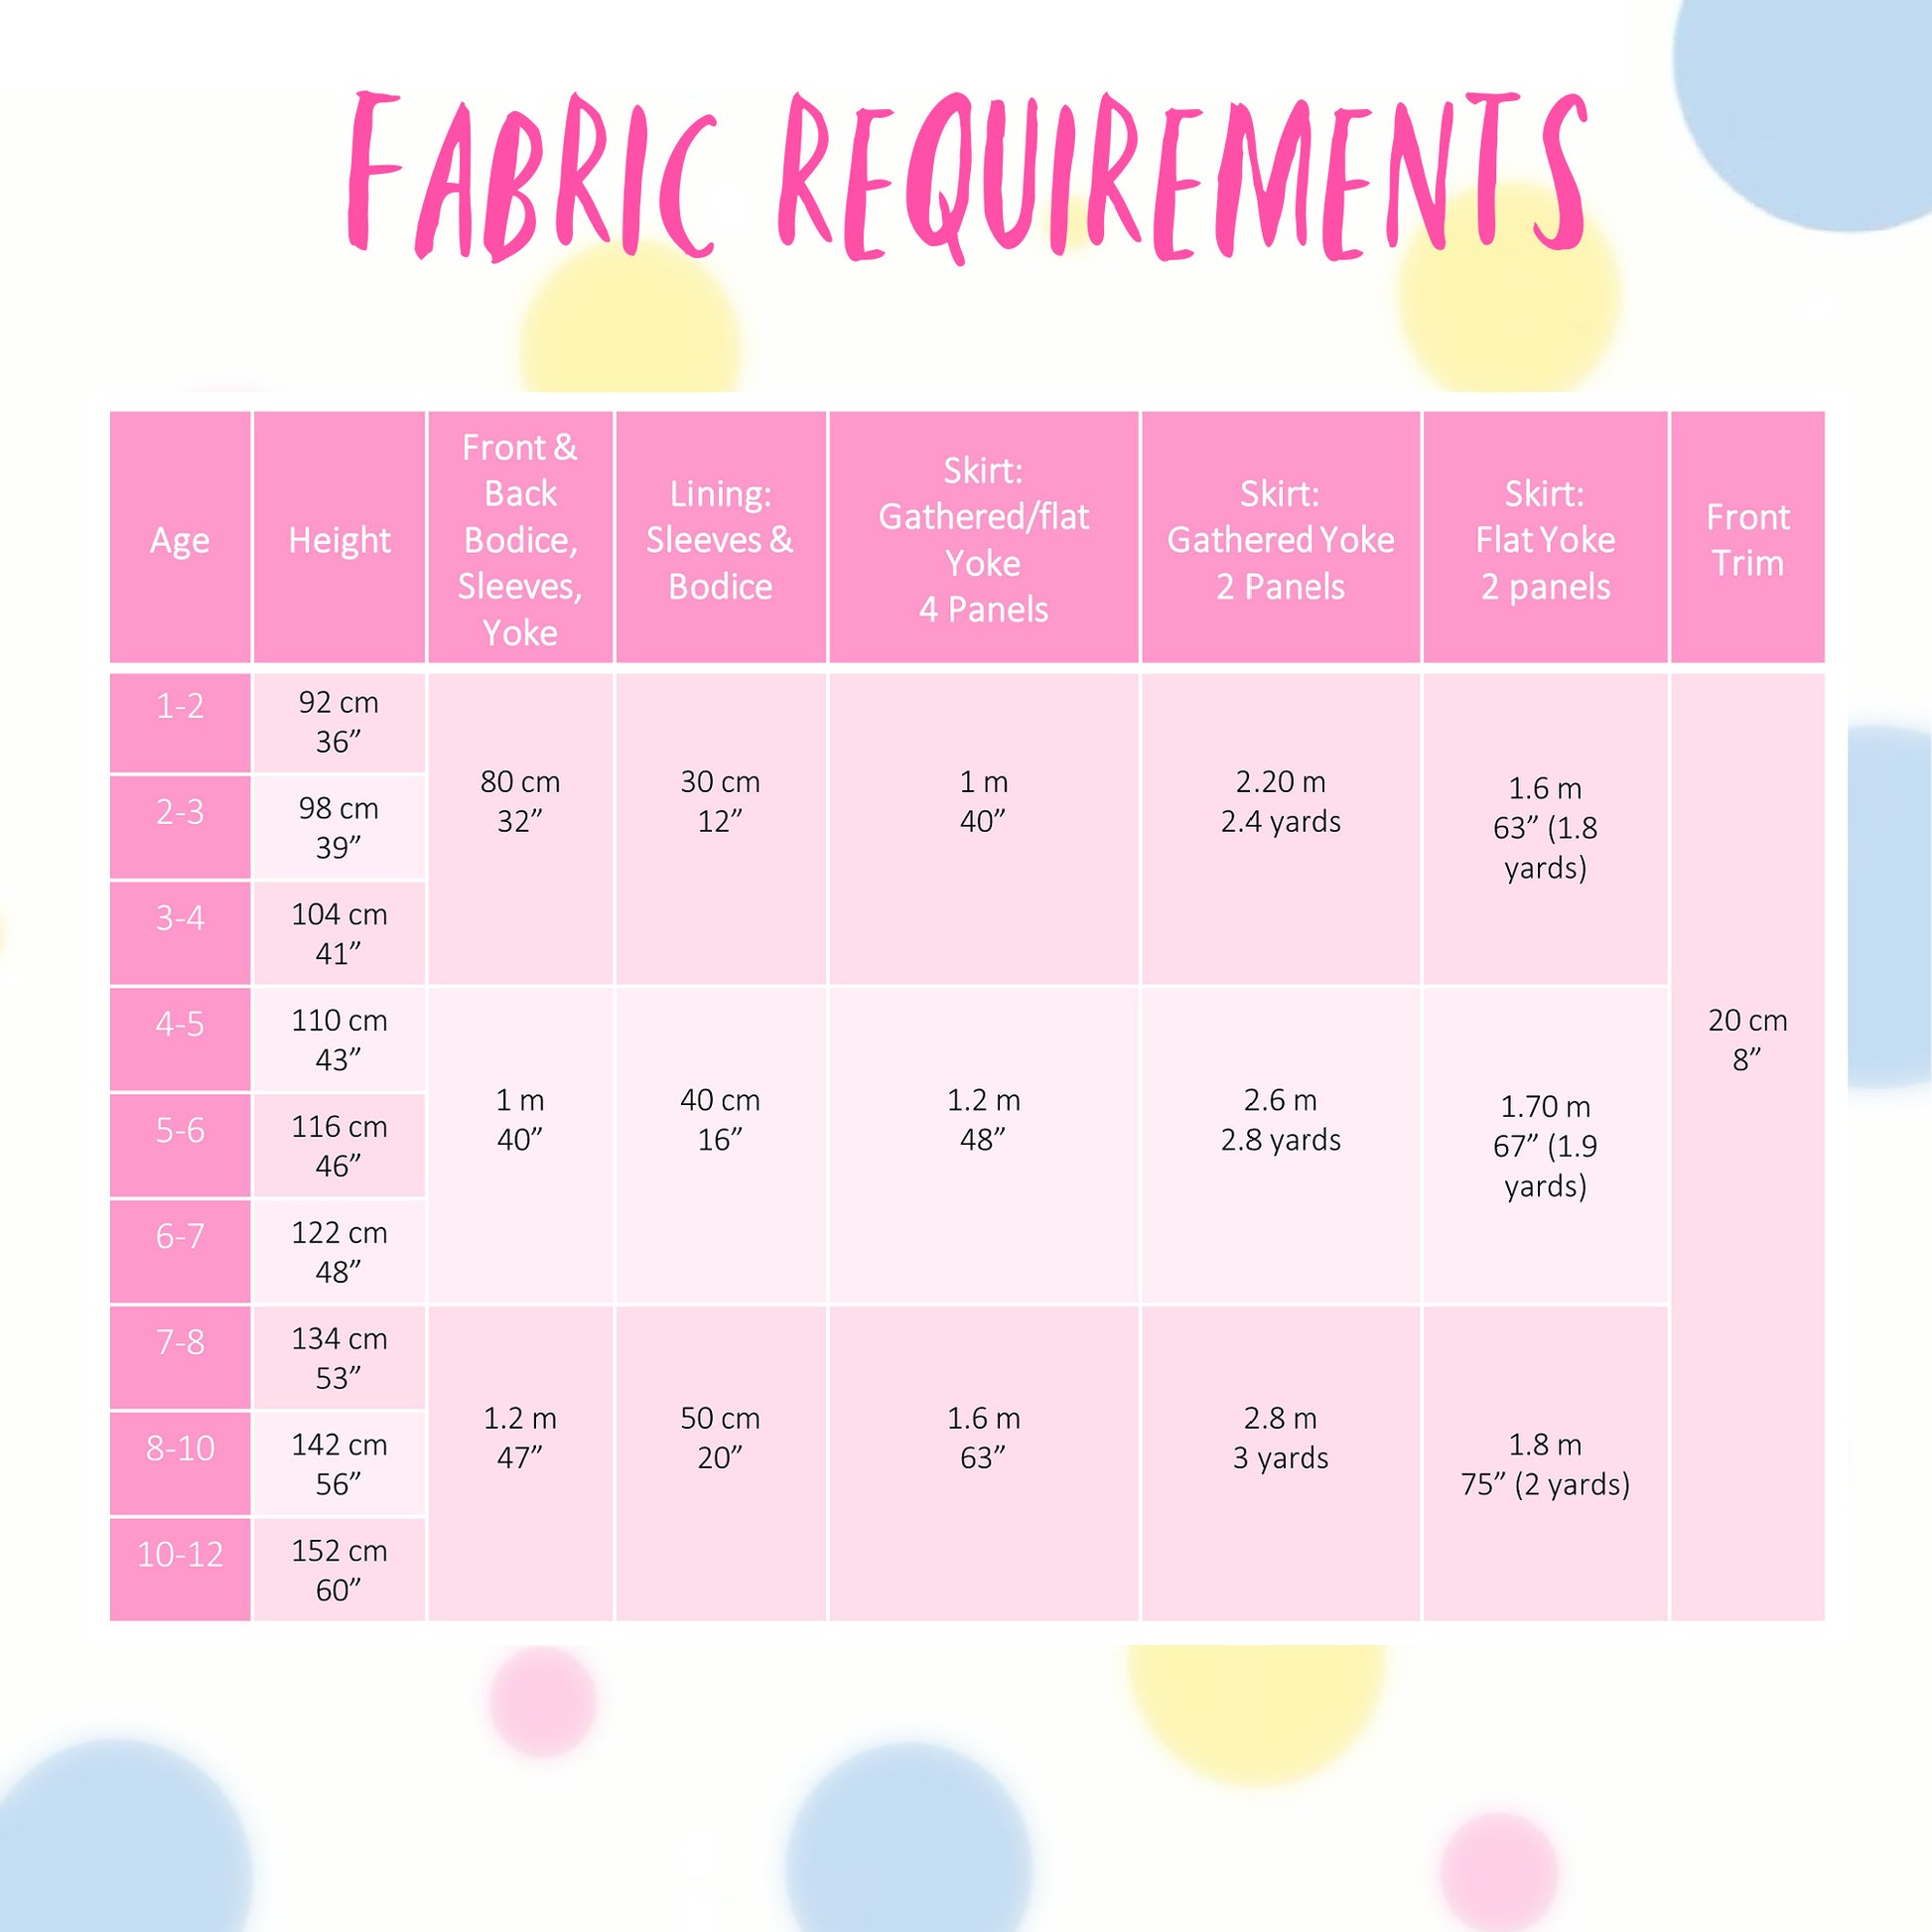
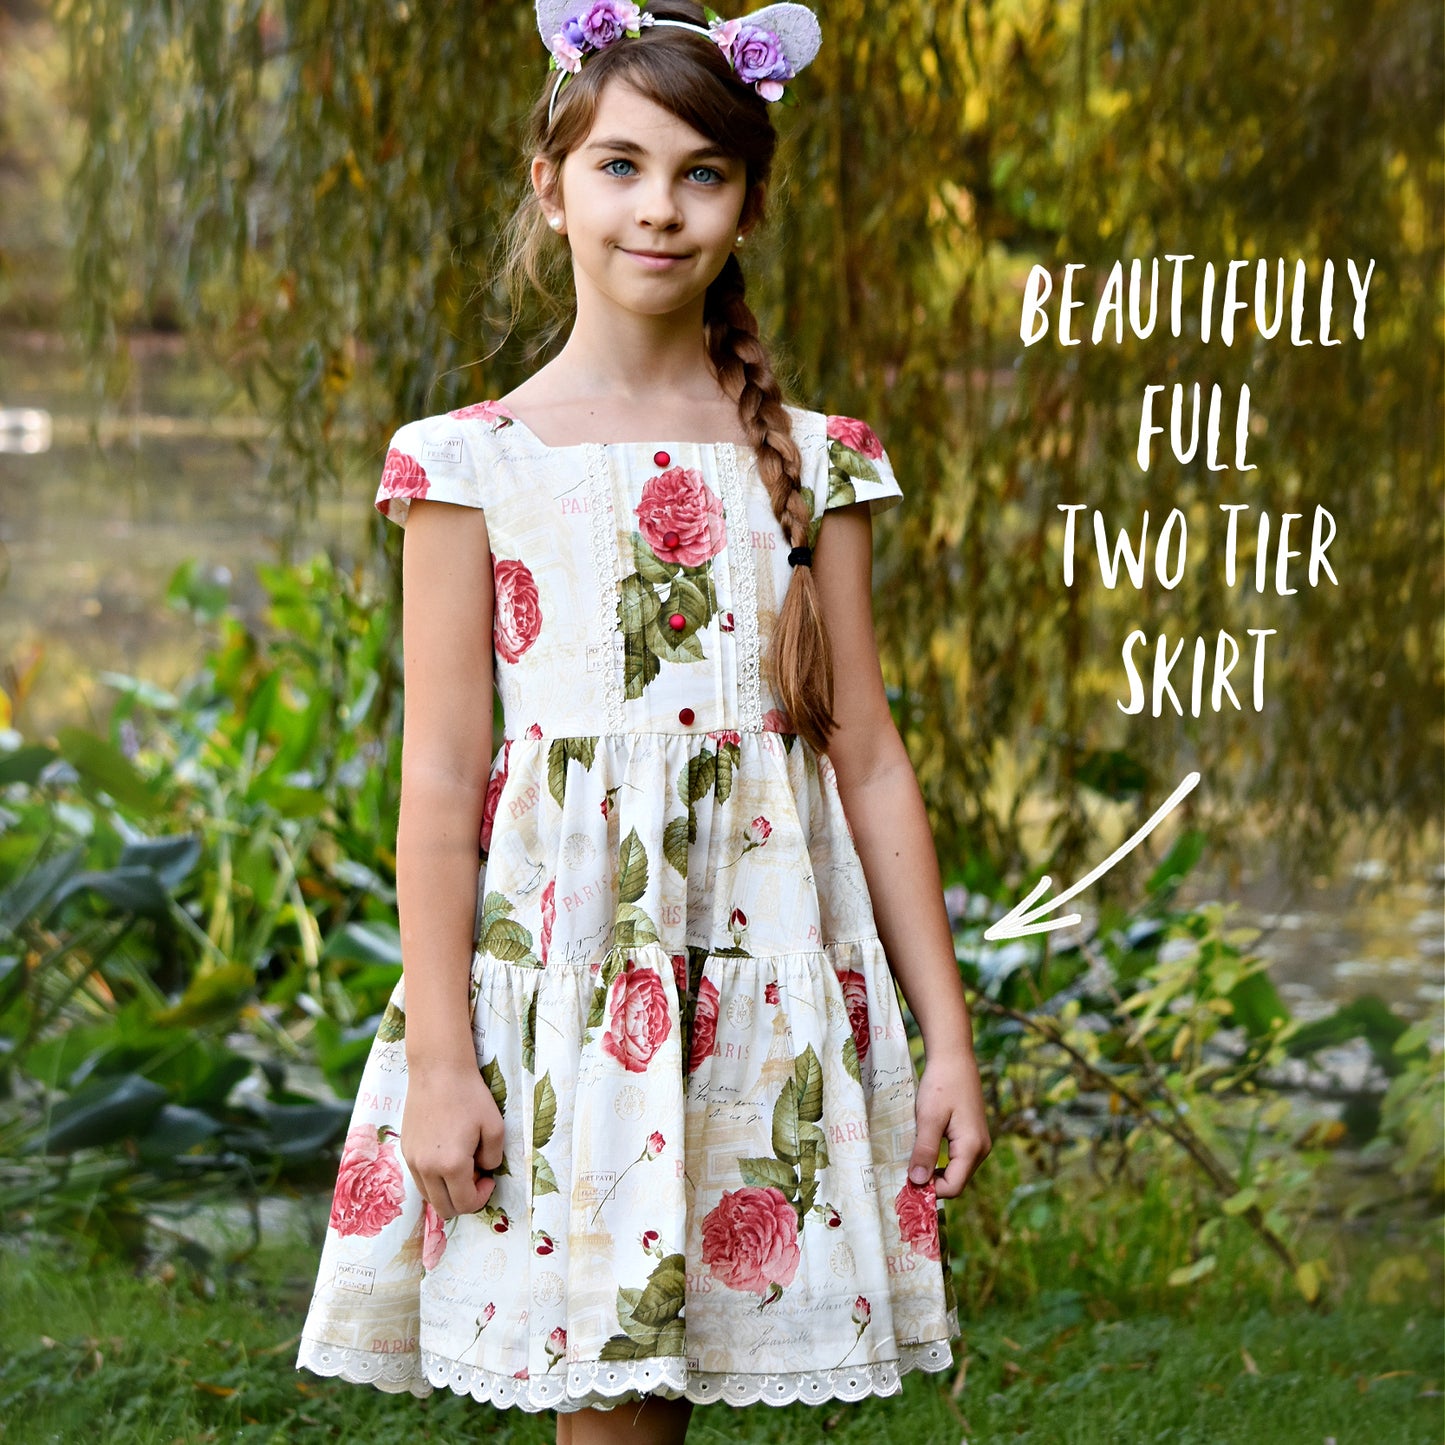
Skirt, Yoke, and Fabric Requirements

For the skirt, you have the yoke, which can be smooth or gathered. The gathered version needs much more fabric, which we will cover in cutting instructions. I will make two dresses so you can see both versions.

Choosing and Adjusting Your Size

Now to find the right size and amend your pattern.

I’ve printed the measurement sheet and my measurements are correct for the slender fit, so I don’t need major changes. The only difference is the chest is about three centimeters smaller.

If the difference is more than four centimeters, I would recommend adjusting the cap sleeve. With a puff sleeve, you don’t need to adjust because it needs more ease.

For Magdalena, I will reduce by five millimeters to give a bit of movement room.

I mark this on each piece and adjust the side seams slightly. It is a small change but it improves fit.

This now gives me my altered line. It’s not a huge difference, but it matters for the fit.

What I like about these pattern lines is that you can easily adjust between sizes. It makes it very flexible.

I must repeat this on all pieces so everything matches.

For Magdalena, I will use the slender line but cut it slightly back because she has good shoulders. I will keep this piece for future use in case I want to make the other version.

I will not be using the puff sleeve for this version, so I can set that aside.

Now I’m ready to start cutting out my dress.

Deciding How to Cut the Skirt

Transcript for the video: Isabella Dress - Skirt Options

In this chapter we are going to cut out the skirt. Before we start, it is important that we have a quick discussion because you have two options. You can either cut your skirt along the selvedge, or you can cut it from selvedge to selvedge. If your fabric is 120 cm wide, which many of the Michael Miller fabrics are, then you will need four panels. That means you are cutting the skirt length four times.

Choosing the Correct Skirt Length

The first thing you need to do is find the height of your child, from the top of the head to the sole of the feet. Then you check that height on your chart for the skirt. We do not go by age, we always go by height. In this example we are using 134 cm.

The next decision is whether you want a flat yoke at the waist or a gathered yoke. If you choose the gathered option, you follow this chart and the skirt depth, which is the actual length, will be 33 cm.

Cutting Options: Four Panels or Two Panels

Now you need to decide how you are cutting the fabric.

If you cut across the fabric in four panels, the fold is on one side and the selvedge is on the other. You are cutting across the fabric width. This is the four-panel option.

The other option is to cut along the selvedge. This uses only two panels, but you will need more fabric overall. If you choose this method, you go to the chart where it says two times cut along the selvedge, and you will need around 2.6 meters of fabric.

Fabric Requirements Explained

Looking at the fabric requirement chart, you can see a clear difference. For four panels you only need around 1.2 meters of fabric. For two panels you need about 2.6 meters. So there is quite a big difference in fabric usage.

If you prefer working with two panels, that is completely fine, but you need to allow for the extra fabric. If you are making contrasts for the skirt or using different fabrics, then you must follow the fabric requirements listed in the chart.

Finished Cutting Example

I have already cut my pieces. I cut along the selvedge, which is the woven edge of the fabric. I cut it to the exact measurement and also the exact length. So I now have my two skirt pieces finished and ready.

Next I can move on and start cutting out the bodice and the lining.

Cutting the Skirt

Transcript for the video: Isabella Dress - Cutting the Skirt Out

Now we’re going to cut out the skirt. Before we start, it’s important to have a little chat so you fully understand your options before cutting anything.

Step 1: Measure Your Child

The first thing to do is to find out the height of your child, from the top of the head to the sole of the feet. Then check that height on your skirt chart. We do not go by age, only by height. For example, here we are using 134 centimeters.

Step 2: Choose Your Skirt Style

Next, you need to decide whether you want a flat yoke at the waist or a gathered yoke. If you choose gathered, you will use the gathered chart, and in this example the skirt depth, meaning the actual length, will be 33 centimeters.

Step 3: Decide Your Cutting Layout

Now you must decide how to cut the skirt.

One option is cutting four panels across the fabric. In this case, the fold is on one side and the selvedge is on the other side, so you are cutting across the fabric.

The other option is cutting along the selvedge, which means you only need two panels, but you will need more fabric.

Step 4: Fabric Requirements

If you are using two panels, you go to the pattern section that says “two times cut along the selvedge,” and you will need two pieces that are about 2.60 meters long.

If your skirt length is 33 centimeters and you are making a flat yoke version, you would look at the flat yoke section and see you only need about 1.80 meters of fabric.

Looking at the fabric requirement chart, the difference becomes clear. For four panels you may only need 1.20 meters, but for two panels you may need 2.60 meters. That is a big difference depending on how you choose to cut.

If you want everything in the same fabric, follow the fabric requirement chart closely. If you are adding contrast pieces, you must adjust accordingly.

Step 5: Final Cutting Notes

When looking at the layout plan, you will notice that whether the child is one year old or twelve years old, cutting along the selvedge allows you to fit all pieces more efficiently in some cases, but it changes your fabric requirements.

So your final fabric usage will be around 2.20 meters, 2.60 meters, or 2.80 meters depending on your choice.

Step 6: What I Did

I have already cut my pieces. I cut along the selvedge, which is the woven edge of the fabric, and I cut to the exact measurements.

Now I have my two skirt pieces ready, and I can move on to cutting out the bodice and lining.

Transcript for the video: Isabella Dress - Cutting Out The Bodice Pieces

Choosing Fabric Layout and Yoke Option

Because I’m using the slightly smaller, flatter yoke, I don’t need quite as much fabric, so I am able to use less.

Always fold over one side first, that’s the rule. Then place the fold line of your pattern piece directly on the fold line of the fabric. I have seen many students move it slightly off, and then of course things will not fit together properly when you sew.

Cutting Direction and Hand Positioning

When cutting out, it’s always important to cut from the left so your pattern piece sits on the right. It makes everything much easier. You can move the fabric up with your left hand.

One thing I tend to do is cut across everything I can first, then cut the rest afterwards. In this case, I’m cutting upwards first, then across, so I end up with a smaller piece of fabric that I can easily move around and keep on the left.

It doesn’t always work perfectly, but whenever possible, it’s better to cut from the left.

Left-Hand Cutting Technique vs Right-Hand Cutting

Sometimes you can cut from the right, but it is not as natural if you are right-handed. When you go into a corner, it becomes harder to turn and control.

If you compare both sides, cutting from the right puts your wrist at a strange angle. You then have to lift and adjust the fabric constantly.

When you cut from the left, your wrist stays much straighter and it is easier to control. It simply feels more natural, and you get a better result.

Cutting the Sleeve Pieces

Now I’m cutting my sleeve. If you look closely, you’ll notice I haven’t actually reduced it to the slender version, which I should have done, but I forgot.

Next I’m cutting the puff sleeve option. When cutting from a check fabric, make sure the checks line up properly.

I’m also interlining this piece because it is a special dress, and I’m using a thin silk. So I place the lining and shell together, fold them, and cut them as mirrored pieces. That way I only need to cut once, which saves time.

Make sure the sleeve starts and ends at the correct underarm point. Then pin everything and cut it all in one go.

Again, I am cutting from the left, through all four layers.

Sleeve Turn-Up and Sizing

Next is the turn-up piece. If your child has a thicker arm, you need to measure carefully and allow at least four centimeters of movement.

In my case, I am using the six to seven size, which gives about four centimeters of movement room. The arm size doesn’t vary too much in children, so this still works well.

I cut the lining at the same time, with folds so I get mirrored pieces again. This is very important.

Marking Pattern Pieces

Now I mark all the important points.

On the sleeve, I mark the front on the turn-up and main piece. You can cut a small triangle if you want, to help identify it later when gathering.

I also mark where the gathering starts and where the turn-up will be attached. I will ignore the exact gathering amount on the instructions because I am using a wider turn-up.

Marking Skirt and Bodice Pieces

For the skirt, I mark the fold on the back sleeve piece. I also mark the shoulder head, although this is optional since both sides are similar.

On the front yoke, I mark the center front and the pintuck positions. You can mark all three points or just the center and mark the rest later with a fabric marker.

I also mark where the sleeve starts on the front piece, and where it ends on the back piece.

On the back piece, I mark the integrated button placket fold, which will also be important later.

Final Preparation Before Sewing

Now I have all my pieces cut out and marked. Everything is ready, and I can move on to the next stage.

Transcript for the video: Isabella Dress - The Optional Collar

In this chapter I’m going to show you how to make the collar. Normally the collar is fairly straightforward, you would cut it with the grain, but because I used a check fabric and wanted it across the grain, I thought I would do a video so you can see how it works in detail.

The collar is lined, and it is only temporarily tacked at the side for a bit of support so it doesn’t shift.

This is one of the options of course. You could also make it with lace, and I’ve got an example for that as well. All of that is in your written instructions, and there are bonus videos if you want to add lace.

Setting Up the Collar on the Bias

In this example we are not cutting the collar on the straight grain, which is the easy method. If you do it on the straight grain, you simply find a central point in your fabric design and use that as your guide.

In my case I wanted more interest, so I placed it on the bias. I created a seam down the center, which is very simple. You just cut through the center and add a one-centimeter seam allowance.

To get a perfect diagonal, fold your fabric at a 90-degree angle. The grid lines on the fabric will help you align it correctly. Then place your pattern piece so the center runs through one of the squares. This ensures both sides will match perfectly.

The idea is that you cut one side, then flip it over with right sides together and match it to the same squares on the other side. That way both sides mirror each other exactly.

In my case, I did not line it up perfectly, so it ended up slightly off. Ideally both sides should be identical. It still looked nice, but it should have been matched more carefully.

Cutting and Preparing the Collar Pieces

In an ideal version, both sides are identical. You then sew straight across with a one-centimeter seam allowance and press the seam open. Always check that it fits properly.

I am cutting this from the lining now. I only need one collar per dress, but I am making two dresses, so I cut two at the same time.

The lining is placed on top with right sides together, and I pin everything in place. I am not trimming anything yet. I use the lining as my guide.

Now I go to the sewing machine and close the seam. My stitch length is 2.5 with a reverse stitch at the start.

Sewing Around the Curve and Managing the Corner

When sewing around the curve, I slow down. I actually reduced my stitch length to 1.5 or even 1 in the tight areas, because the fabric wants to pull and shift here.

It is important to reduce the stitch length in tight corners to avoid fraying and uneven curves. I go slowly and carefully around the curve, sometimes even using a foot width seam allowance instead of a full centimeter.

I actually prefer a slightly smaller seam allowance here because I like a little bit of the collar edge to show. It gives a nicer finish.

On the other side, I repeat the same process. Short stitch length at the start, then back to 2.5 for the rest.

We are not cutting across the corner because it often looks better when it is folded instead of clipped. However, I do trim the seam allowance slightly to reduce bulk. I also snip into the seam near the point to remove tension before turning.

Turning the Collar and Forming the Points

Now I fold the seam allowances together, hold them with my thumbs, and push the fabric through. I use my nail or a pin to help push out the corner.

The result is a clean point.

I repeat the same process on the other side. Fold, switch, and push through again. Then I use a pin to lift out the tip so it becomes sharp and defined.

Pressing and Finishing the Collar Shape

After turning, I gently roll the seam allowance between my fingers and press with plenty of steam. This helps the seam sit neatly along the edge.

I go over both sides, rolling and pressing until everything lies flat and clean. Make sure no lining is visible from the outside.

Once that is done, I pin the collar together. If any lining sticks out, I trim it back. We leave it as is on the inside because we are following the lining edge as the guide.

And that is the collar ready for the next step.

Making the Pintucks

Transcript for the video: Isabella Dress - Bodice Pin Tucks & Lace Trim

In this video we are going to look at how to put in the pintucks. The pintucks are completely gadget-free in my method, because I think it is important that you first learn how it works before you start using any tools or gadgets.

You want to place these as evenly as possible, about four centimeters in the middle. If you want to add lace, it will sit in the center, but make sure your lace is not wider than four centimeters, otherwise it will interfere with the pintucks.

Method 1: Folding and Ironing the Pintucks

To start, open out your fabric. You have two options for creating pintucks.

The first method is simply folding them over and pressing them with an iron. This can work well, especially on a busy printed fabric where perfect precision is less important.

So I iron in my pintucks, and at first it looks fine. But when I check more closely, I can already see that it is not perfectly even. Because the pintucks are close together, even a small difference becomes visible and pushes the lines out of alignment.

When I measured it, one was a couple of millimeters off. That does not matter in a busy fabric, but for something like a Christmas dress or a wedding-style piece, I want it to be perfect.

Method 2: Marking the Pintucks Accurately

So instead of relying only on ironing, I now use a textile marker.

I first mark the two center pintucks. Then I measure two centimeters, or about 0.8 inches, to each side. You can also use a set square, which is even more accurate.

This method gives a much more precise result.

When I compare it to the ironed version, the difference is clear. The marked version is much more even and controlled.

One important tip: when pressing, only press the edges lightly. In my case, the steam started to remove the textile marker, which was not ideal, so be careful with that.

Sewing the Pintucks

Now I am ready to sew.

I use a seam allowance of about five millimeters, or 0.2 inches. I start at the waistline, not at the top. If there is any slight distortion in the fabric, it will be hidden at the bottom, and the top area stays cleaner.

Always start where it is less visible, the same way you would when sewing buttonholes.

I sew slowly, following my markings and the guide on the presser foot. The pintuck will naturally sit edge-to-edge as I sew.

If you have a gadget for pintucks, you can use it, but I recommend learning to do it properly first so you understand what is happening in the fabric. Gadgets can make you rely less on observation skills.

Pressing the Pintucks Into Shape

Once sewn, I press the pintucks towards the center back, starting from the center front on both sides. This helps everything sit neatly and evenly.

Now they look clean and well aligned, and I am happy with the result.

Adding Interlining for Sheer Fabric

Because I am using ivory silk, the fabric is quite see-through. To prevent seams showing through, I use one of my lining pieces as interlining.

If you are using a stable cotton fabric, you do not need this step. But in this case, it helps create a cleaner finish.

I pin everything in place at the corners and treat it as one single layer going forward.

Preparing and Sewing the Lace

Next I add lace. The lace I am using is four centimeters wide, or about 1.8 inches. This is important, because I tested a few options and only this width worked properly.

You could add more lace on the outside, but I wanted to keep it simple and not too busy.

I sew the lace on both sides using a thread color that blends in well. In this case, ivory works better than gold because it disappears into the fabric.

When sewing around, the lace naturally wants to shift slightly, especially on one side, so I use a pin to hold it down and keep it stable.

Checking Alignment and Final Adjustments

Before moving on, I check the alignment carefully by folding the front piece and matching the side seams. This is important because it is easy to miss a small mistake when working with multiple layers.

At first, I noticed it was slightly off, so I corrected it. Once adjusted, everything aligned properly.

If needed, you can also reduce bulk by trimming layers in the seam allowance. In my case, I trimmed the silk layer, and I later realized I could also have removed the interlining in some areas to reduce thickness further.

Now everything is correctly aligned, the pintucks are even, and the lace is securely attached. The front piece is ready for the next construction stage.

Transcript for the video: Isabella Dress - Adding the Lining to the Bodice

Preparing the Back: Interfacing and Stabilizing the Placket

In this chapter we’re going to prepare the back. That means we’re going to apply interfacing, then close the shoulder seams for both the lining and the shell fabric.

First we strengthen the center back where the placket will be. This is important because this is where the buttonholes will go. I’m checking which side is the right side, because we want the underside facing up when we apply the interfacing.

Applying Interfacing and Keeping Seam Allowances Clear

We iron on the interfacing, but we leave out the seam allowance at the neckline and at the waist. I also mark where the fold will be, because that is where the interfacing needs to sit.

I line everything up carefully. It does not matter if it does not go all the way to the edge. If you have an interfacing ruler or guide, this is a good time to use it.

It is always better not to include interfacing in the seam allowance, because it reduces bulk.

Folding and Positioning the Interfacing

Now I fold it over exactly along the marked line.

A useful trick is to place the interfacing about a millimeter over the fold line, rather than exactly on it. This prevents the fold line from becoming too thick and bulky.

Adding Interlining for Stability

Next I apply my interlining. I place it on and secure it with a few pins in strategic points, usually at the shoulder and underarm.

You do not need to over-pin or sew it down. It just needs to sit in place.

I have done this on both sides now, and this helps prevent the fabric from being too see-through.

Closing the Shoulder Seams

Now it is time to close the shoulder seams for both the lining and the shell.

Place the shoulder pieces on top of each other with right sides facing. Always remember we use the lining as the guide for alignment, not the decorative trim, because the trim can shift slightly during handling.

I insert pins vertically to the seam so I can sew over them easily. You can also pin along the seam if you prefer.

I also make sure the lining shoulder seams match up correctly.

Sewing the Shoulder Seams

Now we go to the sewing machine.

We sew with a one-centimeter seam allowance, which is standard for all my patterns unless stated otherwise. Make sure to lock your stitches at the beginning and end.

As I sew, I continue feeding the next section under the machine to avoid wasting thread. This is a good habit to develop.

Once sewn, we press the shoulder seams open.

Attaching the Lining to the Back

Next we attach the lining to the back piece. This is where many people get confused, so I want to show it clearly.

The placket area for the buttons is folded over, which means this section becomes wider than the lining itself. That is completely intentional.

So what we do is place the lining on top of the back piece around the neckline. You will notice the lining is shorter, but that is because the placket will fold over later.

We then gently shift the back piece so it matches the lining edge.

Pinning and Sewing the Back and Lining Together

Now we pin the pieces together. We repeat the same process on the other side, ensuring right sides are facing.

It may look slightly uneven at this stage, but that is expected because the structure changes once it is turned.

We sew this with a one-centimeter seam allowance, removing pins as we go.

I place the next section directly under the machine so I can continue smoothly without stopping.

Pressing the Back for a Clean Finish

Once sewn, we can press the seams.

You can press them open or flat first, then give them a final press when turned. This creates a clean and professional finish.

When turned through and pressed properly, everything falls into place and the shape becomes clear and smooth.

Final Note

And that is the back prepared. It is much easier than it first looks once you understand how the placket folds and how the lining is aligned.

Now we can move on to the next step, which is closing the neckline.

Transcript for the video: Isabella Dress - The Neckline

Preparing to Sew the Neckline

Now we’re ready to sew the neckline. We place the shoulder seams of the lining and the upper fabric together, then pin everything in place.

We also add stay tape in areas that may stretch. As you can see, it goes across the fabric where there is some bias movement. This stabilizes the area so it cannot stretch out later and gives a much firmer finish.

We will also under-stitch afterwards so that nothing rolls to the outside.

Aligning the Neckline Accurately

First, we match the shorter seams of the lining and the outer fabric. With right sides facing each other, we align all seams carefully and secure them with vertical pins so nothing shifts.

It is important that everything lies completely flat at this stage. I always recommend placing the bodice on a table so you can see the full shape clearly. If you try to do this on your lap, it is much easier to misalign the pieces.

I mark the center front on both the lining and the outer fabric, and I secure that point first before working around it.

The pins are placed so they point toward the left edge, because that is how the fabric will naturally feed into the sewing machine.

Using Stay Tape for Stability

Now I add stay tape along the neckline. I personally sometimes add it while sewing, but for beginners it is better to pin it in first so it does not get forgotten.

The stay tape prevents stretching in areas that are not on straight grain. This helps maintain the shape and keeps the neckline stable.

Sewing the Neckline

Now we sew around the neckline.

Although the pattern allows a one-centimeter seam allowance, I prefer using a foot-width seam allowance. This helps the trim sit nicely and gives a softer curve.

When approaching corners, reduce the stitch length to 1 or 1.5 so the fabric does not fray when clipped later.

As you sew across the stay tape, make sure it stays flat and controlled. I sometimes gently hold it to keep tension even, but beginners should rely on pins.

I continue around the neckline slowly, adjusting stitch length again after each corner and keeping everything smooth and flat.

Remember to secure your stitches at the end.

Clipping and Reducing Bulk

Now we clip into the corners right up to the point so the neckline can turn cleanly. This is done at all corner points.

Next we reduce bulk by trimming seam allowances. I trim both the outer fabric and the lining.

You can also trim in stages for a flatter result. For special occasion garments like flower girl dresses, this makes a big difference in the final finish.

Do not trim the outer trim or visible decorative areas too much, as this can create unwanted bulk or distortion. Focus mainly on the lining.

Turning and Under-Stitching

Now we turn everything through.

Next comes under-stitching. This step ensures the lining stays inside and does not roll out. It also helps create a clean edge.

We stitch about a millimeter or so from the edge, keeping the seam allowance directed into the lining.

Use a regular stitch length of 2.5 and sew slowly, gently pulling the fabric apart as you go so everything stays flat.

This step is very important for achieving a professional neckline finish.

Pressing and Shaping the Neckline

Once under-stitched, we press the neckline carefully.

I use a hot iron on a suitable setting for the fabric. Silk can handle heat well, but you must be careful around lace or synthetic trims, which may melt.

I use steam and mainly the tip of the iron to avoid creating marks.

As I press, the neckline naturally rolls into place and forms a smooth edge.

Final Trimming and Preparation for Sleeves

Now we lay everything flat and check alignment. Under-stitching can slightly shift layers, so we trim any uneven edges so both lining and outer fabric match perfectly.

This ensures that when we attach the sleeve later, everything will sit clean and balanced.

Once everything is aligned and secured, we are ready for the next step: attaching the cap sleeve.

If you are using the puff sleeve instead, you would continue with the side seams first.

Preparing the Cap Sleeve or Puff Sleeve

Transcript for the video: Isabella Dress - The Cap Sleeve

Now we’re going to work on the sleeves, and you need to decide whether you want the puff sleeve or the cap sleeve. In this video I’m showing you the cap sleeve. If you are doing the puff sleeve, the order of steps is slightly different, so make sure you follow the correct video for that version.

For the cap sleeve, we usually work with a single layer. However, if your fabric is very sheer, like the one I’m using here, it is a good idea to add interlining for stability and structure.

Preparing and Stabilising the Sleeve

We start by making sure the sleeve begins and ends at the correct positions on both sides, exactly as marked on your pattern. This alignment is very important.

If you are using interlining, place it on the underside of the fabric. I also trim it slightly shorter, removing the hem allowance so the final fold sits cleanly at the correct depth.

I pin the interlining in place so it cannot shift while we work. You do not need to over-pin or stitch it down.

Finishing the Hem

There are several ways to finish the hem. You can overlock or serge the edge first, then turn it up and top stitch, or you can fold it twice.

I fold it up by about 2 centimeters for the hem, then turn the edge in slightly before stitching. I do not fold it exactly to the full centimeter, because a slightly smaller fold gives a cleaner finish.

I then top stitch close to the edge using a longer stitch length, around 3 to 3.5.

If you want, you can also insert a small elastic into the hem for extra shape, although I am not using it here.

Creating the Gather Stitches

Now we prepare the sleeve gathers.

We sew two rows of long stitches. The first row is slightly in from the edge, and the second row is about a foot width away from the first. Both rows use the longest stitch setting on the machine.

These threads will be pulled later to create the gathers.

Positioning the Sleeve on the Armhole

We open out the armhole and begin placing the sleeve.

First, we match the sleeve head to the shoulder seam. This is the most important alignment point.

Next, we locate the starting notch on the sleeve and pin it vertically to the correct position on the armhole.

We then gently pull the gather threads so the sleeve fits into place.

The rule is that the gathers should not extend more than 2 to 2.5 centimeters from the shoulder line. Smaller sizes stay closer to 2 centimeters, and larger sizes can go up to 2.5 centimeters.

We repeat this on the other side, making sure the gathers are even and balanced.

Checking and Adjusting the Gathers

Take your time here. Even though gathering seems simple, it is important to distribute the fullness evenly.

Sometimes the top row of gathering threads does not pull as smoothly because of the curve, so you may need to adjust it slightly.

Once both sides are in place, check that the gathers end at the same point on both sleeves. This ensures symmetry.

First Stitch to Secure the Sleeve

We now sew the sleeve in place using a foot-width seam allowance, not the full one centimeter. This is just a holding stitch.

Go slowly and make sure there are no folds or pleats underneath. This step needs patience because everything must lie flat.

We repeat this process on the other side as well.

Attaching the Lining

Next, we attach the lining over the sleeve.

We start at the underarm and pin the layers together. In my case, there are three layers because I also have interlining.

We match shoulder seams first, then continue around the armhole, ensuring everything aligns properly.

Some areas may look slightly uneven at this stage, but that is normal. We have already trimmed earlier so the edges match as closely as possible.

Sewing the Lining in Place

Now we sew with a one-centimeter seam allowance.

We guide the fabric carefully around the curve, making sure nothing shifts or folds underneath.

It is important not to rush this step. Slow, controlled movement gives the best result.

Once sewn, we remove all pins before turning anything through.

Turning the Sleeve and Cleaning the Inside

We attach a safety pin to the lining and gently pull everything through the shoulder seam.

Once turned, we adjust the underarm and check the shape. If the shoulder is not too narrow, this method works very smoothly.

Next, we remove the gathering stitches by pulling one thread and releasing them.

Under-Stitching the Armhole

Now we under-stitch the armhole so the lining does not roll outward.

We stitch the seam allowance to the lining from the underarm up to the start of the sleeve.

Use a stitch length of 2.5 and keep the seam allowance directed into the lining at all times.

This step helps the armhole stay clean and stable.

Final Pressing

Finally, we press everything carefully with heat and steam.

Move the fabric over the edge of the ironing board when pressing curves so you do not create unwanted folds.

Give both sides a good press and shape the sleeve properly.

Final Result

And that is the cap sleeve finished. It is a simple but very clean construction method once you follow each step carefully.

Next, we will move on to closing the side seams.

Transcript for the video: Isabella Dress - The Side Seams
Now we're going to close the side seam, and there are two options at this point. You either already have your cap sleeve in, like in this example here, and everything is already closed off, or you’ve left it all open and the sleeve is still to go in.

If the sleeve is still to go in, you would close the seams separately and then join them together. But for most of my instructions in these videos, I’ve done it like this: the cap sleeve is already in, the armhole is closed, and now we’re moving on to closing the side seam in one go.

I’ve seen some people simply sew straight through everything so the seam ends up on the outside, even though there is lining. Don’t do that. You want it completely smooth and enclosed, and I’m going to show you now how to do it properly in one go.

Preparing the Layers

The key here is to separate the layers and match them correctly. Take the upper material of the front and back bodice and place them right sides together along the side seam.

If you open everything out and separate the lining from the outer fabric, then bring only the outer fabrics together and secure them with a pin, you’re already on the right path.

Start by placing a pin right at the underarm seam where everything meets, and insert it vertically so it doesn’t shift. From there, continue pinning down the side seam. Make sure the lining is hanging free and not caught in the seam.

Sewing the Side Seam

Now you can close the seam from top to bottom through all the outer layers. Once we press it open later, everything will be neatly enclosed and look very clean.

Repeat the process on the other side: lift the lining away from both front and back, match the outer fabrics together, and pin from the underarm downwards.

The seam allowance here is one centimeter, but this method also gives you a bit of flexibility. You can slightly adjust the fit by going just inside or just outside the seam line if needed, depending on whether you want a slightly tighter or looser bodice.

Snipping and Pressing

In this area, you may get a bit of tension, so it’s important to snip right into the seam allowance at an angle to release it. Do the same on the other side so everything will lie flat when turned.

Now take it to the sewing machine and stitch with a one-centimeter seam allowance. When you come to any curves or tighter areas, take your time and don’t force the fabric.

After sewing, press the seams open over the edge of your ironing board so you don’t accidentally crease unwanted areas. Use plenty of steam and heat.

Once pressed, fold it back and give it another light press so everything sits neatly.

Finishing the Collar

Now I’m also going to do something with the collar because it’s popping up a little and flapping. You can secure it with a few hand stitches by folding the corner slightly and hiding your stitches behind the pin tuck.

Just sew through the lining of the collar to hold it in place. You could also topstitch the collar down, but I’m not doing that here because I want a very fine, clean finish.

A few more stitches, and the collar will stay exactly where it should be.

Next Step

And that’s the side seams done. We’re now ready to move on to the next chapter and sew the skirt.

Transcript for the video: Isabella Dress - The Skirt

Sewing the Skirt Panels

In this chapter we're going to sew the lower part of the skirt, which is essentially the same regardless of whether you're doing the flat yoke or the gathered yoke at the waist. It doesn’t really matter which version you choose.

If you want a really full skirt, you can cut it from selvage to selvage or use a larger fabric layout and cut it along the selvage as we’ve already discussed. The way it is constructed is exactly the same in either case.

The first thing you want to do is sew the seams together. You will either have two or four seams depending on your layout. If you are working with a patterned fabric like checks, it is very important that everything lines up correctly.

If you place your pieces together on the wrong side and the checks match, you know you’ve done it correctly. When you open it out, the pattern should continue smoothly.

Working with Fabric and Seam Construction

I’m using a dupion silk, which has a bit of natural texture and structure. It’s not completely even, especially when compared to very smooth machine-made silk, but that’s part of its character.

With fabrics like this, you sometimes need to decide which areas go at the hem and which go at the waist, especially if there are small irregularities. In my case, I try to place the smoother sections at the top and let any inconsistencies fall toward the hem where they are less noticeable.

Once aligned, sew the seams together. You can pin vertically to hold everything in place, or carefully guide the fabric as you sew. If you’ve matched your checks properly, the fabric should stay aligned.

Repeat this for all remaining seams. One side may feel easier depending on how much fabric you have supporting it.

Finishing the Seams

After sewing, go over to the overlocker or serger and finish the raw edges. If you are working with silk, it is often better to trim carefully first, as silk can shift or pull easily under the blade.

If your machine tends to pull fabric slightly, press the seam flat first before overlocking. Then press the seam allowances toward the center back.

At this point, your skirt panels should already look clean and structured.

Choosing and Preparing the Hem

There are several options for finishing the hem depending on the type of dress.

For very special garments, you might choose a hand-finished hem with lace or delicate stitching. For more casual dresses, a machine topstitch hem is perfectly fine.

If you are working with a large skirt, hand hemming can take a long time, sometimes 40 minutes to an hour or more, depending on the volume of fabric.

Before hemming, always press the hem allowance up first. Typically this will be around 2 to 3 centimeters, depending on your pattern and fabric.

Machine Hem Option

One option is to stitch the hem directly on the machine. If you are using a check or patterned fabric, make sure the fold aligns perfectly so nothing slips out of place.

This method is quick and practical, especially for everyday garments or summer dresses.

Hand Slip-Stitch Hem

For a finer finish, you can use a slip stitch hem.

Secure your thread, then pick up just one or two fibers from the skirt fabric and a small section of the hem fold. Repeat this motion along the entire hem.

The stitch should be loose and almost invisible from the outside. Use a gentle up-and-down motion with your thumb and forefinger guiding the fabric.

Take your time here, as this is what gives a very clean and professional finish.

Adding Lace or Trim

Once the hem is complete, you can also add lace if desired.

Place the lace right sides facing the skirt and fold the start neatly so it can be joined seamlessly. You can hold it in place as you sew around the edge, keeping it slightly taut.

The scalloped edge can be trimmed where needed so it sits evenly around the hem.

You can also experiment with ribbon or decorative trims, depending on the style you want. Just make sure it sits evenly and follows the hemline cleanly.

Gathering the Waistline

Now we prepare the top edge of the skirt.

We sew two rows of long gathering stitches using the longest stitch length on your machine. The first row is about a foot width from the raw edge, and the second row is foot width from that again.

Leave long thread tails at both ends so you can pull and adjust the gathers later.

If you cut along the selvage, the edge will be more stable. If you cut across the grain, you should overlock or finish the edge first to prevent fraying.

Final Step

Once the gathering stitches are in place, the skirt is ready.

Next, we will attach the yoke to the skirt and complete the waistline.

Sewing the Skirt Yoke

Transcript for the video: Isabella Dress - Joining The Skirt & The Yoke

In this chapter we’re sewing the skirt yoke. There are two versions you might be working with: one with gathers at the waist and one without. If you are using the gathered version, you will need to insert gather stitches at the top of the skirt. If you are not using gathers, you can skip that step.

Make sure you have enough fabric for your skirt. The fuller the skirt, the better it will hang. You can follow the measurements provided or cut from selvage to selvage and use multiple panels if needed.

If you are using a gathering foot, you can use it to bring the skirt in evenly to the correct width. When working with dupioni silk, gathering works better along the selvage than across the grain. Across the grain it can become uneven and bumpy.

Preparing the Yoke

I have already interlined my pieces so there are two layers for stability and opacity. If you are not interlining, you may need interfacing in the center back area for buttonholes. This stabilizes the fabric, especially if you are using a lighter material.

If your fabric is thick enough, you may not need additional interfacing. If you do use interfacing, leave out the seam allowances at the waist and where the skirt will attach.

I have also overlocked the raw edges of all pieces to reduce bulk. This is optional but helpful with thicker fabrics.

Closing the Side Seams

Now we close the side seams. If your pieces have stretched slightly during finishing, gently ease them so they match in length.

Sew the side seams with a 1 centimeter seam allowance and a standard stitch length of 2.5. Press the seams after sewing so they lie flat.

Repeat this for both front and back pieces.

Preparing and Attaching the Skirt

Now we join the skirt to the yoke. First, mark your center back and side seams clearly so everything aligns correctly.

Make sure your gathers are evenly distributed. Start by securing the center back, then match the side seams, and finally adjust the gathers evenly across the remaining sections.

If you are working with multiple panels, make sure no seam sits at the center front. The seams should be evenly spaced for balance.

Take your time adjusting the gathers so they sit smoothly and evenly before sewing.

Sewing the Skirt to the Yoke

Once everything is pinned, sew along the gathered edge using the center of the gather stitches as your guide. Keep everything flat as you sew and avoid catching any pleats underneath.

After sewing, check carefully to make sure no folds or tucks have been trapped in the seam. Trim and neaten the seam allowance if needed so everything lies smoothly.

Press the seam thoroughly so the yoke sits neatly against the skirt.

Finishing the Waistline

You can finish the waistline in several ways. You can top stitch it, add a ribbon, or attach lace for decoration.

In this example, lace has been hand stitched onto the yoke for a decorative finish. The lace is carefully aligned and stitched using small, even stitches, following the pattern of the lace as you go.

Once finished, give the entire skirt a final press. The gathers should be even, the yoke should sit smoothly, and the overall finish should look clean and professional.

Now the skirt is complete and ready to be attached to the bodice.

Transcript for the video: Isabella Dress - Inserting the Buttonholes Vertically

Buttonhole Placement

Last but not least, let’s do the buttonholes. Buttonholes can be placed vertically or horizontally, and it depends entirely on the size of your button.

For small buttons, vertical buttonholes are absolutely fine. For larger, feature buttons, horizontal buttonholes usually look much better. Otherwise, the buttonhole becomes too long and visually dominates the garment, especially in silk.

When working with silk, vertical buttonholes can also look less clean, so it’s worth considering this when choosing your layout.

Choosing Your Buttons

You can use simple buttons, decorative buttons, or covered buttons. Small standard buttons work well for this dress, while decorative round buttons can be used on the front as a feature.

Covered buttons are also a great option if you want a more custom look.

A key point: always choose your button first, because the size determines the buttonhole placement. Don’t rely only on pattern markings.

Position from the Top Edge

Start by marking about 0.5 cm (or 5 mm) down from the top edge. This is your starting point for the first button.

This small offset is important because it improves the visual balance, especially once seams and plackets are folded.

Then mark the center of where each button will sit.

Spacing the Buttonholes

Measure the total distance between the top and bottom button positions, then divide it evenly.

For example, if the distance is 16.7 cm and you have three spaces, divide by 3:

16.7 ÷ 3 = 5.6 cm spacing

It’s best to first place pins, double-check the spacing, and only then mark with a fabric pen or chalk.

Small adjustments are normal, especially once the garment is on the body, because seam thickness can slightly affect the visual spacing.

Marking and Adjusting Placement

Once you’ve calculated spacing, mark each buttonhole position clearly.

You may need to adjust slightly so everything looks visually balanced rather than strictly mathematically perfect. The top button is especially important for alignment.

If needed, adjust placement by a few millimeters for a better visual result.

Sewing the Buttonholes

Use your machine’s buttonhole setting and always test on a scrap fabric first.

Place the needle directly on your marked point, align the fabric with the buttonhole foot, and sew slowly and carefully.

Keep stitch tension slightly reduced for a smooth zigzag finish. Start from the lower end of the garment where possible, as small inconsistencies are less noticeable there.

Remove pins as you go and work your way down the placket.

Opening the Buttonholes

Before cutting, place a pin across the top of each buttonhole. This prevents accidental cutting into the stitching.

You can use a seam ripper or small sharp scissors. A safer method is to make a small snip in the center, then carefully open toward both ends.

Work slowly for a clean finish.

Attaching the Buttons

Overlap the placket and sew buttons onto the top layer only for vertical buttonholes.

Make sure the button sits slightly raised, forming a small “mushroom” effect. This prevents the fabric from pulling and allows the button to sit comfortably inside the hole.

Secure with a few strong stitches, then repeat for all buttons.

The final decorative buttons can be sewn on the front, evenly spaced and aligned with the same measurements used for the buttonholes.

Final Result

Once all buttons are attached, the dress is complete. The placement should look balanced, the placket should lie flat, and the closure should feel secure without pulling.

If you’ve followed along, you now have a finished garment ready to wear.

Transcript for the video: Isabella Dress - Inserting the Buttonholes Horizontally

Large Horizontal Buttonholes – When to Use Them

In this chapter we’re focusing on large buttonholes, which are usually worked horizontally. The main difference from vertical buttonholes isn’t the technique itself, but the scale of the button and how it affects placement and appearance.

Horizontal buttonholes are especially useful when you’re working with larger, decorative buttons, where a vertical buttonhole would look too long or visually overpower the design.

Button Placement and Positioning

Start by placing your button so it sits about 0.5 cm from the top and side edges. This ensures the button doesn’t sit too close to the edge of the placket.

Once positioned, mark the center of the button. This is the true reference point for where your buttonhole will go.

Repeat this process at the waist or lower section of the garment if needed.

Calculating Even Spacing

If you have multiple buttons, divide the total distance into equal sections based on the number of gaps.

For example, if you have two buttons, you divide the space into two equal sections. Always measure carefully and adjust based on how the spacing looks visually.

In practice, you may need to slightly adjust measurements so the spacing looks balanced rather than strictly mathematical.

Visual Balance vs Exact Measurement

With button placement, visual balance is just as important as measurement.

On structured areas like a yoke, seam thickness and fabric layers can make distances look smaller than they are. It’s common for things to appear slightly closer than they measure.

Small adjustments of a few millimeters are normal to achieve a better visual result.

Aligning the Buttonholes

When working on a yoke or shaped area, pay attention to grain direction.

For plain fabrics, align the buttonholes parallel to the waistline.

For checked or patterned fabrics, follow the pattern lines instead, even if that means deviating from the waistline. The goal is a visually clean result.

Machine Setup and Common Issues

When sewing horizontal buttonholes, be extra careful with the machine sensor. It is very sensitive and can stop mid-stitch if it is accidentally triggered by fabric bulk or movement.

If this happens, turn the machine off, reset the buttonhole function, and start again. This is normal and not a mistake in your setup.

Areas with gathers or multiple layers are more prone to this issue, so slow down and guide the fabric carefully.

Reinforcing Light Fabrics

If your fabric is very light or only has a single layer, you should reinforce the buttonhole area before sewing.

Cut a small rectangle of fabric, finish the edges, and attach it behind the buttonhole area. This prevents tearing, especially with larger horizontal buttonholes.

If you already have interlining or lining, this step is usually not necessary.

Sewing the Buttonholes

Secure the fabric so it doesn’t shift, especially on bulky or layered areas.

Sew the buttonhole slowly, keeping alignment consistent. Be mindful of direction, especially on yokes where different edges run in different directions.

Always follow the orientation that looks best on the garment, even if it slightly differs from strict horizontal alignment.

Final Adjustment and Fit

After sewing, check alignment carefully. Horizontal buttonholes should sit cleanly and evenly without pulling or distortion.

Once satisfied, open them carefully and attach the buttons so they sit securely but slightly raised, allowing smooth fastening.

The final result should feel balanced, secure, and visually aligned with the garment design.

Puff Sleeves – Overview and Options

Transcript for the video: Isabella Dress Bonus - The Puff Sleeve 1

In this bonus chapter, we’re making puff sleeves. There are several finishing options for the hem, including bias binding, piping, or decorative embroidery. You can also keep it simple with a ribbon detail, depending on the look you want.

The goal is a clean finish on the inside, with seams and overlocking neatly hidden so the sleeve looks polished and professional.

Sleeve Structure and Preparation

The puff sleeve is gathered at both the top and the lower edge to create volume.

Make sure your sleeve is marked correctly:

  • Front notch
  • Sleeve head
  • Start and end points for gathers

The gathers should stay concentrated near the top of the sleeve only. Avoid letting them drift too far down, as this can create unwanted bulk or small pleats.

Interlining and Stabilizing the Fabric

If your fabric is light or see-through, you can add interlining for structure. This helps the sleeve hold its shape and improves the overall finish.

You can also use stay tape along areas that may stretch. This keeps edges stable and prevents distortion during sewing.

Depending on your fabric, interfacing can be used instead, but stay tape keeps the sleeve lighter.

Preparing the Cuff and Hem

The cuff is constructed first by sewing the lining and outer fabric together with right sides facing.

After that:

  • Trim seam allowances slightly to reduce bulk
  • Understitch so the seam rolls cleanly into the lining
  • Press carefully around curves in small sections to avoid puckering

This helps the cuff sit clean and structured.

Adding Gather Stitches

Insert two rows of gathering stitches:

  • First row about half a presser foot from the edge
  • Second row a presser foot width below the first

These two rows allow controlled gathering so the sleeve can be shaped evenly.

Repeat the same process on the lower edge of the sleeve.

Sewing the Cuff

Attach the cuff by matching:

  • Sleeve right side to cuff right side
  • Seams aligned first
  • Notches matched from center outward

Pull gathers evenly from both sides so they are balanced. Avoid crowding gathers in one section.

Adjust until the sleeve fits the cuff smoothly without tension or pulling.

Checking Sleeve Balance

Before sewing permanently, compare both sleeves:

  • Match underarm seams
  • Check gather distribution
  • Ensure both sleeves look identical in fullness and placement

This step ensures symmetry in the finished garment.

Attaching the Sleeve

Sew the sleeve into the armhole carefully:

  • Keep fabric flat and controlled as you sew
  • Work slowly around curves
  • Maintain even seam allowance throughout

This is easier when sewing from the inside, especially with multiple layers.

After stitching, trim excess seam allowance slightly and prepare for finishing.

Overlocking and Cleaning Up

Once sewn, finish raw edges using a serger or overlocker.

Keep fabric flat while serging to avoid puckering or accidental cutting into layers. Remove pins beforehand to avoid damage.

This step helps create a clean, durable seam inside the garment.

Finishing the Cuff

Fold the cuff outward so the seam sits neatly inside.

Avoid aligning edge-to-edge if it causes bulk. Instead, allow a slight overlap so the seam stays hidden inside the cuff.

Then secure everything using:

  • Stitch in the ditch

This locks the cuff in place without visible stitching on the outside.

Final Press and Finish

Press the sleeve thoroughly using steam, shaping the puff and smoothing seams as you go.

Work carefully around curves and avoid flattening the puff structure.

Once pressed, the sleeve should:

  • Hold its shape
  • Sit evenly
  • Have clean internal finishes
  • Show no visible seam bulk on the outside

The puff sleeve is now complete and ready to attach to the bodice.

Transcript for the video: Isabella Dress Bonus - The Puff Sleeve 2

In this video, I'm going to show you how to work the bodice. It's a little bit different to what you would do if you have the little cap sleeve.

Here we are closing the side seams for our upper bodice and then also the side seams for the lining of the bodice. Both are joined with one centimeter seam allowance.

Now I would try this on your child just in case you want to make it a little bit smaller or indeed you want to take less of a seam allowance because you need a little bit more. So it's worthwhile checking this if your child was just within the margins recommended on the pattern. And then we sew those together and iron the seams apart.

Preparing the Lining

The next step is to pin the lining to the upper material with some pins which face basically vertical to whatever seam we're going to do so that we can leave them in and they sit quite nicely.

Inserting the Sleeve

Now we're going to put the sleeve in, so find the snip for the front and then we're taking that sleeve and we're pulling it through into the bodice.

I'm going to first put the underarm seams on top of each other and then I'm going to pin the top of the sleeve, the sleeve head, to the shoulder seam. Then I will pin first from the underarm seam up, and it's about two pins that you put in.

While I do this, I roll the fabric over my fingers, so the left hand is really in there to make sure that this sleeve will not sit tightly. It's very, very easy to do that, and we don't want to do that. It should sit in very evenly, so it's important that you roll that edge slightly. I do the same on both sides.

Forming and Distributing the Gathers

Now I can start pulling in my gather threads to make it fit. Again, I want to pull my gather threads up so that I have about two centimeters or, tops, two and a half centimeters on either side of the shoulder seam.

I made the gathers for these puff sleeves very dense. I think it's really lovely to do that, and it's also cut in a way that the puff sleeve will stand up a little bit over the shoulder.

I'm going to put another pin in there and now measure it, and it's an inch and a half, which is okay really. It's a little bit more than two and a half, but I can adjust that in a minute if I want to.

Now I'm going to pull it from the other side and again I put another pin in there. You could also now secure that gather thread so that it can't go anywhere, so that it can't become loose anymore. So put the pin in vertically and then just wrap your yarn around it in a figure of eight.

Now I can distribute them without them slipping out again. Take this to the outside, this is one of the most important things, just check that it's all even steven and looks really nice. I think that's quite good, really pretty.

I do the other side as well and then I compare both and make sure that my gathers start and end at exactly the same point. If they don't, this is the time to put it right.

Sewing the Sleeves In

So now I can go and sew both my sleeves in. It's really hard to show what you're doing here, as you can see, but we've done it on the other sleeve already.

Here we're just sewing around, obviously checking that everything is nice and flat underneath it, and making sure that none of the gathers push over the edge and therefore make it all a little bit smaller in the sleeve area. We don't want that. We keep everything edge to edge, and if need be you can adjust the gathers with a pin.

Finishing the Seams

When the sleeves have been sewn in, all I have to do is serge the edge. Make sure that you have removed all the pins. I also tend to cut off all the threads. I don't want anything hanging in there. Even though I'm cutting things off, if the threads come from the seam line you want to cut them off first. You don't want them in there at all.

And then after that, all we have to do is iron that seam flat.

Final Note

[Applause] And that's the end of our Isabella dress now, really the final clip. I hope you enjoyed this and don't forget that you can watch all the other little clips from the Western Blouse, which gives you a lot more options for the cuffs of the sleeves. They're really interesting, so go have a look at that as well.

And, well, come back for another project. Bye for now.

Bishop Sleeve Drafting Overview

Transcript for the video: Isabella Dress - How to Draft a Bishop Sleeve

Hi everyone. Today I’m going to show you how to make a bishop sleeve with any sleeve you’ve got at home.

The reason I’m doing this video is because Emily, who lives in the UK and works with my patterns a lot and actually has really helped to design the Isabella dress, said: you need a long sleeve and I want a bishop sleeve. I was short of time and didn’t do it, but now she’s made one and I think it’s fantastic.

So I thought I’d show everyone how you can draft it yourself. It’s very simple.

Choosing the Base Sleeve

All you need is a long sleeve from a different pattern, preferably one that is not heavily gathered at the sleeve head, or only very lightly gathered.

If you’re working with different patterns, like the Virginia and the Isabella, you need to make sure the sleeve fits first.

I’ve taken the same size, 3–4, here from a different pattern. What you need to do is simply pin the pattern together along this line here (1 cm seam allowance), then open it out.

Now take the sleeve you’ve chosen and check if it fits into the armhole, because the armhole for a dress like this might be completely different to a blouse, which is meant to sit a lot looser.

When you try this, you can see it doesn’t really fit well. You would have to go quite far up before it even sits properly, which creates too much fabric in the wrong area.

So what I do is start at the top, go down with my finger or a pen along the 1 cm seam line, and mark where the sleeve would sit flat. Then I add 1 cm to that point. That gives me the correct sleeve round shape.

Adjusting the Sleeve Shape

Do the same on the other side.

Start at the sleeve head, go down along the 1 cm line, and mark where it falls.

If I add 1 cm to that, I can see how much I need to adjust.

Then I trim a little evenly from the back and a little from the top, making sure both sides match.

The front should be slightly more cut away, because that prevents bulk. The back needs more fullness so the sleeve can roll around the arm properly.

Reference and Sleeve Length

Before we continue, I just want to show you this book by Winifred Aldrich, which I use a lot. It shows pattern drafting for sleeves, including bishop sleeves, and how they fan out at the bottom.

To create a bishop sleeve, we will be slashing and fanning out the sleeve shape.

Now, the sleeve length for this design is 34 cm. This was decided to avoid a sleeve that becomes flat before the cuff and then suddenly balloons.

So we mark 34 cm on the sleeve.

If you are working with a longer sleeve pattern, you simply remove about 5 cm to achieve this effect.

Marking the Slash Lines

Now we mark the lines where we will slash the pattern.

First, find the centre by folding the sleeve and marking it.

Then divide each side into thirds. In my case, it’s roughly 3.5 cm between each line.

Draw the lines down the sleeve.

I do have to confess, when I work on my own, I sometimes just cut these lines in directly, but here we’ll do it properly.

Now repeat on the other side and draw the lines through.

Creating the Bishop Shape (Fanning Out)

Now we cut along these lines, but not all the way through at the top. Leave a small hinge so the pieces stay attached.

When we move the pieces apart, the volume increases and the sleeve opens out into a fan shape.

This is the key to a bishop sleeve. You cannot just open it evenly; it must be shaped.

The front should have less volume and the back should have more, because the arm moves forward more at the back.

A good reference is a ratio of 1:1:2:2:2, but for this children’s sleeve I reduce it slightly.

Adjusting Width and Spacing

For this sleeve, I use:

  • 3 cm at the front sections
  • 6 cm at the back sections

We tape the pieces in place as we space them out.

The centre section is split evenly, then the next sections are spaced according to these measurements.

The reason we reduce the front is because there is less movement there. The back needs more fullness for the arm to move comfortably and for the sleeve to hang nicely.

You don’t want too many gathers under the arm, so distribution is very important.

Shaping the Hem Line

Now we shape the hem line.

The front rises slightly and the back drops down a bit to allow for the natural arm curve.

In my case, this drop is about 1.5 cm. You can adjust this slightly, but it’s important to keep that shaping.

Once you’re happy, you can cut the sleeve shape.

Adding a Cuff Opening

If you are using a woven cuff, you need a slit.

Divide the sleeve into quarters to find placement.

The slit should sit slightly away from the edge, not exactly on it.

The slit length should be about 6 cm total from the seam allowance, which gives enough room for dressing without being too boxy.

If you are using jersey or ribbing, you don’t need a slit.

Drafting the Cuff

For the cuff, I am using the Virginia cuff again.

The cuff height is 11 cm.

You can cut it:

  • 4 times separately, or
  • 2 times on the fold

The cuff length needs to be reduced by 2 cm for this style.

Final Notes

And that’s it for drafting a bishop sleeve.

In the next video, I’ll show you how to sew it together step by step.

If you want the patterns, the links are in the description, including the Isabella dress pattern.

I’ll see you in the next video where we put the bishop sleeve together.

Sewing the Bishop Sleeve

Transcript for the video: Isabella Dress - How to Sew a Bishop Sleeve

Hi, I'm Marina from Frocks and Frolics, and today I'm going to show you how to sew the bishop sleeve. We already have made the pattern for this, and if you haven't tuned into that one, you can do that. The link is in the description, it's also under the info box at the top. So if you click on the “i” for info, you'll find the link there, and there's also a link at the end of this video so you cannot miss it.

As you can see here, I've got all my stuff already cut out. I have the sleeve, I've got two times the cuff which we need, and then I've got some bias binding from the shop or alternatively you can make your own bias binding. I'm going to show you now how to put all this together.

Preparing the Cuff and Interfacing

The first thing you need to do is iron some interfacing on the underside of one of your cuffs so that it's nice and stable. I've also rounded the edges a bit because I thought that would be nicer than the cuff I've used from the Virginia sleeve, which didn't have that.

Making Bias Binding

You can make your own bias binding or buy it. I'm going to quickly show you how to make your own.

First, iron it over so you have a crease directly in the middle. Then turn one of the sides in, but do not go all the way to the middle, you want to be shy of the middle otherwise it makes it unnecessarily thick. Now do the other side as well, this time a little closer to the edge but not quite to the middle either.

Next, reinforce the crease you already made. Now turn the bias binding so the shorter side (about 3 millimetres shorter) faces you. When you fold it, you'll see it's about a millimetre and a half shorter. That small difference makes sewing much easier later.

You can see in close-up that one side is shorter, which helps when we topstitch because it ensures we definitely catch the underside.

Attaching Bias Binding

Next, we put the bias binding on. I like to cut the ends off because it's better to start and finish neatly.

Make sure the shorter side is always at the top so when we stitch it down, the underside is caught properly.

Take the upper side of the fabric and place the bias binding in. You don't need to slide it all the way in, just about half a centimetre. Put a pin in to secure it.

Run the bias binding from one end to the other. When you reach the tip, only catch it slightly. Do not push it in too far or you'll get a pleat, and we don't want that.

If you're a beginner, you can add extra pins, but I usually don't. Then sew it in one go, rather than stitching one side and flipping it later, which actually makes it harder.

Sewing the Slit

Now we go to the sewing machine. I haven't changed the thread so you can see it clearly, even though this sleeve won't be seen.

Start slightly in from the end so you can begin cleanly on the edge. Make sure you catch the underside because it's slightly longer.

Remove pins as you go and keep everything flat. Hold the centre so nothing slips and sew all the way down. Secure your stitches at the end.

The slit is now in. When closed, it should sit neatly like this on the upper side of the fabric.

Press it lightly so it stays in place and you don't forget which side folds over. This is where people often accidentally create a small pleat at the top, which is normal.

Joining the Sleeve Seams

Now we overlock or finish the edges. You can sew both sides together with a 1 cm seam allowance. Always lock your stitches at the beginning and end.

If you're using linen like I am, I prefer to press seams open because it reduces bulk. Then sew the sleeve seam and press it open again.

Adding Gather Stitches

Next, go back to the sewing machine and add gather stitches all around the edge. Use a longer stitch length, around 4.5.

Sew one line, then another close beside it so you have two gather rows.

Distributing the Gathers

The bishop sleeve needs uneven gathering. The front has less gather, the back has more. So adjust as you go.

In the front section, reduce the gathers. Under the arm, also use less. The rest can have more volume for the puff effect.

Attaching the Cuff

Now we attach the cuff. First, use the cuff with interfacing.

Pin it to the sleeve, letting it sit over the seam allowance. Secure both sides so nothing shifts.

Pull the gathers evenly until it fits. Check both sides so nothing is pulled unevenly. If it looks good, sew it in.

Remove pins and check the cuff is attached properly.

Finishing Options

Now you need to decide how to close the sleeve. You can use rouleau loops with buttons, or you can use cam snaps.

I'm using cam snaps here. Mark placement evenly, ensuring overlap is consistent on both sides.

Use an awl to pierce through, insert the cam snap parts, and press with pliers. Repeat for all closures.

Final Steps

Once all snaps are in place, your bishop sleeve is finished. Thank you for watching this mini project. If you'd like to see something else, let me know in the comments. I'll be back next week with another project.

YOU MAY ALSO LIKE

Isabella

SHOP NOW

Audrey

SHOP NOW

Scarlett

SHOP NOW

Frances

SHOP NOW