


VIVIENNE GIRL & TEEN
VIVIENNE GIRL & TEEN
Couldn't load pickup availability
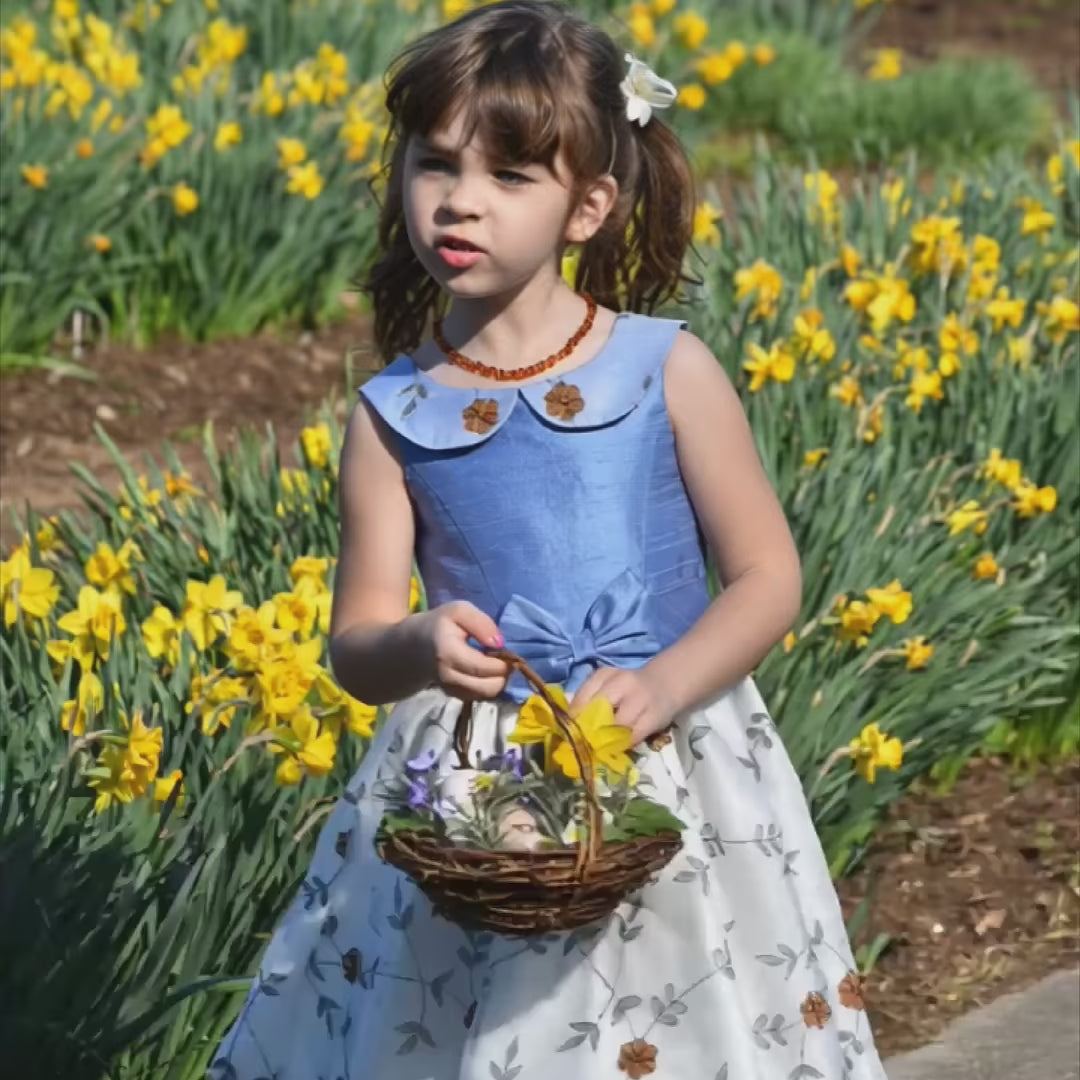
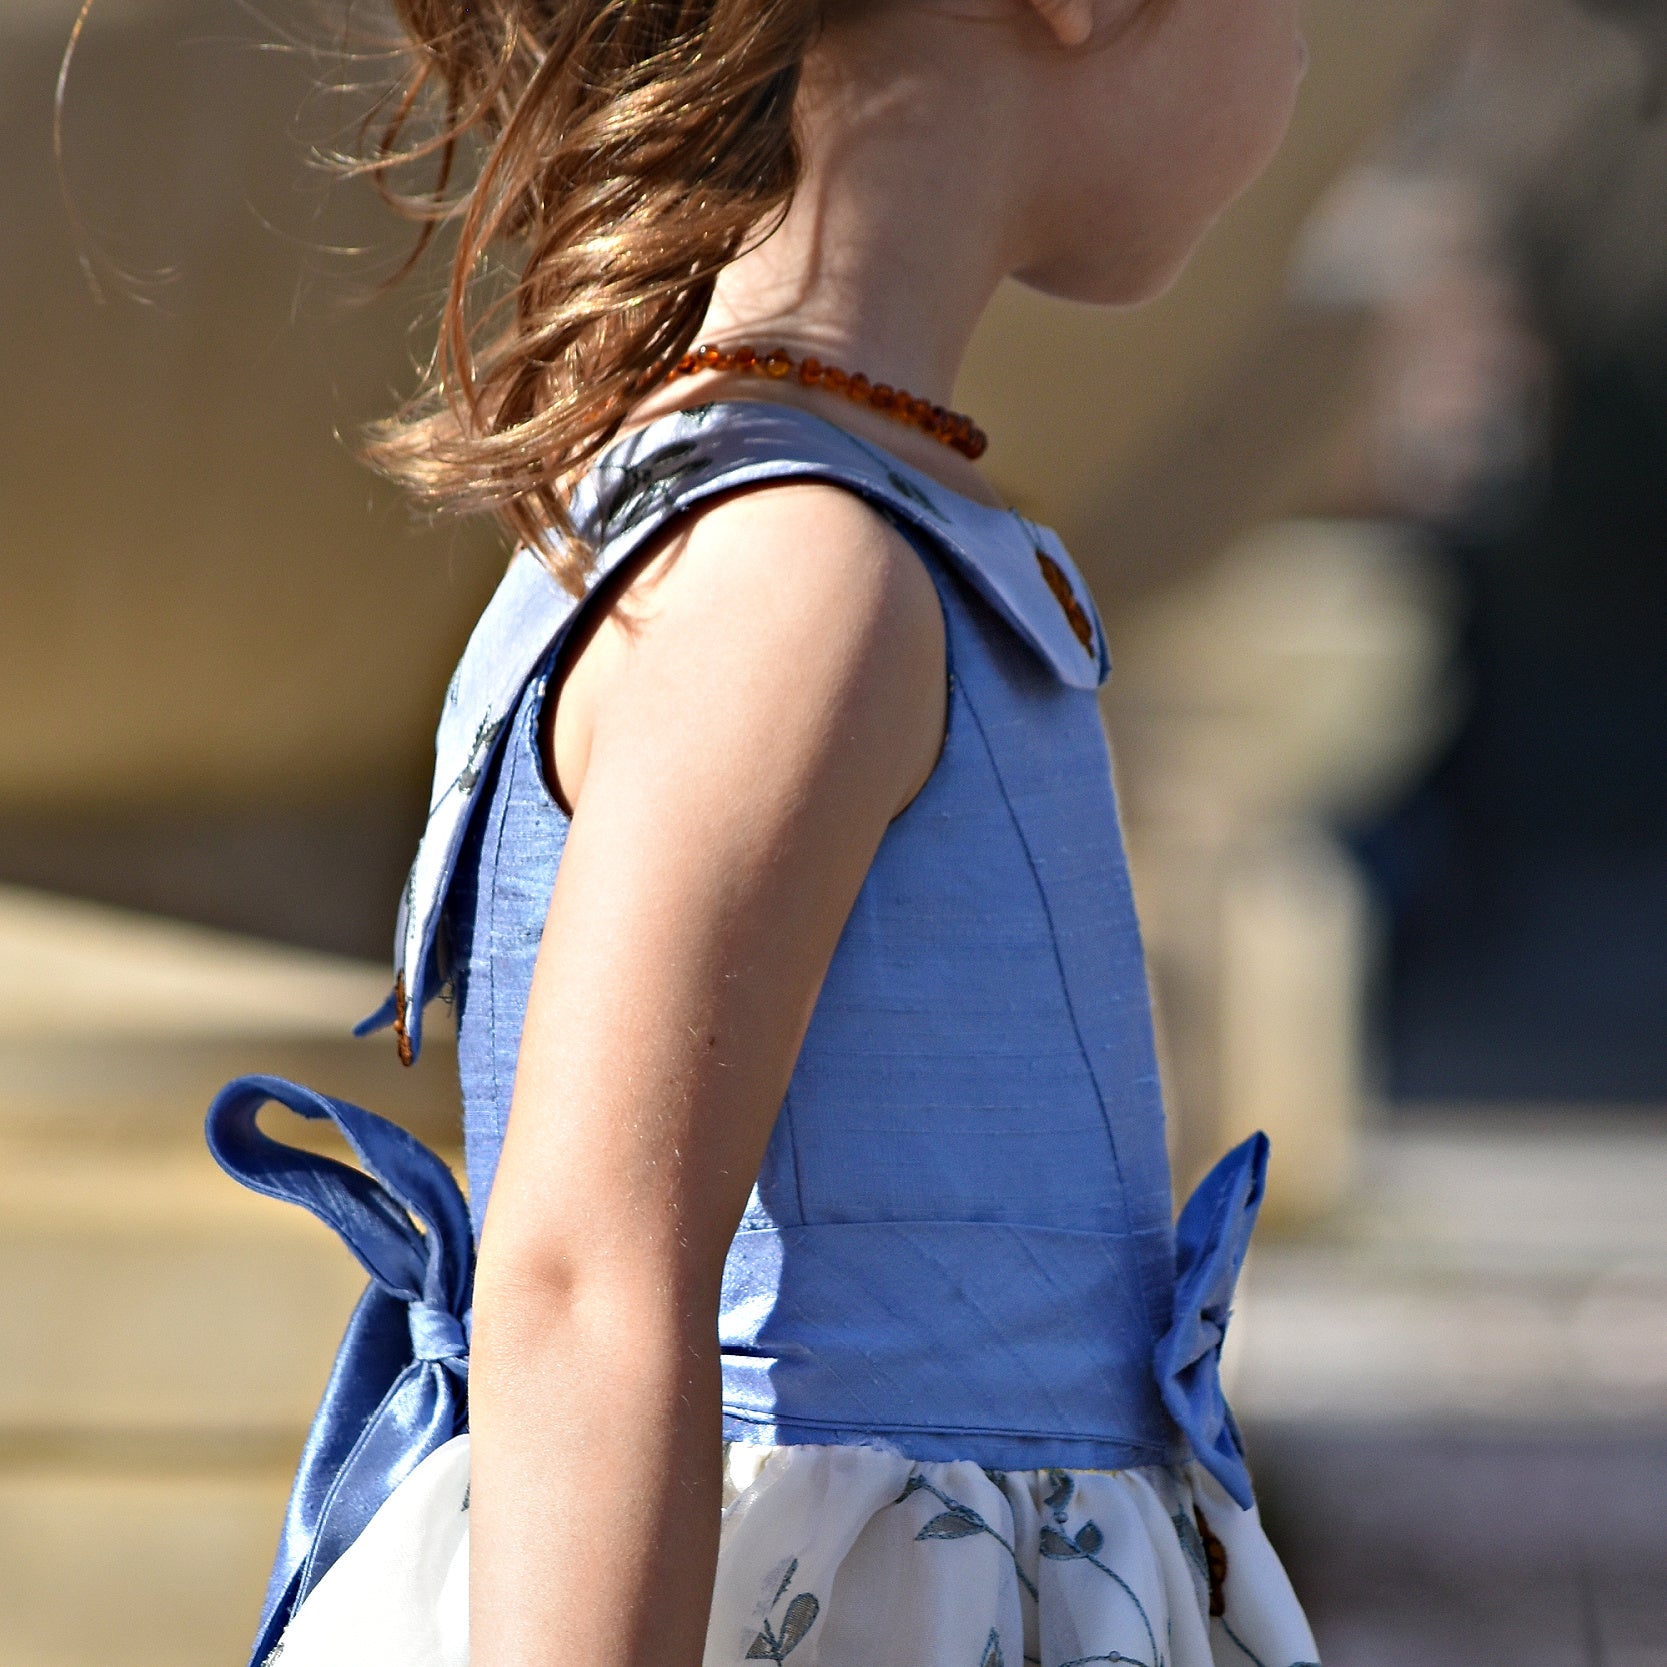
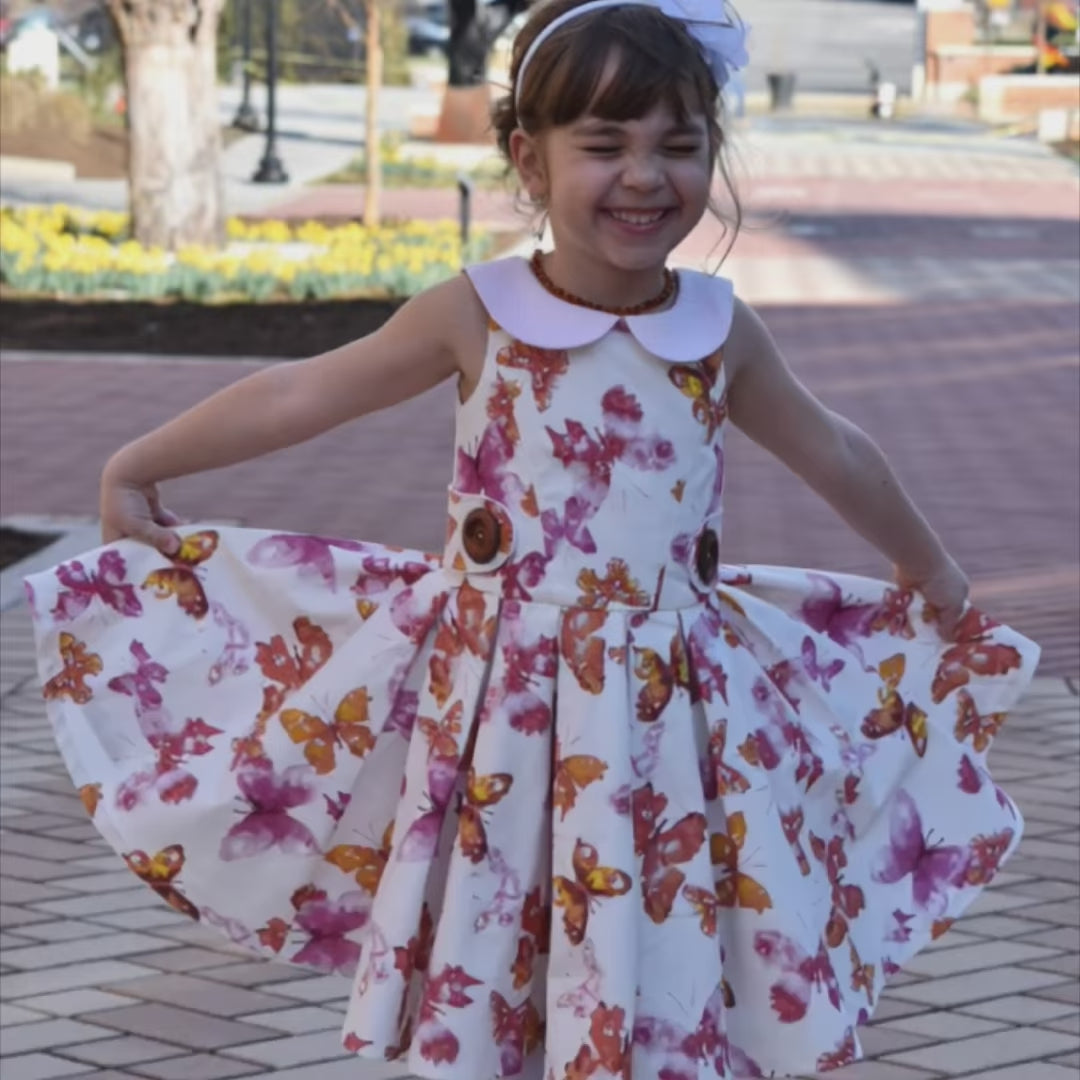
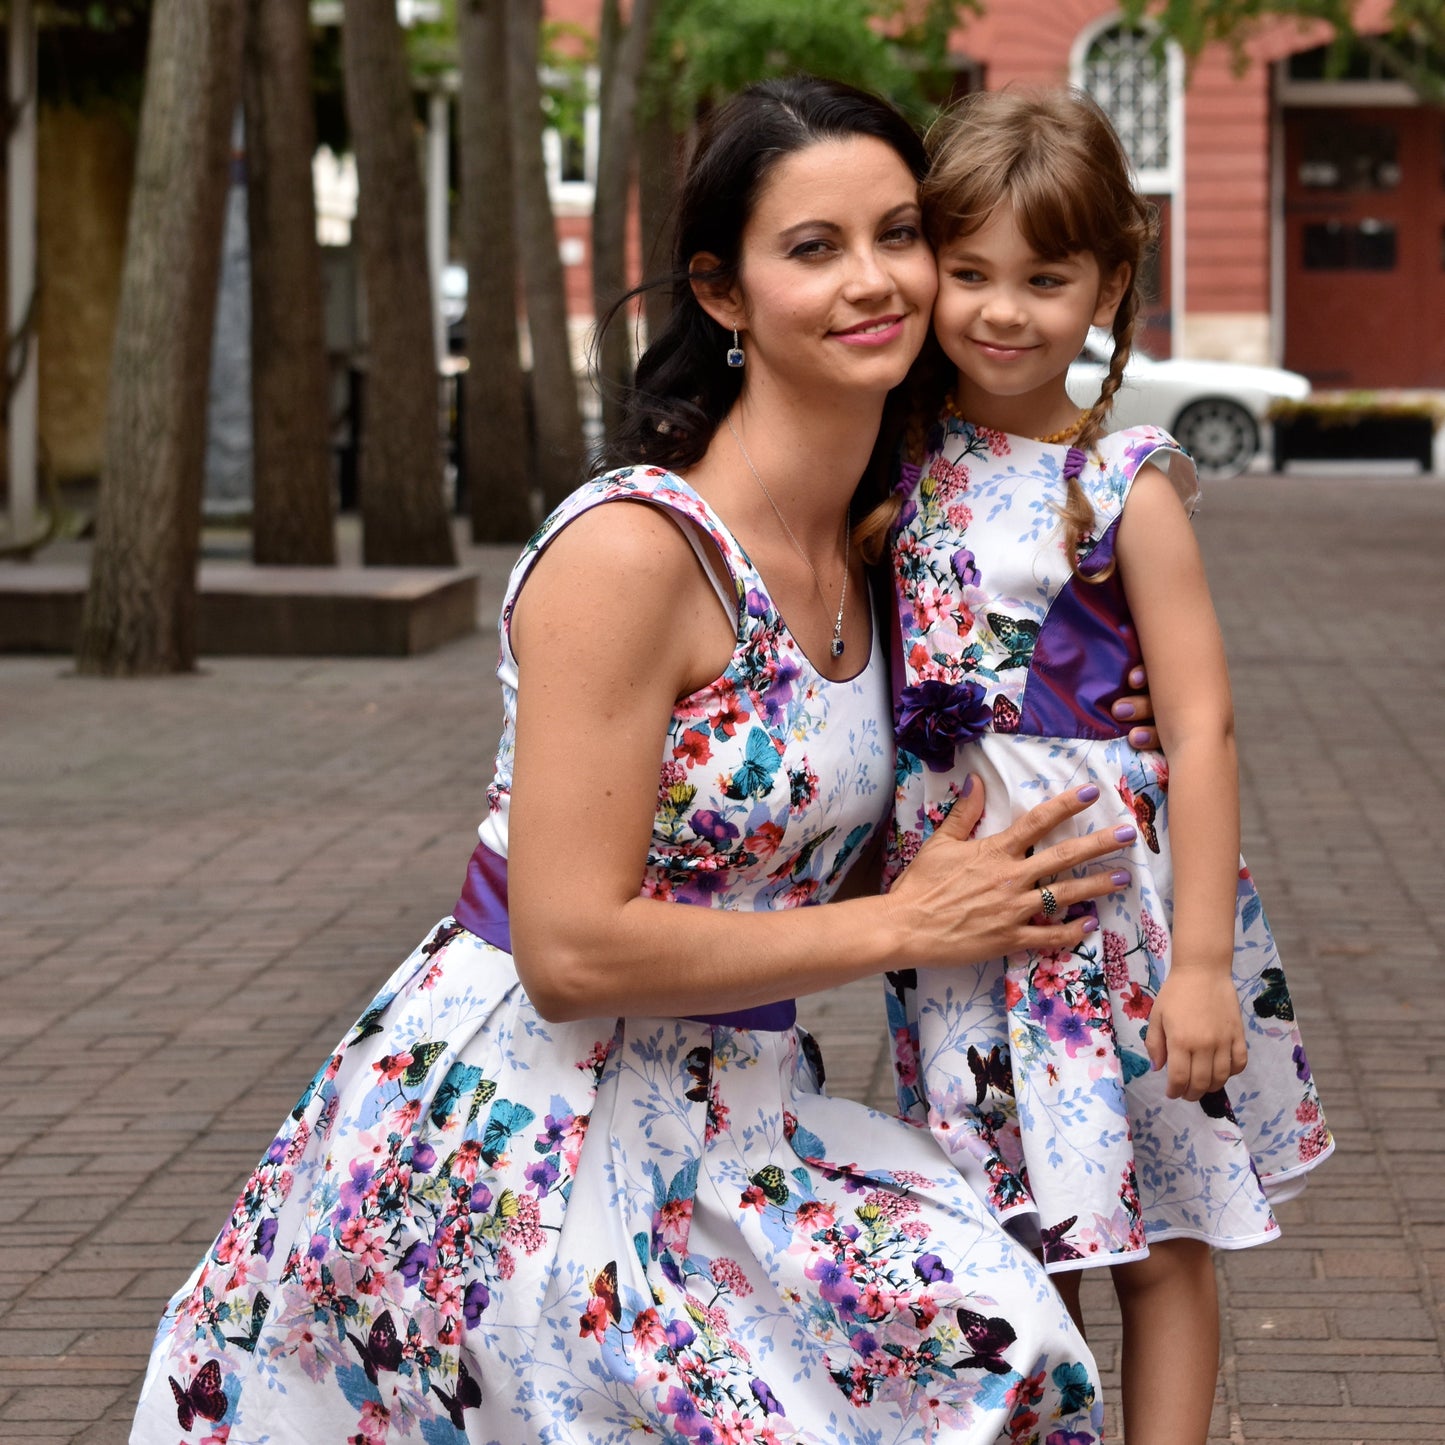
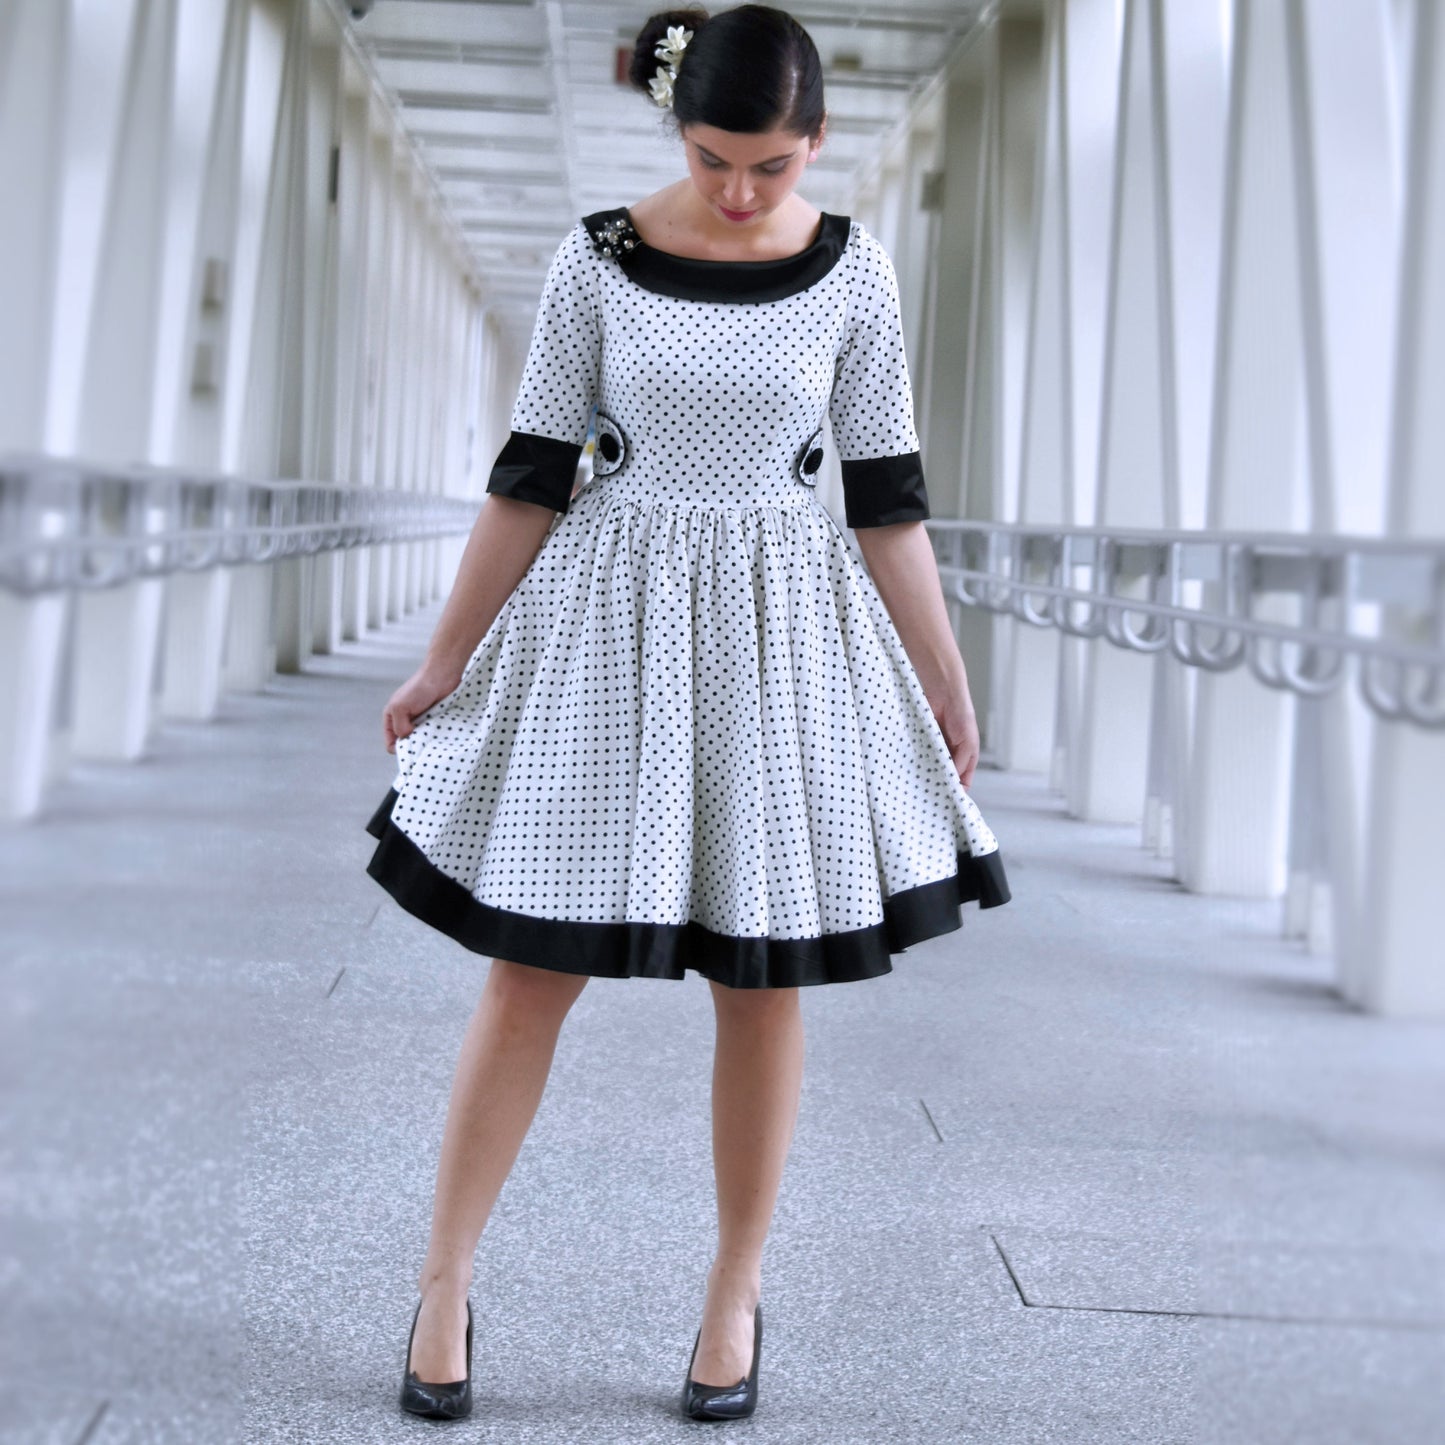
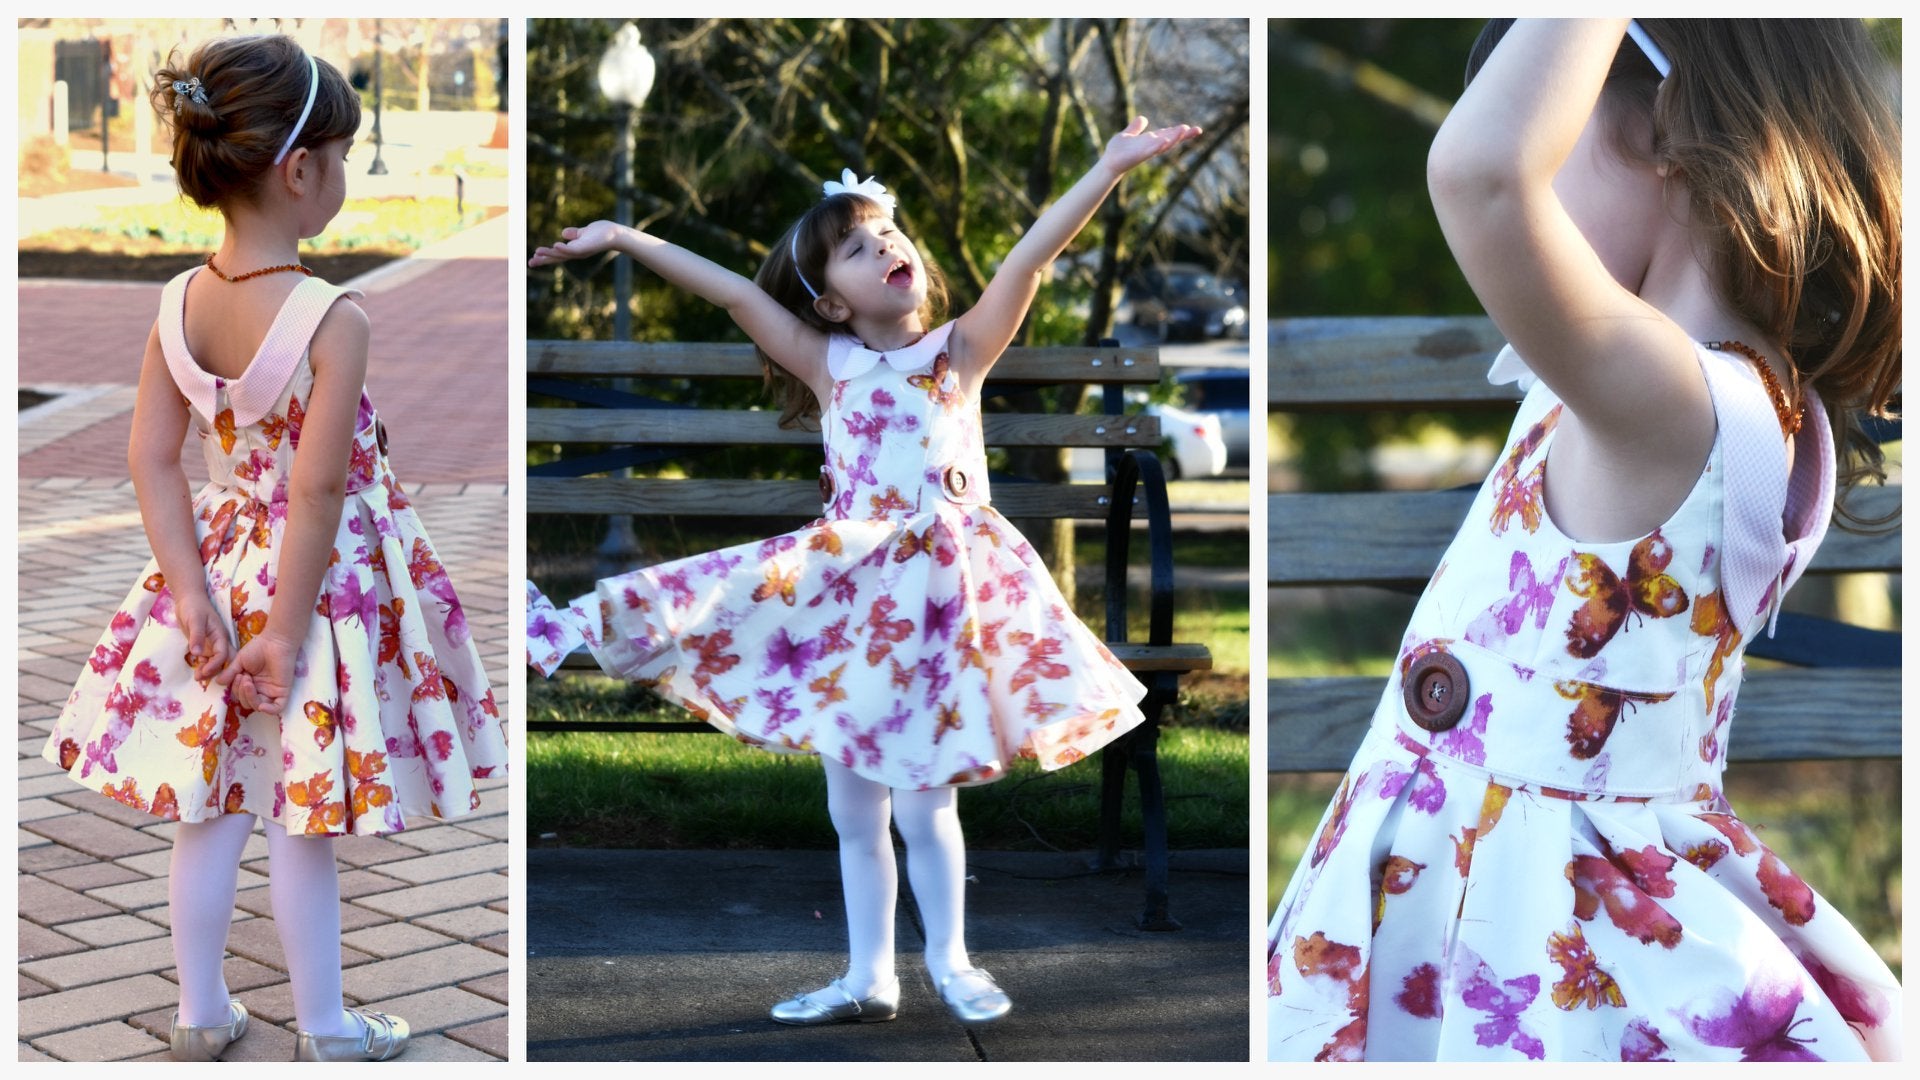
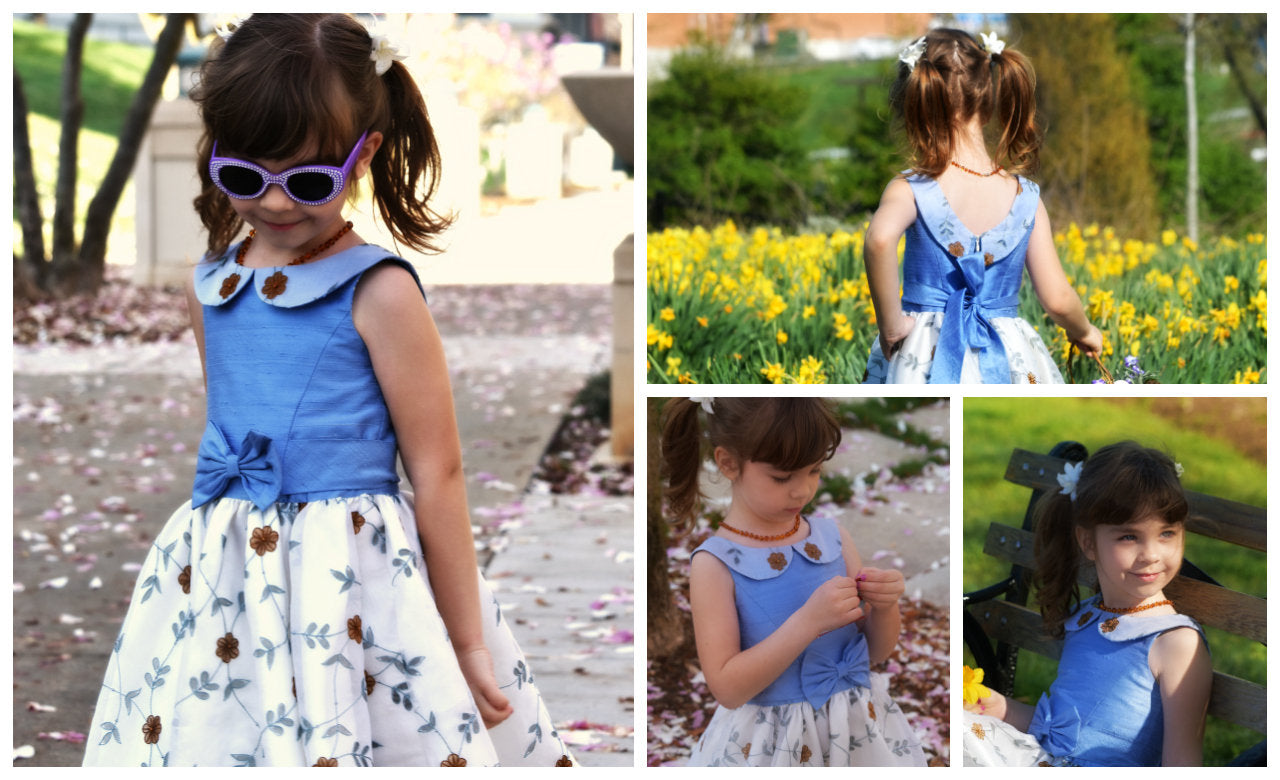
Vivienne is a beautifully drafted dress pattern. Designed with elegant princess seams and refined shaping, the Vivienne pattern offers both sleeveless, ¾ length sleeve and short sleeve options, giving you flexibility for any season or event.
You can choose from a graceful circle skirt, a playful skater dress, or a full twirl skirt for maximum movement. The silhouette is especially flattering for teens, making it a wonderful choice for formal events like graduation or prom.
Marina’s video tutorials cover every aspect of sewing this unforgettable dress. Just scroll down and start watching. Vivienne will adapt beautifully to your vision — for unforgettable special‑occasion makes.
Pattern Download Includes
Pattern Download Includes
- Instant Download
- DIN A4 & US Letter Size
- Individual PDF files for every Size
- All Sizes included
- Detailed eBook
- Video Tutorials
Design Options
Design Options
TEEN:
- Low cut round-neck
- Low scooped back
- Sleeves: 3/4 length long sleeves, cap sleeve, puff sleeves
- Skirt Options: Gathered straight skirt, pleated skirt, circle skirt, gathered circle skirt
GIRLS:
- Waist measurement: 25 - 29 inches,
- Bust measurement: 30 - 38 inches
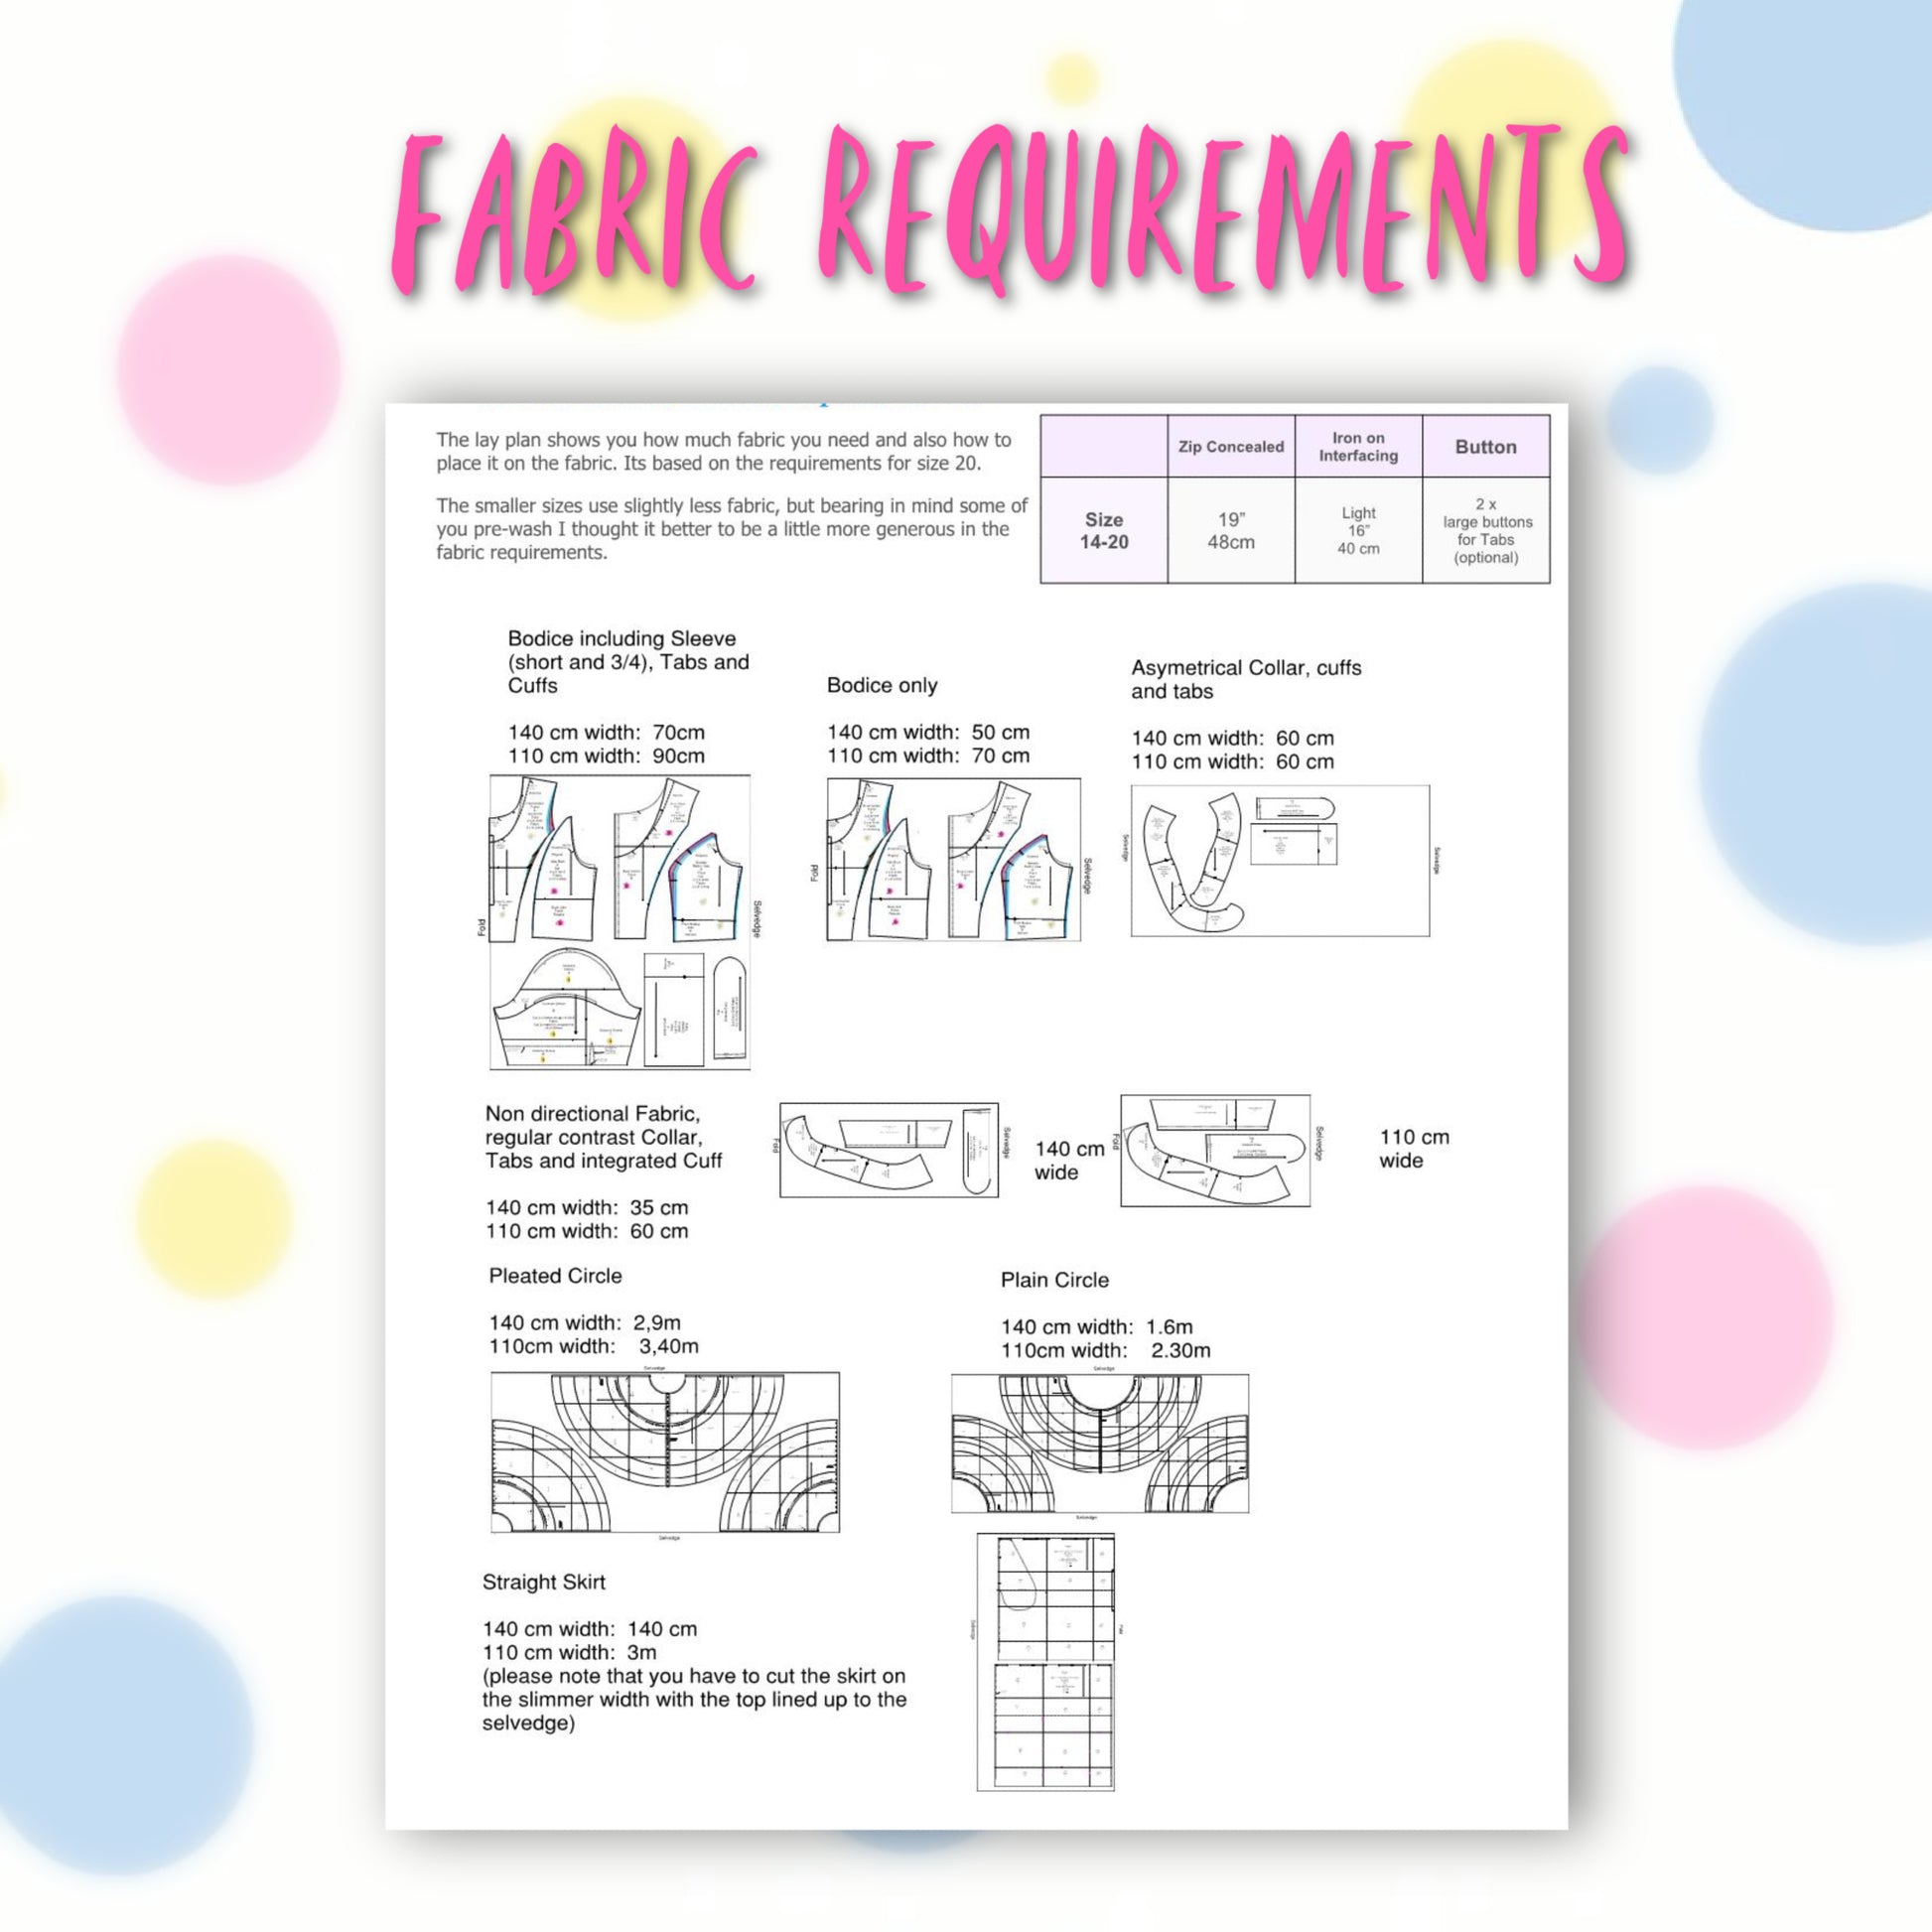
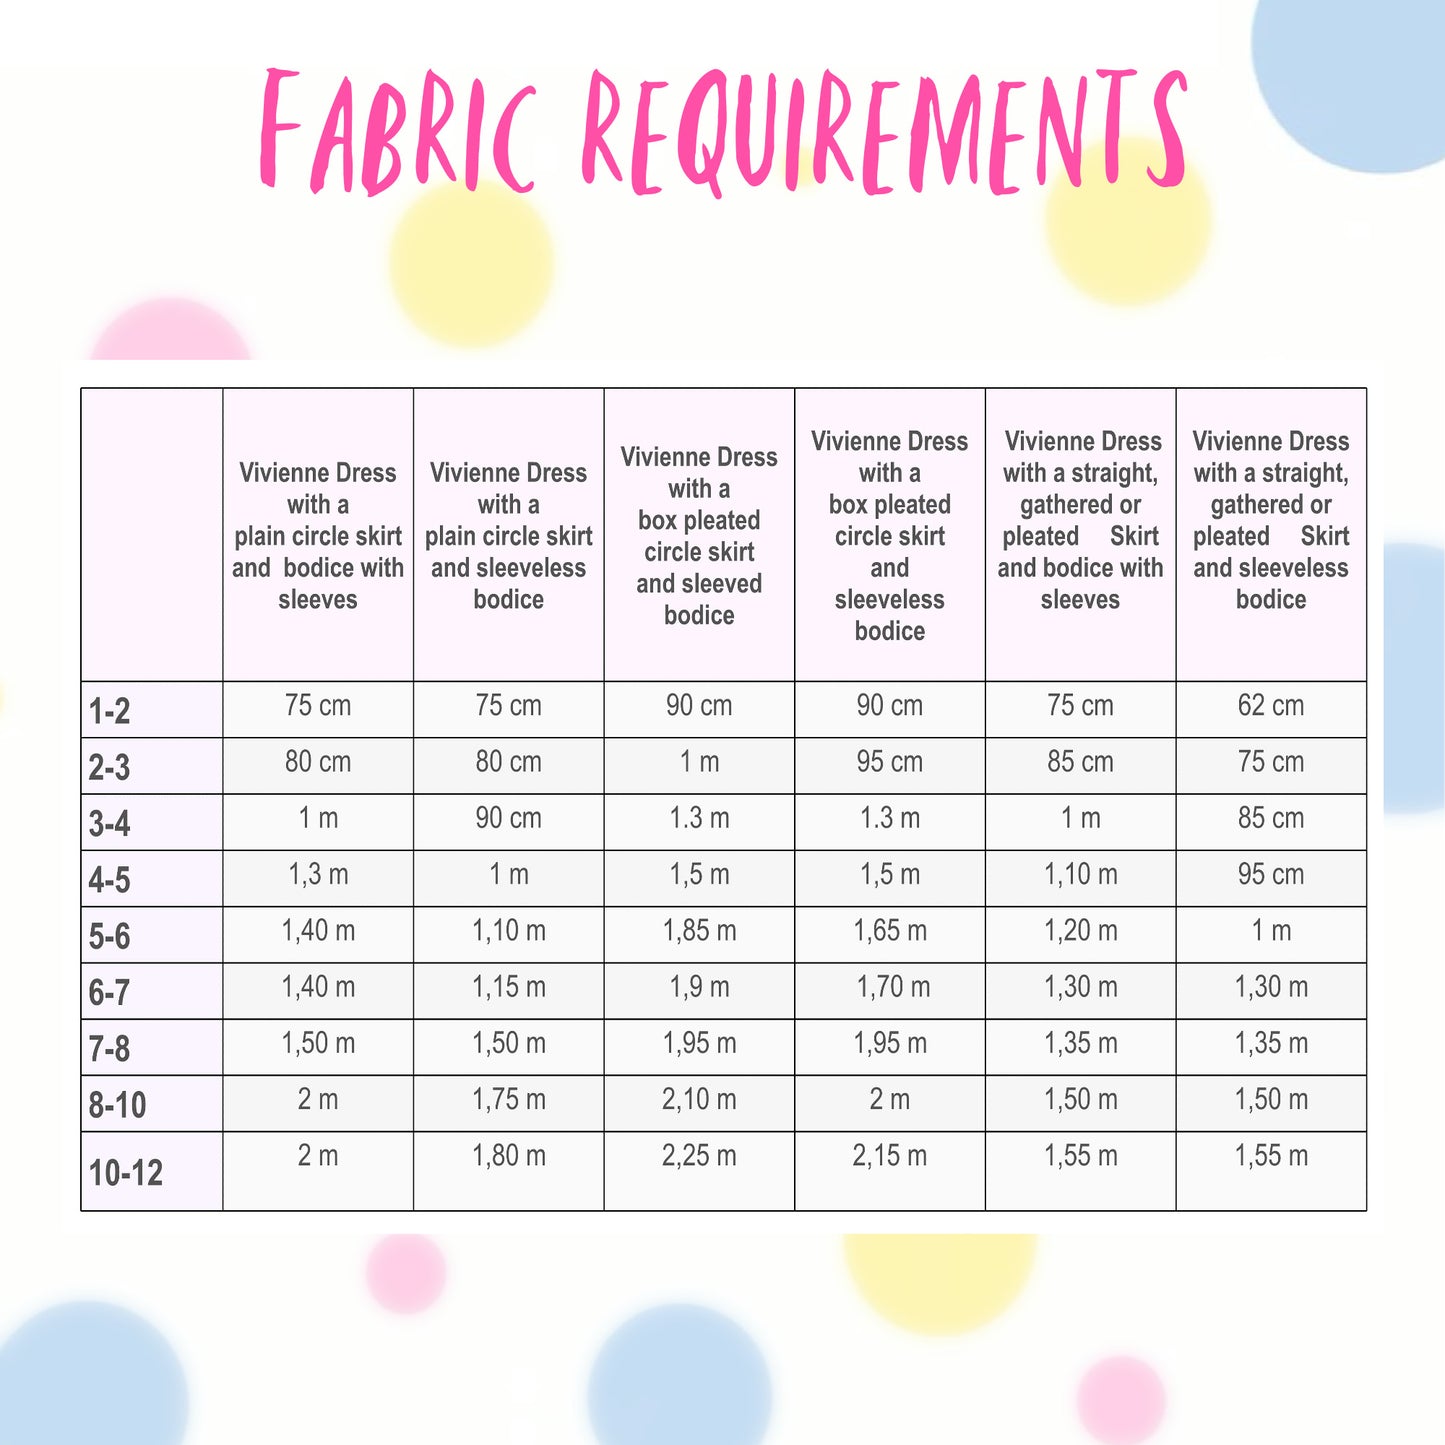
Fabric Requirements
Fabric Requirements
TEEN:
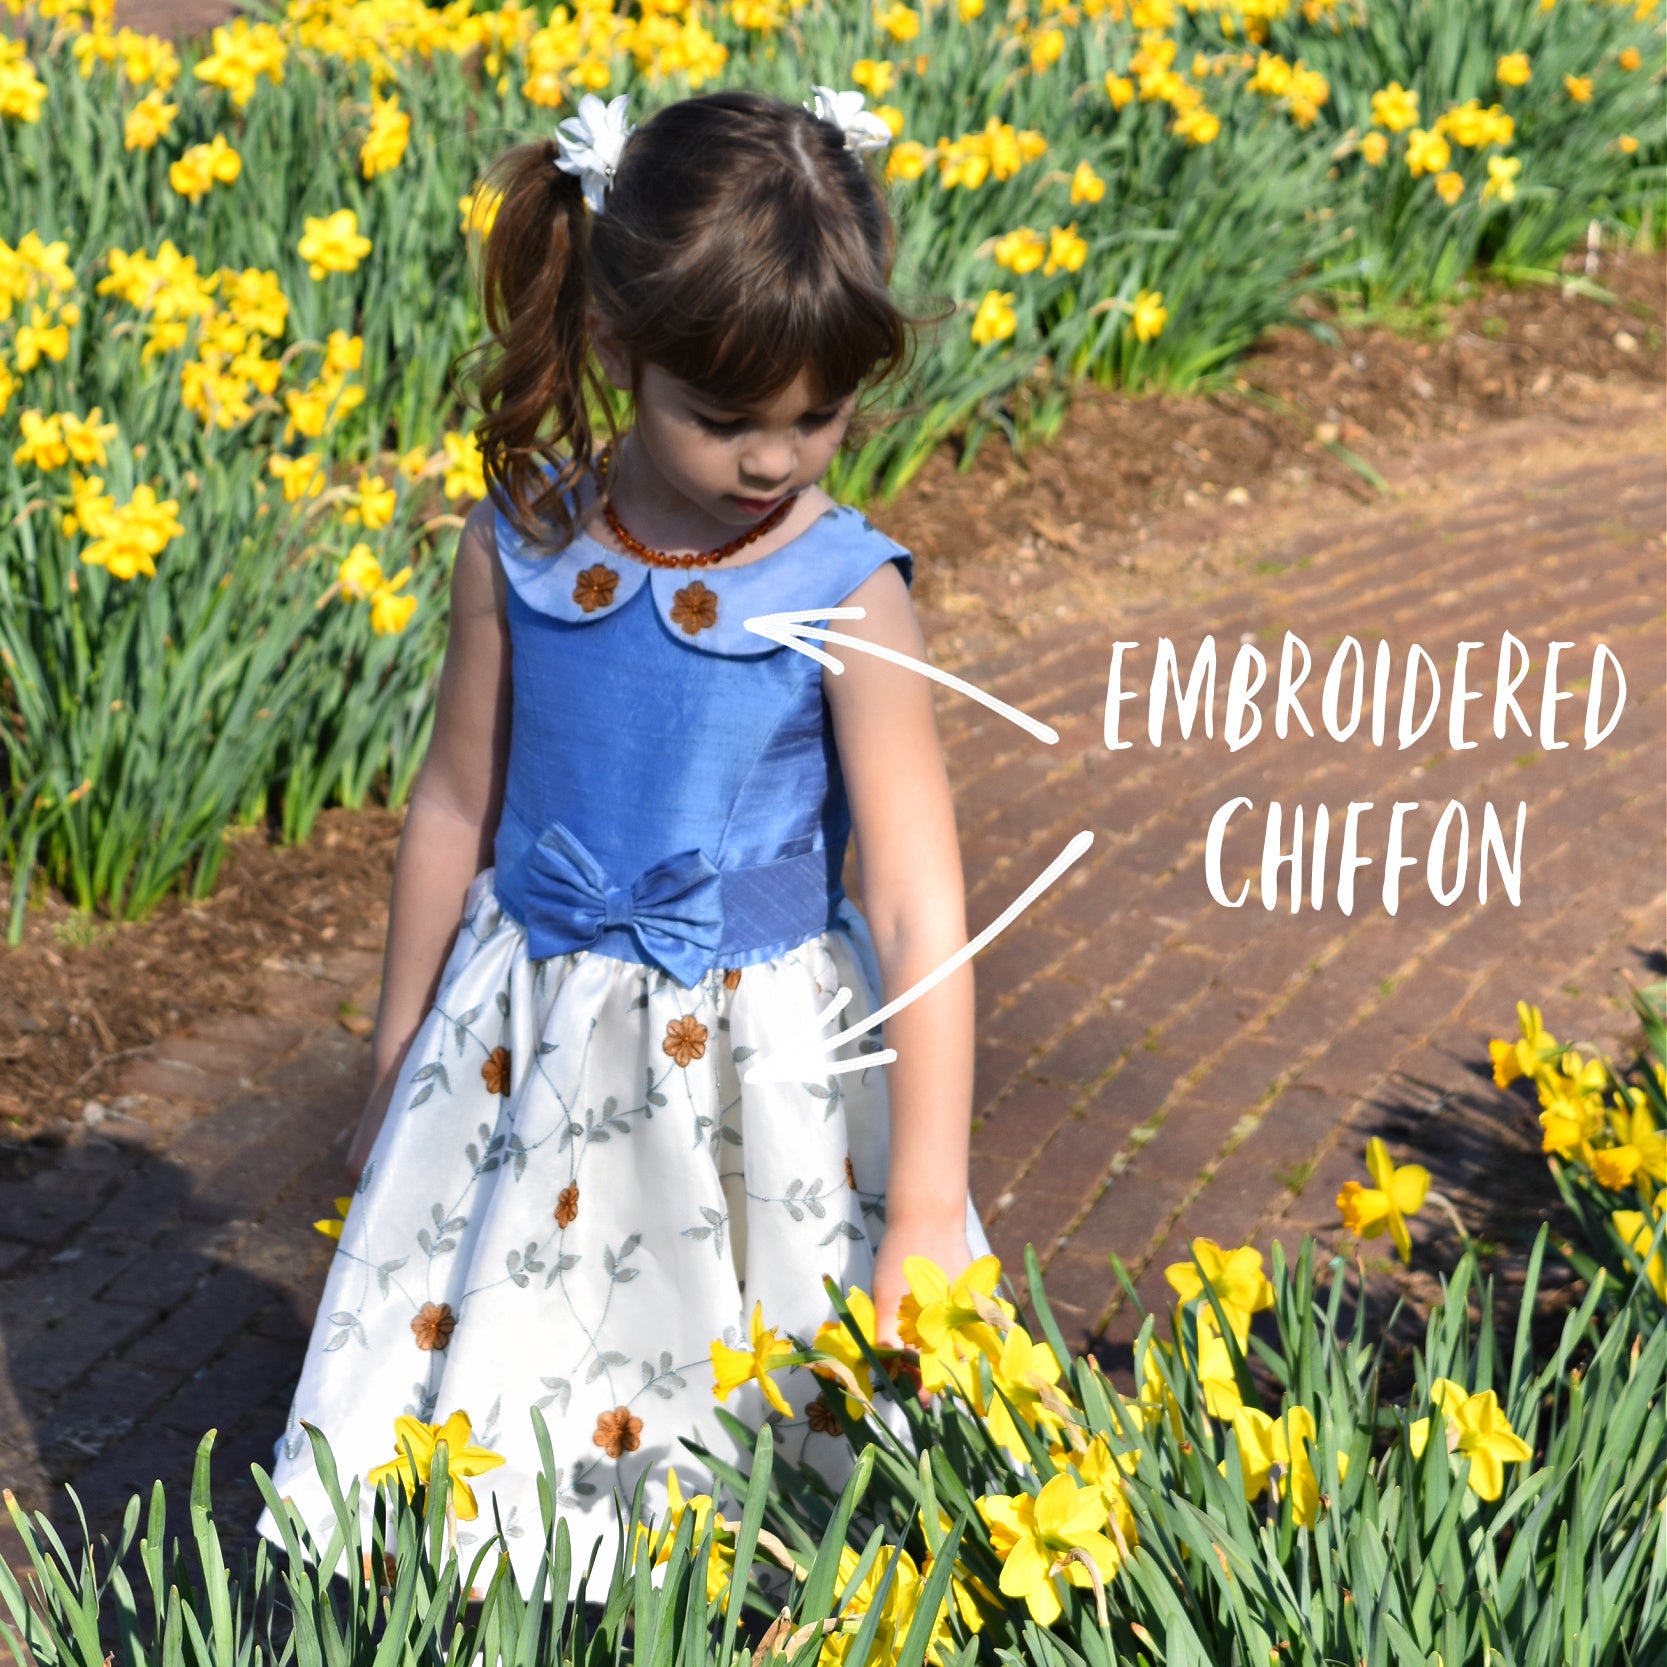
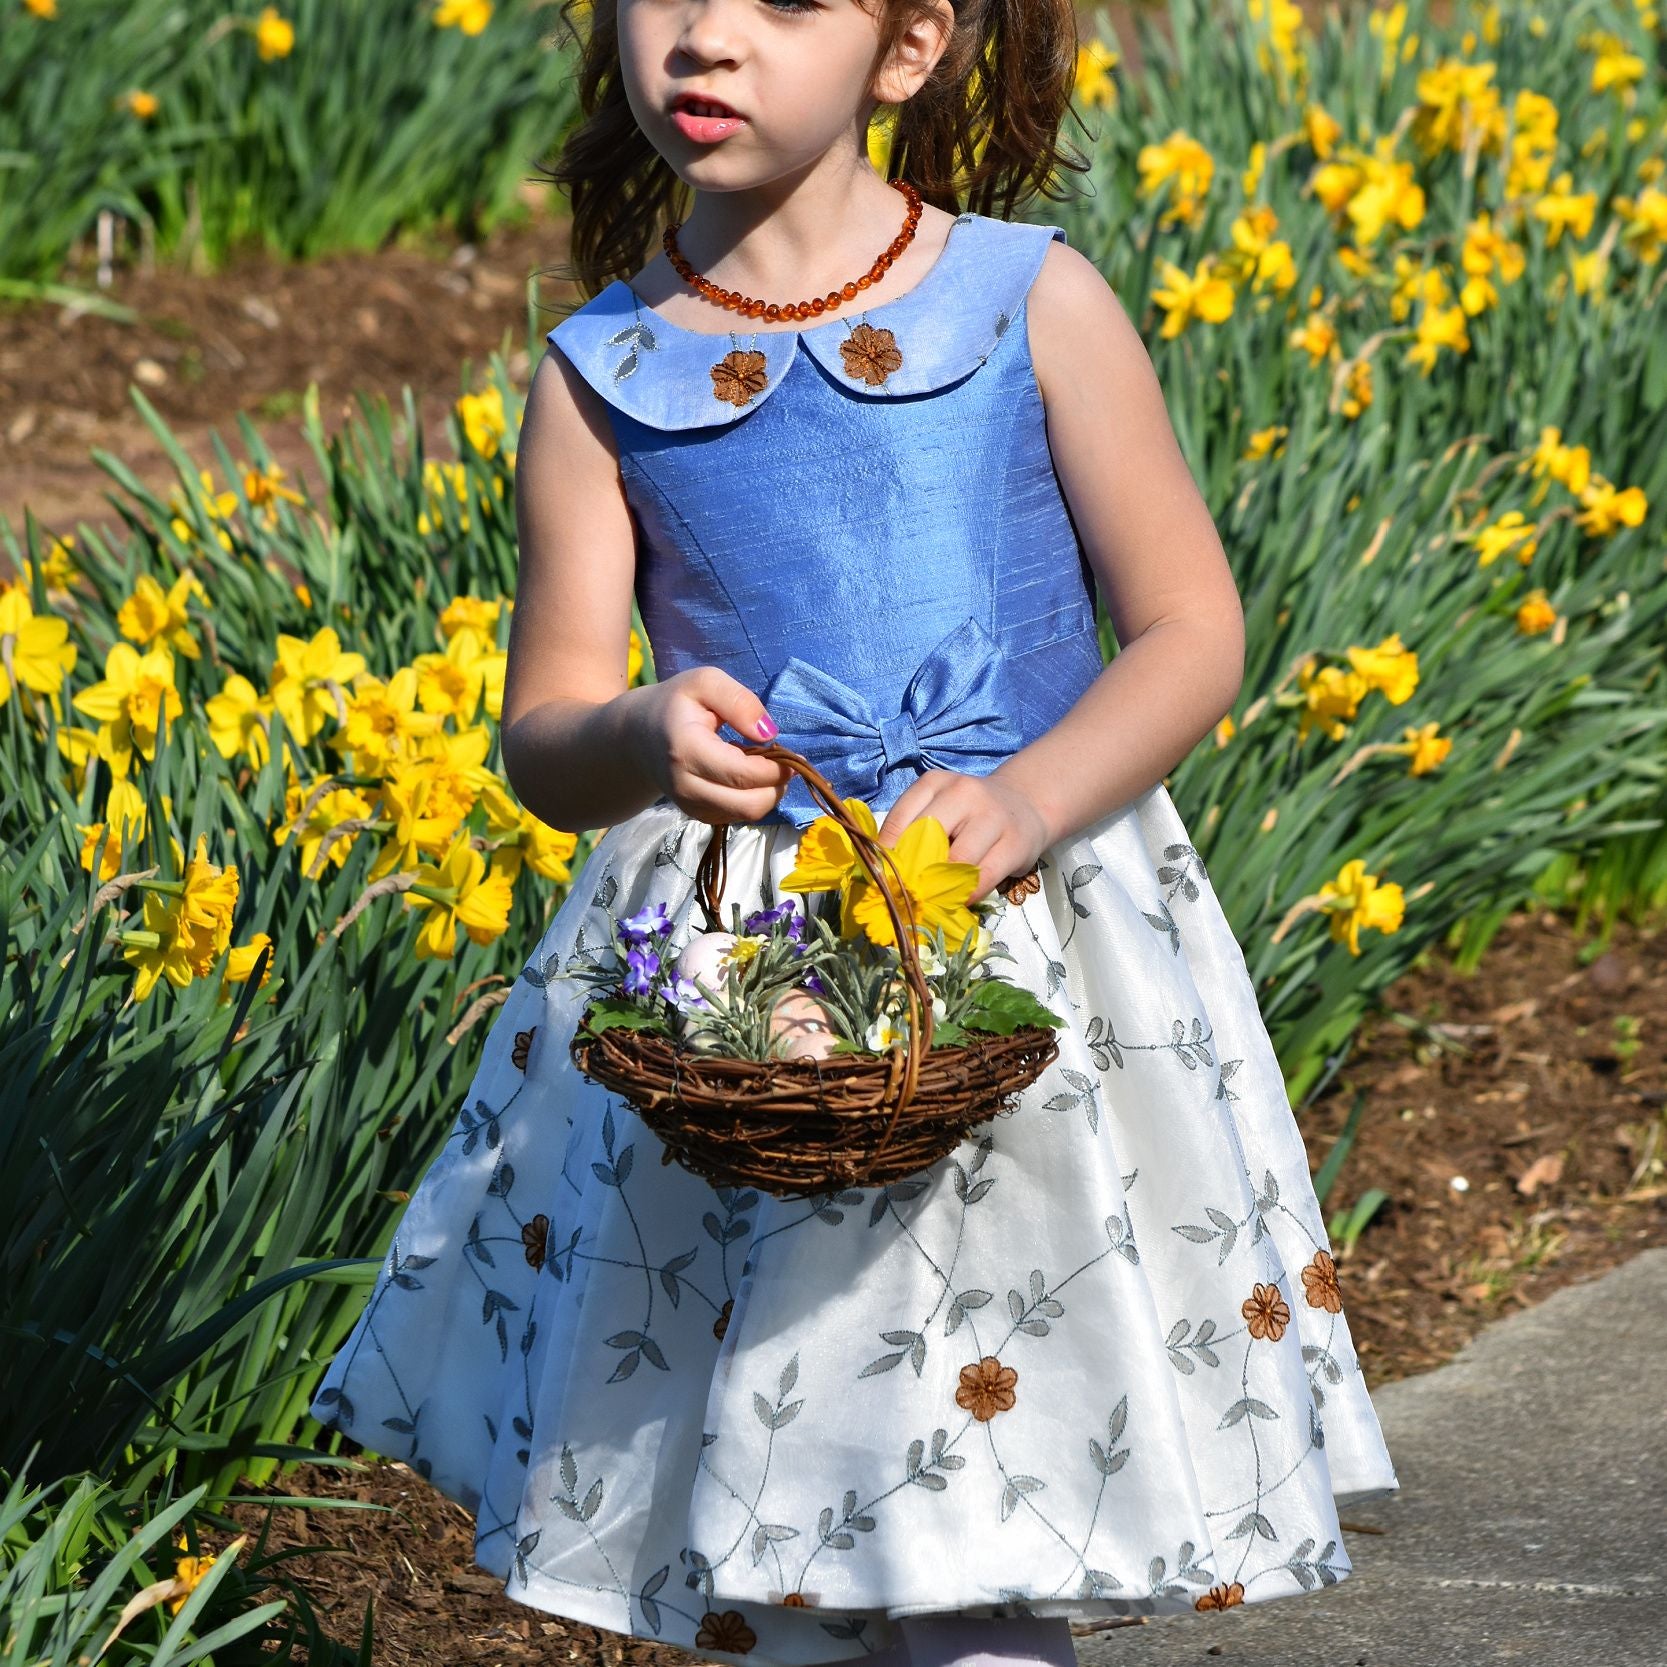
If you are making this dress for a special occasion, choose a gorgeous silk dupioni. For a summer dress, choose a woven fabric in cotton or linen. My favorite is a cotton sateen with Lycra. Its comfortable and easy to work with.
FABRIC REQUIREMENT
- Shell & lining: 2.50-4 yards (2,3-3,7 m)
NOTIONS
- Concealed zip: 19 inches (48cm)
- Iron on interfacing (H180): 16 inches (40cm)
- Large buttons for tabs: 2 x (optional)
- Matching thread: 2 reels
GIRLS:
Available Sizes
Available Sizes
Vivienne Teen:
This pattern is for teens age 14 - 18 /XS,S,M,L
To make sure it's the perfect fit, this fitted bodice pattern lets you choose the bust size in every size. So effectively you choose the waist size and then have 8 bust size options.
Vivienne Girls:
Please Read
Please Read
- This is a digital pattern or PDF file, not a physical product. It will be delivered electronically via a download link delivered to the email used for the purchase.
- To ensure the pattern prints at its actual size, it's recommended that you use Adobe Acrobat Reader.
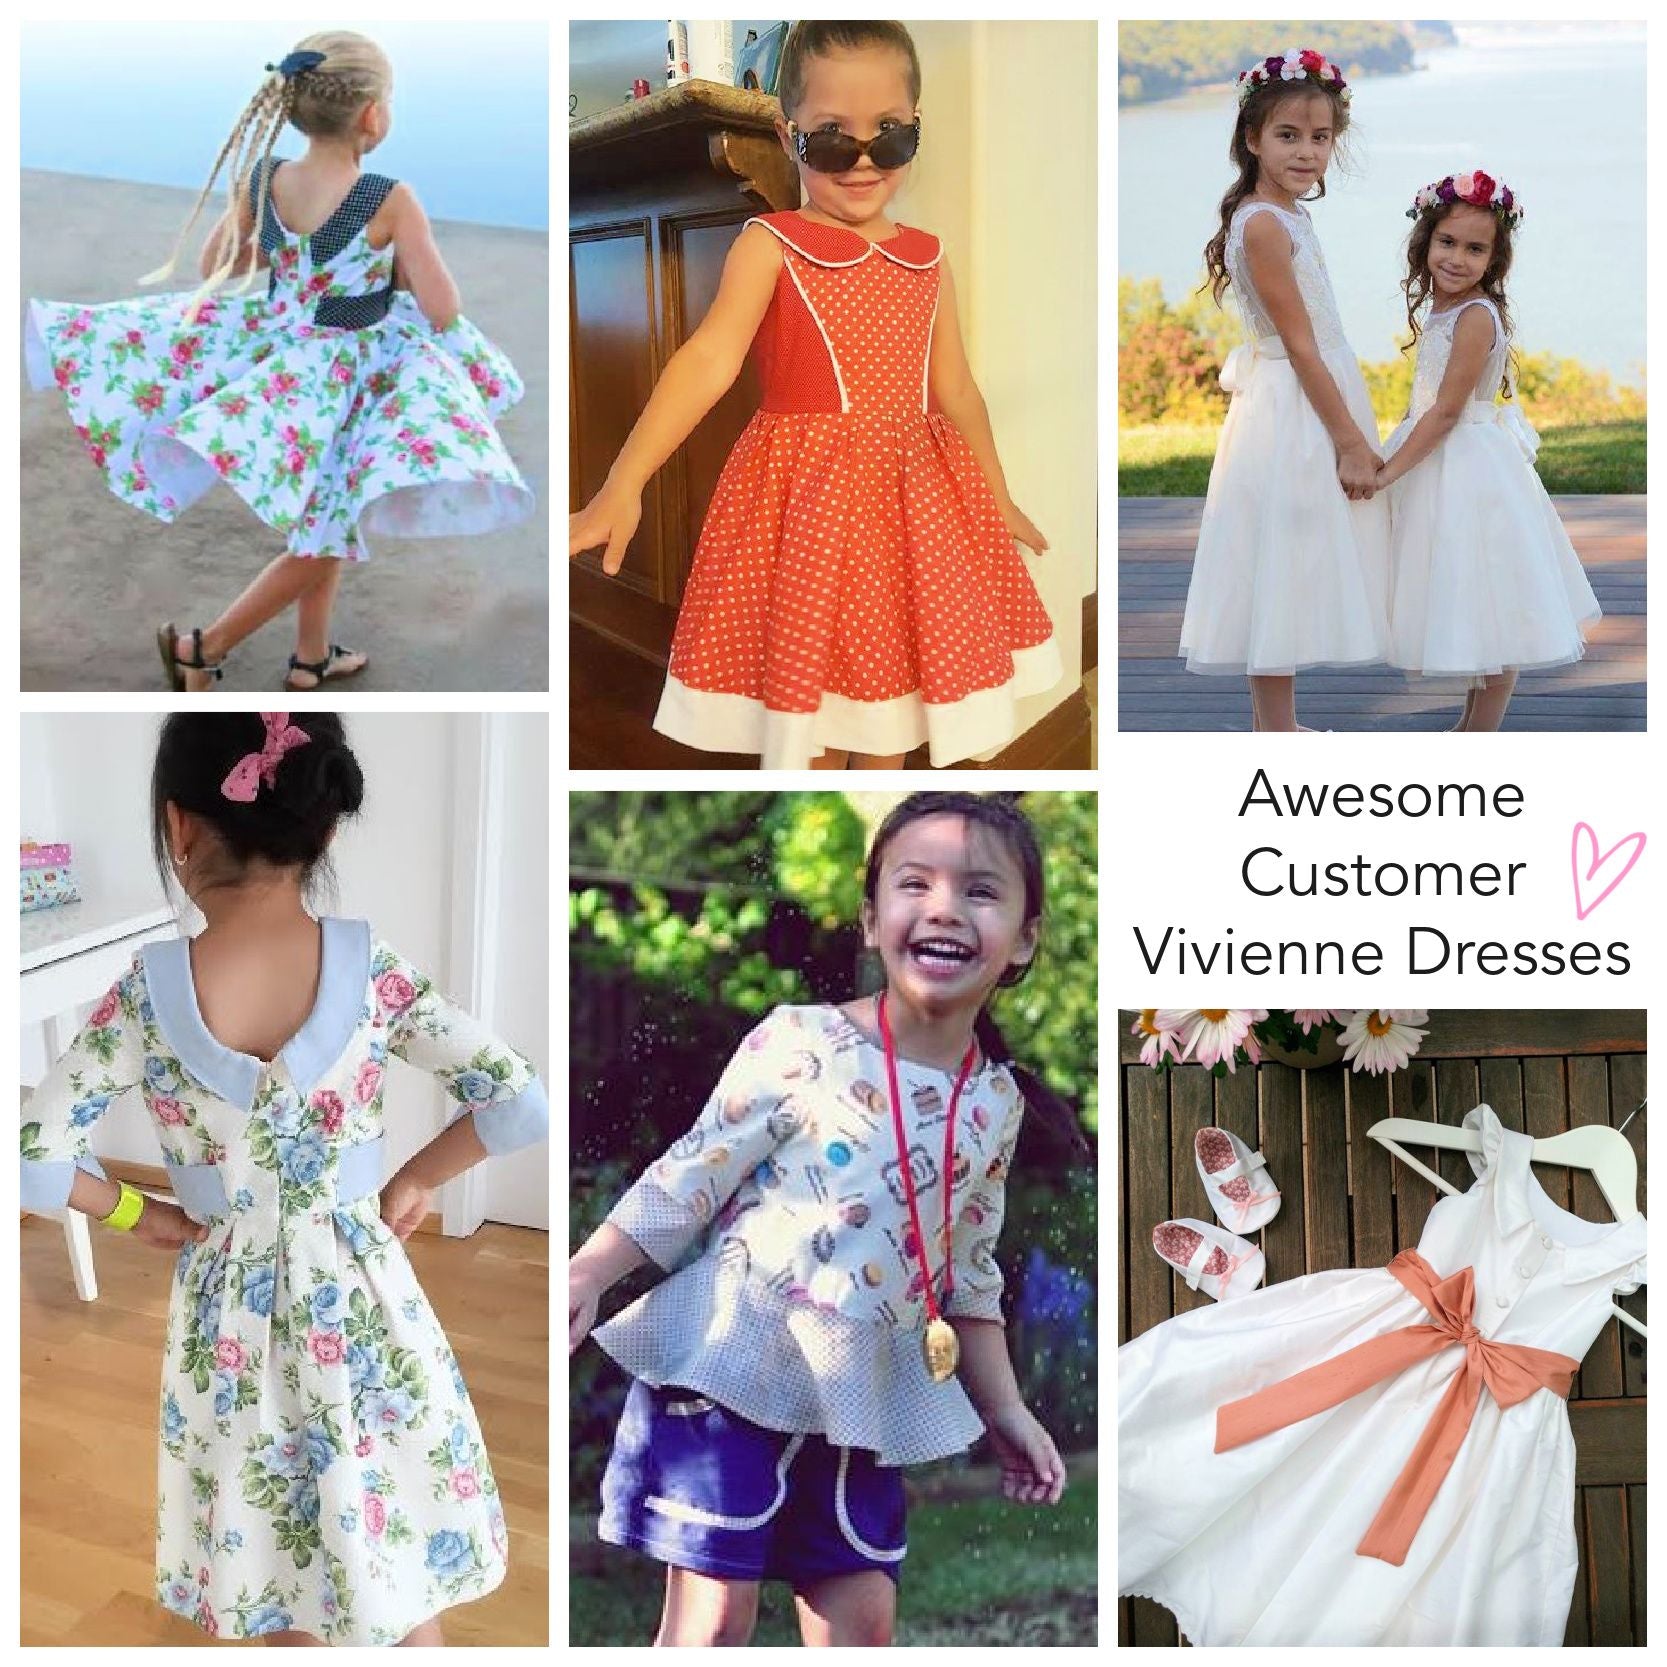
- The pattern creator, Frocks & Frolics, welcomes small-scale production using their patterns.
Customers are encouraged to tag Frocks & Frolics when sharing projects made using their patterns on social media.
@frocksandfrolics #frocksandfrolics
Share


STEP-BY-STEP VIDEO TUTORIALS
VIDEO TEXT
Introducing the “Vivienne” Dress Pattern
Transcript for the video: Vivienne Girl - Introduction to the Project
Hi everyone and welcome to my new dress design. It is called the Vivienne and it is sized from 2 to 12 years old. When you look at your pattern pieces, you will notice that sizes from 2 to 8 all look the same, and then sizes from 8 to 12 also share the same structure.
Pattern Overview: Bodice Construction
At the back, you will find one center back panel and two side panels. One side panel is for the sleeved version and the other is for the sleeveless version.
The front is exactly the same, with matching options. For both versions, there is a front lining and back lining as one-piece linings, which makes construction much easier.
However, from size 8 to 12, you can no longer use one-piece linings due to shaping, so the pattern is separated into additional pieces.
For the sleeved version, you will have:
- Center back panels
- Side panels
For the sleeveless version, you also have:
- Center back panels
- Center front panels
The most important thing is to make sure you match the correct pieces when cutting.
Identifying the Correct Version
Everything is clearly marked in your pattern pack. I have also added a visual marker so you can immediately see whether you are working on the sleeved or sleeveless version.
If you are making the sleeved version, cut all bodice pieces marked for sleeves. If you are making the sleeveless version, use the pieces marked with the sleeveless diagram.
Skirt Options Overview
You have several skirt options included in the pattern:
You can choose a straight skirt, either:
- Completed fitted skirt
- Gathered version (not overly wide)
If you want a more dramatic pleated skirt, you can scale it up. However, box pleats are already calculated for each size, almost down to the centimeter, so you can simply cut and sew.
You can also choose:
- Gathered skirt
- Circle skirt
- Box pleat circle skirt
The box pleat circle skirt gives good volume while keeping the waist area flat, which creates a very balanced shape.
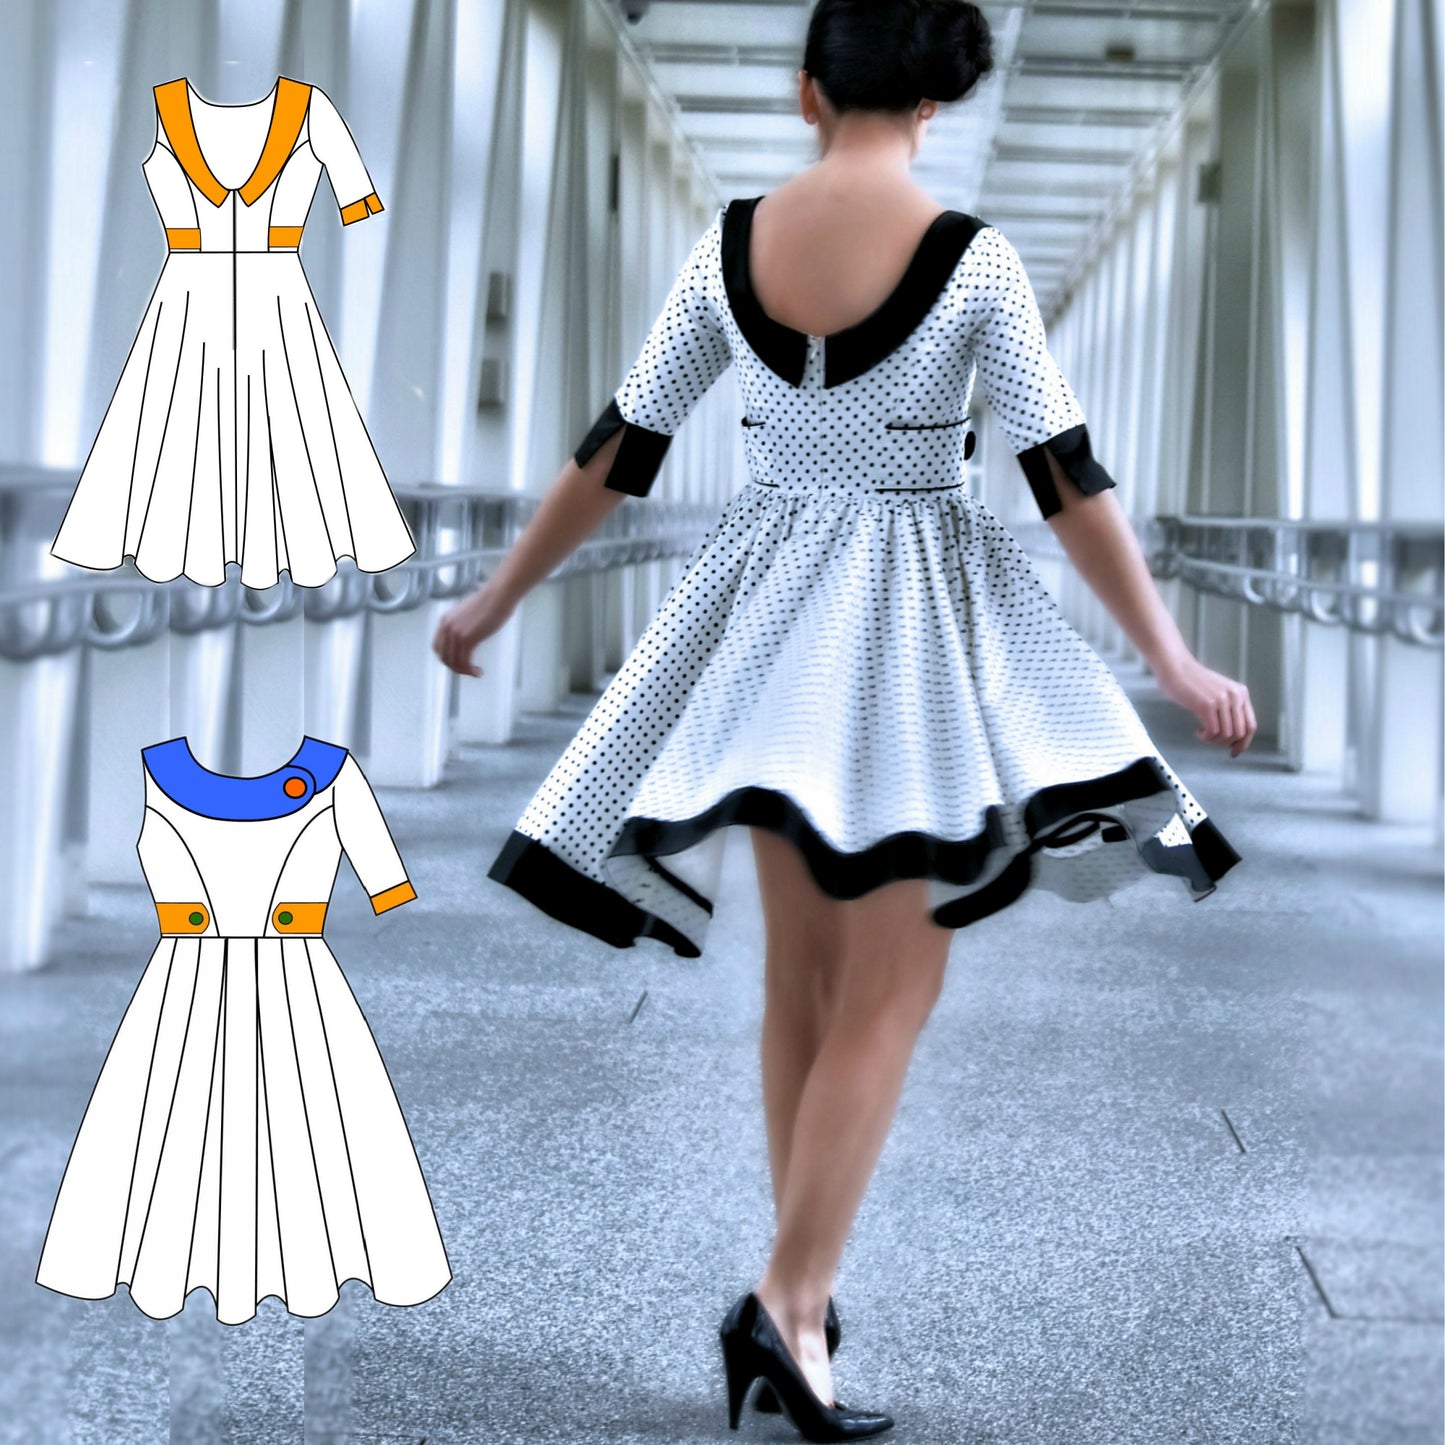
Additional Design Features
The dress can also include:
- Collar
- Cuffs
- Side tabs (optional)
You can choose whether to include the tabs or leave them out. A diagram is included in the pattern to guide you.
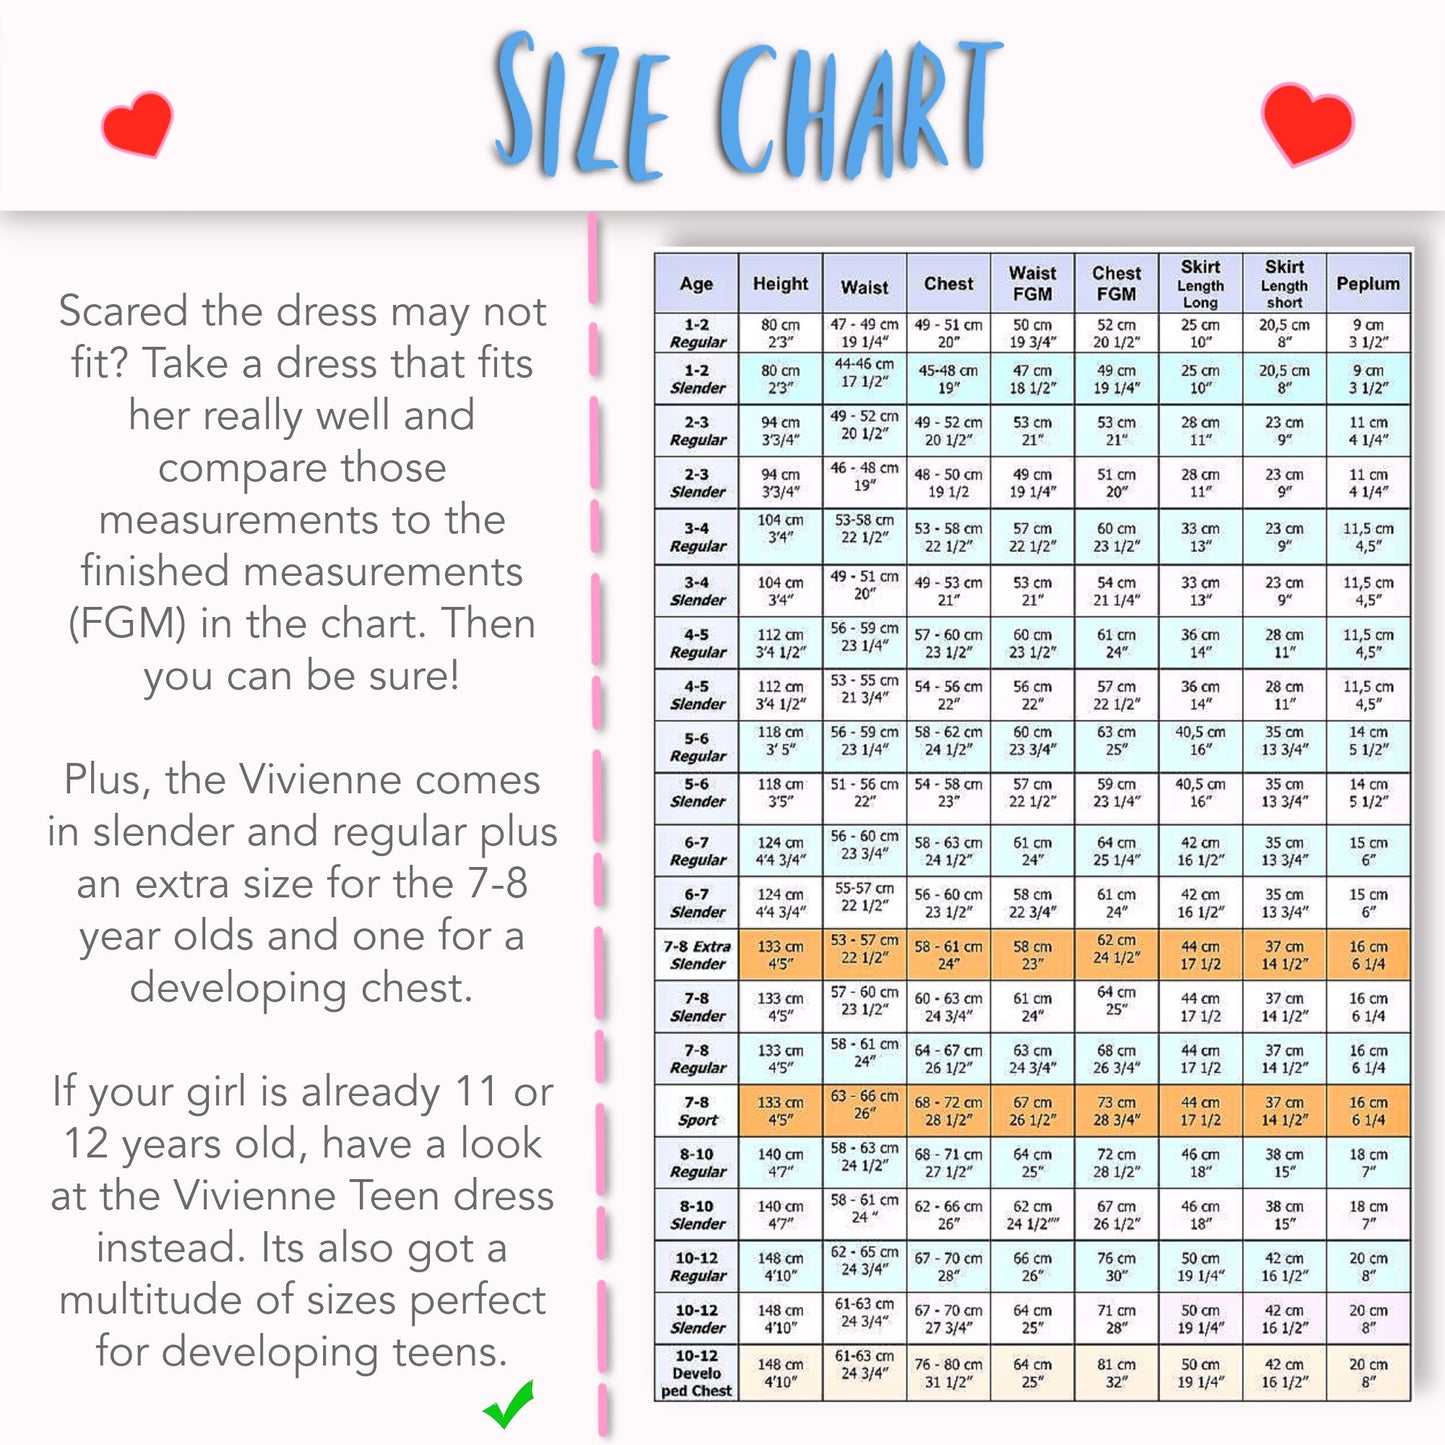
Sizing System Explained
Originally, I planned for 10 sizes, but I ended up creating 20 sizes. During testing, we found that standard sizing did not fit children consistently, so additional sizing categories were added.
Now the pattern includes:
- Slim fit
- Regular fit
- Sport fit (wider fit category)
For ages 7 to 8, there are four variations due to large differences in body shapes:
- Extra slender
- Slender
- Regular
- Sport
This ensures a much better fit without needing to size up incorrectly.
The most important rule when choosing a size is to go by height first.
Sleeve and Cuff Details
The sleeve pattern includes a small marking at the back where the cuff is attached. The cuff is cut on the fold and comes in two parts for most sizes, which are then taped together.
When attached, this creates a small opening at the back of the arm, which is a lovely design detail.
Collar Design
The collar sits high at the front and has a soft curved shape at the back. The curve is adjusted depending on age:
- Smaller sizes have a subtler curve
- Larger sizes have a deeper curve
This keeps the design age-appropriate and balanced.
Tab Placement Adjustment
Originally, I suggested placing the tab on the center back piece. However, I found that this caused confusion during construction.
It is now easier to place the tab on the side panel instead. This makes the alignment clearer and ensures it sits straight. It should end exactly where the panel ends, and you can finish it with a small button at the top.
Skirt Cutting Instructions
For the plain circle skirt:
- Use black dots
- Available in peplum, short, and standard lengths
- Cut as a full circle (duplicate four times and assemble)
For the box pleat skirt:
- Follow alphabet markings (A, B, C, etc.) depending on size
- Use blue dots for guidance
- Fold pleats from the side toward the center
You will need:
- Two back pieces
- One front piece cut on the fold
When cutting on the fold, remember to fold away seam allowance first.
Final Skirt Variations
The final skirt version includes:
- Pink dots for back pieces
- Black dots for front pieces
- Box pleats included
- Peplum, short, and regular lengths
If you want a fuller skirt, you can simply extend the width before cutting.
Closing Notes
This pattern has been carefully developed and tested to ensure a great fit across a wide range of body types. I hope you really enjoy making the Vivienne dress.
Please join our Facebook group, share your finished makes, and post pictures. I would love to see what you create.
Thank you so much for watching.
Transcript for the video: Vivienne Teen - Introduction to the Project
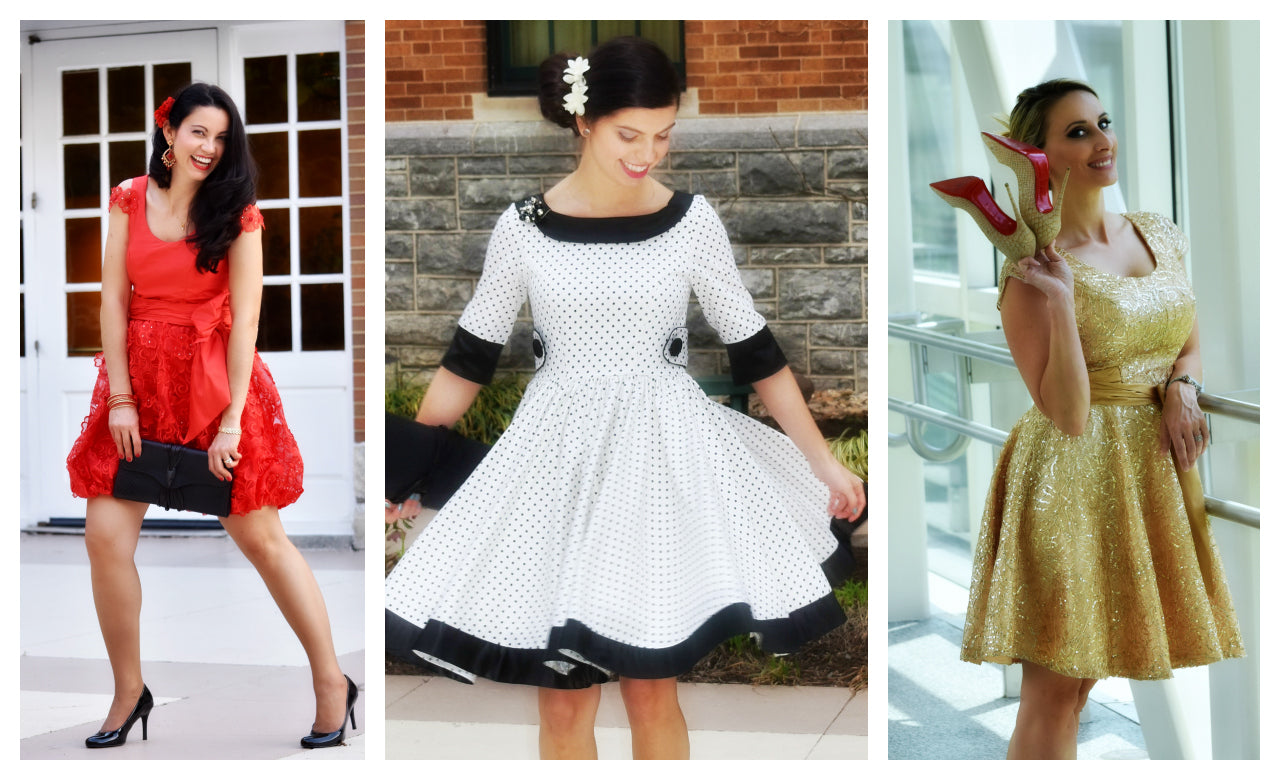
Hi everyone and welcome to the Teen Vivienne. I’ve been asked so many times if I could make this little kitty dress into a grown-up dress, and I thought I’m not really doing grown-up clothing, but the way around it is to do a teen version that will fit most of you as well as myself.
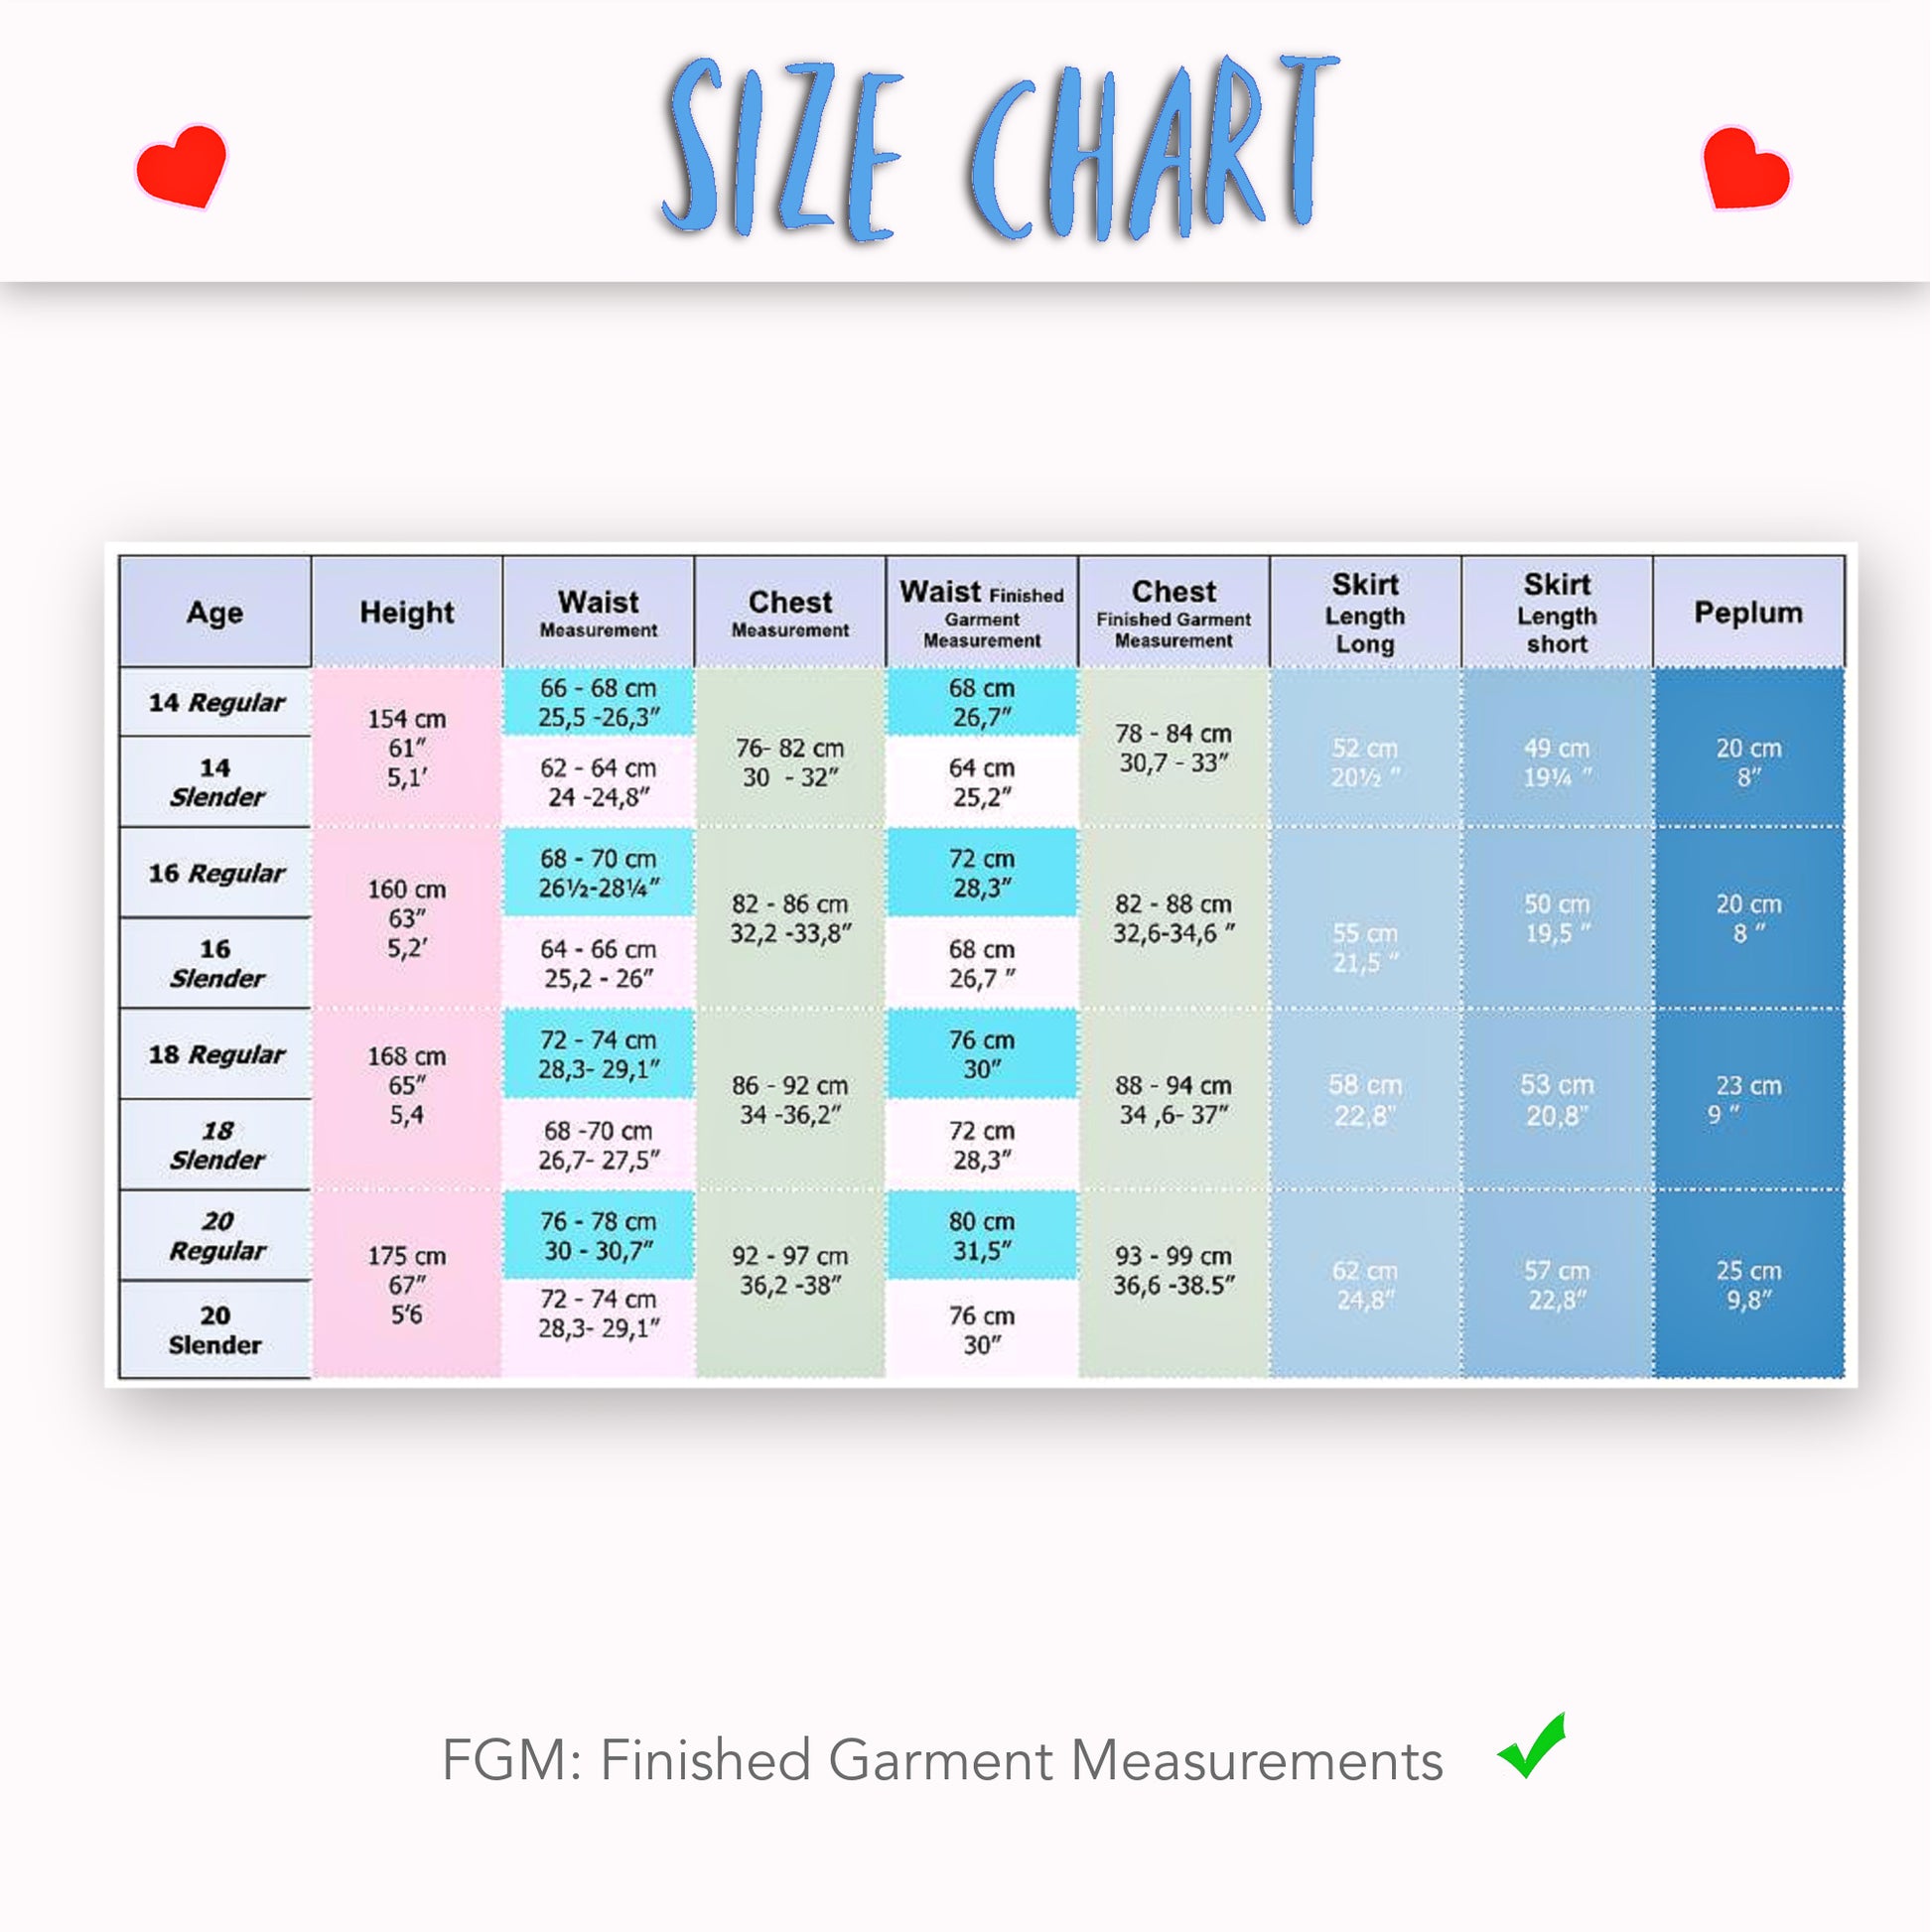
So the teen version includes sizes 14 to 20, and it starts with height selection, just like in a children’s pattern. This is really helpful for smaller ladies as well because, for me, most clothing is too long in the waist. So you can choose your size by height, bust, and waist using the sizing chart, and we will look at that in more detail when we go through the pattern.
Every size comes as a separate file. Normally with patterns you get multi-size files where the bust is the same, but here each size is separated so different bust options can be included. That means you can cut out and go, which makes fitting much easier.
All the dresses shown were not pre-fitted. Measurements were taken, the dress was made, and then worn as-is, which shows the benefit of having different bust sizes built into the pattern.
I’m very proud of this project and everyone involved, from Ella Burbeck Brown’s photography to the models Naida and Ivana.
Fabric Recommendation for the Vivienne Dress
For this dress, I recommend a cotton stretch satin with about 3–5% elastane or Lycra. This creates a very comfortable and flattering fit.
My first dress in this fabric surprised me because I originally expected plain satin, but the stretch made it much more wearable and comfortable.
Choosing Your Size and Fit
A very common challenge is knowing which size to cut.
Take a woven dress from your wardrobe that fits well and measure across it. You may find it matches your waist or is even slightly smaller than expected.
- For workwear: include a little ease
- For party or fitted wear: reduce or remove ease for a more fitted “wow” look
For stretch satin, you can cut closer to body measurements. For non-stretch fabrics like silk, you may need to add ease.
If needed, you can also follow the separate video on personal size adjustment for a fully customized fit.
Printing and Assembling the Pattern
When printing the pattern:
- Print at 100% or actual size
- Check the 5 cm test square (or 1 inch if using inches)
- Cut around all pieces, including dashed attachment lines
Each size is in its own file, so do not mix pieces between sizes.
Pattern pieces are labeled and designed like a puzzle to reduce paper waste.
For example:
- Vivienne cuff A + B pieces go together
- Some cuffs form rectangles, others form integrated cuffs with a slit
Sleeve Overview and Assembly
All sleeve pieces are marked with a yellow flower symbol and should be assembled in order (A, B, C, D, etc.).
The sleeve includes:
- Markings for cuff placement
- Snip points for fabric alignment
- Reinforced areas for structure
You should lightly snip fabric at indicated points to help alignment.
The sleeve is shaped with more fullness toward the back to allow movement and proper fit around the shoulder.
The sleeve head marking aligns with the shoulder seam.
Short sleeves are slightly shaped forward to avoid excess fabric standing up and to improve fit.
Sleeve Fit and Ease
The sleeve head is designed to be eased in for a smooth fit.
- Gather short sleeves slightly (approx. 4 in / 12 cm total ease)
- This prevents looseness at the shoulder
- Elastic may be added depending on style
Always check fit before sewing. Sleeve shape should be tested on the body or mannequin.
Cap Sleeve Overview
The cap sleeve is slightly more fitted and comes in A and B pieces.
Differences:
- One version includes elastic
- One is more structured and less gathered
- Width may vary depending on arm size
This is a flexible design, so you may need to adjust depending on arm measurements.
A full tutorial is available separately for construction.
Collar Pieces and Options
There are two collar styles:
- Standard collar
- Asymmetrical collar
Separate pattern pieces are grouped accordingly.
When assembling:
- Match A, B, and C pieces
- Use snip marks for alignment (do not cut through to edge)
- Choose between rounded or straight collar finish
The collar is designed to roll and sit neatly without flopping due to shaping in the back section.
Front Panels and Side Pieces
The front bodice includes:
- Bust adjustment lines
- Slender and regular versions
Difference:
- Slender is approximately 1 cm smaller than regular
This separation prevents cluttered pattern lines and confusion.
Bust adjustment is based on measurement lines:
- Match bust measurement to sizing chart
- Cut along correct bust line
- Waist remains consistent across sizes
Adjustments should be made carefully to avoid armhole gaping.
Back Panels and Fit Notes
Back pieces also include:
- Slender and regular versions
- Bust line markers
- Shoulder attachment points for sleeves
The difference between versions is minimal but important for shaping.
- Solid line = fuller fit
- Blue/green lines = size variations
Neckline and Sleeve Options
The pattern includes multiple neckline and sleeve variations:
- Dotted line = sleeveless or cap sleeve option
- Solid line = full sleeve option
Do not cut off options permanently. Instead, snip and fold so you can reuse pattern pieces for different versions.
Skirt Options Overview
Several skirt styles are included:
- Circle skirt (voluminous with pleats or flat front option)
- Bubble hem variation
- Peplum length option
- Straight skirt with front/back distinction
- Pleated skirt with slender and regular versions
The circle skirt can be adjusted for either:
- More volume (box pleats)
- Less volume (flat gathered waist)
Peplum and shorter versions are also available depending on design preference.
Final Notes
This pattern takes you from a “kitty dress” style to a fully grown-up teen-friendly design.
The only question now is: which Vivienne will you make?
Thank you for watching.
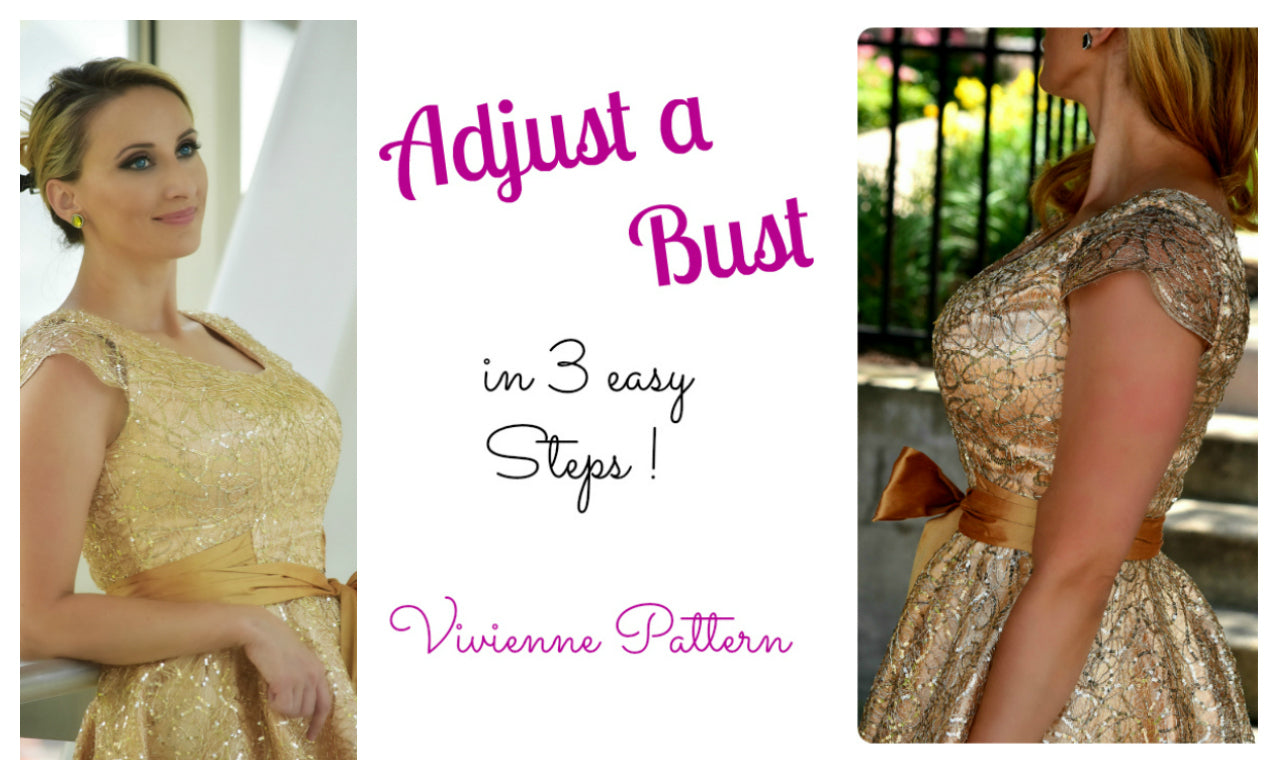
Bust Adjustment Tutorial (Vivienne Pattern)
Transcript for the video: Vivienne Teen - How to Adjust a Bust
Hi everyone and welcome to the Vivienne teen. In this tutorial, we’re going to talk about a bust adjustment and what to do if you don’t quite fit the standard sizing.
The example we’re using is for a person with a waist of 74 cm and a bust of 102 cm. According to the chart, the height is 165 cm (size 18 range), but the bust measurement falls slightly outside the standard range.
The key idea is that you don’t need a traditional full bust adjustment because the Vivienne pattern already includes bust lines, which makes fitting much easier.
Step 1: Take Your Measurements and Compare to the Chart
We start by identifying:
- Waist: 74 cm
- Bust: 102 cm
- Height: 165 cm (size 18 reference)
The waist sits between sizes, but the bust is slightly larger than the highest standard range. However, because stretch fabric is being used (such as stretch satin), the adjustment does not need to be excessive.
A small amount of additional ease or support is often enough for a comfortable, fitted result.
Step 2: Combine Sizes Instead of Doing a Full Bust Adjustment
Instead of drafting a full bust adjustment, the method uses overlapping pattern sizes.
The process:
- Place the size 18 and size 20 front pieces on top of each other
- Align them along the side seam and bust line reference points
- Tape them together securely
- Trim excess from the larger size where needed
This keeps the original shaping intact while allowing extra room where needed.
Step 3: Adjust the Side Seam for Extra Width
To add subtle extra room:
- Add approximately 5 mm on each side seam
- This results in about 1 cm total per seam
- Repeat adjustments on both front and back panels if needed
This method distributes the extra width evenly without distorting the design.
Step 4: Refine the Armhole and Shape
It’s important not to enlarge the armhole too much.
If you have added width in the bust area:
- Slightly adjust the armhole upward or maintain the original curve
- Ensure the shoulder line remains unchanged
- Avoid making the shoulder wider, even if the bust is larger
This keeps the garment structured and flattering.
Step 5: Check the Fit Logically Before Cutting
Before finalizing:
- Measure across the adjusted pattern
- Compare front and back seams for consistency
- Ensure total added width matches the target measurement (in this example, approximately 102 cm bust)
A helpful method is to measure across key points and confirm everything aligns mathematically before cutting fabric.
Step 6: Adjusting for Smaller Bust Sizes
If the bust is smaller than the standard:
- Move down the bust line increments on the pattern (for example, 1–4 lines depending on difference)
- Keep the waist and hip unchanged where possible
- Redraw the side seam to connect smoothly back into the original shape
This allows reduction without losing the design proportions.
Key Principle of This Method
The Vivienne pattern is designed so that:
- Bust adjustments are made using built-in graded lines
- Sizes can be blended instead of fully redrafted
- Small seam adjustments replace complex dart manipulation
- Fit can be customized without altering the overall design structure
Final Note
Once all adjustments are complete, the pattern should:
- Match the bust measurement closely (especially for stretch fabrics)
- Maintain clean shoulder and armhole lines
- Preserve the original silhouette
If you want to see the full garment construction or more fitted dress variations, check the Vivienne playlist for the complete series.
Transcript for the video: Vivienne Girl - How to Adapt the Pattern for Knit Fabrics
Guess what, we’re back with another Vivienne video and this time I’ve gone all out. I’ve made this beautiful dress and it’s got a silk organza skirt which is lined with satin and I’ve got a dupion silk bodice. We’ve got a bow here and instead of having the tabs that come from the back and go to the front, what I’ve done is I’ve put a tie in. When you turn it to the back you can tie it into a bow or just leave it hanging like that. I think it’s really beautiful. It doesn’t have to hold in anything on these dresses because they’re fitted so you could just tie it.
It doesn’t quite fit on here because I’ve got a very tiny model, but you’ve got the beautiful collar here. And what I’ve done is I’ve actually covered it with the same fabric that we’ve got here. And because when you’re working with organza there are a few things that you have to work differently. For example, when you want to put in the zip, you can’t put the zip straight under the organza, it would look really horrible. So we’re working this a little bit backward and then ending up with a seam here which captures all the fabric in together. And that way it’s a beautiful finish for my zip all the way down.
Because that’s really quite different to how you would work normally, that’s why there is another video. This video is not as detailed, it won’t show you every single step on the sewing machine. It will show you every single step in the instructions so you can see then do this, then do that, then do this. If you wanted to see every single sewing step for the Vivienne dress you have to go back to the original videos. This is really for when you want to make a very special occasion dress and a labor of love.
Pattern Pieces Overview
Now let’s get started with our pure silk dress. Let’s have a quick look at the cutout pattern pieces. We’ve got the collar four times, you need that two for left, two for right, and the overlay which is in a silk organza. Then we need for the under collar the Vilene or interfacing.
You also need a strip so that you can make your ties. You need to decide on your width minus 15 cm and the length should be about 90 cm up to 120 cm. Then we’ve also got a bow and the center of a bow and we’ve got the front and the back and the side pieces.
The lining comes in a one piece again so no joining of the princess seams here. And then we’ve got the front for the organza skirt on the fold and two back pieces and the matching lining for this. It’s exactly the same pattern but here I was able to cut the circle in one go and just open up the back.
Collar and Bodice Preparation
The first thing to do is to put over the overlay on the collar and I would just pin it in a few places. Then you need to put the Vilene or interfacing onto the under collar, iron it on, and then with the right side facing you’re going to sew this together all the way around and leave the neckline open.
Once you’ve done that you might notice on collars like this that the front of the collar stands up. So what you do is you push down the upper collar by about 2 or 3 mm which will automatically push the collar down instead of pushing it up.
Ties and Bodice Assembly
Now these are my ties. I’ve sewn them together with a 1 cm seam allowance and mine are quite slim really, but you could make them much wider and then gather them.
Here is my tie. You work out the edges and I would definitely have a tip at the back.
Then we’re going to put the bodice together and you’ve got the side panels for the back and the back.
In the front you need to insert the ties you’ve just made. The ties go about 1.5 cm above the edge of the fabric. From the inside I’m going to cut off that little triangle. I wouldn’t do it before because it can easily go wrong. Just make sure it goes in dead straight. Then you close the shoulder seams and you’re ready to put on your collar.
The collar is stay stitched all the way around. Then you put your lining over the top and sew around the neckline, stopping 4 cm before the end. You also do the armholes.
And there we go, the bodice is finished. The collar stays down nicely, lovely ties. You can make them longer as well, 90 cm to 120 cm for bigger girls, up to 150 cm.
Side Seams and Reinforcement
Then we do the side seam. When you iron the side seam, you want to release the tension on either side so there’s no pulling, then press it back.
The bodice is almost prepped, but we need to do one more thing. At the back we put Vilene or iron-on interfacing so that when we put the zip in this can’t rip out at all. That is very important, make sure it is secure.
Skirt Construction
Now we are finished with our bodice and we can start on the skirt. You want to close the side seams of the skirt first, but this time we are doing a French seam. So we sew it together with the right side facing out and a 5 mm seam allowance only.
Then cut it back, fold it over, and do another seam with the right side on the inside.
Then we put the lining over the top, but instead of shiny side down, shiny side is up. Very important, it looks much nicer. Pin all the way around the skirt and sew it.
Then cut back your seam allowance and understitch the whole lot, then turn it to the right side and press it.
If you’re working with polyester fabrics you might want an ironing cloth. For me it’s fine here because I use silk organza and silk can take any heat, it’s a natural fiber.
Gathering and Center Back
Next we overlock the center back seam and then pull away the overlocking to make it neat. We also put gather threads in here. I’m not going to pleat it this time, two lines of stitching. Use good thread so it doesn’t break when you pull them, and only pull the upper threads.
Then close the center back seam. Some people leave that open and do it last when inserting the zip. Either method works.
Zip Insertion
So I have now attached the skirt and it’s all gathered. I’m going to put my zip in. You can see how to do the concealed zip in the sewing workshop video.
Because the zip ends are really long I will trim them down so you get your 1 cm seam allowance, otherwise it’s difficult to line up.
Pin in your zip and sew it in. Then fold over the lining and the zip over it, sew that down, and you’re done. It’s very simple and the top edge comes out beautiful.
If you want, you can also add hook and eye, but I tend to leave that.
Hand Finishing
Then we do a little bit of hand stitching, slip stitching everything in neatly. This takes quite a while. Pin everything carefully and cover all seams at the bottom as well.
Once that is done, the dress is basically finished.
Making the Bow
If you want to add a bow on the front, take a letter size or A4 piece of paper, slightly wider if needed. Fold one long side over, then the other so they slightly overlap. Then fold from each side again so everything overlaps neatly.
Fold it to create a center crease. Take a needle and thread, double thread with a knot, and do a running stitch along the crease all the way through.
Pull it to form the bow. It’s really easy and gives a beautiful voluminous shape.
Wrap and secure the center using a ribbon or the same fabric. In my case I interfaced both sides of a center piece and stitched it around neatly.
It’s always nice to use a contrast. This bow was originally made for a Wizard of Oz themed wedding where I did the flower girl, and I thought it tied in beautifully.
Final Notes
And there your bow is finished, just needs putting on the front of the dress and we are done.
Thank you for watching again and don’t forget there are many more videos. You can go on frocksandfrolics.com, find the project page for the Vivienne dress, and you will find many more ideas on how you can use this pattern.
Bye and see you next time.
Love it, it came out fine.
tolles Schnittmuster, vielen Dank dafür.