SOPHIA FAUX WRAP DRESS
Couldn't load pickup availability
The Sophia faux wrap knit dress is a cheerful little PDF sewing pattern, full of easy charm. With its secure V‑neck, smooth bias binding finish, and swishy circle skirt, this sleeveless summer dress is a delightful quick sew. Sophia stays put all day — no gaping, no fuss, even when you bend down.
With Marina’s free video sewing course, you sew as if a friendly companion is right beside you, cheering you along.
Pattern Download Includes
- Instant Download
- DIN A4 & US Letter Size
- Multi-size pattern
- A0 Copy Shop
- Detailed eBook
- Video Tutorials
Design Options
Design Options
- Knit bodice and skirt
- Delightful faux wrap feature
- Circle skirt
- Bound edges
- Sleeveless
Fabric Requirements
Fabric Requirements
BEST MATERIAL CHOICE
- Knit fabrics
- Scuba
- Interlock
FABRIC REQUIREMENTS
- Shell: 2-2.5 yards (1.6–2.1 m)
Available Sizes
Available Sizes
- 0 – 22 (US)
- 28-48 (DE)
Please Read
Please Read
- This is a digital pattern or PDF file, not a physical product. It will be delivered electronically via a download link delivered to the email used for the purchase.
- To ensure the pattern prints at its actual size, it's recommended that you use Adobe Acrobat Reader.
- The pattern creator, Frocks & Frolics, welcomes small-scale production using their patterns.
Customers are encouraged to tag Frocks & Frolics when sharing projects made using their patterns on social media.
@frocksandfrolics #frocksandfrolics
Share

STEP-BY-STEP VIDEO TUTORIALS
VIDEO TEXT
Transcript for the video: Sophia Faux Wrap Dress - Introduction
Hi everyone, welcome to show you how to make the Sophia dress. This is one of many that I’ve made, and it’s my favorite. I’m going to talk you quickly through a few things that you need to know in order to make this beautiful dress.
This is my favorite dress of all the ones I’ve made—I have a thing for it, I have to say. I’ve borrowed the edges of the dress on the neckline and on the armhole, which I think is really, really nice. And as you can see, I’m quite short, so the dress length here is perfect for me. It just ends above the knee. But if you’re taller, you might want to add a little bit to the length of the dress.
You will also notice that this dress is rather snug compared to the one I made for the instructions in 100% cotton. That’s because this one is a polyester and elastane mix. I think it might have a little bit of cotton in it, but not very much at all. It has wonderful recovery because it is a synthetic fiber.
100% Cotton Version
Now let’s have a look at the same dress in 100% cotton.
This is the same size in 100% cotton. You can see that it is much looser. I’ve got tons of room in here, and it’s also more relaxed on the shoulder.
The reason for that is that the binding on this dress was particularly loose because I didn’t realize how much stretch recovery would matter. So what I’ve done for your instructions is I’ve added a column for binding length for cotton with very low stretch recovery, because it is very common.
This is a Birch Fabrics organic cotton, which I absolutely adore. It is super comfortable, but be aware that you need a much shorter length of binding. Don’t accidentally cut it too long, because when you bend over, you don’t want everything to show—you want it to curve in properly.
Cotton Lycra Version
Let’s look at the same size again in a cotton Lycra mix.
This time I’m using a different technique. I would say this is right in the middle between polyester and 100% cotton. It is super comfy and has a bit more room.
I’ve also done something differently here. I’ve attached the binding, overlocked it, and then topstitched it. This is done with an interlock, which is a very stable knit fabric.
If you’re using interlock for the binding, you can use the looser column of binding and even add a couple of centimeters—around 4 centimeters longer for each side.
If you do this method, you also need to reduce the seam allowances, otherwise it will look bulky and frumpy.
Lined Version / Special Occasion Dress
Here is another version I made quite a while ago. It’s actually a whole size too small, so I don’t get to wear it much anymore.
I lined the entire dress for this one. This is a nice technique if you want a special occasion wrap dress. I fused a very lightweight cotton lining so the outer fabric wouldn’t be see-through.
I think it looks really great as a two-layer dress in the same fabric. It gives a beautiful effect.
One thing you’ll notice is that the armhole is lower. I’m going to compare that in a minute. Ideally, the armhole height should be the same as the red dress, but because it’s lined, it sits lower.
Some of you might prefer a lower armhole. The important thing is that it covers your bra, so you can adjust it to your preference.
I also lined the lower section separately, so it sits over the top. I think that gives a really nice layered effect.
Binding Technique
What I used here is standard binding—4 centimeters wide as in the pattern—but I sewed it to the inside first, understitched it, and then rolled it to the outside.
It still keeps everything nice and secure, so you can move, dance, and wear it comfortably without anything shifting.
I prefer this method for a clean finish.
Fabric Stretch Test
Now let’s look at the fabrics used in these dresses.
I’ve got:
- 100% cotton
- Polyester
- Cotton Lycra mix
- Interlock
- Jacquard knit
We’re going to test how they stretch.
When I stretch 100% cotton, it does not recover. It stretches and stays stretched. Polyester, on the other hand, recovers immediately. Cotton Lycra also recovers very well.
Interlock stretches but behaves better when folded. Jacquard is fairly stable, especially on the diagonal, which makes it useful for turning edges without finishing.
Binding Stretch Test
Now I’m doing the same test with binding pieces cut to the same length.
Polyester stays the same length. Interlock stretches slightly but behaves well when folded. Cotton stretches significantly and does not recover.
This is why polyester and interlock bindings can be made slightly longer—just a few centimeters extra helps ensure a better fit. Cotton, however, must follow the exact measurement in the instructions.
Construction Notes
On the red dress, it’s very important to always topstitch from the upper side of the fabric. Otherwise, you can get a wobbly seam, and that’s hard to fix.
Here you can also see the difference in sizing between cotton and polyester versions. The cotton version is much larger because it stretches during handling.
Even a few centimeters makes a big difference.
Pattern Adjustments and Fit Issues
I did adjust some seam allowances, but I still made a few mistakes. The shoulder area became a bit too wide and slightly frumpy.
So the important lesson is:
- Remove the seam allowance properly
- Do not ease it back in unless instructed
- Keep the shoulder line clean and consistent
Otherwise, the dress can lose its shape.
Final Construction Notes
When lining the dress, the armhole may stretch slightly, especially with lightweight knit lining. This is normal if you are not using binding.
For binding, I sewed it to the inside first, then turned it out and topstitched it for a clean finish.
This helps keep everything stable while still being flexible and comfortable.
Final Comparison
If you compare the dresses side by side, you can clearly see the difference in height and width caused by fabric stretch and recovery.
The cotton version is much looser, while the polyester version stays true to size.
Even small differences in fabric behavior can change the final fit by several centimeters.
Closing
This is my favorite dress that I’m going to wear all summer long, and I cannot wait to see what you make.
Please share your versions everywhere—tag us on Instagram and share in the academy. I would love to see what you create.
See you soon, bye for now.
Transcript for the video: Sophia Faux Wrap Dress - The Pattern
Pattern Overview
The sewing pattern comes either in a big AO sheet or in individual sheets in DINA4 or letter size, and I’m going to show you how to put together your letter size pattern.
You need to make sure that your scale is either in inches or five centimeters so that you know everything is printed off correctly.
Then you just cut out all the pattern pieces.
Pattern Identification
You can see here we’ve got attachment lines, which makes it really easy to put everything together.
Also:
- The front always has a white flower
- The back always has a pink flower
I’ve cut out all my pattern pieces and put the skirt, front, and other pieces to the side.
Just get everything with a white flower or yellow flower and put them aside.
It’s a very simple system.
Assembling the Pattern
The pattern uses alphabetical order (A, B, C, etc.), and we just put them on in order. It works really well.
You can see here how it fits together. We’ve also got notches so you know which pieces go together.
The front is assembled in exactly the same way.
Skirt Notes (AO Sheet Adjustment)
Just a quick note about the skirt:
It is also assembled in the same way, but on the large AO sheet the skirt length for all sizes is not included.
So you need to:
- Add whatever you cut away from the top
- Transfer that amount to the hem
This ensures you get the correct finished length.
I didn’t want to make you buy another AO sheet just for that adjustment, since it didn’t quite fit.
Adjusting Length
The method is very simple:
- Measure down from the top edge to your size line
- Take that measurement
- Add it to the hem
You can either:
- Adjust it directly on the pattern, or
- Draw it out while cutting (which is what I usually do)
Size Merging (Fit Adjustment)
This dress is designed so it’s very easy to merge sizes, especially if you are fuller in the bust and smaller at the waist.
You want to:
- Go by your bust size first
- Then follow the shorter bust line
From there, you can smoothly blend the sizes.
It’s actually very easy to merge sizes on this pattern.
Back Adjustment
For the back:
- Use your bust size at the shoulder seam
- Then blend from the underarm into the waist
- Adjust smoothly to the smaller or larger waist as needed
So if you need to merge sizes, this pattern is ideal for that.
So now we can cut out the fabric.
Cutting Layout Overview
Transcript for the video: Sophia Faux Wrap Dress- Cutting Out
A few words first: you do have a layout plan in your eBook, but the main thing is that the back must be cut on the fold, and you need two front pieces in a mirror image. That’s the important part.
I’m working with a fabric width of 140 cm, which is smaller than usual. Jerseys are normally about 150 cm wide, but in this case I had washed it and it shrunk quite a bit, so I had to place the pieces slightly differently.
Cutting Technique
Then you place your fabric weights on.
You should also get into the habit of cutting from the left-hand side when you’re cutting out. It’s much easier and gives you more control.
So there we go:
- Back cut on the fold
- Front pieces cut in mirror image
Same applies for both pieces.
Dart Adjustment
One important thing: you need to cut the dart away completely.
We are not leaving the dart standing. We’re cutting it away.
There we go—it’s much easier because you don’t have to mark the dart, and later we will simply overlock it.
This is how it will look.
Skirt Adjustment
Now I’ve taken off some of the top because I’m cutting a size 12, so I need to add that to the hem of the skirt.
You can mark it, or if you’re confident, you can use scissors and cut it directly while holding your tape measure.
In this case, I just want to show you that you should mark it—it gives a nicer result.
I’m cutting all the way around now.
Alternative Layering Method
You can also see here that Frieda, who tested this dress, actually forgot to do this step. She ended up with a shorter layer, and she simply added a longer layer on top.
It actually looks very pretty like that—you can have one shorter and one longer layer and then work them together as one skirt.
Fabric Efficiency Tip
Here you can see I’ve placed the skirt piece onto the other side of the fabric instead of using the paper pattern again.
This works well if you are using a stable knit. In that case, you don’t need to remark everything.
Cutting the Binding
Next we cut our binding.
The binding needs to be 4 cm wide.
First, fold the fabric so you get a nice straight edge, then draw your line. This helps avoid wobbly cuts.
Then mark your 4 cm width.
You can adjust this depending on your style:
- 4 cm = standard binding
- 3.5 cm = slightly slimmer binding
- 3 cm = narrow, more decorative binding
For example, in the green dress I showed earlier, I used 4 cm binding, but I think a thinner binding would have looked nicer.
Cutting the Strips
Now cut along the marked lines to create long strips.
Hold the fabric with your left hand and cut from left to right for better control.
Beautiful—and that’s it.
We’ve cut everything out and we’re ready to start preparing the binding in the next chapter.
Inserting the Dart
Transcript for the video: Sophia Faux Wrap Dress - The Darts
Now we’re going to insert the dart. Because we’ve cut away the dart, it’s really easy. All we have to do is place the edges together.
The lower part is a tiny bit longer than the top. That’s not a mistake—that’s exactly how it should be. This gives the bust a really nice curve.
You can also see where the dart ends right here, and we are going to sew slightly over that point.
Shaping the Dart
We’re sewing for about 1.5 cm or even a little bit more, but do not sew in a curved point like this—you’ll never get a nice finish that way.
What you want instead is a line that gradually tapers off toward the top, almost curving the other way to follow the shape of the bust.
So I’m marking it like this:
- Start at the 1 cm seam allowance
- Then gradually taper the stitching line
- Let it get smaller and smaller toward the tip
What you don’t want is a sharp point like you get when you simply follow pins. We want it smooth so you can’t even tell there’s a dart there.
Sewing the Dart
Let’s go to the sewing machine.
We sew with a 1 cm seam allowance, and you can see I’m feeding the fabric in quite straight at first.
Then it gradually gets smaller and smaller until I reach a very fine tip at the end. That small tip can be steamed flat afterwards.
Now I’m overlocking the dart to finish it neatly.
Pressing and Finishing
Here is the overlocked dart—nice and clean.
Now for pressing.
You can see we have a tiny point here, and we need to smooth that out. Because I’m working with 100% cotton, this is very easy.
I’m also overlocking the side seam now.
Normally, the dart should face toward the center of the body and point downward. Mine is facing upward, but don’t worry—it doesn’t matter too much here because this isn’t a traditional dart; we cut most of it away, so it’s very light.
Steam Shaping
Now we use lots and lots of steam before placing the iron down.
Keep steaming and pressing until the dart melts into the fabric.
You can see the small bubble in the fabric gradually disappearing.
The more cotton in your fabric, the easier this step is.
Final Result
And now it’s completely flat.
This beautiful curve will sit perfectly over the bust. If you have a larger bust, this dart is very important—it helps the garment sit smoothly and comfortably.
And that is the dart finished.
We can now move on to the next chapter.
Preparing the Seams
Transcript for the video: Sophia Faux Wrap Dress - The Shoulder Seams
We’re going to place the shoulder seams, and it’s very, very simple.
We could overlock them together in one go if you’ve got one of those marvelous overlockers. But in my case, I’m working with quite thick jersey, so I prefer to overlock them separately first and then sew them together.
Overlocking the Pieces
So I’m going to overlock the shoulder seams first.
Your overlocker usually has a guide marking so you can see where the knife will cut.
I’ve already got all my seams prepared here—great.
You could also overlock the front pieces at the same time, and I’m overlocking the back as well, because I like to be prepared and not keep going back and forth.
I just pull on the serger threads a little bit. That’s why I leave them hanging—so they don’t unravel when I move the fabric.
Different overlockers behave differently depending on fabric, so sometimes you need to adjust things slightly. I’m using a fairly basic machine, but it works really well—you just need to occasionally guide it.
I’ve got one more seam here, and then we’re done.
This is something you always want to do—don’t cut the threads too short or they can unravel, and then you’ll have to go back and re-overlock everything. That’s very annoying.
Sewing the Shoulder Seams
Now I’m going to sew the shoulder seams—ready, steady, go.
Again, we are using a 1 cm seam allowance.
If only this fabric had been a little easier to work with, or if I had used a jersey with better recovery for the binding, it would have helped a lot.
Pressing the Seams
Once the shoulder seams are sewn, we iron them open so they sit nice and flat.
And that’s it—everything is neat, stable, and ready for the next step.
Preparing the Binding
Transcript for the video: Sophia Faux Wrap Dress: Preparing the Binding
Now we’re going to prepare the binding.
You might want to add the binding length to your pattern page so you don’t have to keep going back to the instructions. Once you’ve made one or two dresses, you’ll know exactly what you need.
For your first version, always cut the length that is written in your pattern. After that, you can adjust—maybe a little tighter or a little looser depending on your preference.
On this dress, I originally made the binding way too long. I’ve now shortened it significantly for the pattern so you won’t have to go through the same trial and error.
Joining Binding Pieces
If you need to join binding because your strip isn’t long enough, here’s how:
Fold one end over at a 90-degree angle to create a guide line, then do the same from the opposite side. This gives you a clear diagonal line to cut along.
You can also simply place the pieces at a 90-degree angle and sew them together—that’s what I usually do—but this method is great if you’re still getting used to it.
Now I’m going to pin this and sew it.
Sewing and Pressing the Binding
Over to the sewing machine—we stitch the pieces together, then iron the seam open.
After that, trim back the seam allowance neatly so you don’t have bulk. This gives a smooth, flat finish and avoids stacking seams.
Arm Binding Preparation
For the arm binding, we leave it as one continuous strip.
The goal is to have the underarm seam of the garment and the binding seam meet in the same place.
First, iron the binding lengthwise in half.
Then check the length again—this is important because some fabrics, especially low-recovery jersey, can stretch when pressed.
I had to be careful with mine because it stretched slightly during ironing.
Joining the Arm Binding
Now I join the arm binding seam using a 1 cm seam allowance.
A good habit is to place the next piece under the machine immediately so you don’t waste thread.
Lock your stitches at the beginning and end.
Then press the seam open, trim back the seam allowance, and set it aside.
Marking Centers
Before we move on, we mark the centers:
- Mark the center of the arm binding
- Mark the center of the neckline binding
- Add a small snip (not too big)
This is very important because it helps you align everything later at the sewing machine.
There’s nothing worse than getting to the machine and realizing you didn’t mark your back or center points.
Ready to Sew
And that’s it—we’re ready to start sewing.
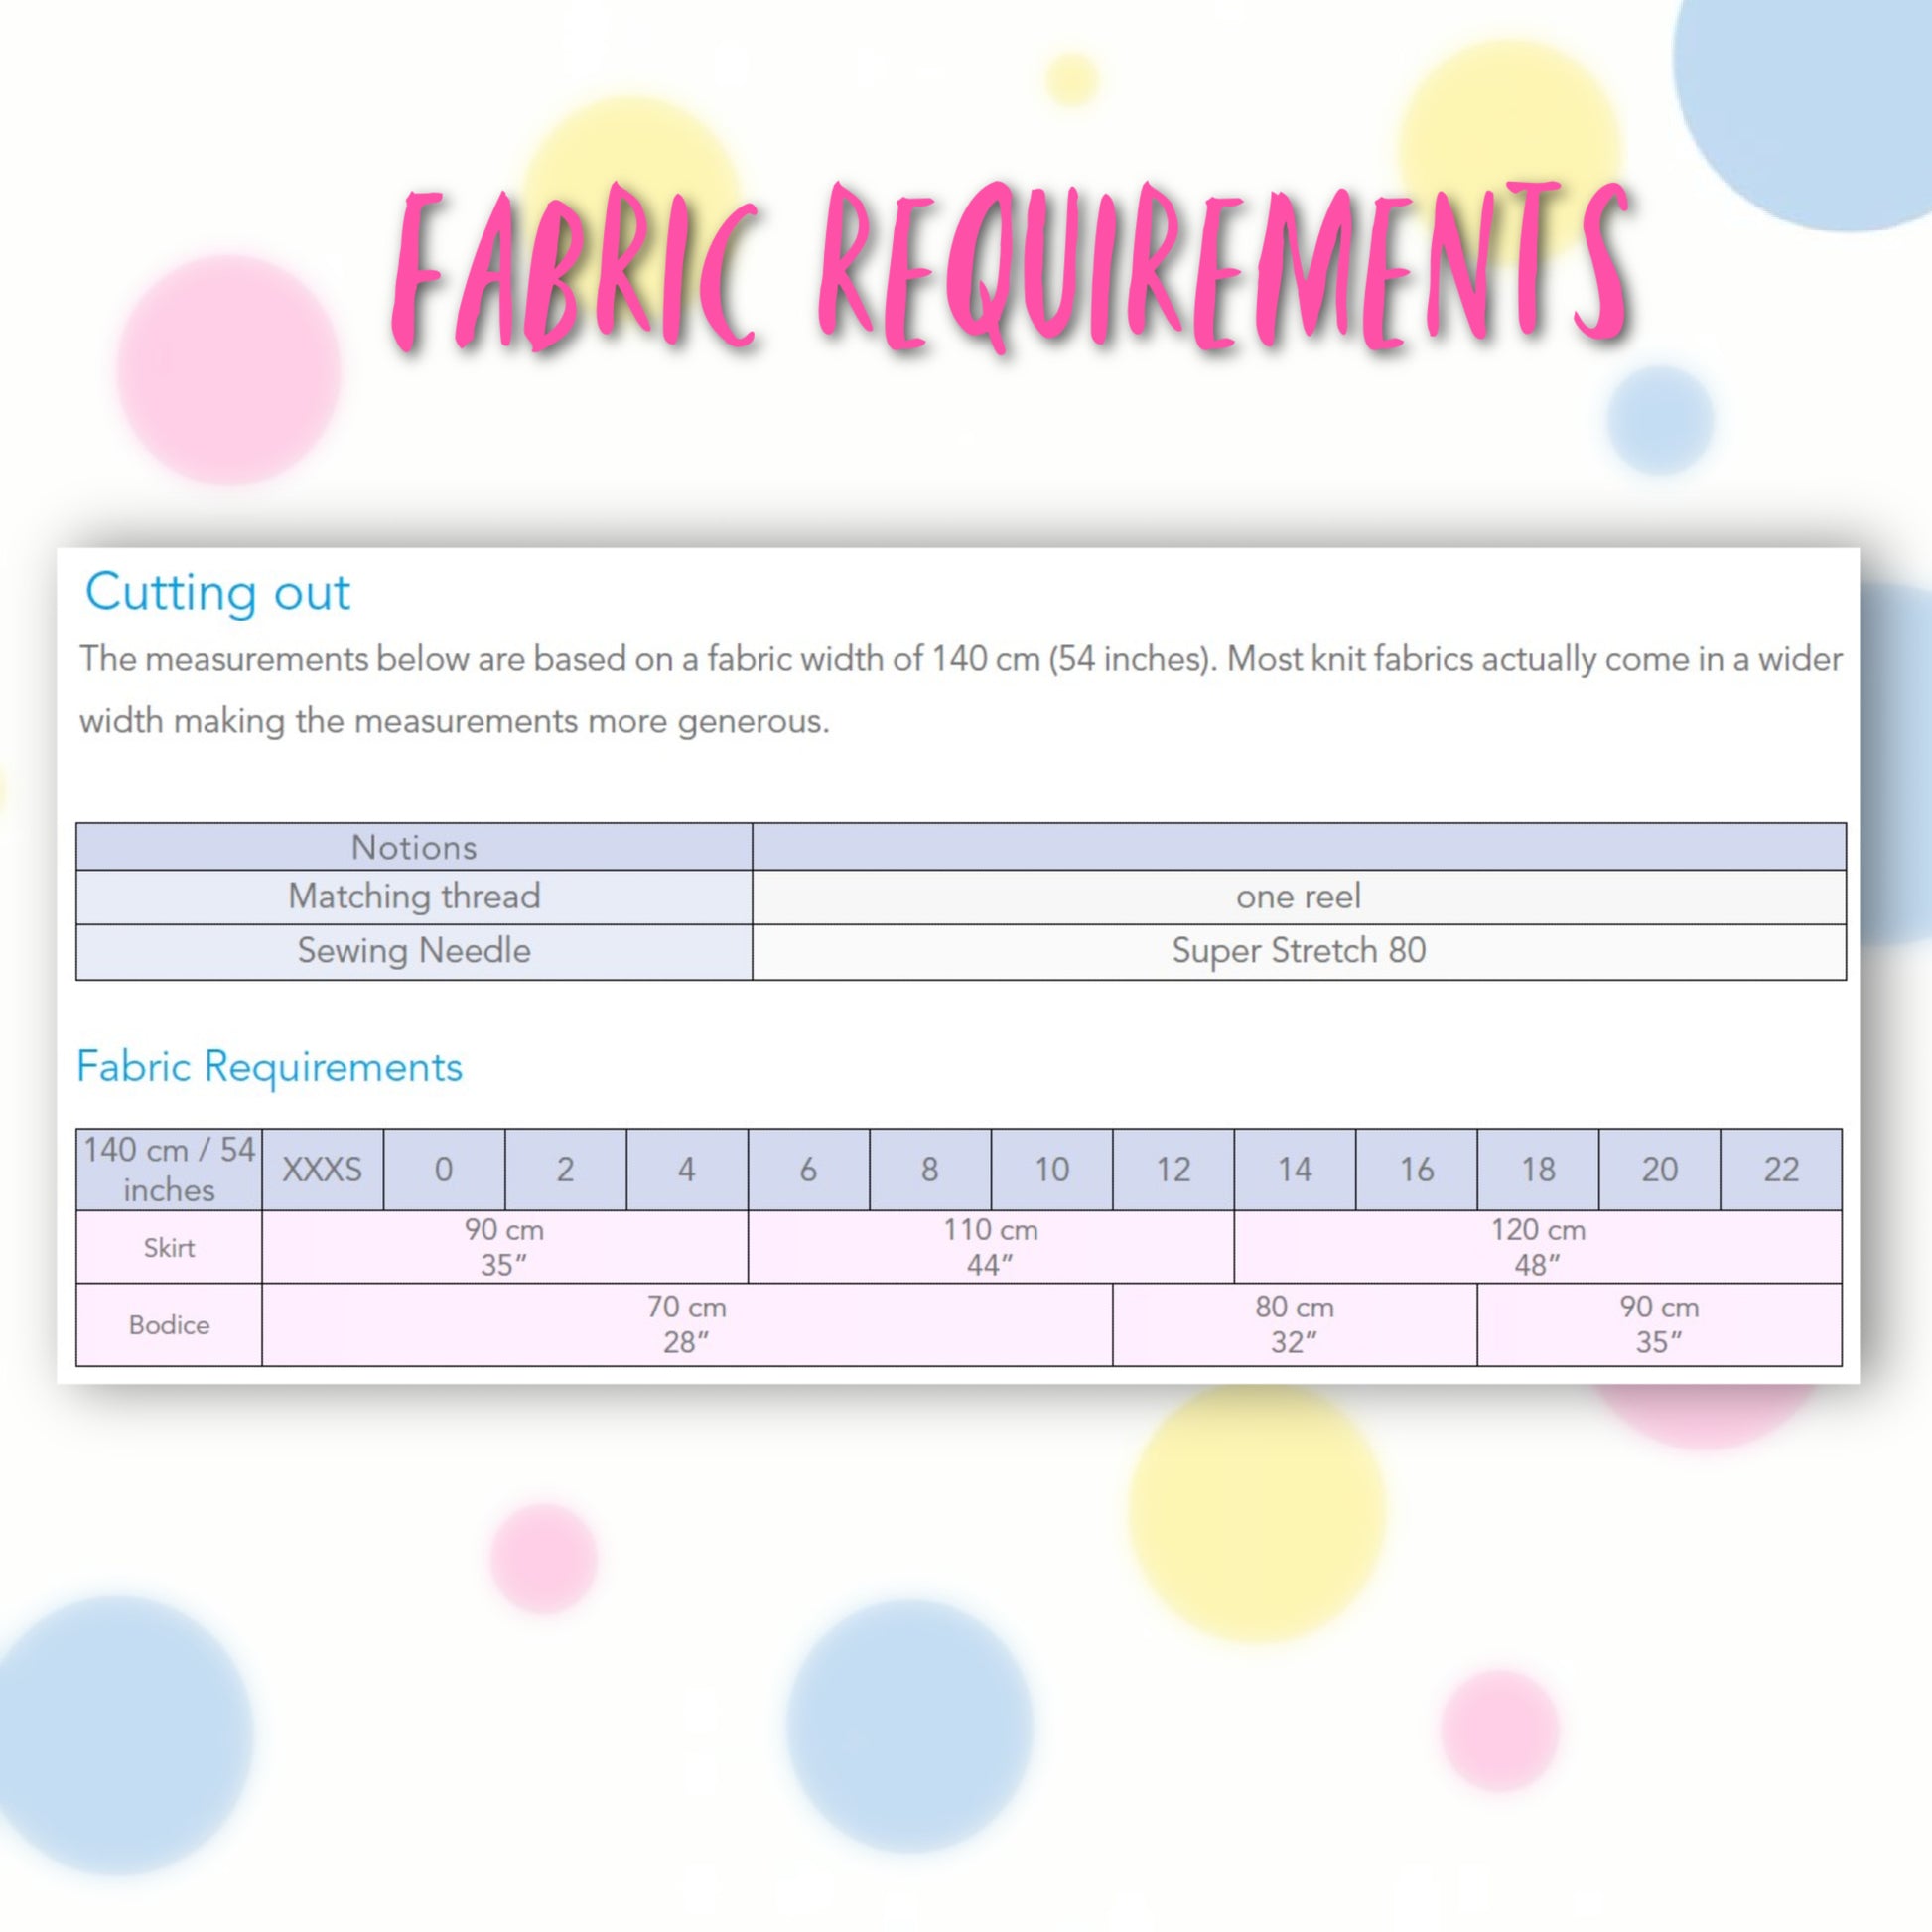
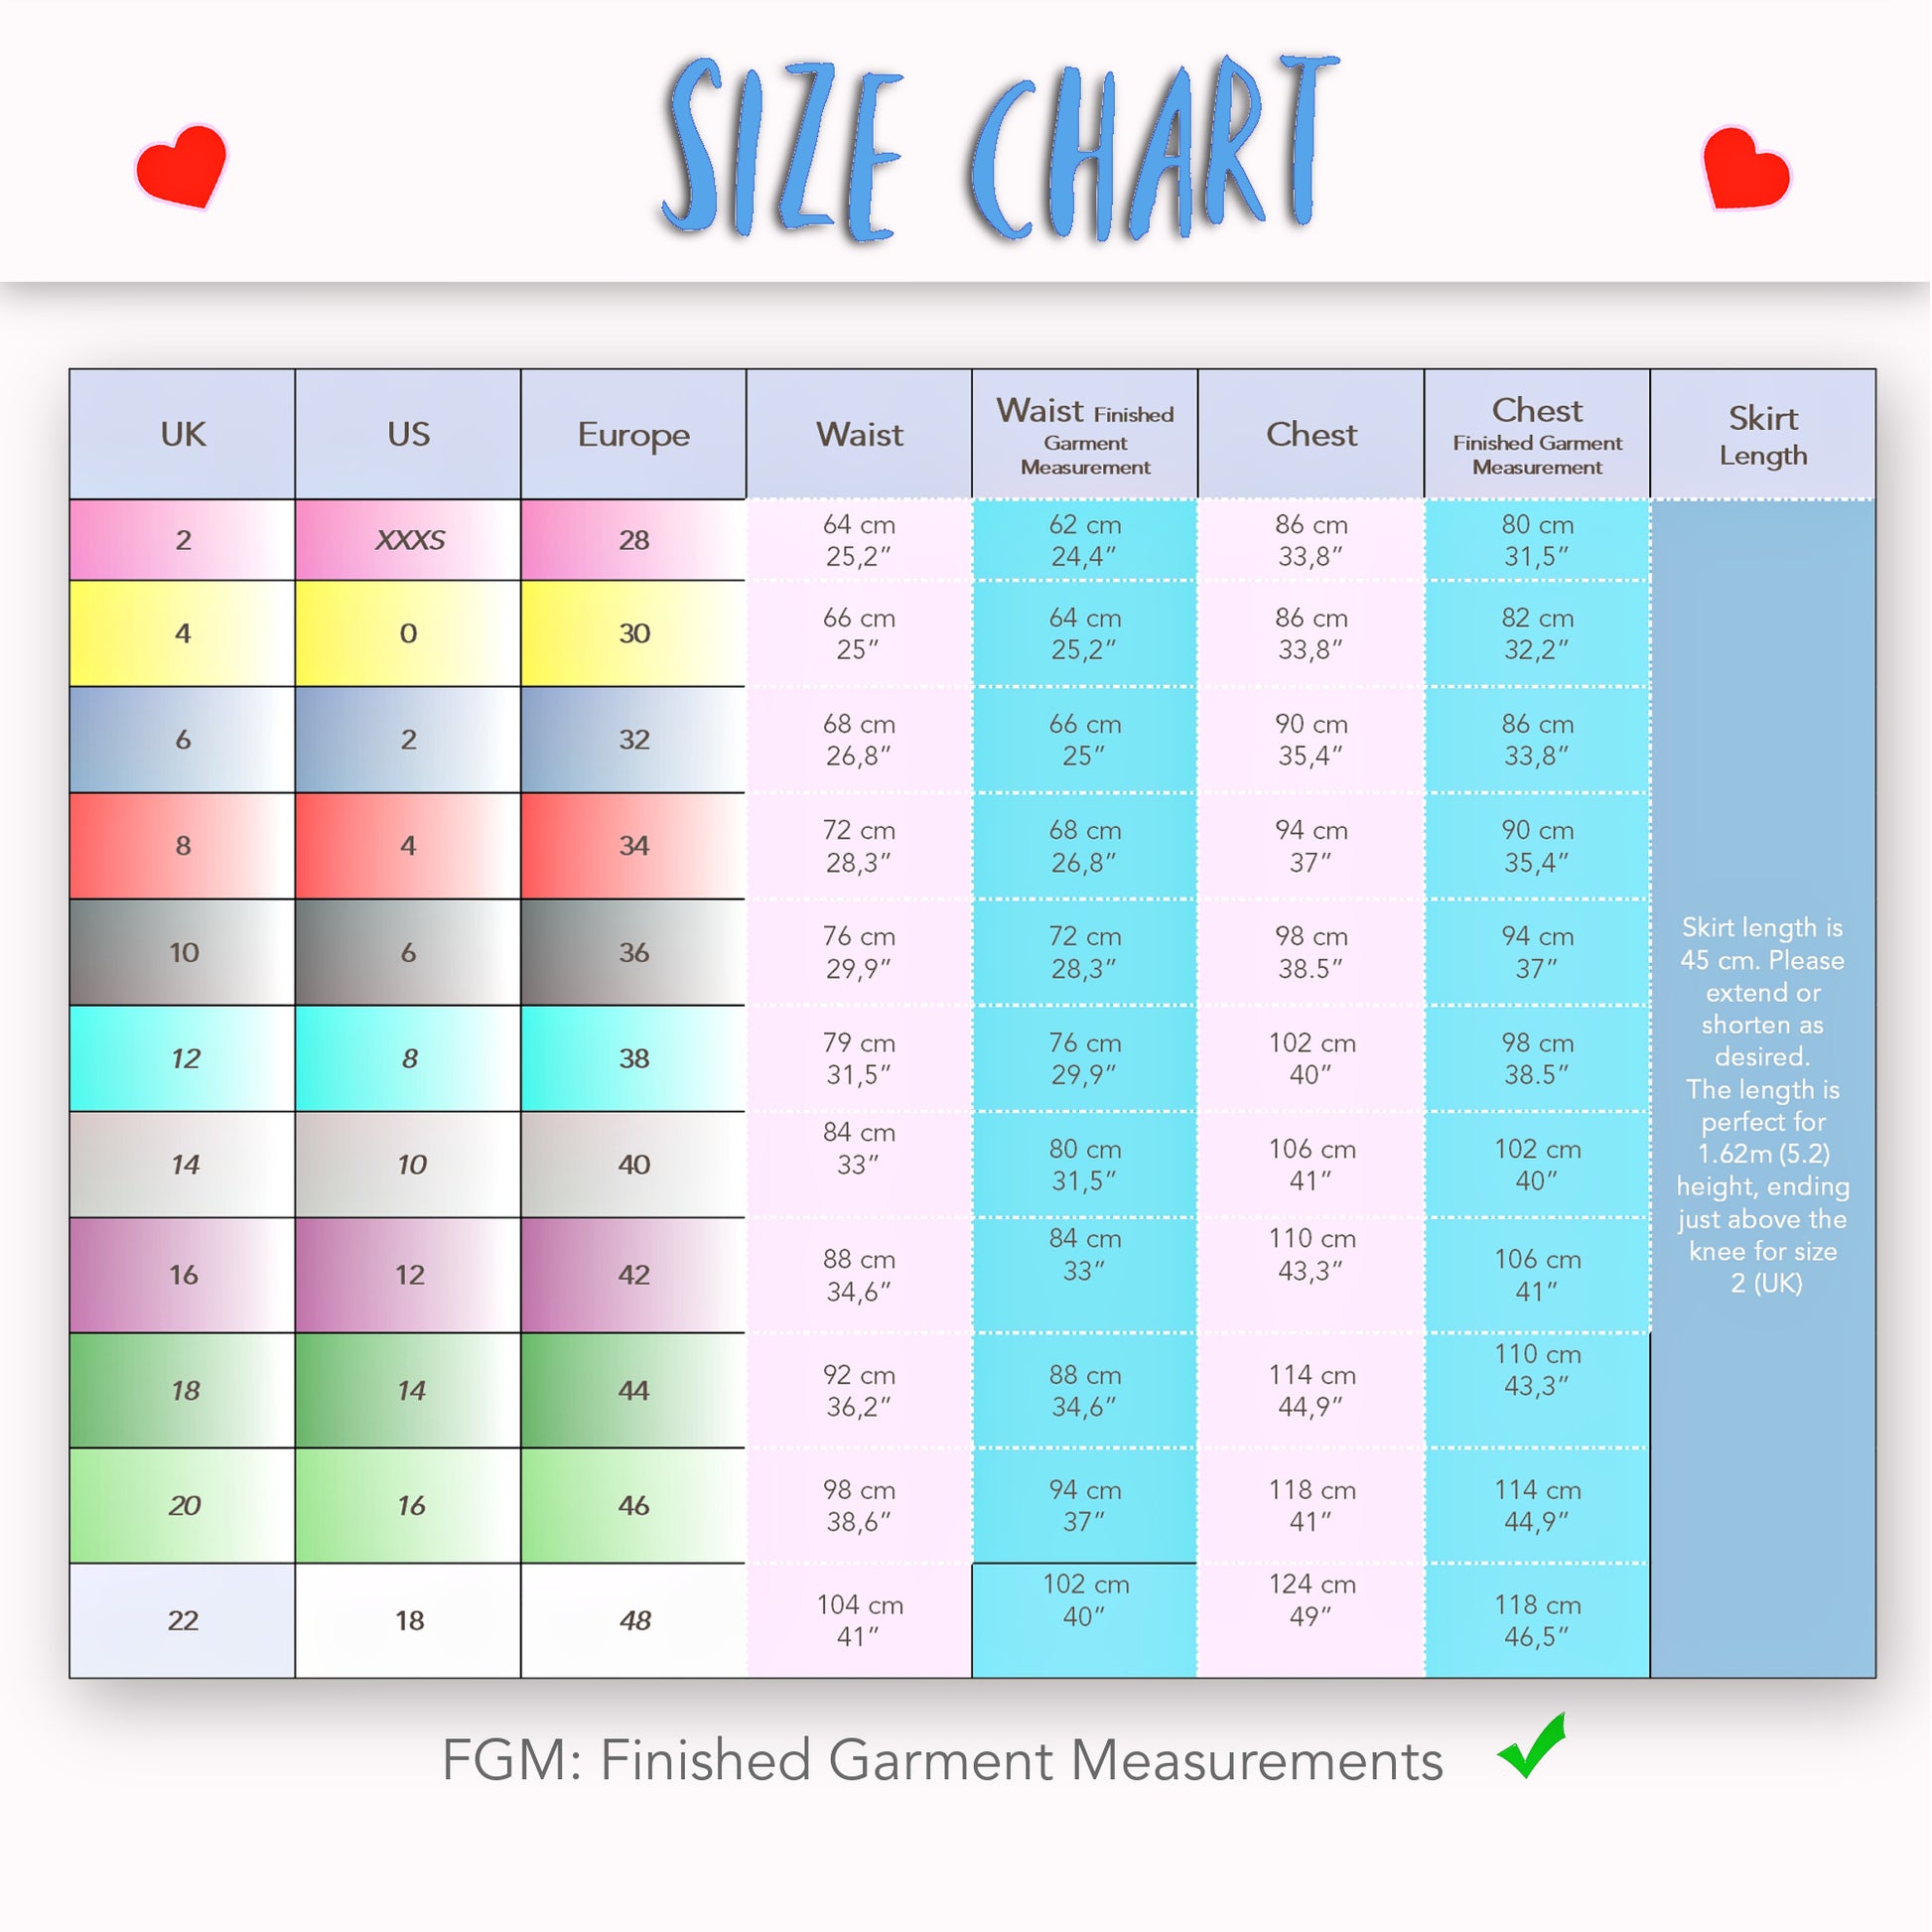
Transcript for the video: Sophia Faux Wrap Dress - Binding the Neckline
Now we’re going to bind the neckline. The first thing to do is to mark the back, obviously, or we have done it already, and the center back as well. Then you line those up with the binding and put a pin there so you know where it goes.
I’ve just got to say that this binding is too long. There wasn’t enough tension there. So when you’re going to do it and then sew it on, turn it over and turn it in, it’s going to be perfect. But when I did it, I made it a little bit too long, so what you won’t be seeing here is that I had to pick it all again and do it again.
So if it goes on a little bit too easy here without any of the front and back gathering up, then that’s why. But it will gather up quite a bit when you’re doing it yourself, as it should be.
We pin it to the back here, and now I take the front and I’m going to put that right on here. It needs to stand over the edge of it so that when we turn it in and down, it’s not too short. So make sure that you have it standing over. Don’t do it like this because it’s going to be too short. We want it to stand over the edge.
Then I put a pin in here that holds it in place. Lay it nice and flat, and then you just work your hands towards the middle and you pin it there. You can see I didn’t have enough tension there, and a lot of you will just want to be doing this on the sewing machine.
You mark the back and maybe mark one of the four quarters or something, but then you’ve got a sewing machine. I just do it entirely at the sewing machine and make this a very, very quick dress. But of course, if you’re doing it for the first time, you might want to do it on the work table like I’m doing here.
You can see I made it quite a bit shorter, but that was not short enough. It needs to really hold it in quite substantially, especially if you’re working with 100% cotton because that really doesn’t recover. So what happens is it’s just going to stretch and stretch and stretch.
So the binding needs to be way shorter, but it still came out all right. I worked my way around it. When I was finished with the dress, I was dead chuffed with it, so it was worth the effort.
But when you’re working with 100% cotton, it is really important that you use the binding measurement in the e-book that is way shorter so that you don’t have to fiddle as much. You will have to steam in a little bit, but I had to do it excessively. It’s not a bad thing for a teaching video because you can see how you can get around it.
If you were just lining this and you weren’t putting on any binding to hold it in, all these tips and tricks would really help you get it right.
Sewing the Binding
Now I can sew this on. I’m popping over to my sewing machine and we’re sewing with either foot width or a one centimeter seam allowance. That’s up to you. I tend to work foot width. It doesn’t really matter too much as there’s not much in it.
The key is you really don’t stretch the fabric that is underneath it. The only thing that needs stretching is the binding, which is why sometimes pins are more of a hindrance than helpful.
So concentrate on not stretching the dress, just the binding. Professionals would just hold the binding in one hand and stretch it slightly. That’s what I do. I don’t even measure it.
I was surprised when I did this pattern how much I actually stretched it. For me, it’s easier to just have a certain amount of pull and do that all the way around so I get it very evenly.
But of course, when you do it for the first or second or tenth time, it is much better to have the measurements. I have worked them out for you so you can get it right.
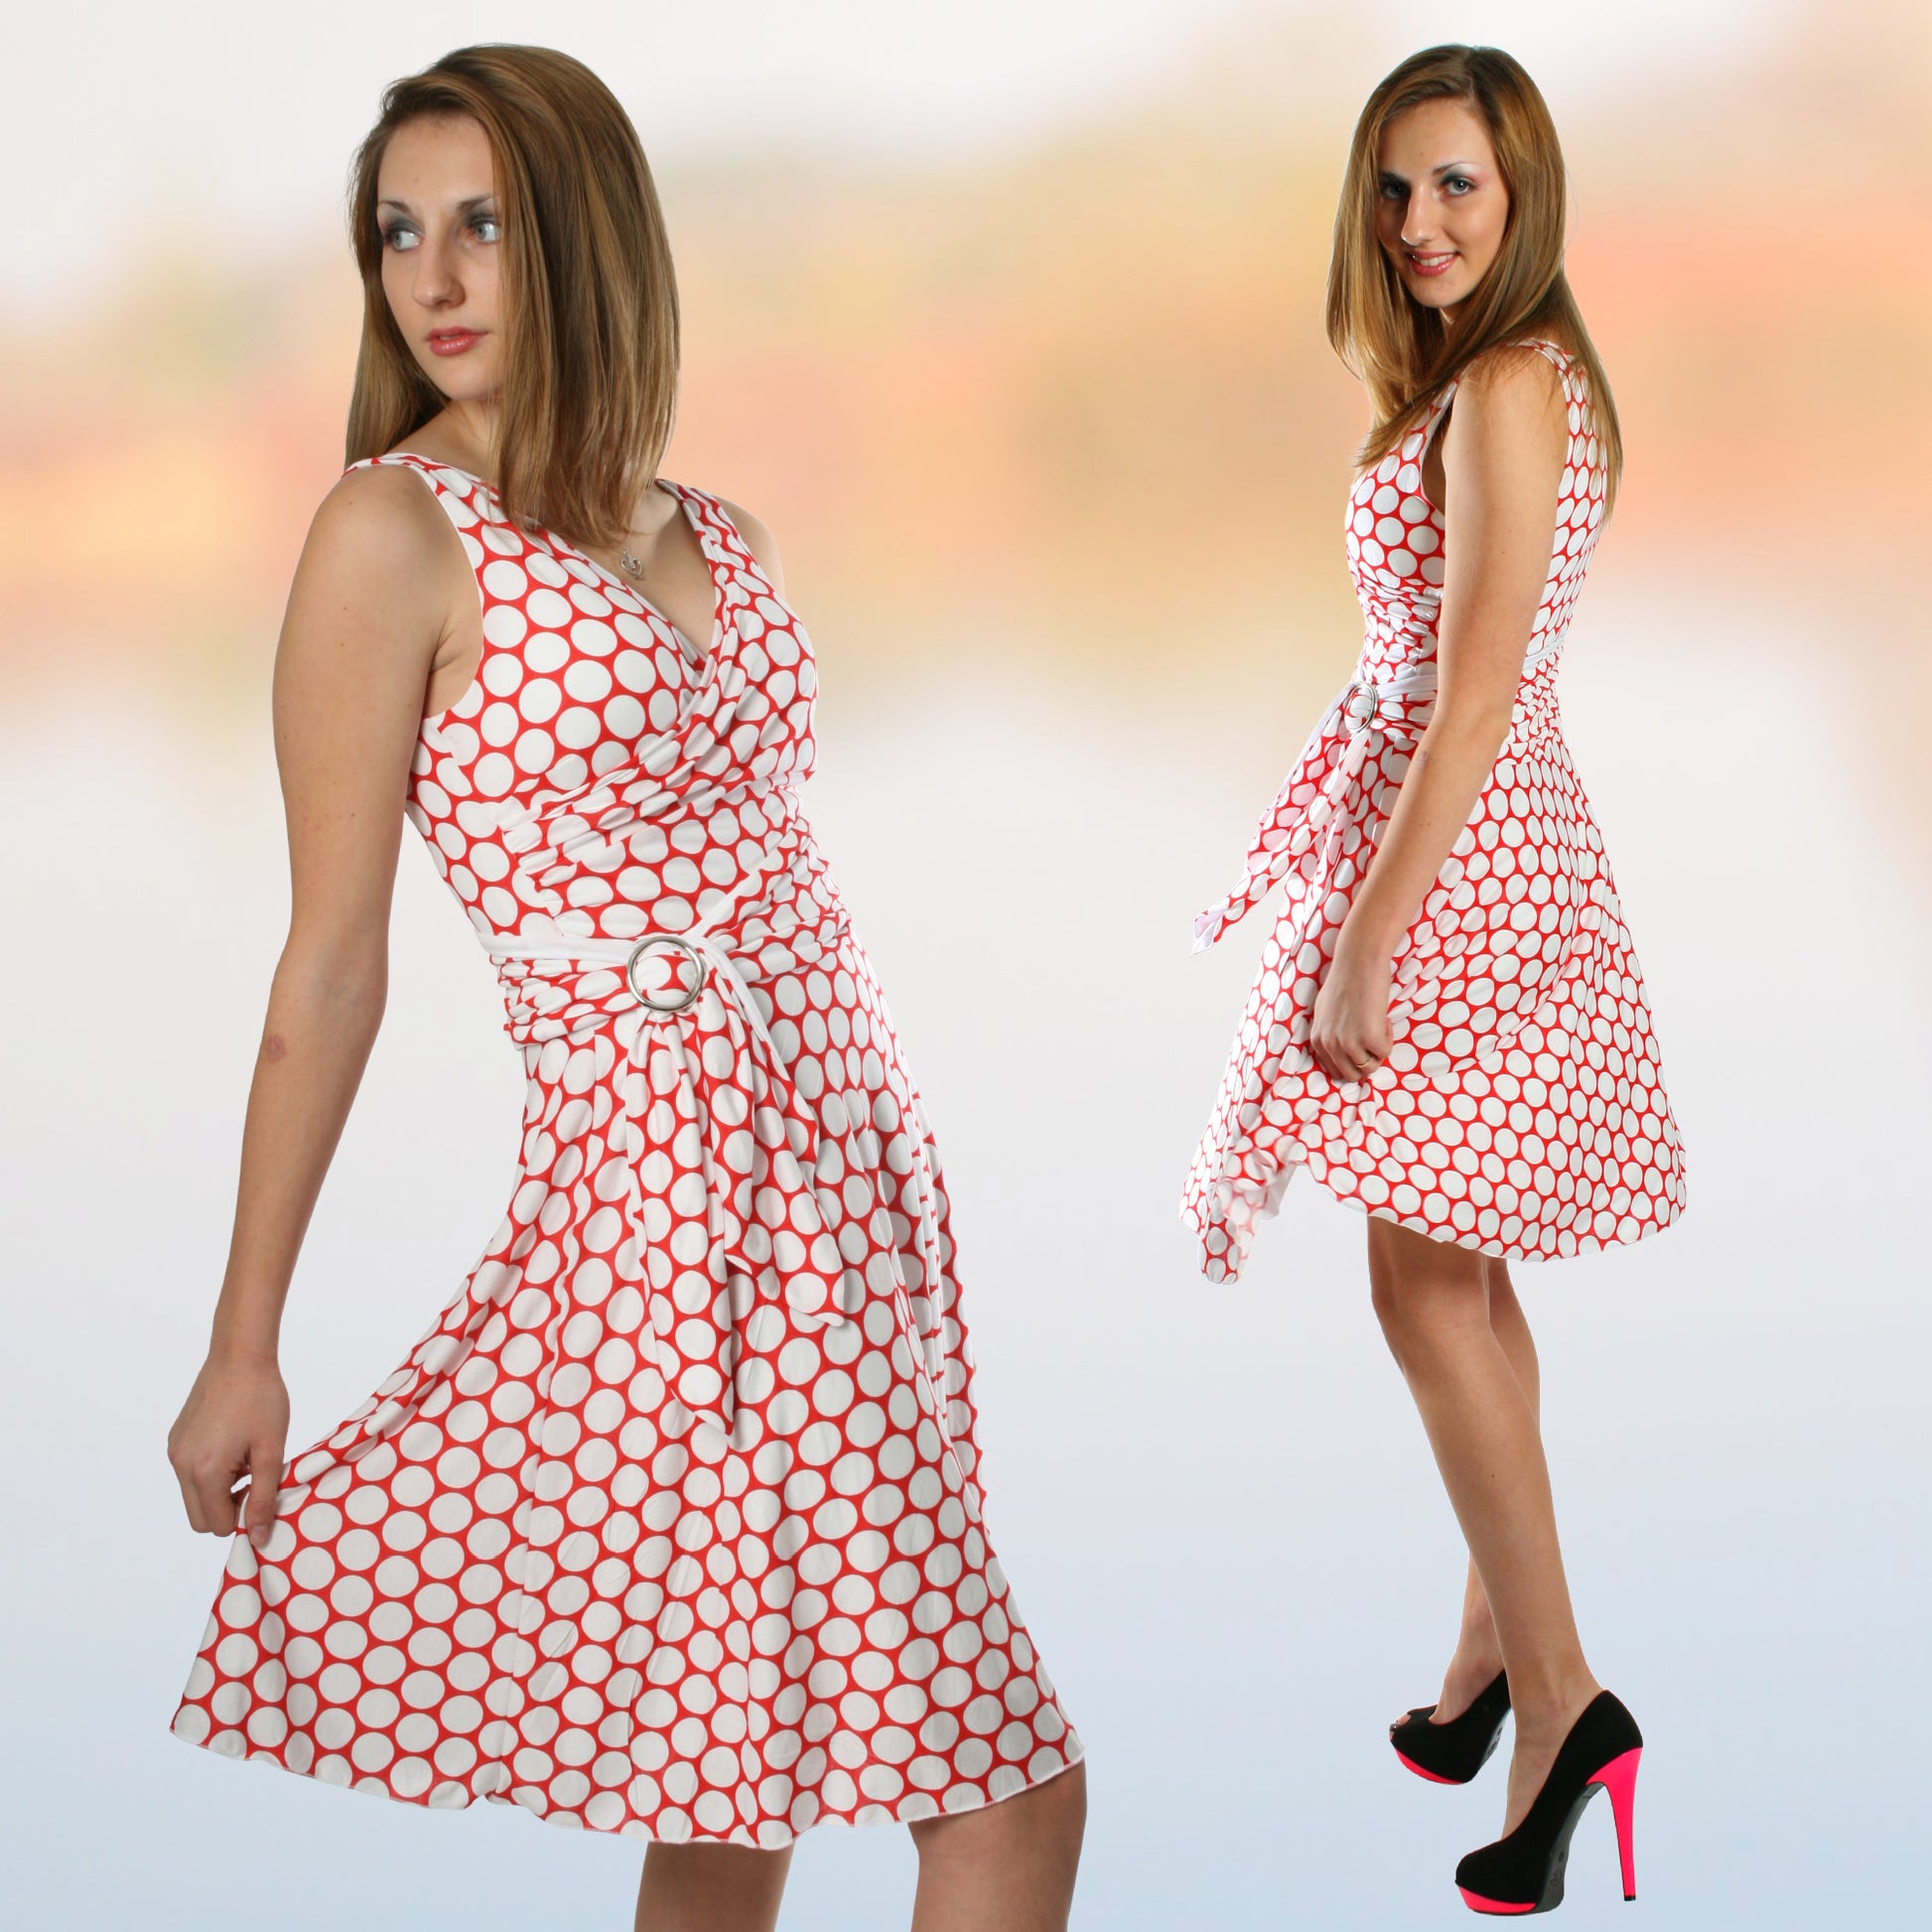
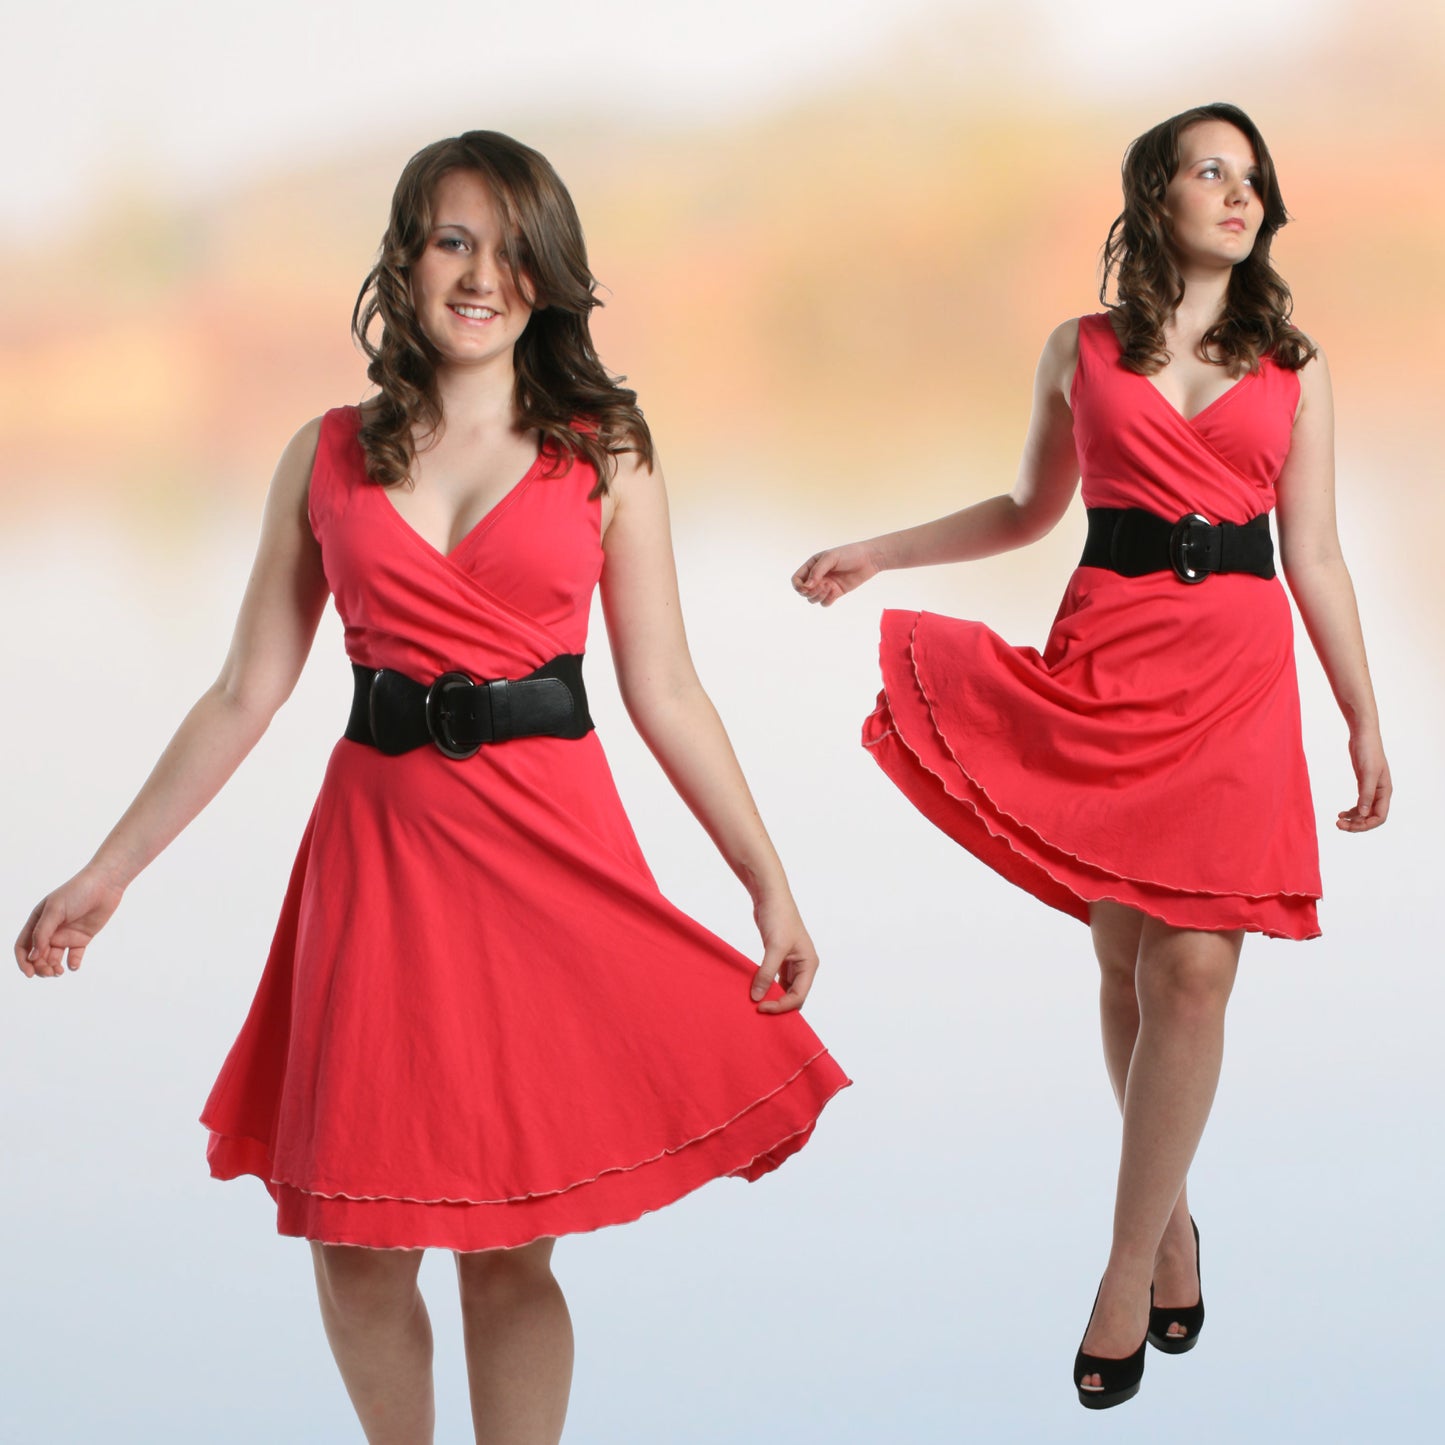
I really like this fabric. It’s from Birch from Fabric Worm in California. It’s an organic fabric and I’ve worn this dress quite a few times now.
I’ve found my neckline a little bit loose, but it is so comfy and so beautiful. You could now overlock what we’ve just sewn and use that as the neckline, but it will come out wider. So if you wanted to do that, you would have to trim the seam allowance when cutting out.
It does look nice though. I think it’s beautiful.
Understitching and Finishing the Neckline
Now we’re going to do some understitching. Again, it will stretch my fabric, so it was very important that your binding is very taut on there because every step of the way you are stretching the fabric back out afterwards.
What I’m going to do now is cut back the seam allowance through the center so it’s a bit flatter. Then when that’s overlocked, it’s going to be much nicer.
On a quick dress, if I wanted to make a very fast summer dress and it was a very light fabric, I would just cut it back in one go. I don’t bother with all these steps. Straight on the machine: sew, overlock, topstitch.
But when you’re doing it with a cotton like this that stretches, it’s important to do it in steps.
So at this point, once it’s cut back, I go back to my ironing board and steam it back in because I don’t want it to stretch and I want it to look really nice and pristine.
This dress will take you more like an hour and a half if you do it this way. I’m obviously a bit faster, but it still took quite a long time.
Now I steam it in so when I understitch it and it gets stretched again, I don’t stretch it further.
If you put your pattern back on, you’ll see how much I’ve steamed it in. It really went back to its shape. It took away quite a bit.
By the time I finish, it will look exactly like the pattern piece again.
So I’m just checking that I’ve steamed it evenly. Now I’m going to stitch my seam allowance to the binding. That is called understitching.
Understitching can also work the other way around, but this time we are stitching the binding to the seam allowance, right on the edge.
I have to say, even though this was hard to do out of the three dresses I made for this sewing course, I think I like this one the best.
I wish I had made it a full size smaller. That is something I would recommend. If you are working with 100% cotton and this kind of stretch, unless you are using a different type of fabric for your binding, it will stretch quite a bit.
As you could see in the introduction, I made the dresses in the same size, but this looks significantly bigger in cotton.
I think it really needs a good wash and maybe a tumble dry.
Now you can see it has stretched again, so I will have to steam it again. That’s the thing with 100% cotton.
But it is worthwhile, because it is a very comfortable dress and I’m going to love wearing it all summer long.
Maybe it’s not a bad thing it’s a bit looser—if it gets really hot, at least it’s not clingy.
You can see on the back how much it has stretched. That’s why it was so important to make the binding shorter.
I could have cut all this out, but that’s not how I work. This is real sewing, and you can see what happens.
On this side as well, you just want everything nice and flat. Steam first, then press.
Now I’m going to turn it in. It would look absolutely beautiful if I left it like that.
But now we topstitch from the outside. This makes it much easier to keep everything even.
If you are doing this for the first time, you can iron it over like I’m doing here. For experienced sewers, you can just roll it with your hands.
But on this fabric, I want to avoid stretching.
So I topstitch from the top. You just find a fixed point on your presser foot and guide the fabric.
What you don’t do is pull it. You always push the fabric through.
This is effectively another stay stitch.
Never pull, especially with 100% cotton with no recovery.
Look how lovely that looks. You get a beautiful stitching line.
Very important: your stitch length should be about 3.5. Don’t go too small or it will look very homemade.
The distance from the neckline edge is just under foot width, and that looks absolutely stunning.
And now that I’m done, I can look at it and go—glad I finished this. Now we can go on to closing the side seams.
Closing the Side Seams
Transcript for the video: Sophia Faux Wrap Dress - The Side Seams
Now we’re going to close the side seams, and you need to make sure that you’ve overlocked the shorter edge of the front. I’m going to iron my seams apart, but I have to say if you guys want to just overlock it all in one go, you could overlock the side seam after you’ve sewn it. That is possible, especially if you have a lighter fabric.
First thing to do though is to put both fronts on top of each other, and then pin them in with pins that are vertical to your seam. Then you can either leave them in or take them back out. After that, you put the back over it and you pin it down, so it is gridded effectively.
Down here we have three layers, so it does get a little bit thick. I like that because also any imperfections are not so visible. Little rolls of something on my belly will not be seen so much if you have this nicely held in by a double layer of fabric. That’s why I quite like wrap dresses—they really do wonders for a figure.
One-centimeter seam allowance.
Now take it to your ironing board, and we need most of this seam ironed to the back because it would be way too thick if we didn’t do that. But at the top, because I’m going to put my binding on there, and since mine is quite a thick one, more medium weight, I wanted to iron two parts so that it’s not too thick in that area.
You could of course have ironed it all into one direction, the back, that also would have worked. But why have it easy when you can do it beautifully?
Okay, side seams done—excellent. We are coming to the end. It’s going to go really fast now, on to the armhole binding.
Transcript for the video: Sophia Faux Wrap Dress - Binding the Armholes
Now we’re going to finish the armhole. It’s exactly the same method that we’ve just employed, only we don’t need to do quite as much ironing.
I’m going to put my binding here on the underarm seam. Make sure that my seams don’t fold over. Put a pin in there. Put a pin at the shoulder as well. It’s exactly half, right? So that’s excellent. And it’s also exactly half on my armhole binding.
So I just need to put these on top of each other and then I can ease the rest in. There’s a little bit of easing to be done, just so the armhole isn’t too saggy. But I also have to say at this point I like my armholes higher up. A lot of sewing patterns have them very, very low.
If you prefer them lower, you could always lower your armhole if you liked, and then whatever you lower it, you add to the length of your armhole binding. Me personally, I like them higher up because I don’t like all this exposing myself, especially if I already have a pretty deep neckline.
So can you see here that I’m easing in a little bit, and that will just come out perfect.
Sewing the Armhole Binding
I’m going to go over to my sewing machine: 1 centimeter seam allowance.
The armhole is actually to the right-hand side of you as you’re working on this one. It just makes it easier, but you can go with whatever method works best for you. With sewing, you find out that you will develop your own methods after a while, and you don’t have to always follow what somebody else is doing.
Maybe when you start you do, but later on you find your own way.
Now here I’m just going to show you that you could also cut it back in layers. That means the first layer is cut very close, just leaving a couple of millimeters. Then the next layer sits in between that and the tallest layer, so it’s nice and flat. You can absolutely do that as well.
Now we’re going to do the understitching, and then we’re going to fold it over and stitch it.
There we go. I’m just folding that in nicely.
Here you can see what I mean: I’m working on the inside, whereas the garment is turned inside out, and I now have my armhole to the left side of my presser foot.
Topstitching and Finishing
Next step is to topstitch it. This time we’re sewing it again so that the armhole is on the right side of us. Slightly different again—just tiny little tricks you learn as you go.
Keep it nice and flat so you don’t sew in any pleats. This is particularly important in areas where you are holding it in a little bit more.
Don’t forget that I made the binding slightly shorter because it did stretch more than I wanted it to. So you need to really smooth this out.
Less ease is needed in the shoulder area because the fabric is fairly straight there—it doesn’t stretch as much as it does on the bias.
Most of the holding-in happens here where it is on the diagonal. That’s where it stretches the most.
So if you stretch your binding more in that area, you will not have any gaping armholes.
Look at that—now we’ve got our armhole done. I’m just going to give it a little bit of an iron from the top as well.
It’s beautiful.
And now we’re ready for the skirt.
Transcript for the video: Sophia Faux Wrap Dress - The Skirt
Are you excited because now it comes to the really easy simple skirt so quick. All you have to do is close the side seams. I’ve overlocked them of course first. You can do it in one go, that’s why I don’t have to do it like really nicely like I do here. Actually it’s just dress, but I wanted to iron them apart and you know proper dress making.
So one centimeter seam allowance all the way to the hem. And I am now seaming apart, overlock round the hem. So quick and easy depending on which fabric you use. With a hundred percent cotton it took me like 40 minutes, 30 minutes. It’s so quick.
All we’re going to do is stitch in the overlocking edge there, turn it up about 1.2, 1.3 centimeters, just over a centimeter actually. And then you just let that lie to the sewing machine. Very important that you have a fixed point on your foot that’s sort of over to the right. It’ll be just a little bit less than presser foot width I think, or presser foot width.
I’m going for that one little line that’s just to the left of it. And that’s all I concentrate on as I go around. And then again, as you can see, it’s stretched again. So what do you do? Yeah, you’ve got to steam it all back in.
Attaching the Bodice and the Skirt
And now we can attach the bodice and the skirt. So I’m going to turn my bodice inside out before I do that. I mark the centres so that I can line up the centre of the skirt with the centre of the bodice, and the side seams of the skirt with the side seams of the bodice. So it’s basically quartered. It’s very, very easy, I love it.
I’ll do another snip on this side. Excellent. Now there is my top turned inside out and I’m just going to stick that over my skirt. There you go. Make sure that the seam allowances stay apart.
I’ve got that. It’s hard to get in actually because we’ve got so many layers there.
Choosing the Stitch for the Waistline
And the next thing we need to talk about is what stitch do you use when you do this waistline.
Now on this fabric, which you know doesn’t really stretch very much or doesn’t recover, the last thing you want to do is stretch it. It is so stretched already.
So I used a standard stitch. I didn’t do anything different than I would normally and that was absolutely fine.
If you have a fabric which has got good recovery, 25% elastane or lycra, then you can stretch it as you go and that’s fine too.
If you’re using a very stable interlock with elastane, what you really want to do is use the triple stitch because otherwise the threads will break when you put it on. For a very stable interlock with elastane I would recommend that you use the triple stitch. Indeed, for all interlocks I would say triple stitch is a good one.
If it’s just one of your flimsy jerseys which rolls up on the side, beautiful for a summer dress, then you can stretch it as you go and use a standard stitch.
If you’re using a hundred percent cotton, and you can see it if it looks like mine and it stretches, you don’t need to do anything. You just choose a standard stitch and that’ll do it.
And then you just sew that now. The next step is just to overlock it all the way around, and that’s basically your beautiful dress done.
Final Thoughts
It’s just lovely. I’m absolutely in love with this dress. I think you will love this too.
Look at that. So you’ve learned how to do binding and how to put together a very nice knit dress. Hopefully I see you again for another item in our Jersey collection.
Bye for now.
Good pattern makes a very nice dress!