Skip to product information
1 of 13

MAISY SHORTS

MAISY SHORTS

Filled Circle
Filled Circle
Empty Circle
Empty Circle
Empty Circle
Regular price €5,95 EUR
Regular price Sale price €5,95 EUR
Sale Sold out

Maisy is a cheerful pair of summer shorts designed for sunny adventures and everyday play. This sweet girls sewing pattern, features a comfy elastic waist, a tidy flat front, practical side pockets, and a charming turned‑up hem in a breezy Bermuda length.

She’s a delightfully quick sew, perfect for anyone starting their beginner sewing journey. 

As with all of Marina’s patterns, the video sewing course is completely free — just scroll down a little and start watching - making Maisy one of the friendliest little projects to sew.

Pattern Download Includes

  • Instant Download
  • DIN A4 & US Letter Size
  • Individual PDF files for every Size
  • All Sizes included
  • Detailed eBook
  • Video Tutorials

Design Options

  • Elasticated waist with belt loops and ties for a gorgeous bow
  • Optional waist tie 
  • Back darts to create a lovely shape
  • Oversized back pockets
  • Optional hem trim with side split and a cute bow
  • Side pockets with optional piping or binding

Fabric Requirements

BEST MATERIAL CHOICE

  • Cotton
  • Linen
  • Denim

FABRIC REQUIREMENTS
•  Shell: 16–24 inches (40cm - 60cm)

NOTIONS

  • Matching thread
  • Topstitching thread
  • Machine needle (80)
  • Eyelets 8mm: 2 x
  • Cord: 31-39 inches (80-1 m)
  • Elastic 1.6-2 inches (4-5cm) wide: 17.7-31 inches (45-80cm)
  • Iron on Interfacing (H180): small Rest

Available Sizes

Sizes: 1-12 Years

Please Read

  1. This is a digital pattern or PDF file, not a physical product. It will be delivered electronically via a download link delivered to the email used for the purchase.
  2. To ensure the pattern prints at its actual size, it's recommended that you use Adobe Acrobat Reader.
  3. The pattern creator, Frocks & Frolics, welcomes small-scale production using their patterns. 

Customers are encouraged to tag Frocks & Frolics when sharing projects made using their patterns on social media.

@frocksandfrolics #frocksandfrolics

View full details

STEP-BY-STEP VIDEO TUTORIALS

Thumbnail
INTRODUCTION TO THE PROJECT
Thumbnail
BASIC VIDEO TUTORIAL
Thumbnail
INSERTING EYELETS
Thumbnail
FABRICS WITH DISTICT PATTERNS
Thumbnail
FUNKY HEM TRIM AND ELASTICATED PATCH POCKETS
Thumbnail
PERFECT WESTERN POCKET

VIDEO TEXT

Welcome to the Girly Shorts

Transcript for the video: Maisy Shorts - Introduction to the Project

Welcome to the Girly Shorts Maisy. My patterns come with individual files for every size. Each one of the pattern pieces has a different flower on it, so they go together and you won’t get confused.

The waistband has a bright yellow flower, the front has a white little flower, and the back has a purple flower.

Organizing and Sorting Pattern Pieces

I’ve cut all my pieces out and now I’m going to put together all the back pieces. Everything with a dark flower goes into one pile, and everything without a flower is a single piece, so we set those aside.

The waistband comes in two parts, and the front comes in three parts. Then finally we’ve got the girly pocket, which is on its own again.

Assembling the Pattern

Put the pattern pieces together so they overlap and the attachment line is completely removed. Use the notches to help you align everything, then tape it in place.

For the back piece, you’ve got three sections. Start by overlapping the lower part, then place it onto the upper part, and tape it together. The pattern piece is now complete.

Cutting and Construction Notes

You can now work with this pattern. The back includes a dart, which you need to snip when cutting out. There is also a placement guide for the pocket, a turned-up hem, and an arrow that needs to lie parallel to the selvedge.

Style Options and Variations

Now you need to decide which version of the trousers you want to make.

You can make a very simple version with a large back pocket and a side pocket, but no eyelets at the top. Or you can add eyelets, which give a more sporty look and allow for better adjustability.

You can also choose to use eyelets without the front pocket if you prefer. To step it up further, you can add ties, belt loops, a small bow, and a trim at the bottom.

As you can see, there are also variations with a slightly changed pocket, including an elasticated version and decorative trim with a small pleat.

It is a very easy pattern to make, so have fun. Thank you for watching.

Transcript for the video: Maisy Shorts - Basic Video Tutorial

Welcome to the Detailed Instructions of the Maisy Shorts

The Maisy Shorts have fake turnups, which you can see here. We've got some really lovely side pockets with faux piping, darts in the front and waistband with a special technique devised by myself, and plenty of room in the bottom area for a diaper, which is especially important for the smaller sizes.

Let's get started.

Cutting Out the Fabric

When you're cutting out, my measurements say 50–70 cm for 140 cm wide fabric. If you've only got 22 inches wide fabric, you can nest the pattern pieces into each other to make them fit.

I turned over the back piece here to make sure it fits alongside the pocket facing and waistband. If you're cutting those from a different fabric, you won't need as much of your main fabric.

The pocket was cut afterward, but of course you could cut the pocket first before cutting out the rest.

When cutting out the back piece, make sure that if it's on the wrong side of the fabric, you turn it over to the right side before marking your darts. That's quite important. You don't want to realize later that you've forgotten to do it.

You can mark either both sides or just the center. It doesn't really matter.

We're also cutting out the pocket. Remove the pins because you'll need the pattern piece again to cut the pocket from the lining fabric, which in my case is a check fabric.

When cutting out the front, cut the dart all the way down. Your dart on the pattern is actually much shorter now because my husband noticed the original version and said, "Oh no, that looks like something for a boy." I noticed it too, so I shortened the darts to create a much nicer pleat.

The pocket sits underneath here like this.

That is everything we need from the shell fabric.

Cutting the Waistband, Facing, and Pocket

Now we're going to cut the waistband, facing, and pocket.

For the waistband, it's best to tear the fabric because that ensures the width stays perfectly straight.

You can add eyelets if you'd like. I haven't done that on this simple version, but there's a separate video showing how to install the eyelets.

I'm also cutting out my pocket facing. You can cut it either straight grain or cross grain. Either is fine.

Detailed instructions regarding elastic width are included with the pattern.

Making the Pocket

Begin by placing the pocket pieces right sides together.

Sew all the way around, leaving a turning gap. Make sure the turning gap is on the straight section rather than on a curve, because it's much easier to finish neatly afterward.

As you're sewing curves, take a few stitches, leave the needle down, lift the presser foot, pivot slightly, and continue sewing. This creates smooth curves without puckering.

Once sewn, trim the seam allowance back to approximately 2–3 mm. Around the turning gap, leave a slightly wider seam allowance because it helps when turning and pressing later.

Turn the pocket through from the side furthest away from the turning gap. Pull it through carefully and shape all the curves.

Press thoroughly, making sure all curves are fully turned out. If a little lining fabric peeks out, that's perfectly fine and can actually look quite attractive.

Fold over and press the top edge as well.

Topstitching the Pocket

We're going to topstitch along the top edge using a triple stitch.

On most sewing machines, this stitch looks like three parallel lines and is sometimes called a jersey stitch. It moves backward and forward repeatedly, creating a strong decorative stitch.

Sewing the Back Darts

You can use the center notch you cut earlier to locate the dart.

The fabric edges must lie perfectly on top of each other so the dart forms correctly. Pin carefully and sew straight down.

The dart measures 9 cm, but if you're sewing accurately, you don't necessarily need to measure. Beginners may prefer to mark the endpoint with a pin.

Press the dart toward the center back.

Then topstitch over the dart using the triple stitch. This secures the seam allowance and creates a professional finish.

One advantage of the triple stitch is that it gives a decorative effect without requiring thicker topstitching thread, which can cause looping underneath on some machines.

Attaching the Back Pockets

Cut out the positioning template and place the pocket over it.

Once positioned correctly, secure with a few pins.

Repeat for the second leg.

Topstitch the pockets in place using the triple stitch. Start at the top edge and ensure the folded-over section is fully caught in the stitching.

I use the red markings on my Pfaff presser foot as a guide, which places the stitching approximately 2.5–3 mm from the edge.

Secure the threads when finished.

Constructing the Front Pocket

Place the pocket facing right sides together with the front piece.

Sew using a 1 cm seam allowance.

Trim the seam allowance back to approximately 3 mm and turn the facing inward.

Press carefully so that a tiny amount of the seam allowance shows. This creates the appearance of piping without any extra work.

Place the pocket bag underneath, matching the curved edges.

Pin thoroughly and sew all the way around using a 1 cm seam allowance.

I always use a 1 cm seam allowance throughout my patterns.

Finishing the Front Pocket

Fold the pocket into position and topstitch around the curved edge using the triple stitch.

This prevents the faux piping effect from shifting after washing.

Next, overlock the curved edge.

When sewing curves on the overlocker, pull the fabric gently toward the right rather than downward. This keeps the stitches neat and prevents them from becoming overly tight.

Give everything a good press.

Secure the pocket to the trouser front with a few pins so it doesn't move while you're working.

Sewing the Center Front

Sew the center front using a 1 cm seam allowance.

Whenever you approach a curve, stop with the needle down, pivot, and continue slowly.

Take your time around curves to keep them smooth.

Overlock the seam afterward. Turn the knife off for this area if necessary to avoid accidentally cutting into the fabric.

Sewing the Center Back

Sew the center back seam using a 1 cm seam allowance.

Overlock the seam and then press the seam allowance toward the right.

For the front, press the seam allowance toward the left. This ensures both seams face the same direction once the garment is assembled.

Stabilizing and Topstitching

Apply fusible interfacing to the wrong side of the center front to stabilize it and prevent wrinkling during wear.

Press firmly. A useful guide is to count slowly to eight while holding the iron in place.

Secure the pocket temporarily and then topstitch both the center front and center back seams using the triple stitch.

You can add a second row of topstitching if you wish, but I don't think it's necessary for girls' shorts.

Sewing the Side Seams

Pin the side seams together and sew using a 1 cm seam allowance.

Remember, when sewing, watch the seam guide on your needle plate rather than staring at the needle itself.

Overlock the seams with the right side facing upward. This ensures all seam allowances are pressed toward the back.

Press the seam allowances toward the back and topstitch using the triple stitch.

Because the inseams are still open, this is very easy to do.

Attaching the Waistband

Fold the waistband in half to locate the center back.

Pin the center back first, then the sides, and finally distribute additional pins around the waistband.

Sew the waistband to the shorts using a 1 cm seam allowance.

Remove pins only as you reach them with the needle.

Press the seam allowance upward into the waistband.

Sewing the Front Darts and Inseams

Remember that the darts are now shorter than those shown in some earlier samples.

Pin carefully and sew the darts to create pleats rather than shaping darts.

At the same time, pin the inseams together.

Sew the inseams with a 1 cm seam allowance.

Make sure the fabric edges align perfectly, particularly at the crotch intersection.

Overlock the darts, inseams, and top edge of the waistband.

Pressing the Pleats

One mistake I made repeatedly was pressing the pleats in the wrong direction.

The pleats should point toward the center front so that they open toward the side seams.

Press them carefully before continuing.

Sewing the Leg Seams and Hem

Join the legs and overlock the seams.

Turn the hem up 3 cm and pin vertically all the way around.

Slide the leg onto the sewing machine arm and stitch around the hem, starting at the inseam.

Secure the stitching.

Creating the Fake Turnup

Flatten the seam allowance and fold the hem upward so that it extends approximately 1 cm above the seam.

Pin in place.

Stitch in the seam on the inside and topstitch on the outside. This creates a fake turnup.

This technique is common in ready-to-wear clothing because it saves fabric and is very easy to sew.

Finishing the Waistband

Fold the waistband down 4.5 cm to create a casing for 4 cm elastic.

Pin all the way around and stitch in the seam.

Using the machine arm makes this much easier.

Inserting the Elastic

Attach a safety pin to the middle of the elastic and thread it through the waistband.

Position the first end so it overlaps by 1 cm and aligns with the dart seam allowance.

Topstitch it in place.

Thread the remaining elastic through the casing and secure the second end in the same way.

Don't forget to remove the safety pin first.

At this stage, the shorts are essentially complete.

Optional Elastic Topstitching

If you'd like a more professional ready-to-wear appearance, you can topstitch through the elastic.

I usually sew one row 1.5 cm from the top and another 1.5 cm from the bottom.

Stretch the elastic evenly while sewing, but don't overstretch it or pull too hard, as this can break the needle.

Finished Maisy Shorts

The simple version of the Maisy Shorts is now complete.

They provide lots of leg room and plenty of diaper room, making them ideal for summer wear.

You can also customize them by:


  • Adding eyelets
  • Using contrast fabrics
  • Adding front ties
  • Adding belt loops
  • Adding decorative hem trims
  • Creating elasticated Megan pockets

Separate videos show each of these techniques in detail, and the pattern includes separate pieces for the belt loops, ties, and bow.

Have fun sewing, and I'll see you next time.

Thank you for watching. Bye.

Installing Eyelets on the Maisy Shorts

Transcript for the video: Maisy Shorts - Inserting Eyelets

Now let's get started on installing some eyelets.

You just need some metal eyelets and a cord to thread through them. You can see I've made the pocket slightly differently on this version, so if you don't want to work with a patterned fabric in that area, that's a really good option.

Here, I've simply topstitched the pocket ends, and on this version I've created a little toggle.

Materials Needed

To complete this variation, you'll need:

  • Four eyelet components (the eyelets and their backing washers)
  • Cord for threading through the waistband
  • Two small pieces of interfacing (Vilene)
  • Pocket pieces, if you're making the contrast pocket version

If you'd like to make the pocket as I've done here, cut the pocket base from the check fabric and the facing from the shell fabric.

Preparing the Eyelet Areas

You'll need two additional pieces of interfacing positioned exactly where the eyelets are marked on the pattern.

I recommend cutting the interfacing into small circles as I've done here. Apply the interfacing to the marked area and then place the pattern piece back on top so you can mark the eyelet position with a pencil.

Once marked, cut out the small circle for the eyelet.

On the waistband, turn over the pattern piece and apply the interfacing to the wrong side.

You can also add two additional eyelets at the back, as I've done on this sample. These positions are marked on the pattern as well.

Make sure you mark the positions before cutting the holes. It makes the process much easier.

Installing the Eyelets

Insert the longer part of the eyelet—the piece with the stem—from the outside of the fabric.

It's very important not to make the hole too large. I make only a very small opening and gently force the fabric apart. This allows the fabric to fray slightly around the eyelet without weakening the area.

Place the washer over the stem with the raised side facing upward and the thicker section facing down.

Then position the eyelet-setting tool over the top and hammer it into place.

This is the point where you'll probably excite all your neighbors with a bit of hammering.

Once installed, the metal edges fold down neatly and create a professional-looking finish.

Sewing the Waistband with Eyelets

I've already sewn on my waistband, and now we're going to look at how to stitch it.

This process is only slightly different from the standard shorts construction.

Because we need to sew very close to the eyelets, I recommend using a piping foot. This allows you to move the needle almost all the way to the right so you can stitch very close to the eyelet edge.

Before stretching anything, secure your stitches by sewing backward and forward.

Stretch the waistband only very gently while sewing. If you pull too hard, you may break your needle.

Choosing the Right Needle

I'm using a jeans needle.

I originally tried:

  • Size 80 needle — broke
  • Size 90 needle — broke
  • Another size 90 needle — also broke

Eventually I switched to a jeans needle, which is made from much stronger steel.

Even with the jeans needle, I still needed to be careful not to overstretch the fabric while sewing.

Stitching Around the Eyelets

Sew along one side, keeping the stitching close to the eyelets.

When you reach the end, secure your stitches.

On my Pfaff machine, I can simply move the piping foot to the opposite side and adjust the needle position accordingly. If you move the needle all the way to the edge and then back two steps, you'll usually get the perfect position.

If you sew too close to the eyelet edge, you'll likely break your needle again. I learned that the hard way.

The key is finding a position that's close enough to look neat without allowing the needle to strike the metal.

Again, secure the stitching before stretching the waistband and sewing across the top edge.

Adding the Drawcord

Before threading the cord through the eyelets, check the length and adjust it to your preference.

The pattern includes measurements, but I always recommend testing it first.

If you'd like to tie a bow at the front, you'll probably want a slightly longer cord.

Thread the cord through one eyelet and out the other side.

This creates an adjustable waistband, which I really like because it allows you to tighten the shorts if needed.

Once you're happy with the length, stitch across the cord ends and fray them out.

Of course, if you prefer a ready-to-wear finish, you can simply tie knots in the ends instead.

Making Fabric Toggles

If you'd like to make the fabric toggles shown here, fold the fabric strip and position it around the cord approximately 2 cm from the end.

Repeat on the other side.

The open edge should face downward before folding the strip over and pinning it tightly around the cord.

This process is much easier if the fabric has been cut on the bias.

Unfortunately, I cut mine on the straight grain because I was sewing on autopilot and didn't pay attention to the pattern piece. There is actually a diagonal grainline marked on the pattern.

Sewing the Toggles

Secure the top edge well and sew diagonally toward the outer edge.

Use a short stitch length—about 1.2 mm—so the fabric won't fray excessively.

Secure your stitches and trim away the excess fabric, being careful not to cut the cord.

Trim around the cord and down the length of the toggle.

Turning and Finishing the Toggles

Now turn the toggle right side out.

When I say "simply turn it," that's definitely easier if you've cut the fabric on the bias. Straight-grain fabric takes quite a bit more persuasion.

I use a pin or safety pin to help push the fabric through.

The finished toggle looks a little bit like a bell, which I really like.

Pull everything into shape and then fray the end to create the decorative tassel effect.

Finally, trim both ends so they match.

I probably didn't need to trim them, but I like everything to look neat and even.

Finished Eyelet Version

And that's it—the eyelet version is finished.

It's a very simple addition, but it gives the shorts a completely different look and adds some adjustability.

If you'd like to see what else you can do with this pattern, check out the other videos on the project page.

You'll also find tutorials showing:

  • Alternative back pocket styles
  • Decorative front ties
  • Belt loops
  • Additional pocket variations
  • The simple beginner-friendly version

This project can easily be completed in an afternoon.

Thank you very much for watching, and I'll see you next time.

Bye for now.

Transcript for the video: Maisy Shorts - Fabrics with Distinct Patterns

This is a very quick run-through and shows you how you would be dealing with these trousers if they had a very distinct pattern and if you wanted to put on belt loops and ties and create a proper tie. You could also wear these as Bermuda pants as well and have them longer. Some people really like that for their girls; they don't like them too short.

The back has got the oversized pockets again, and I've used loads of belt loops and some buttons to create a little bit of interest. I think that's a really nice way to do it, so you could try three fabrics instead of just the two.

Fabric and Cutting Tips

The fabric I've used for this is a nice quilting cotton. It's about 70 cm for the larger sizes and about 50 cm for the smaller sizes. For contrast, I have used gingham, and then I've also used linen to offset both fabrics.

I've also wanted to show you this little trick here. If you fold the pocket in half and place it not with the grain but across or even diagonally, you don't have to worry about the pattern so much. Just make sure that the crease you've just put in is actually central to the pattern where you place it.

You want to make the leg about 8 cm longer, so you cut the back leg first. Cut out the back and then place the back onto the front so that you can see where the pattern sits. Now I'm using the inner leg seam, and I shouldn't have done that. Of course, you need to use the outer one. I must have been so tired. The same applies here. If you line this up with the outer leg seam, then of course you can shimmy it around so the pattern sits perfectly where it needs to sit.

Then you cut your front out and can cut that one out completely. This will ensure that you've got the right patterns there.

For the pocket, when you cut this little bit out afterwards, you have a little template as to where the pattern needs to sit. When you cut your pocket out, you can place that on there first to position this under-pocket, and it will work splendidly.

Materials Needed

For this version, the facing of the trouser is done in white, and so is the waistband. For the waistband, you'll also need some Vilene to make it stronger.

For the ties, I've used the gingham, the same as the buttons, which I think is quite lovely.

We've got some elastic again, and for the belt loops I've cut them across the fabric to avoid them looking too similar. You need them as long as possible, and they're 5 cm wide (2 inches). We need about seven of them, and each one is about 4 cm long.

Making the Pockets

Now we're going to start with the pockets.

Sew all the way around and leave a turning gap. Don't forget this is the quick run-through. If this is too fast for you, please watch the main video where I'm showing everything much more slowly.

Turn the pocket through and then iron the pocket. Iron the top over. To get the other pocket exactly the same, turn it over, put the other pocket over the top, and iron that one down. That way, of course, they're exactly the same.

Now I'm going to use the triple stitch along the edge just to where the crease is.

Sewing the Dart and Back Section

Next, I'm going to close my dart. Iron the dart towards the body middle and then triple stitch that dart again to make it look really nice and structural.

Now we can position the pocket on and triple stitch that one on. You need to make sure that you catch it at the very top because otherwise it'll kind of flop about.

Then we're going to close the center back with a 1 cm seam allowance. Overlock the whole lot and then iron that seam towards the right side. That's really important.

Then triple stitch it again, moving the fabric away from the seam so you kind of force it apart.

Front Pocket Construction

Next, we're going to put the pocket facing onto the front and sew it into place with a 1 cm seam allowance.

Then we want to cut back that seam allowance. About 2–3 mm is very good.

Iron the facing under, but let a little bit peek out so that it looks a little bit like piping. You could now triple stitch that as well, or you could wait until later.

Match up your pattern exactly. It's not so important that the pocket is in the right position; it's more important that the pattern matches up.

Then you can close the pocket all the way around with a 1 cm seam allowance and remove the pins.

If you haven't triple stitched that already, you need to do that before you close the rest off.

Overlock the pocket, and it's actually done. It's such an easy pocket to do.

Preparing the Belt Loops

Overlock your belt loops on both sides. Then iron them over so that one edge sits into the other edge.

Top stitch from either side with the triple stitch again, and they're ready.

Then cut them to a length of 4 cm.

I've also secured my pocket so it can't go anywhere, and we're going to stitch that in. We'll also stitch the center front now.

Center Front and Side Seams

Overlock the center front. Here I've left the knife on. If you are a beginner, I would really recommend that you disable your knife.

Now you should iron that seam for the center front towards the left so that when we top stitch it, they're both going the same way. You wouldn't want to unpick any of that.

You also want to iron a little bit of Vilene onto the front. That gives it a little bit more stability.

We're going to triple stitch all the way down the front.

Now we can put together the back and the front. Again, you have a 1 cm seam allowance all the way down, and we overlock it.

Then we're going to iron the seam towards the center back, and we're also going to triple stitch this seam the same way as before.

Waistband and Hem

Now I'm going to put my waistband on and iron that seam into the waistband.

We're going to turn this to the inside and do the dart all the way up and all the way down. Then we iron up the hem 8 cm.

Now we're going to close the inner leg seam and overlock it.

We're going on our overlocking frenzy again, so we're also going to overlock the legs now and the darts.

Don't forget they need to be ironed towards the body middle, not to the outside. I've done that wrong on every single trouser.

We overlock along the top, and now I've done this, I can top stitch where my overlocking is all the way around and then just turn it up.

Adding the Elastic

Turn in your waistband 4.5 cm and pin it all the way around.

We're going to stitch right in the seam here so that it's almost invisible.

Once I've done that, I can put in the elastic. I would put the safety pin in the middle, not the lower part. That's actually easier.

Move it through nice and flat, and when it's standing over exactly 1 cm, the same as your dart, then you can stitch it down. It's secure, and you don't need to worry about the elastic slipping out when you do the other side.

On the other side, of course, you do exactly the same. Move it through, have that 1 cm standing, pin it, and stitch that one down.

There you go.

Now you need to distribute the elastic all the way around, and we're going to do two stitching lines on top of the waistband.

You could leave that off, but I think it looks really nice, so let's put those in.

Making the Tie

To put the button on, you might want to measure across so you can find the middle and then sew the button on.

Now I'm going to make the tie.

Fold that tie in half lengthways, and you might want to put a tip in this one. I wasn't sure about the length yet, but you know what the length is and it's all perfect because it's in the pattern.

Do a tip if you like, then leave a turning gap and sew all the way to the end.

Then you can use a pencil—preferably not with a sharp end like I've done here, but with the dull end. I think I was a bit tired when I did this.

Move it through to the turning gap and just pull it through.

Then get out the pencil again and iron it. Move out your seam really well, and your tie is ready.

Attaching the Belt Loops

Now we need to put those belt loops on.

I think it looks really nice if you put loads of belt loops on. The first one is just over a centimeter over to the side, about 1.2–1.3 cm.

Then I've put another one on the side seam, another one on the center back, and another one in the center of that, which incidentally is just where the dart starts. That's optically quite good.

The belt loop kind of sits just over that stitching line that I've done before, if you're wondering where I measure them.

Turn them in at the top and put them in roughly the same space. You need to make sure that you leave a little bit of room there so that you can put your tie through.

It looks so much nicer if it's not too flush and tight.

Move your tie through. Lucky you, you've already got the right measurements in the pattern, whereas I didn't know how much I would need, so I had to cut it back afterwards.

Once I had my tie in the right place and the right length, I cut them. I hand-stitched all of that, and it's basically finished, but you can do that from the start.

Finished Shorts

I hope this has helped you a little bit to see how you need to put it together when you have a pattern.

Loads of belt loops—that is so cute. I'm actually very excited about these ones. They are my favorite. I think they're so, so nice.

You could also make them with eyelets, so there's a separate video showing you how to put a waistband on with the eyelets. Otherwise, it's really all the same.

Again, here I've left the front pocket off, which I also think is really nice.

Then I've got another option where I added the Megan pocket, but I put elastic in the top. We have the same belt loops and tie, but we've also got a hem trim and a bow on it.

I hope you enjoyed this, and I'll see you next time.

Transcript for the video: Maisy Shorts - Funky Hem Trim & Elasticated Patch Pockets

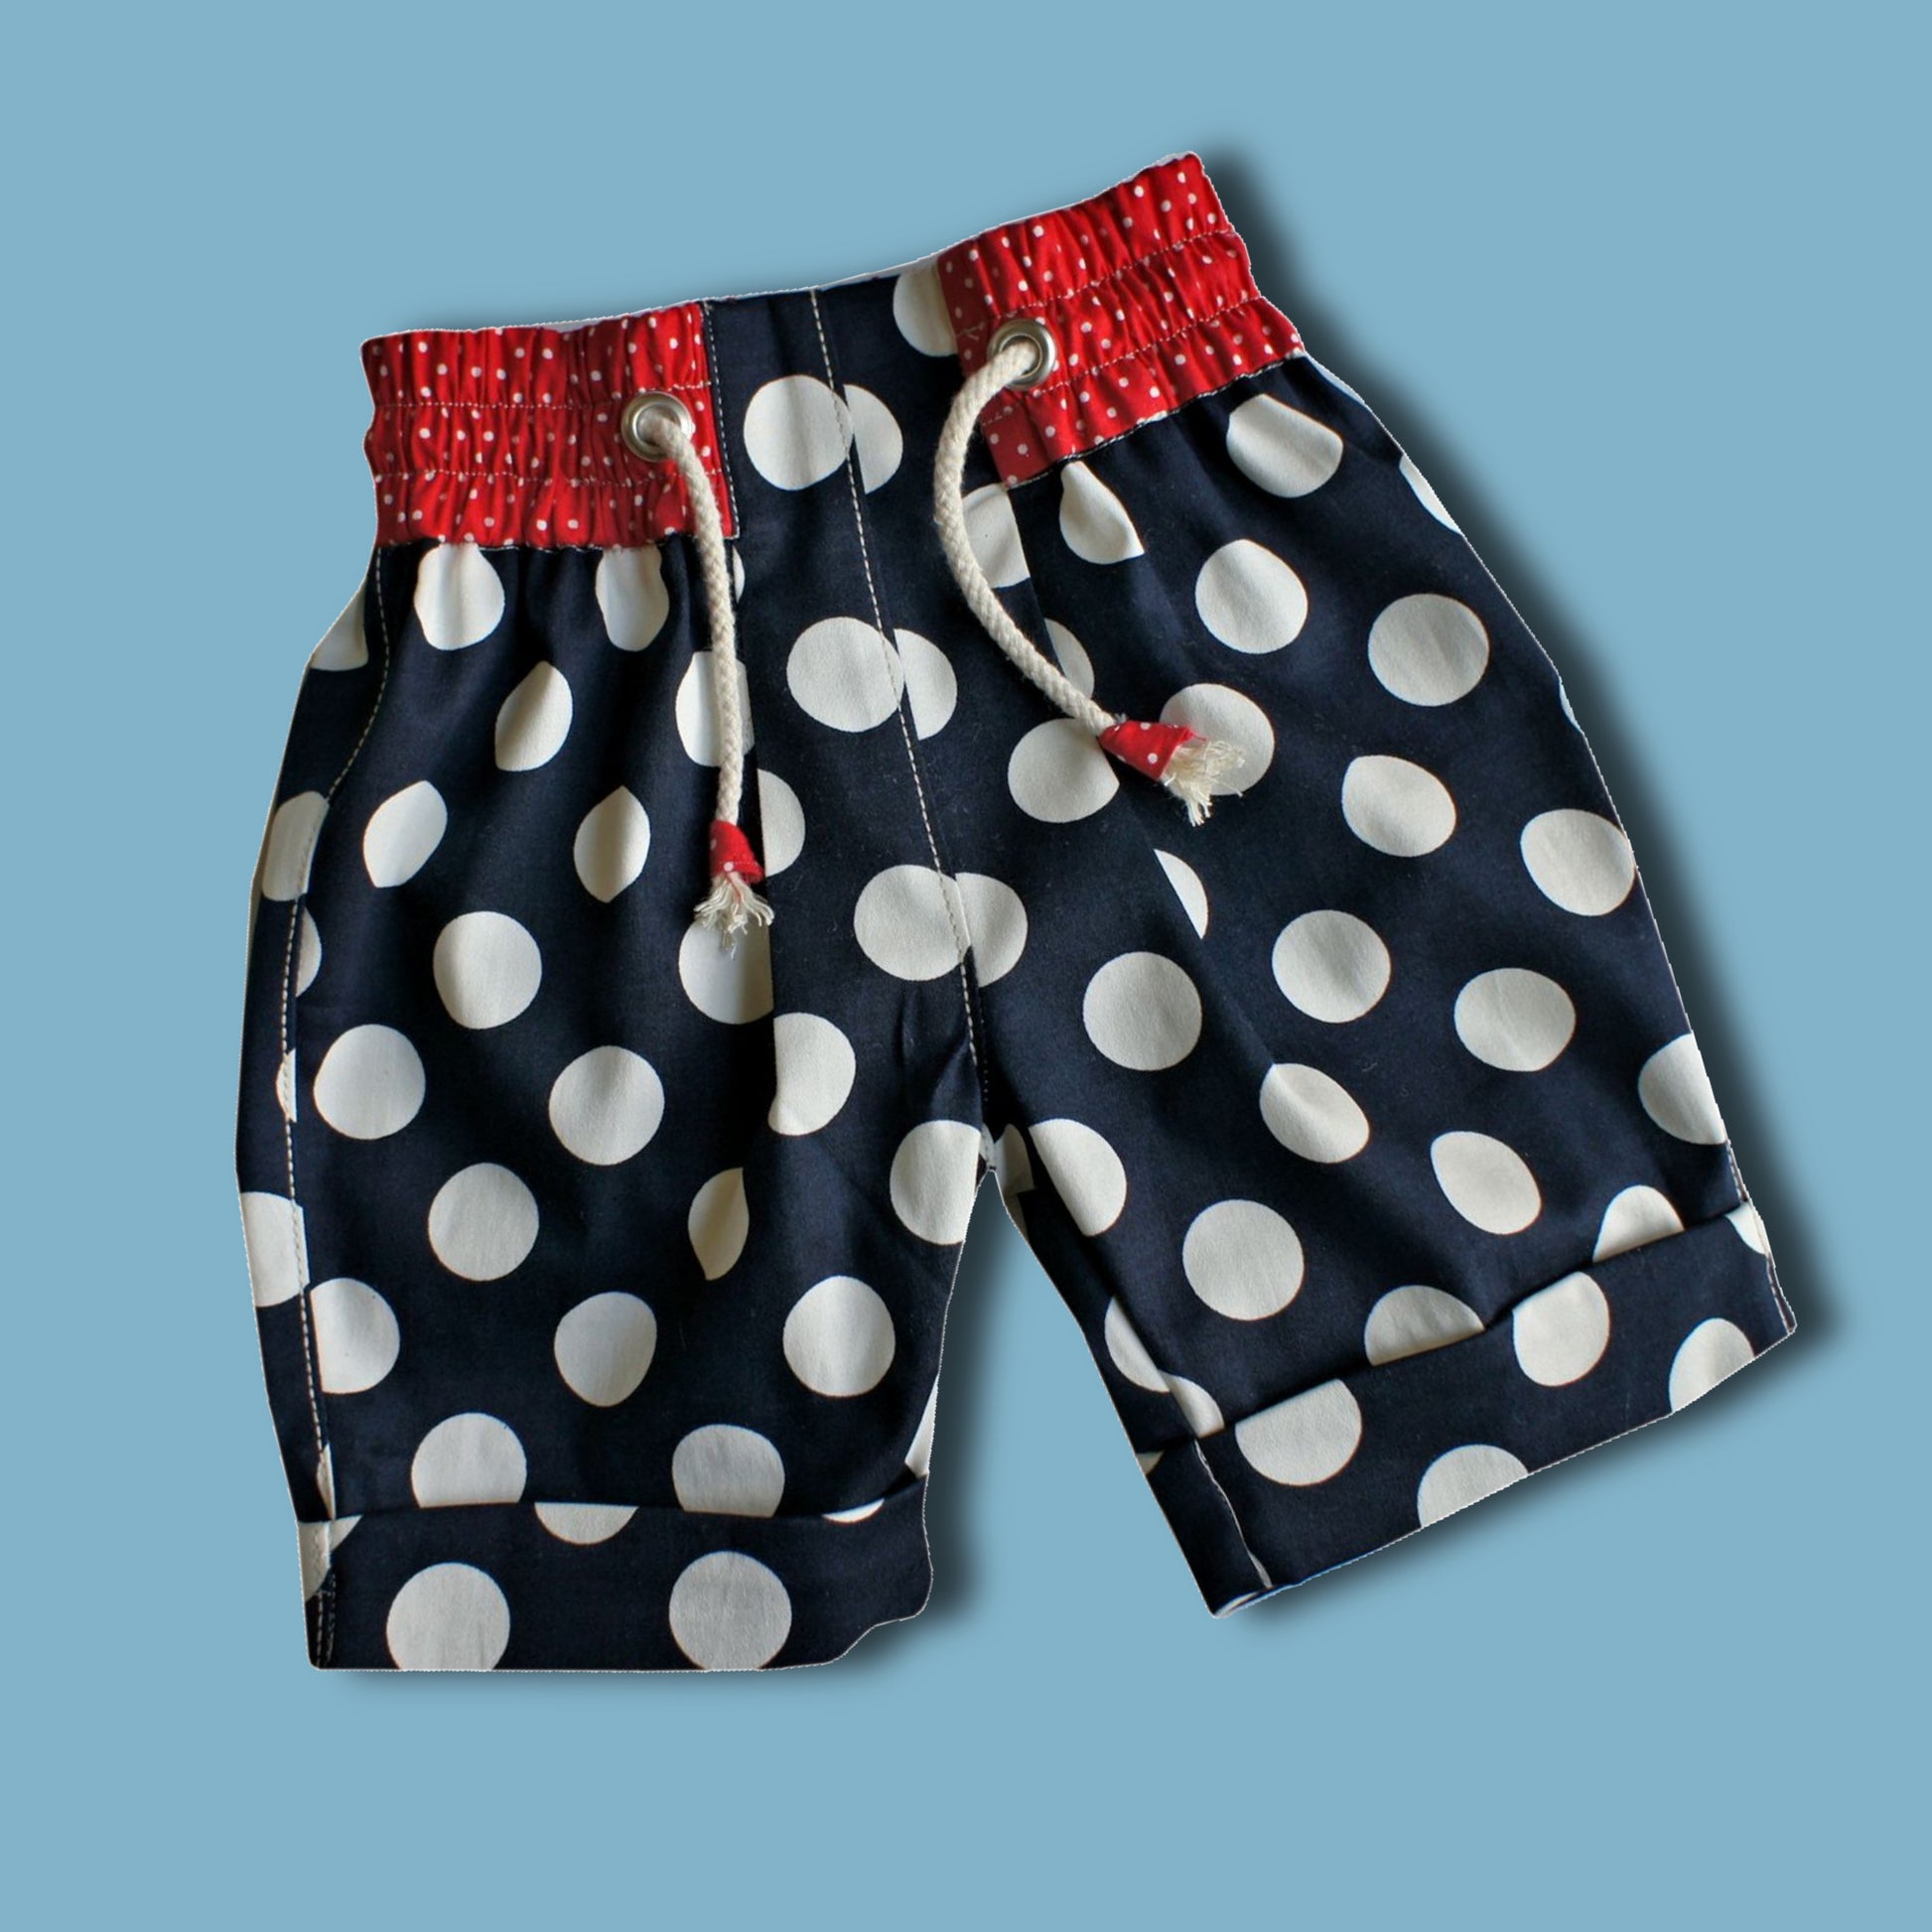
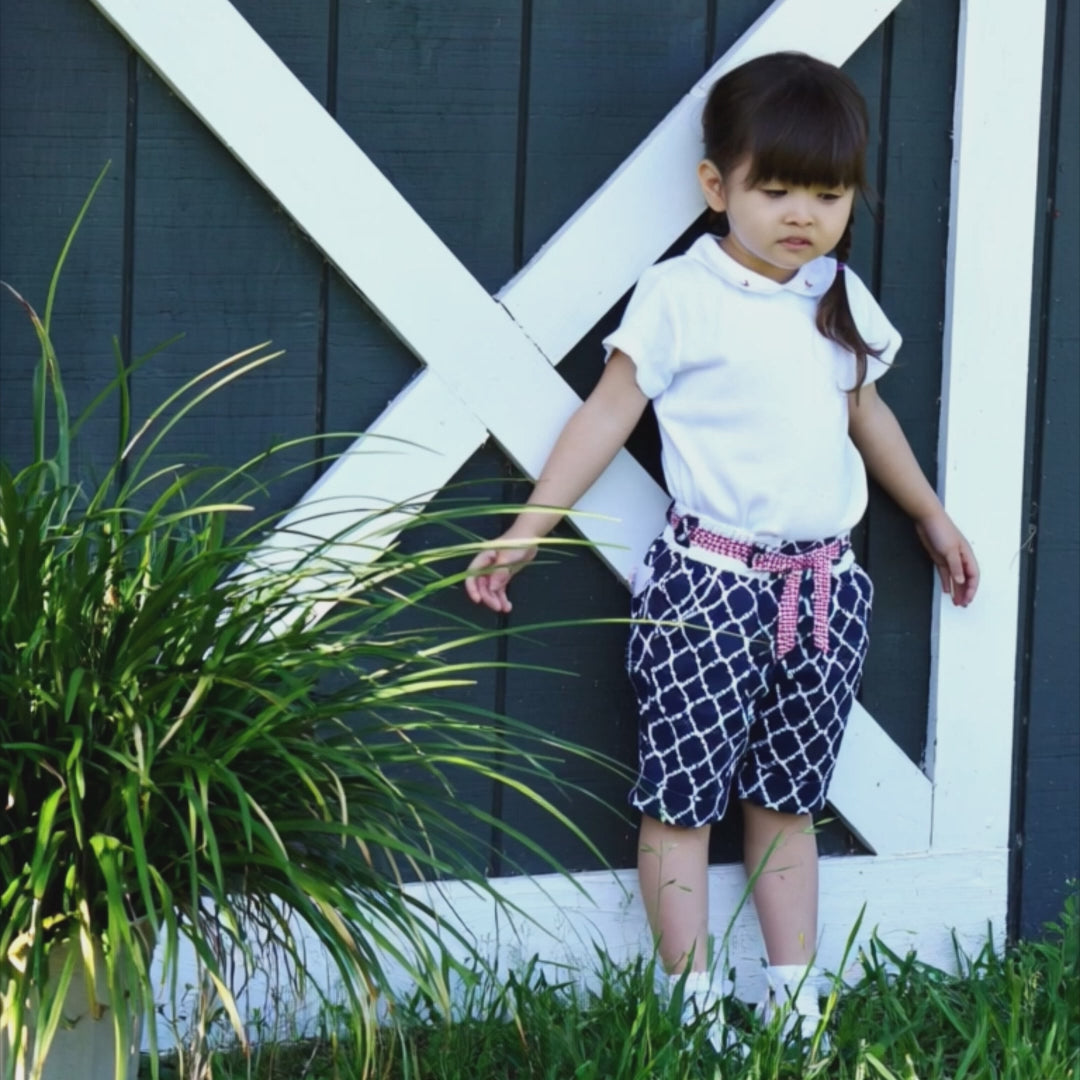
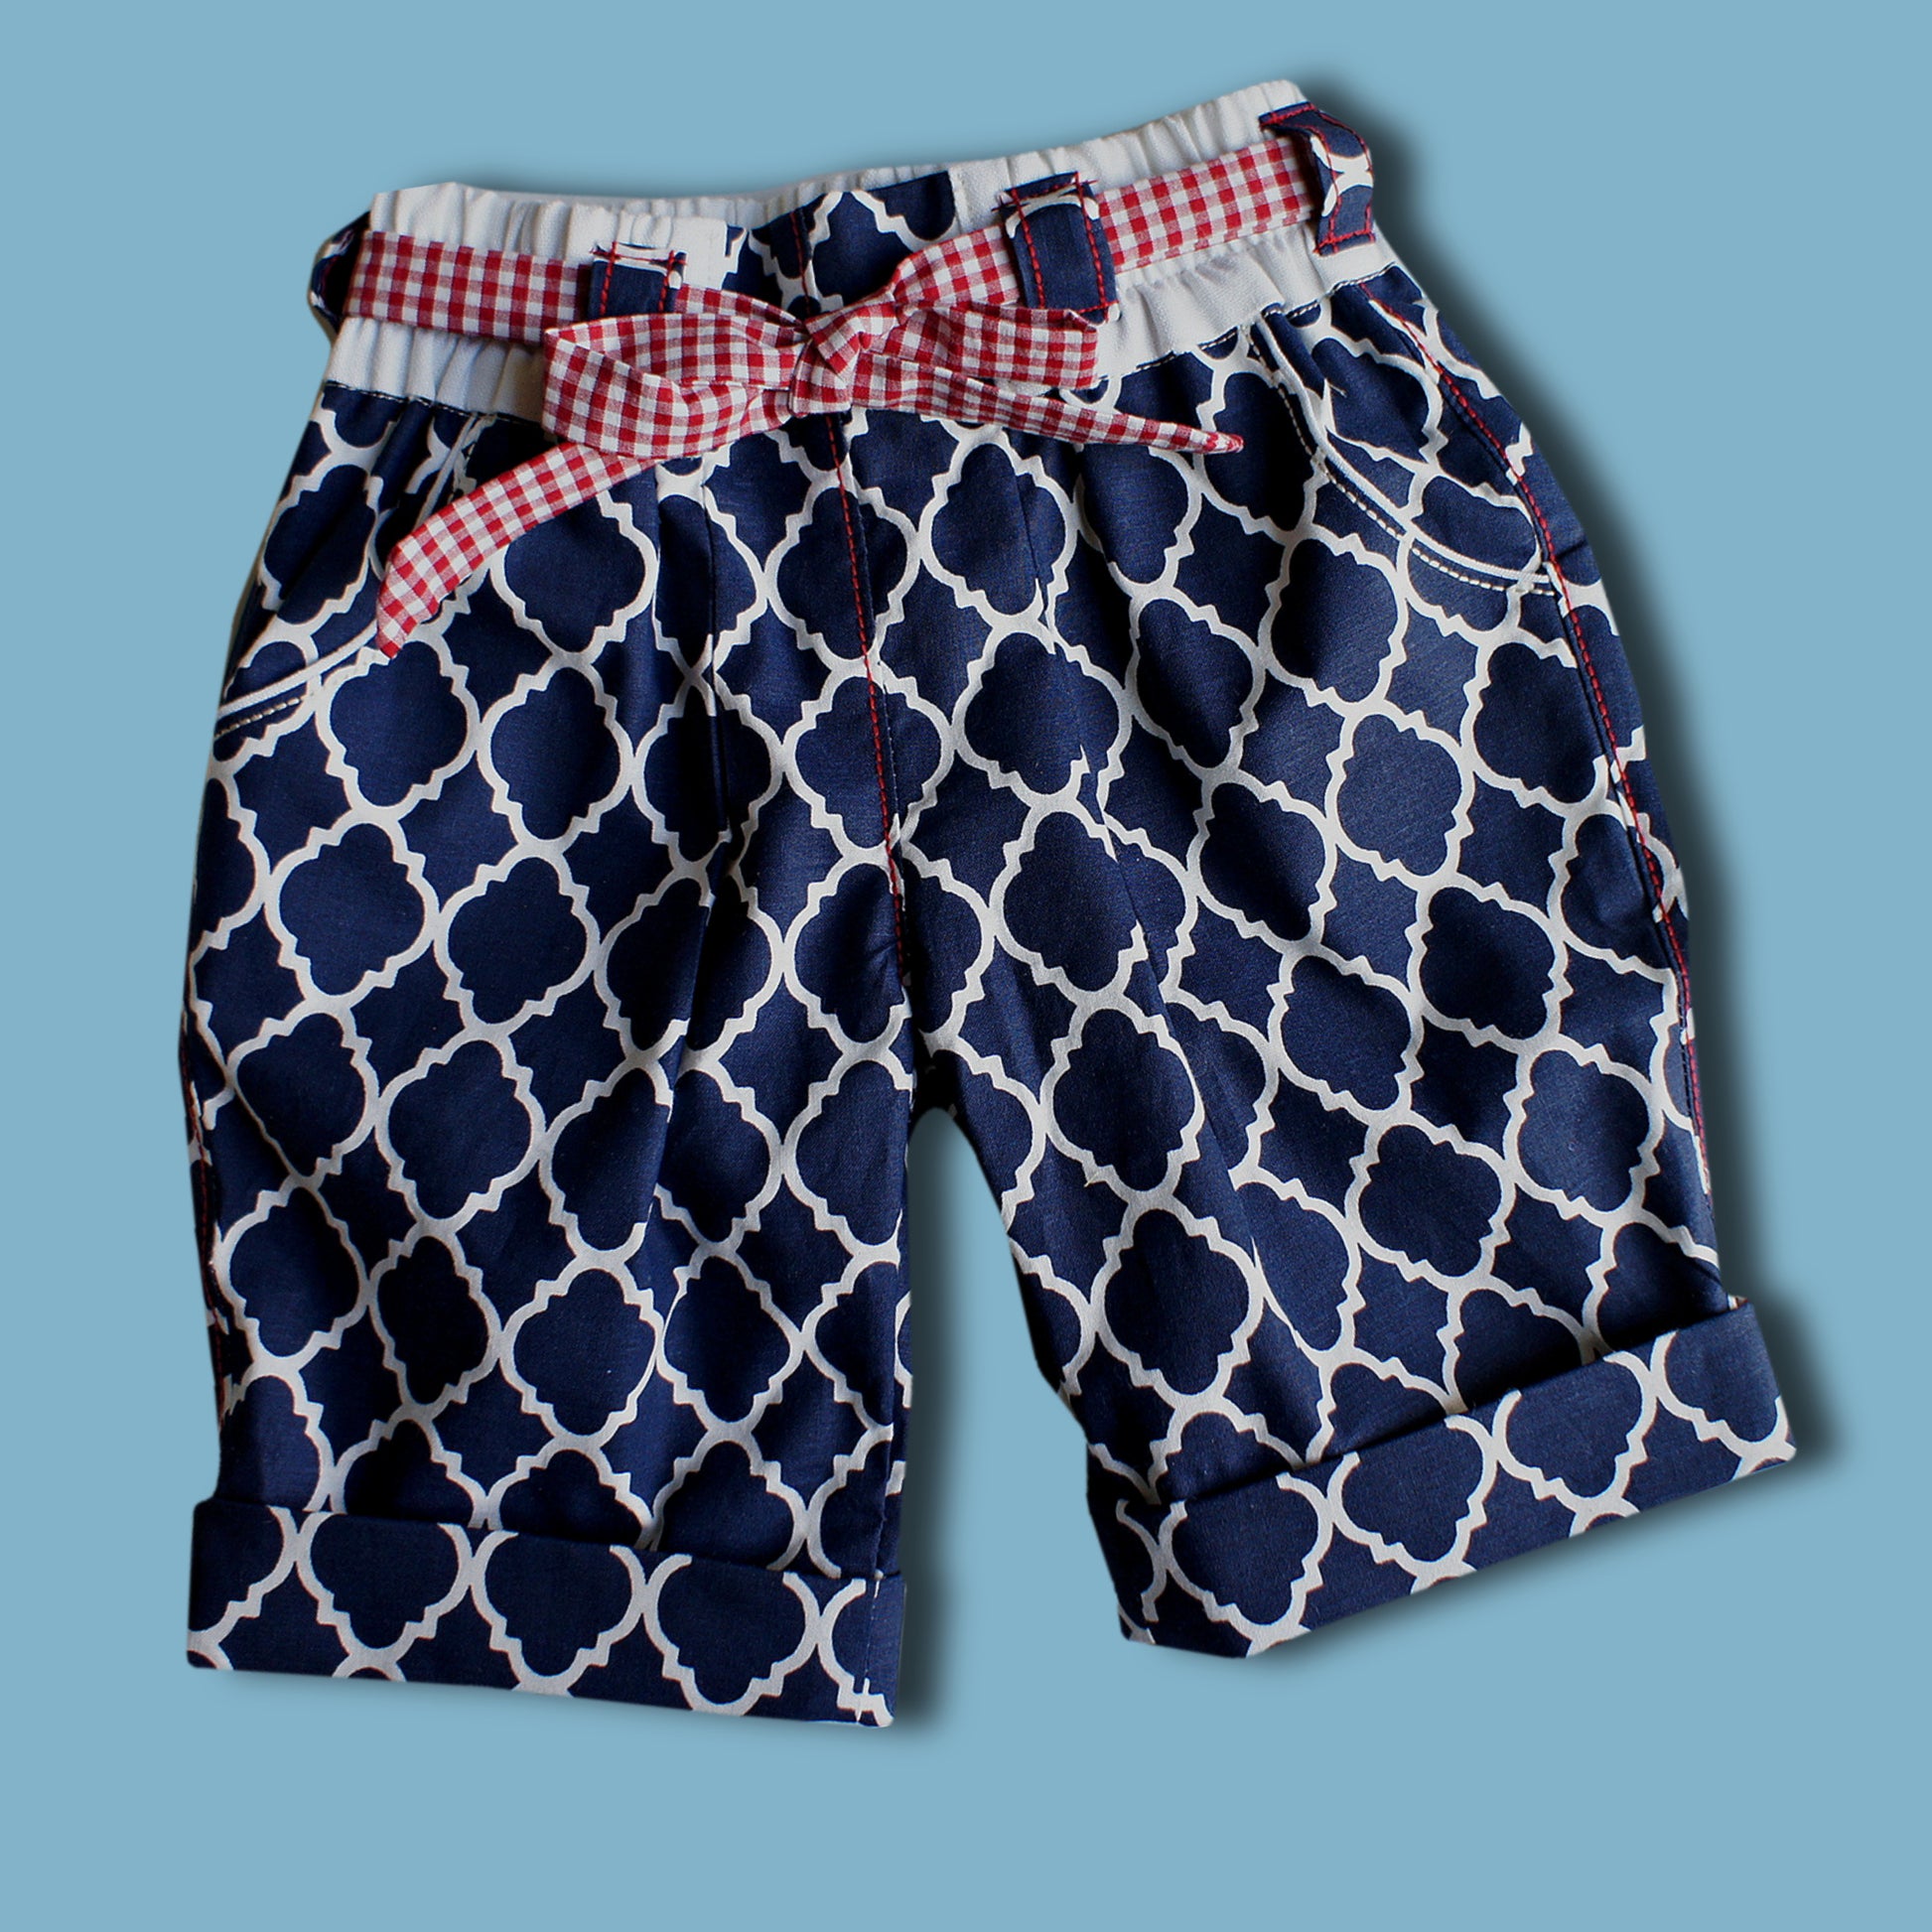
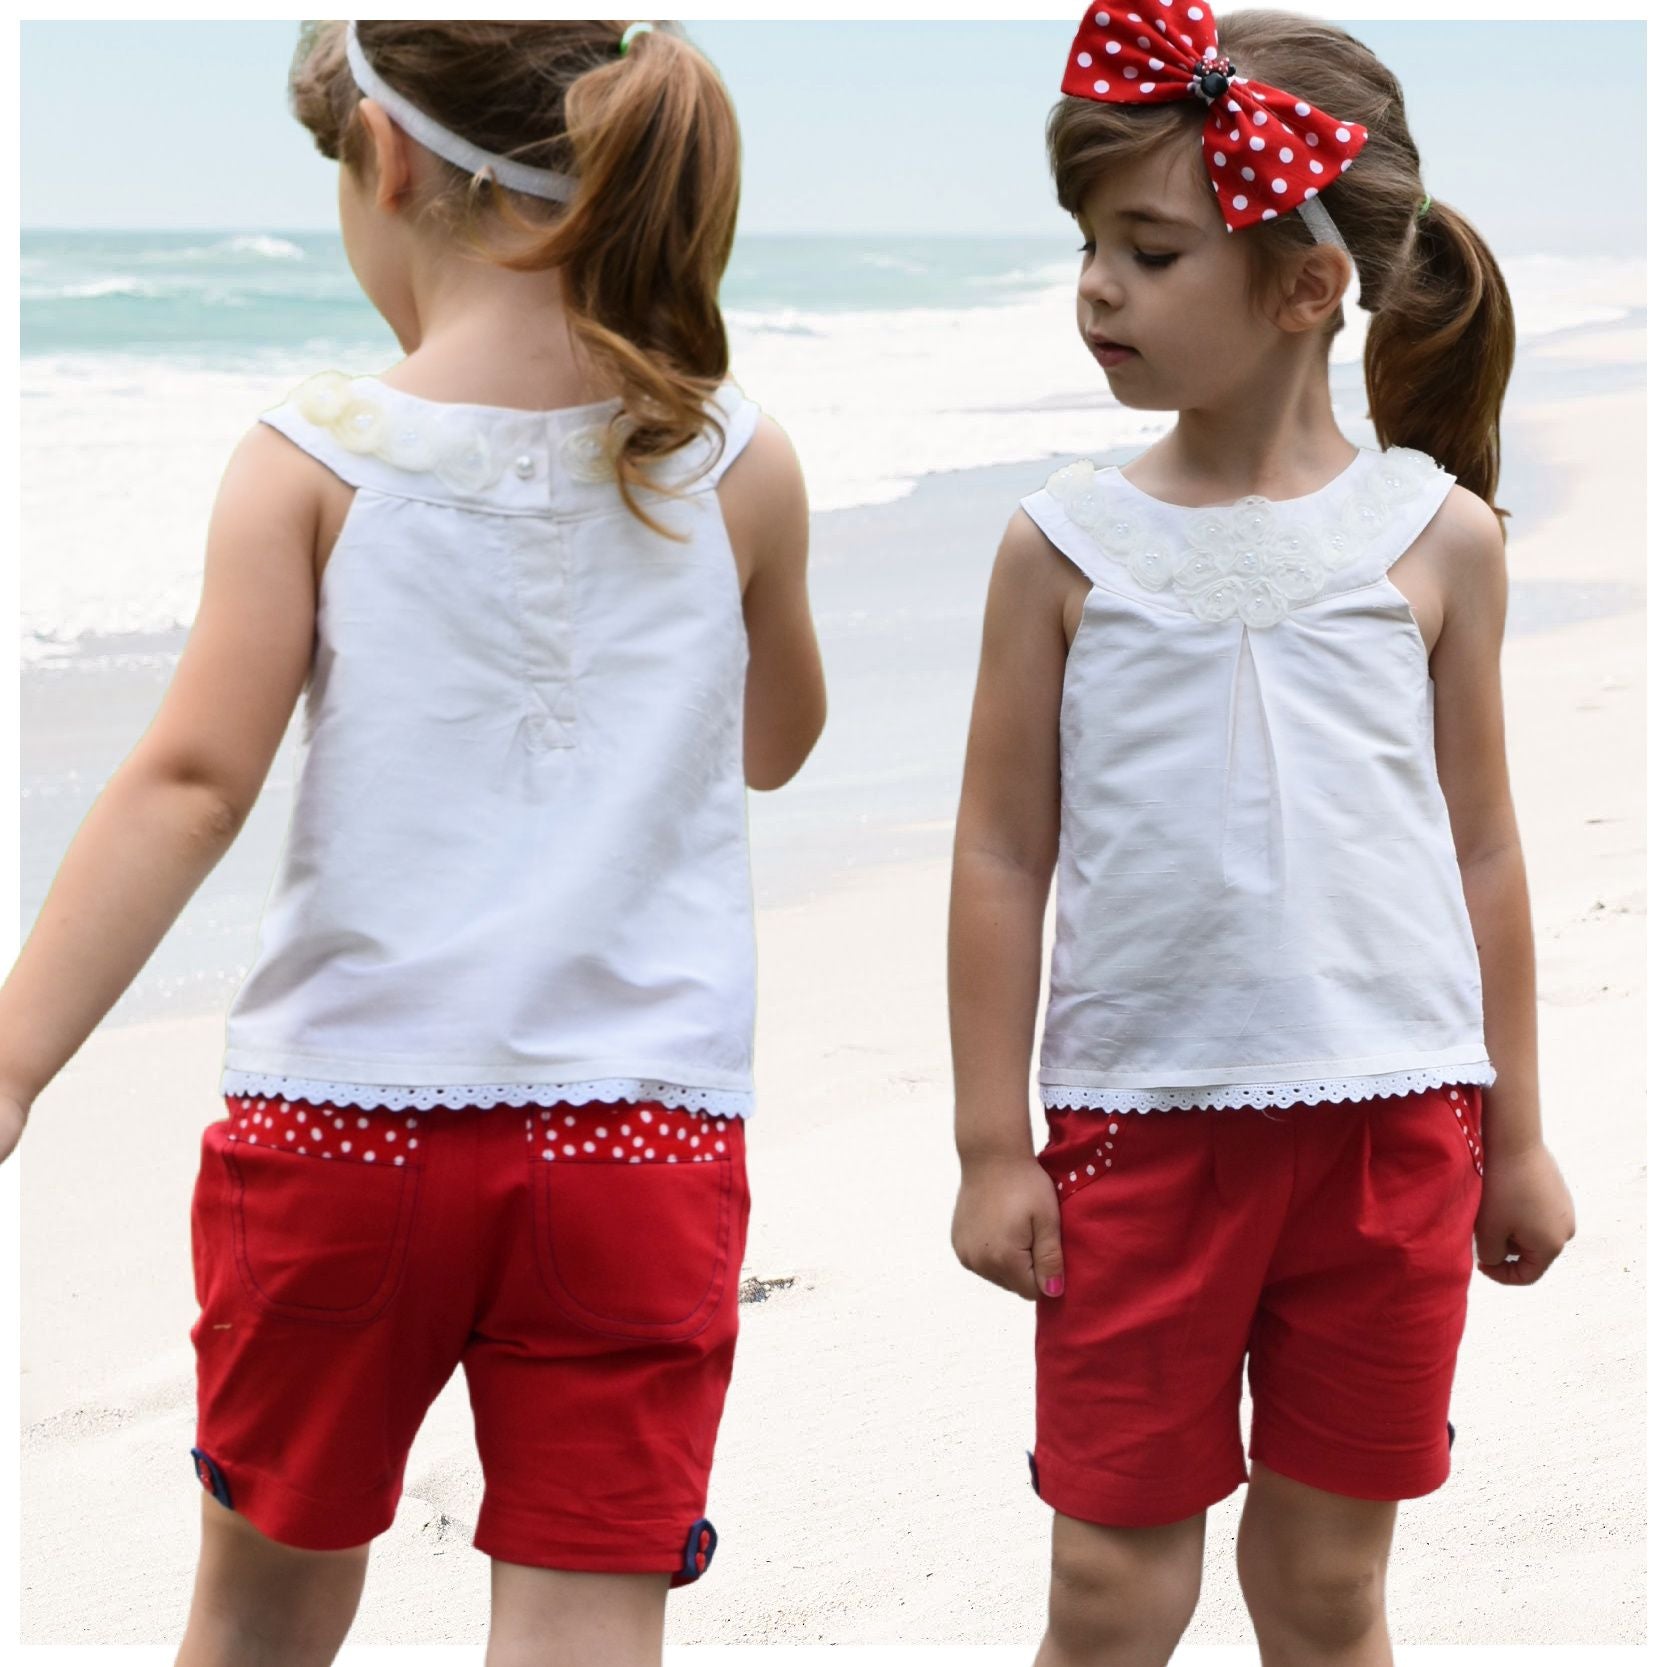
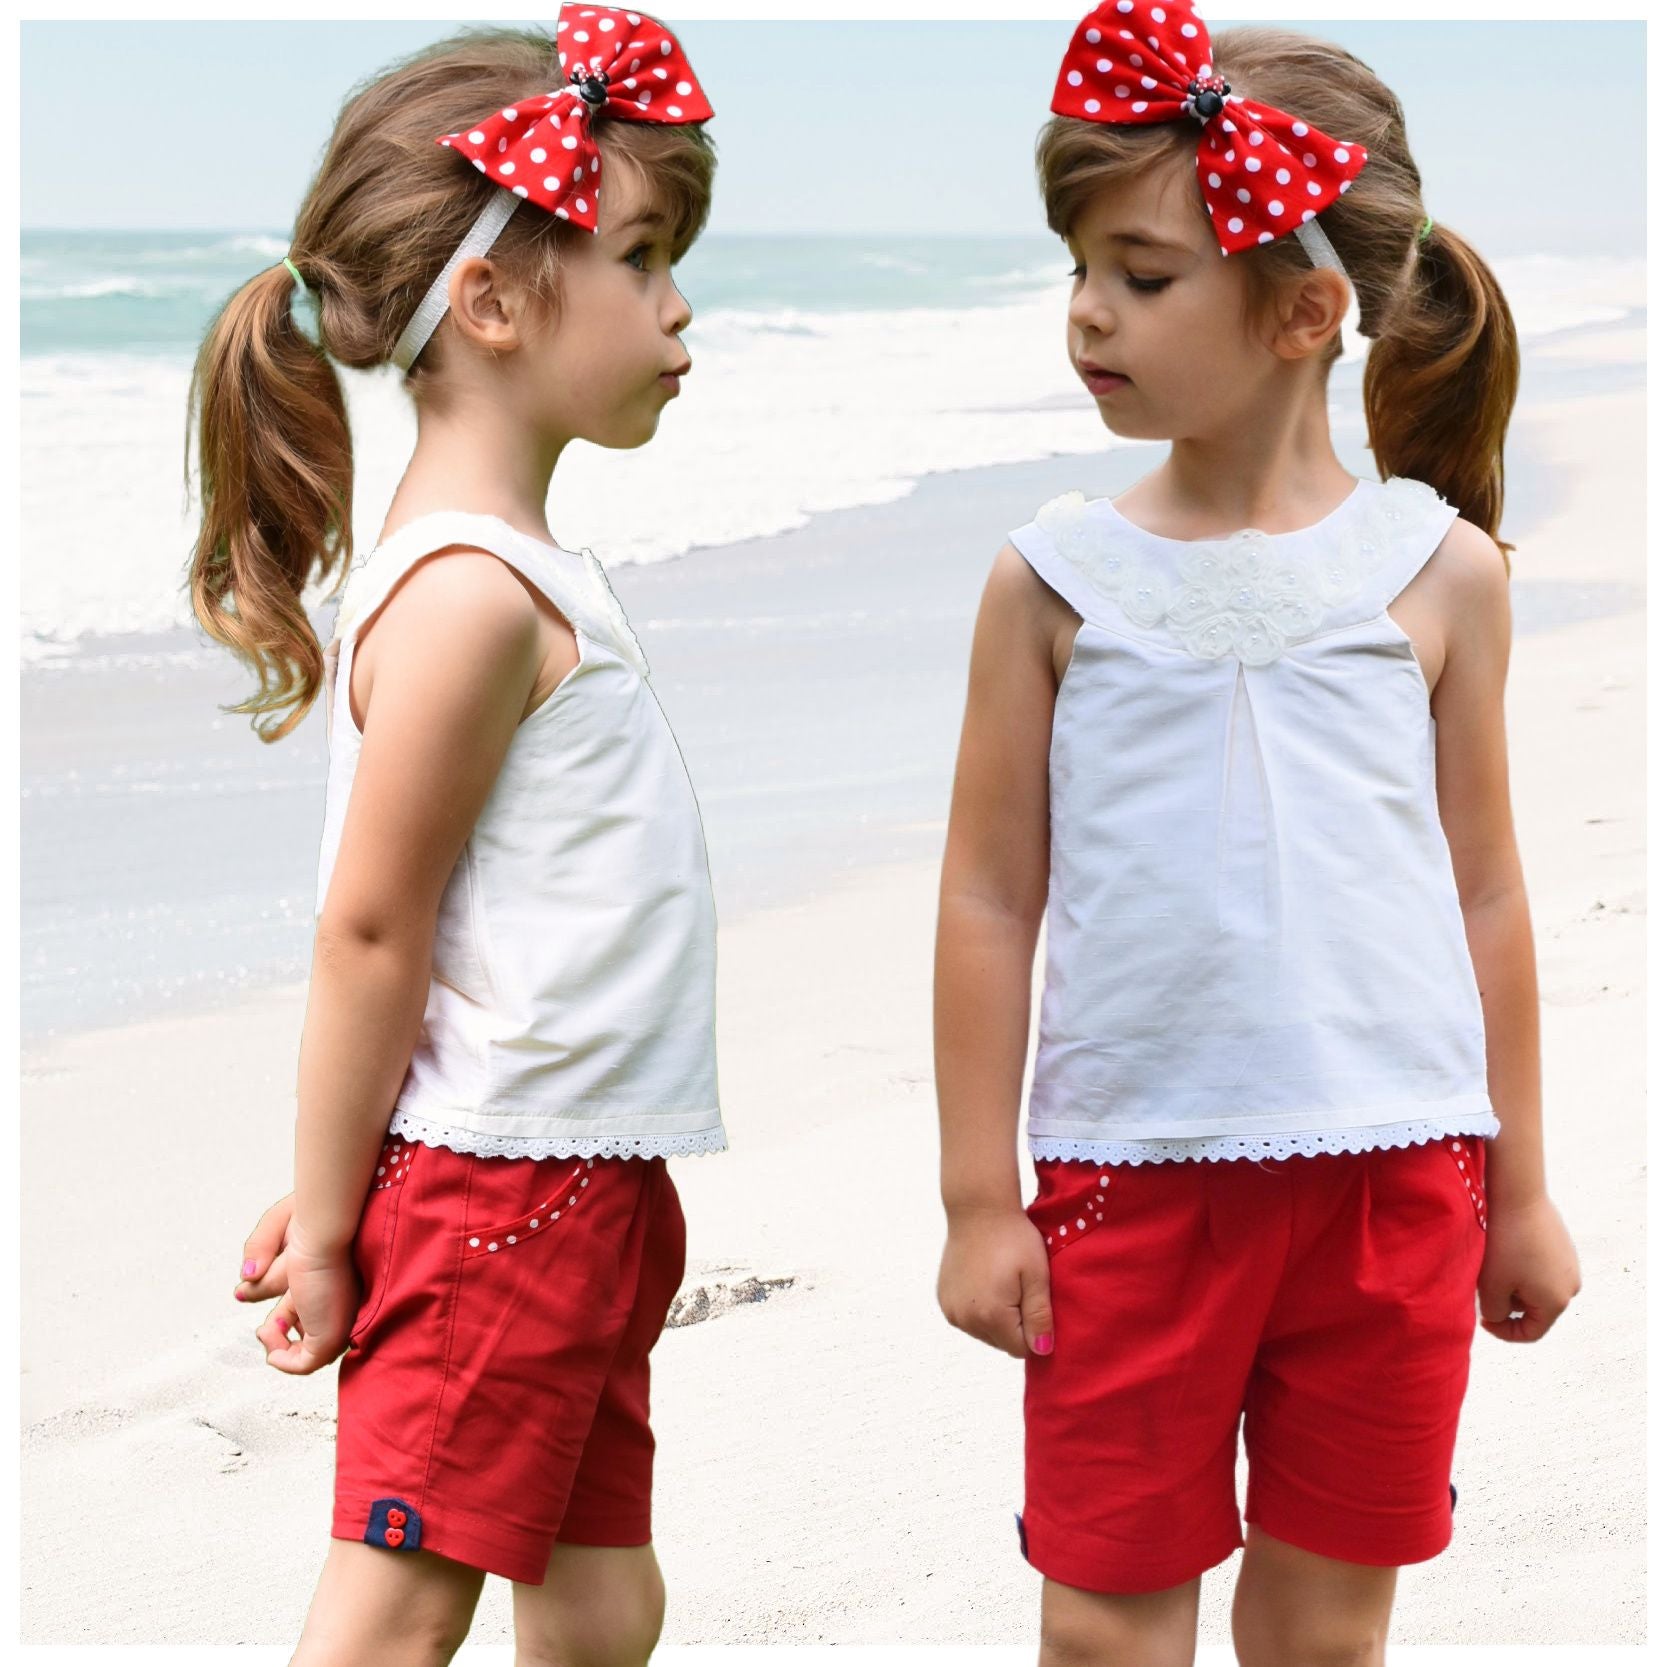
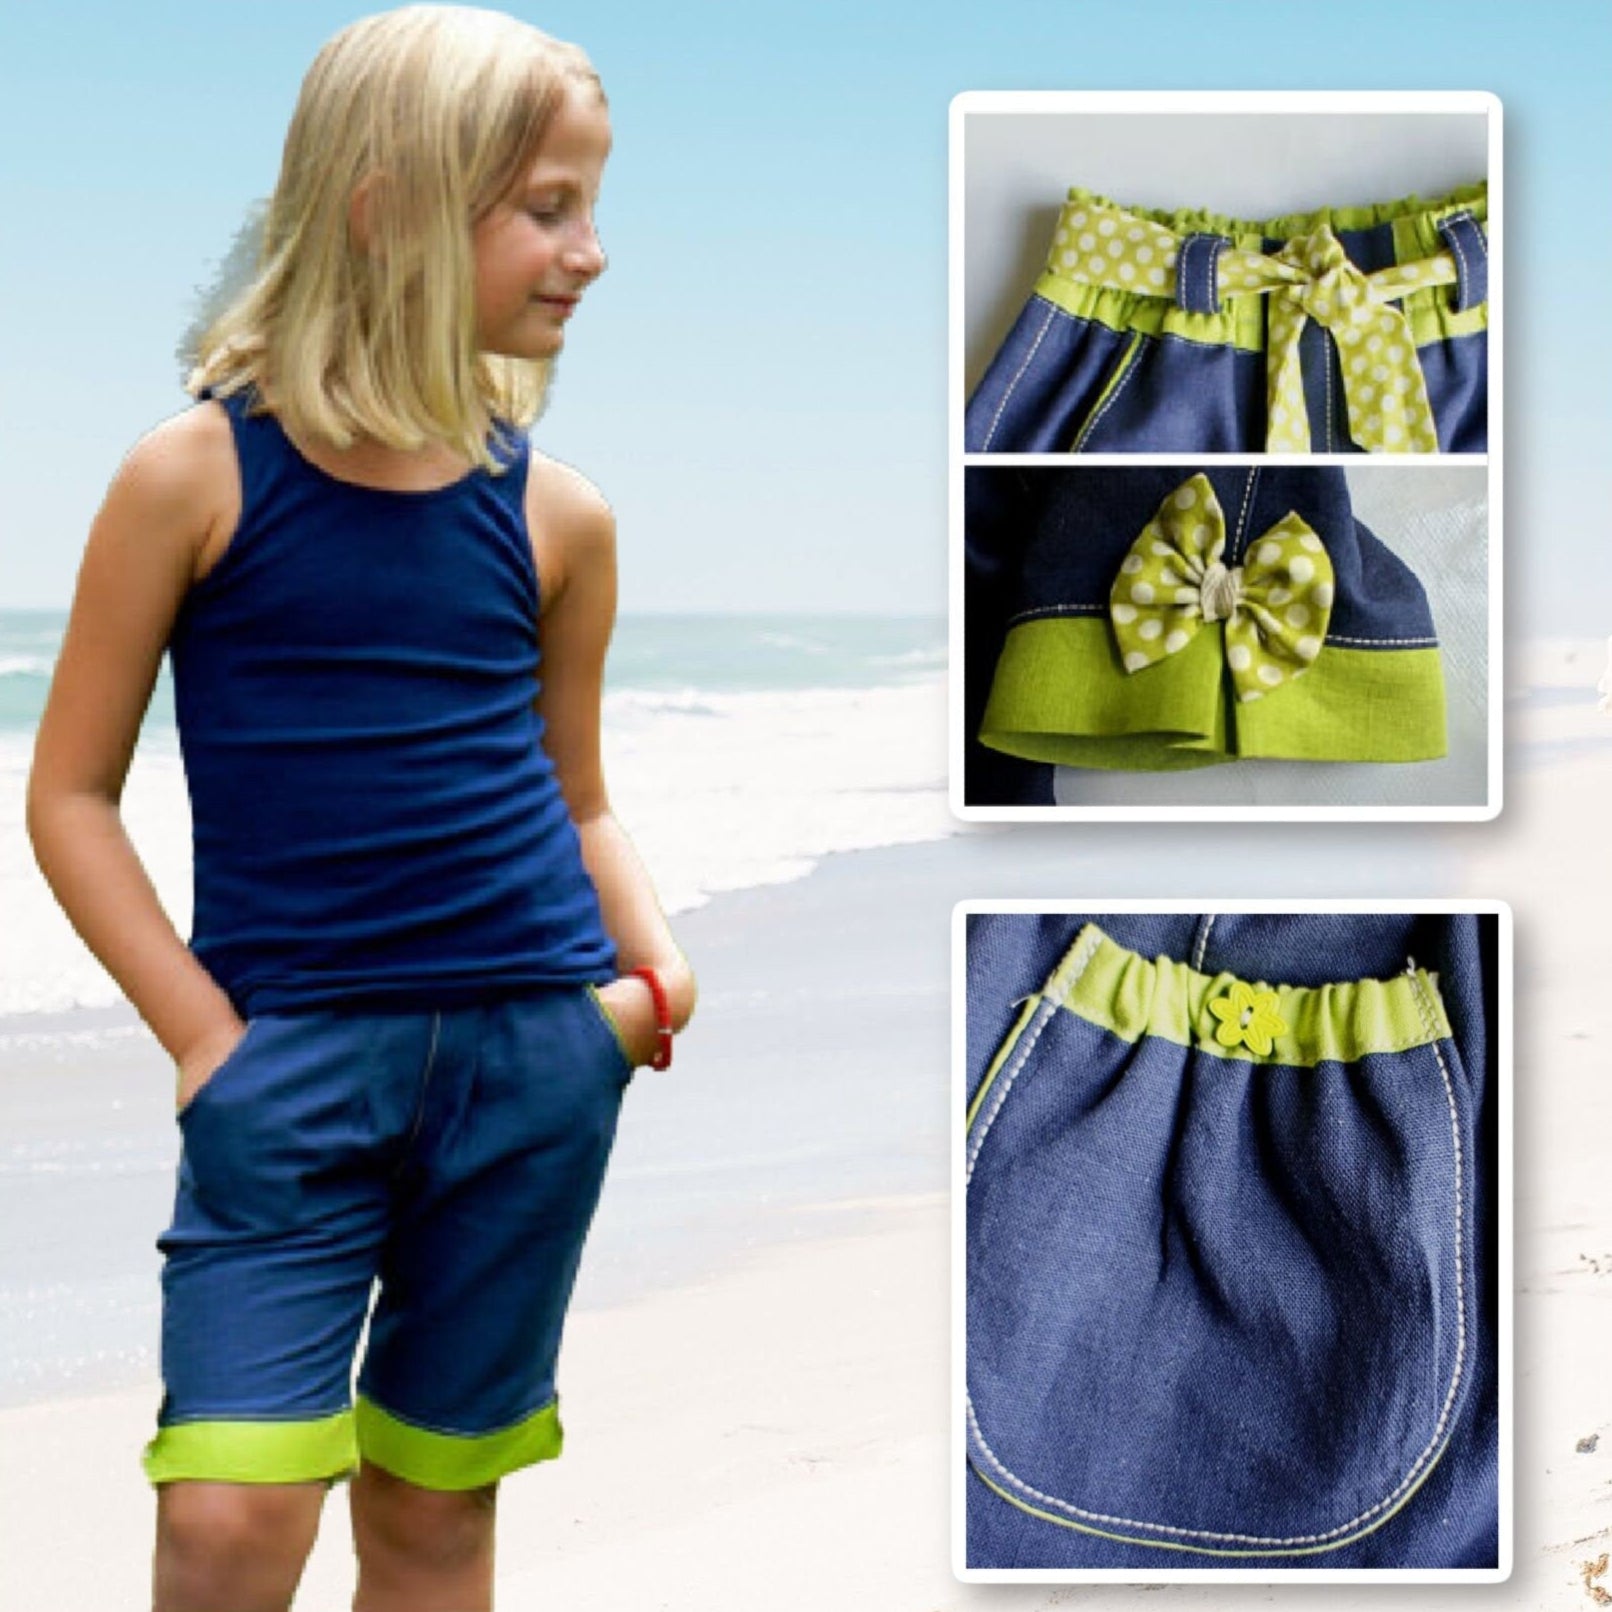
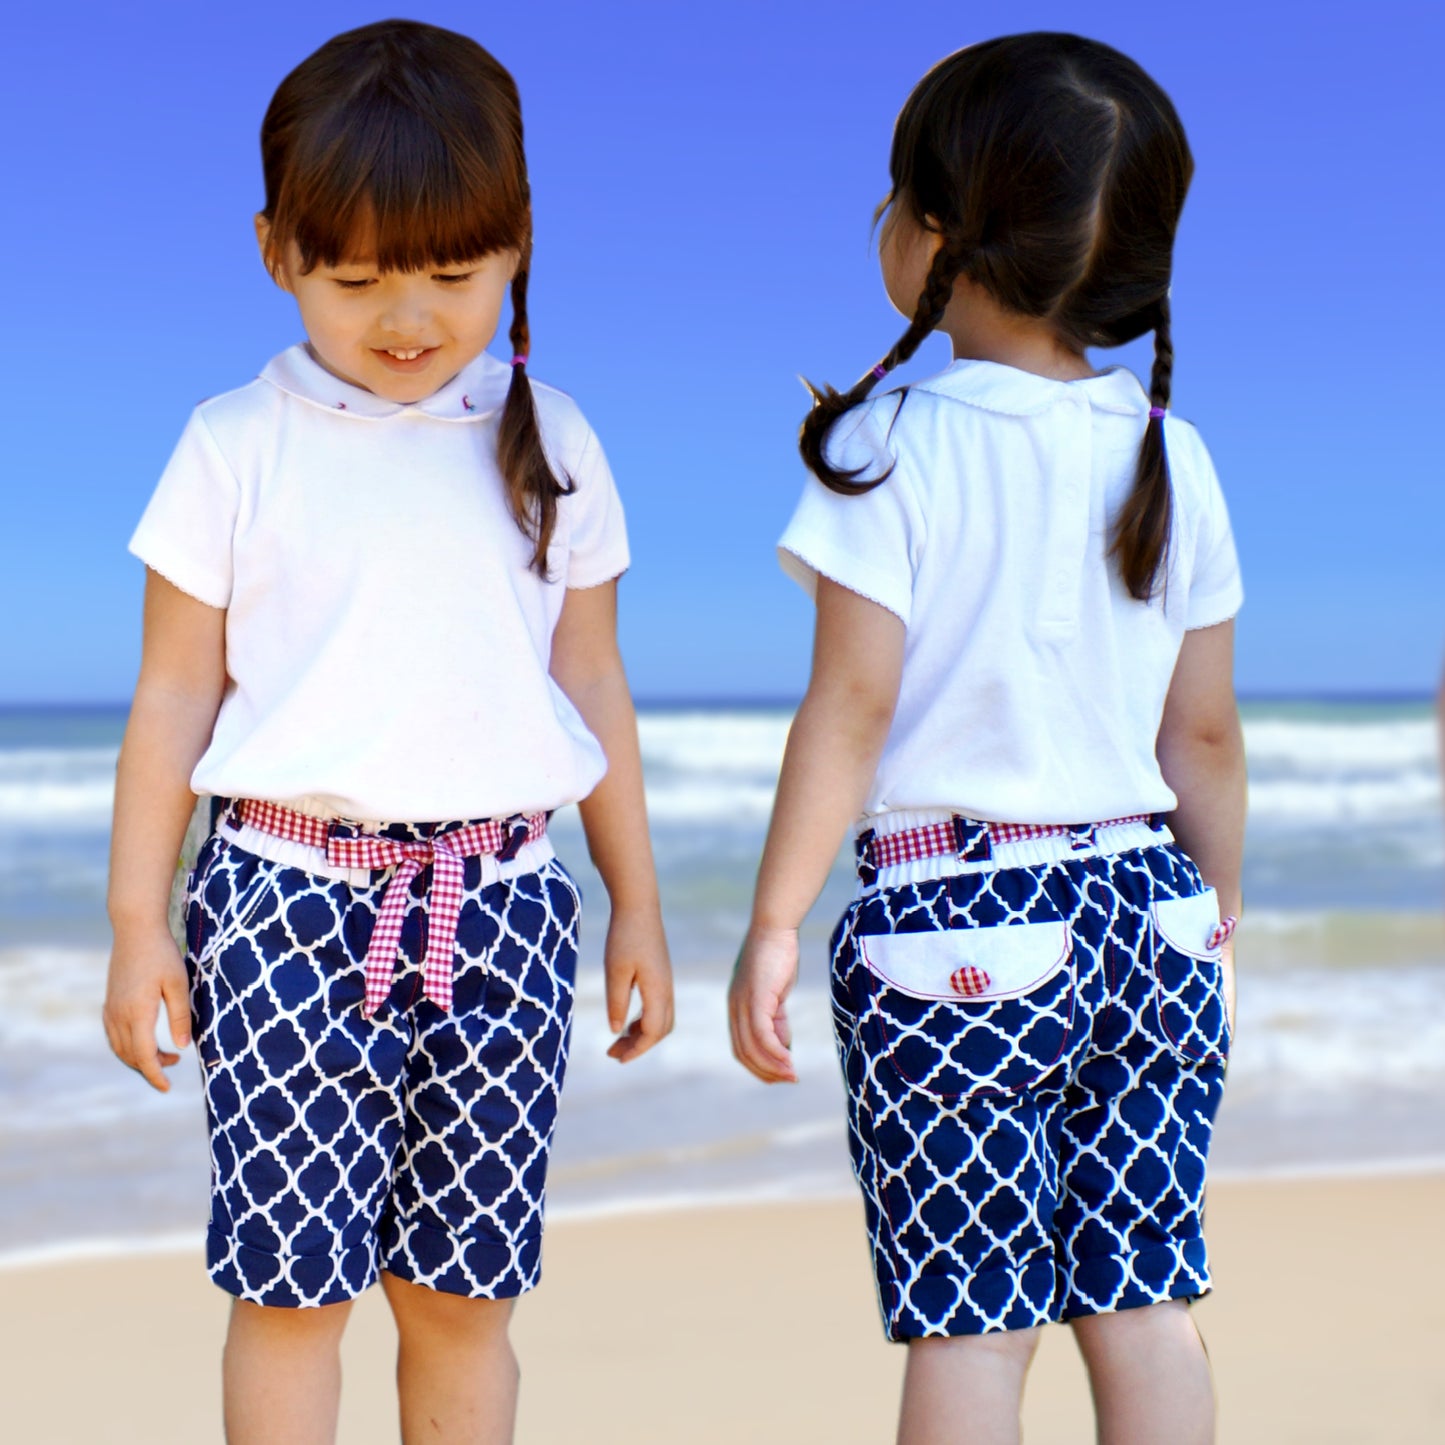
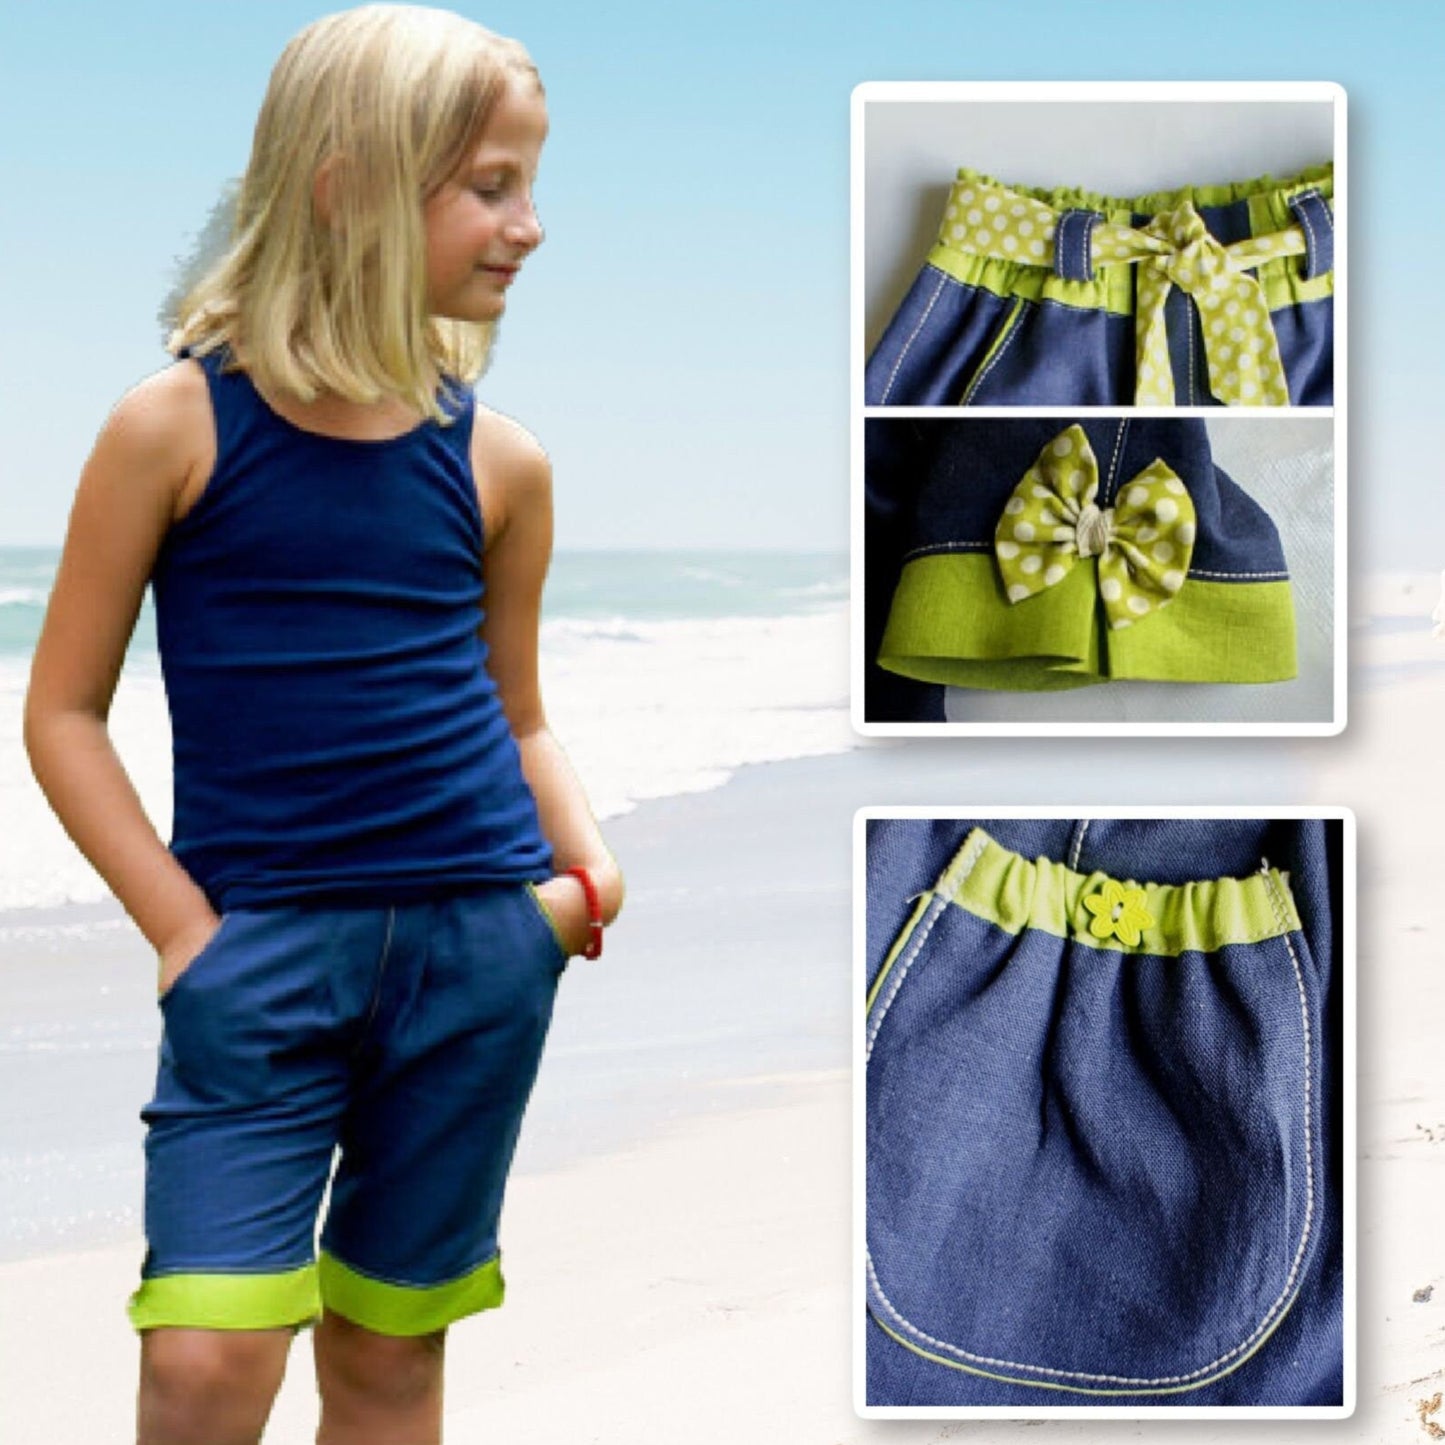
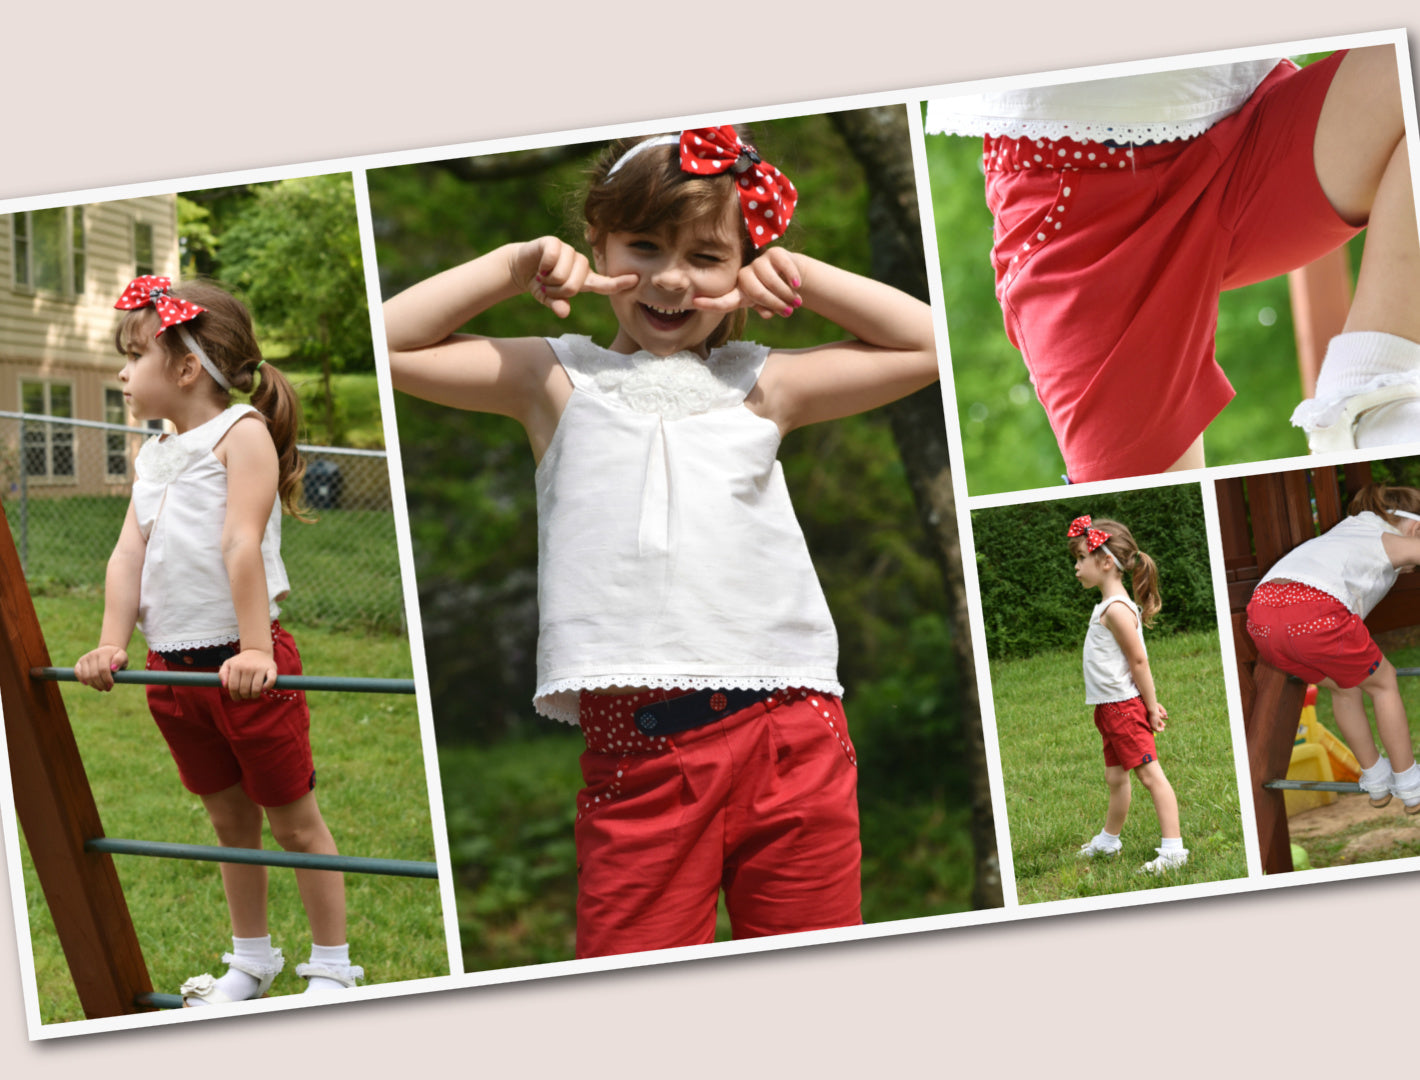
Welcome to Another Variation of the Maisy Shorts They have the same pockets on the side here, but on the hem I have put a hem trim on and a really cute little bow. I'm also working with a bow in the front. You can, of course, just knot this if you like; you don't need to put a bow in.

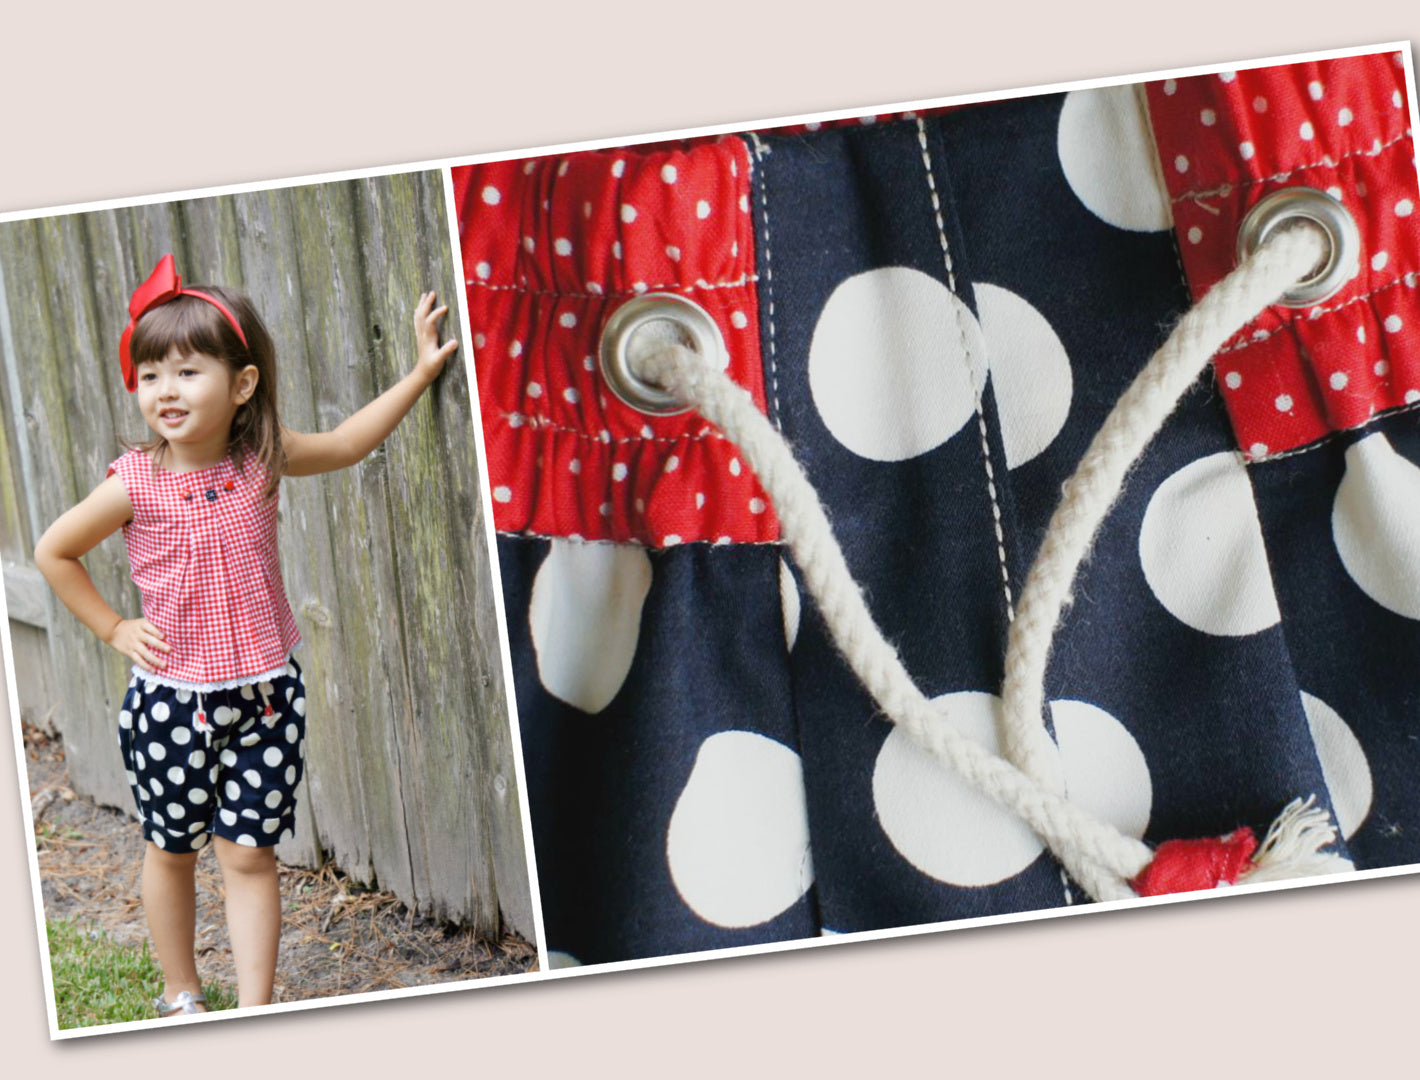
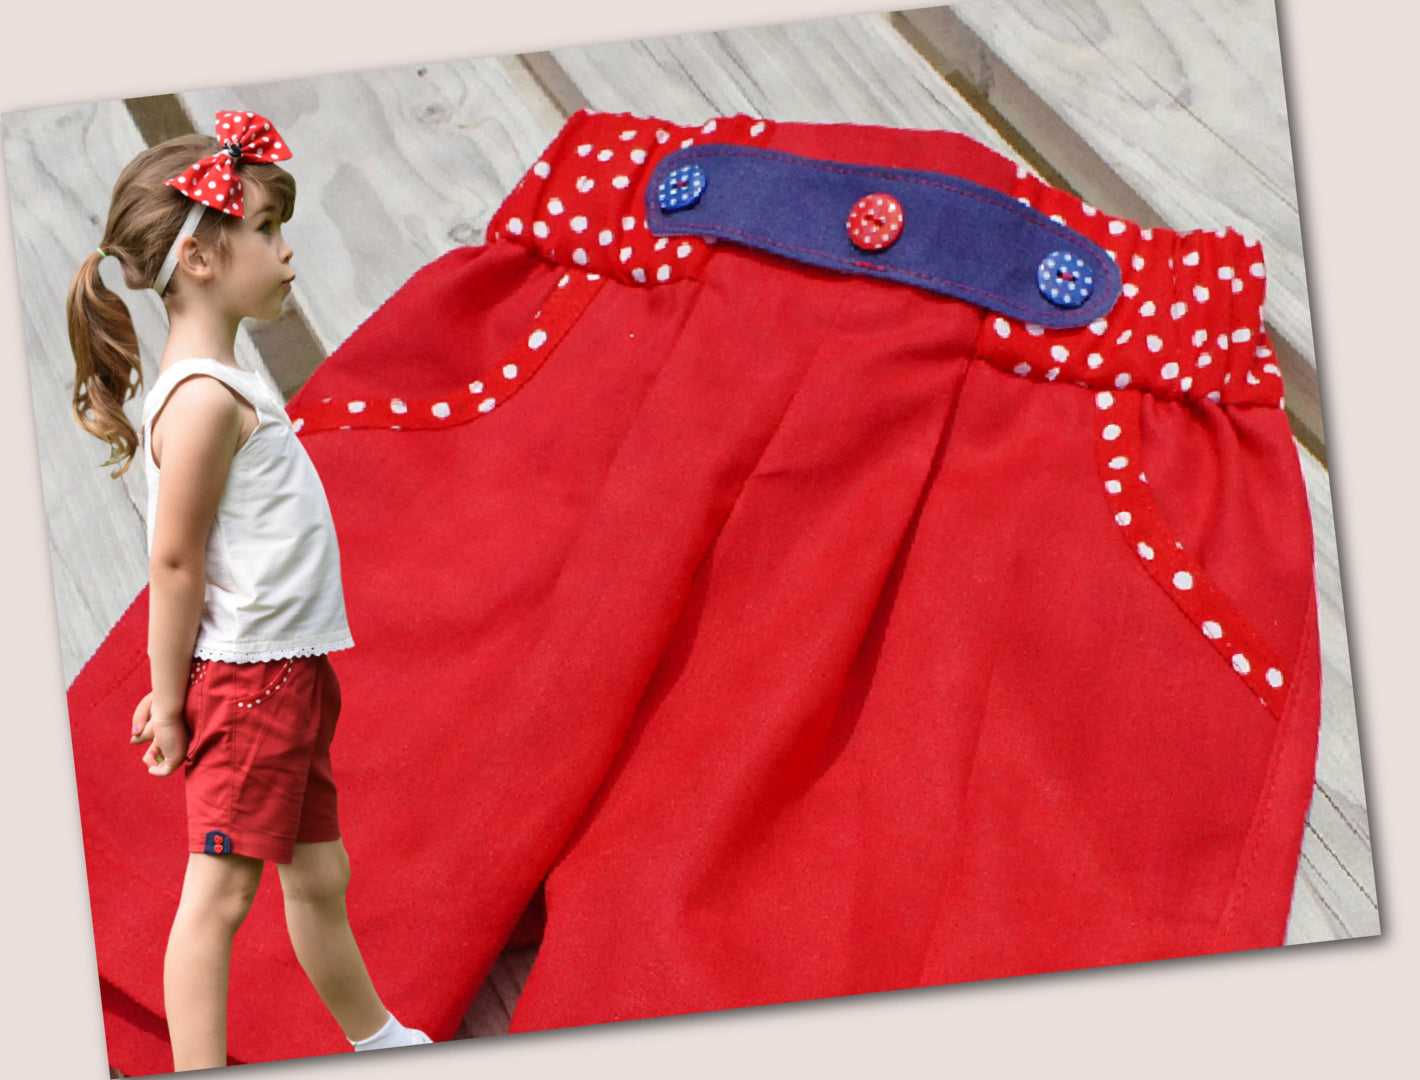
On the back, I have adapted the pockets a little bit and I've put elastic on the top, which is really cute as well, and a little button.

I've made this from an old dress I had in blue linen, and the lime green linen was from an old shirt.

So let's get started.

Cutting Out the Pieces

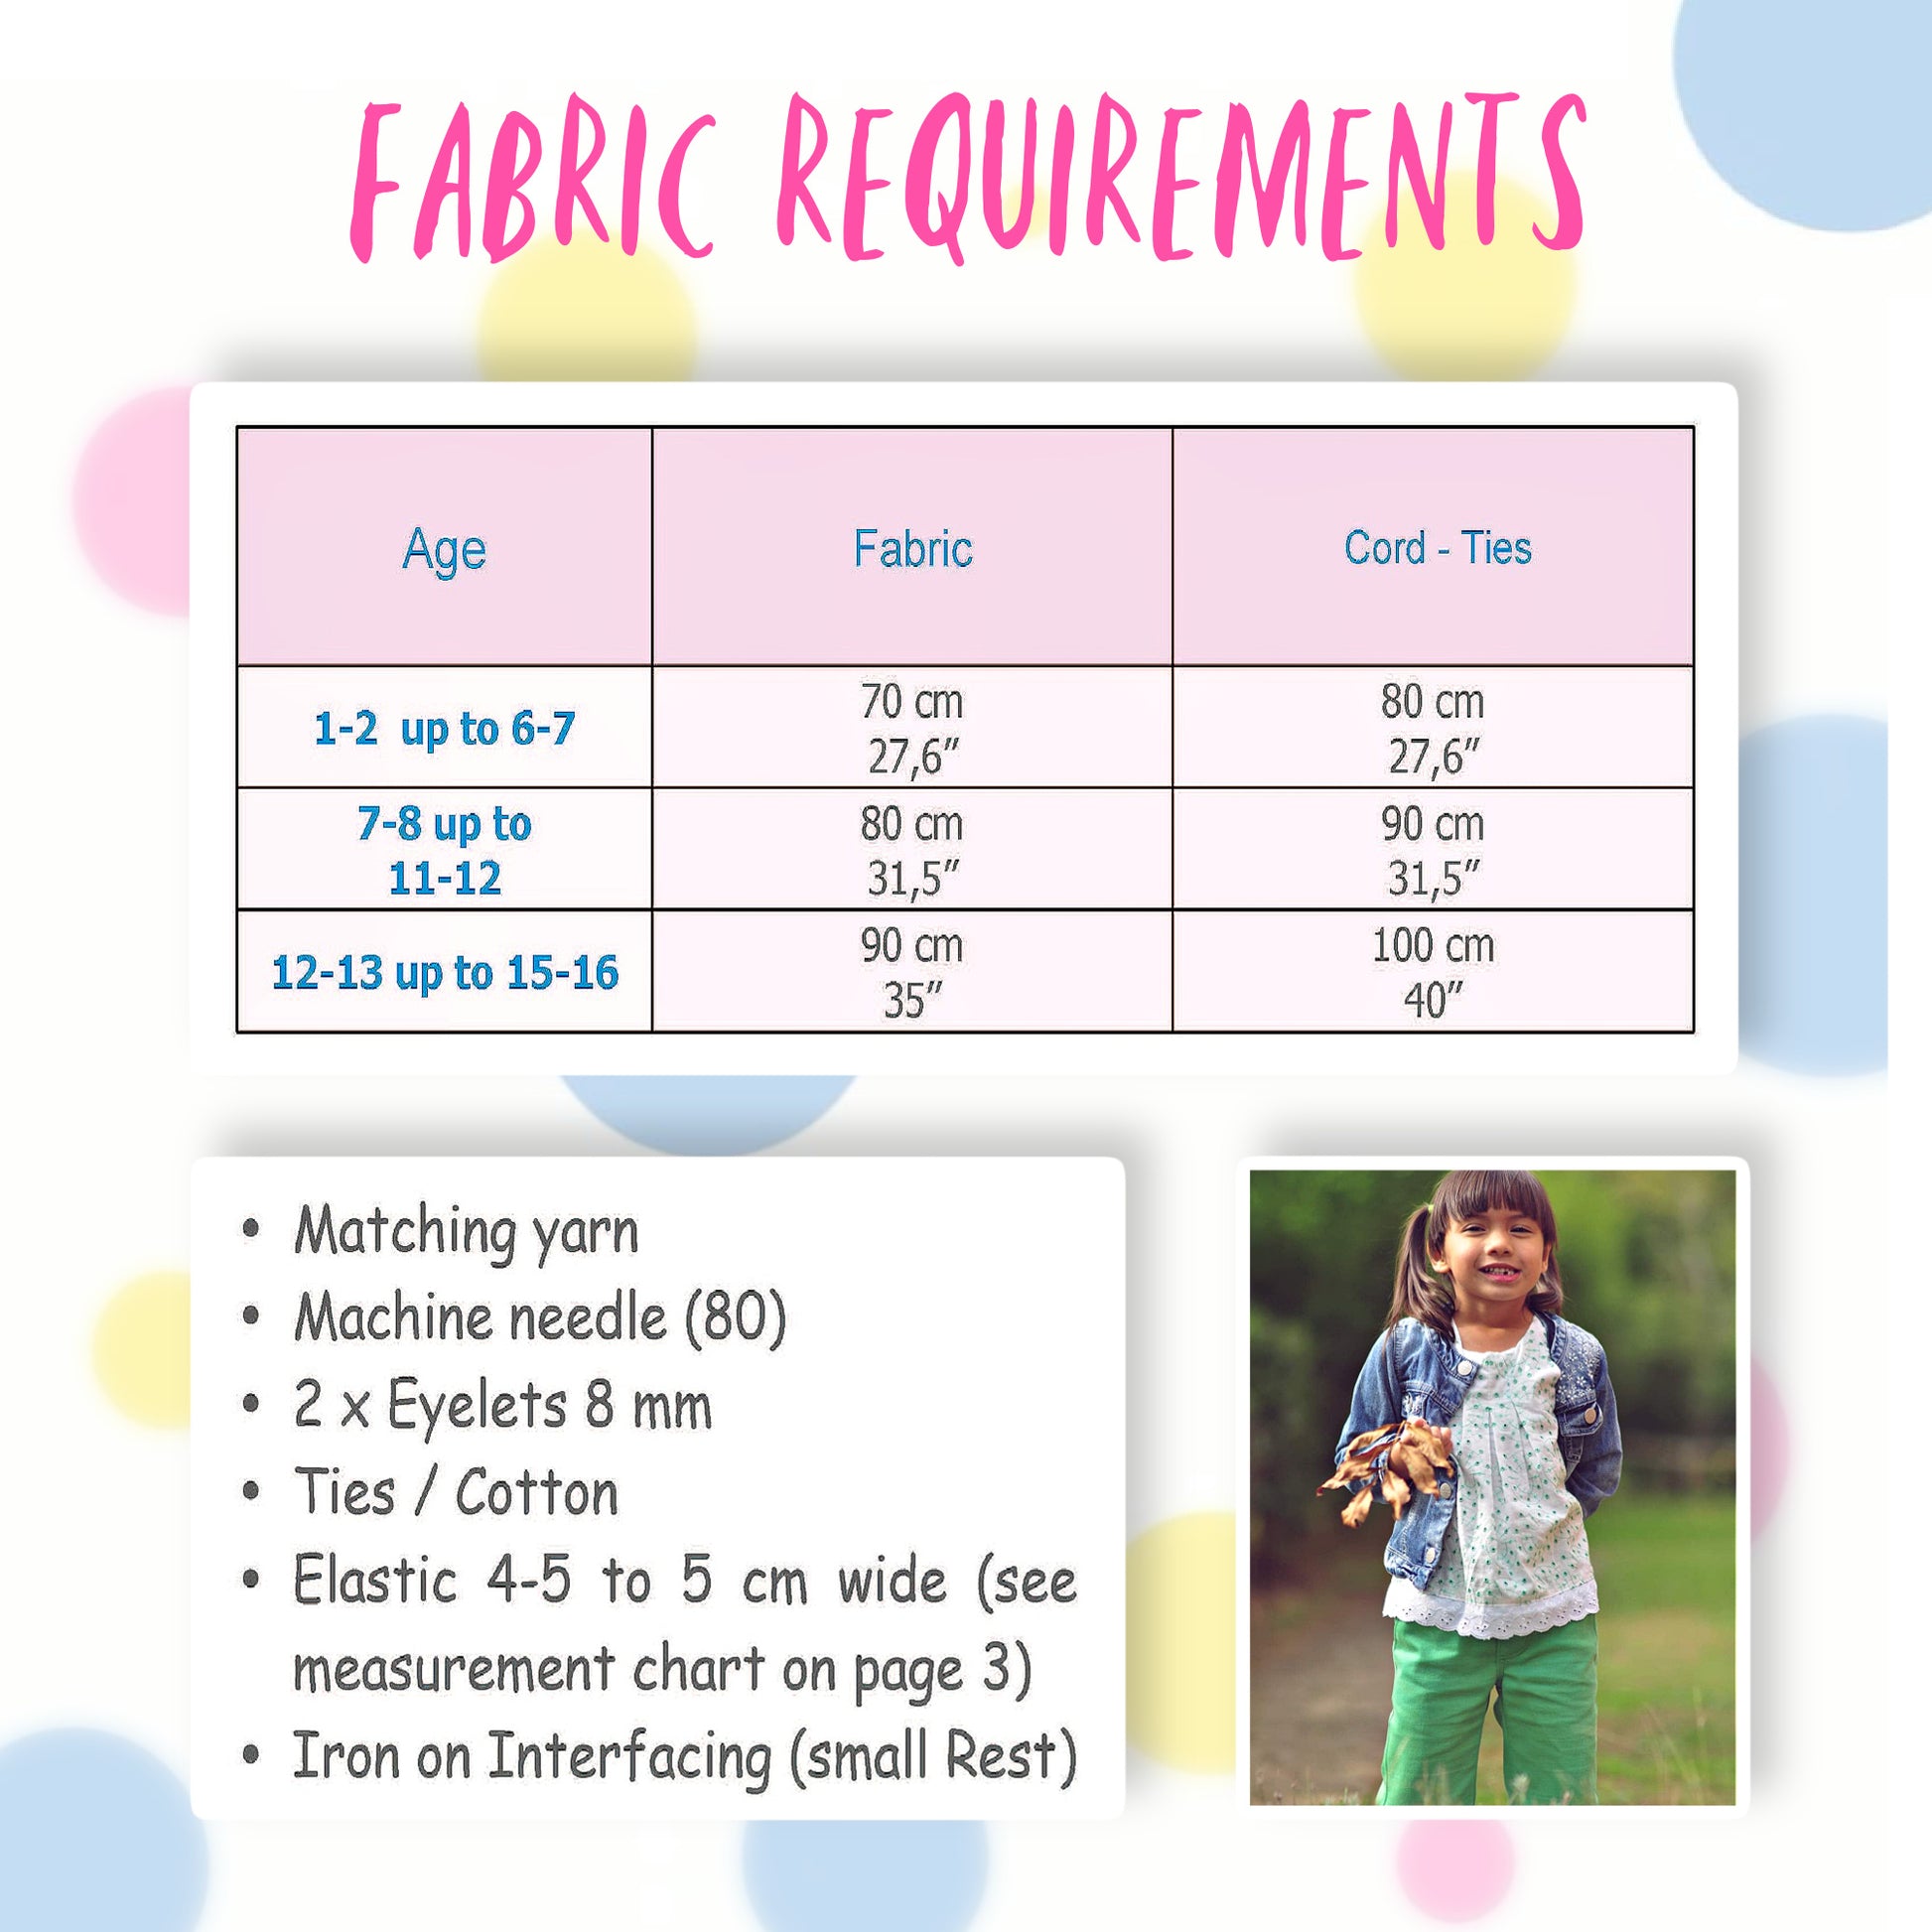
When you're cutting out of a remnant and you haven't got enough fabric, you can actually cut it both ways as long as it's a plain weave.

Then you fold over the hem because we won't be needing that for this.

You're cutting out the front twice, the back twice, the patch pocket, and the front pocket. Here you can see I've already cut up my shirt pretty well for the contrast. That's my pocket facing, and here you can see I've also done my waistband.

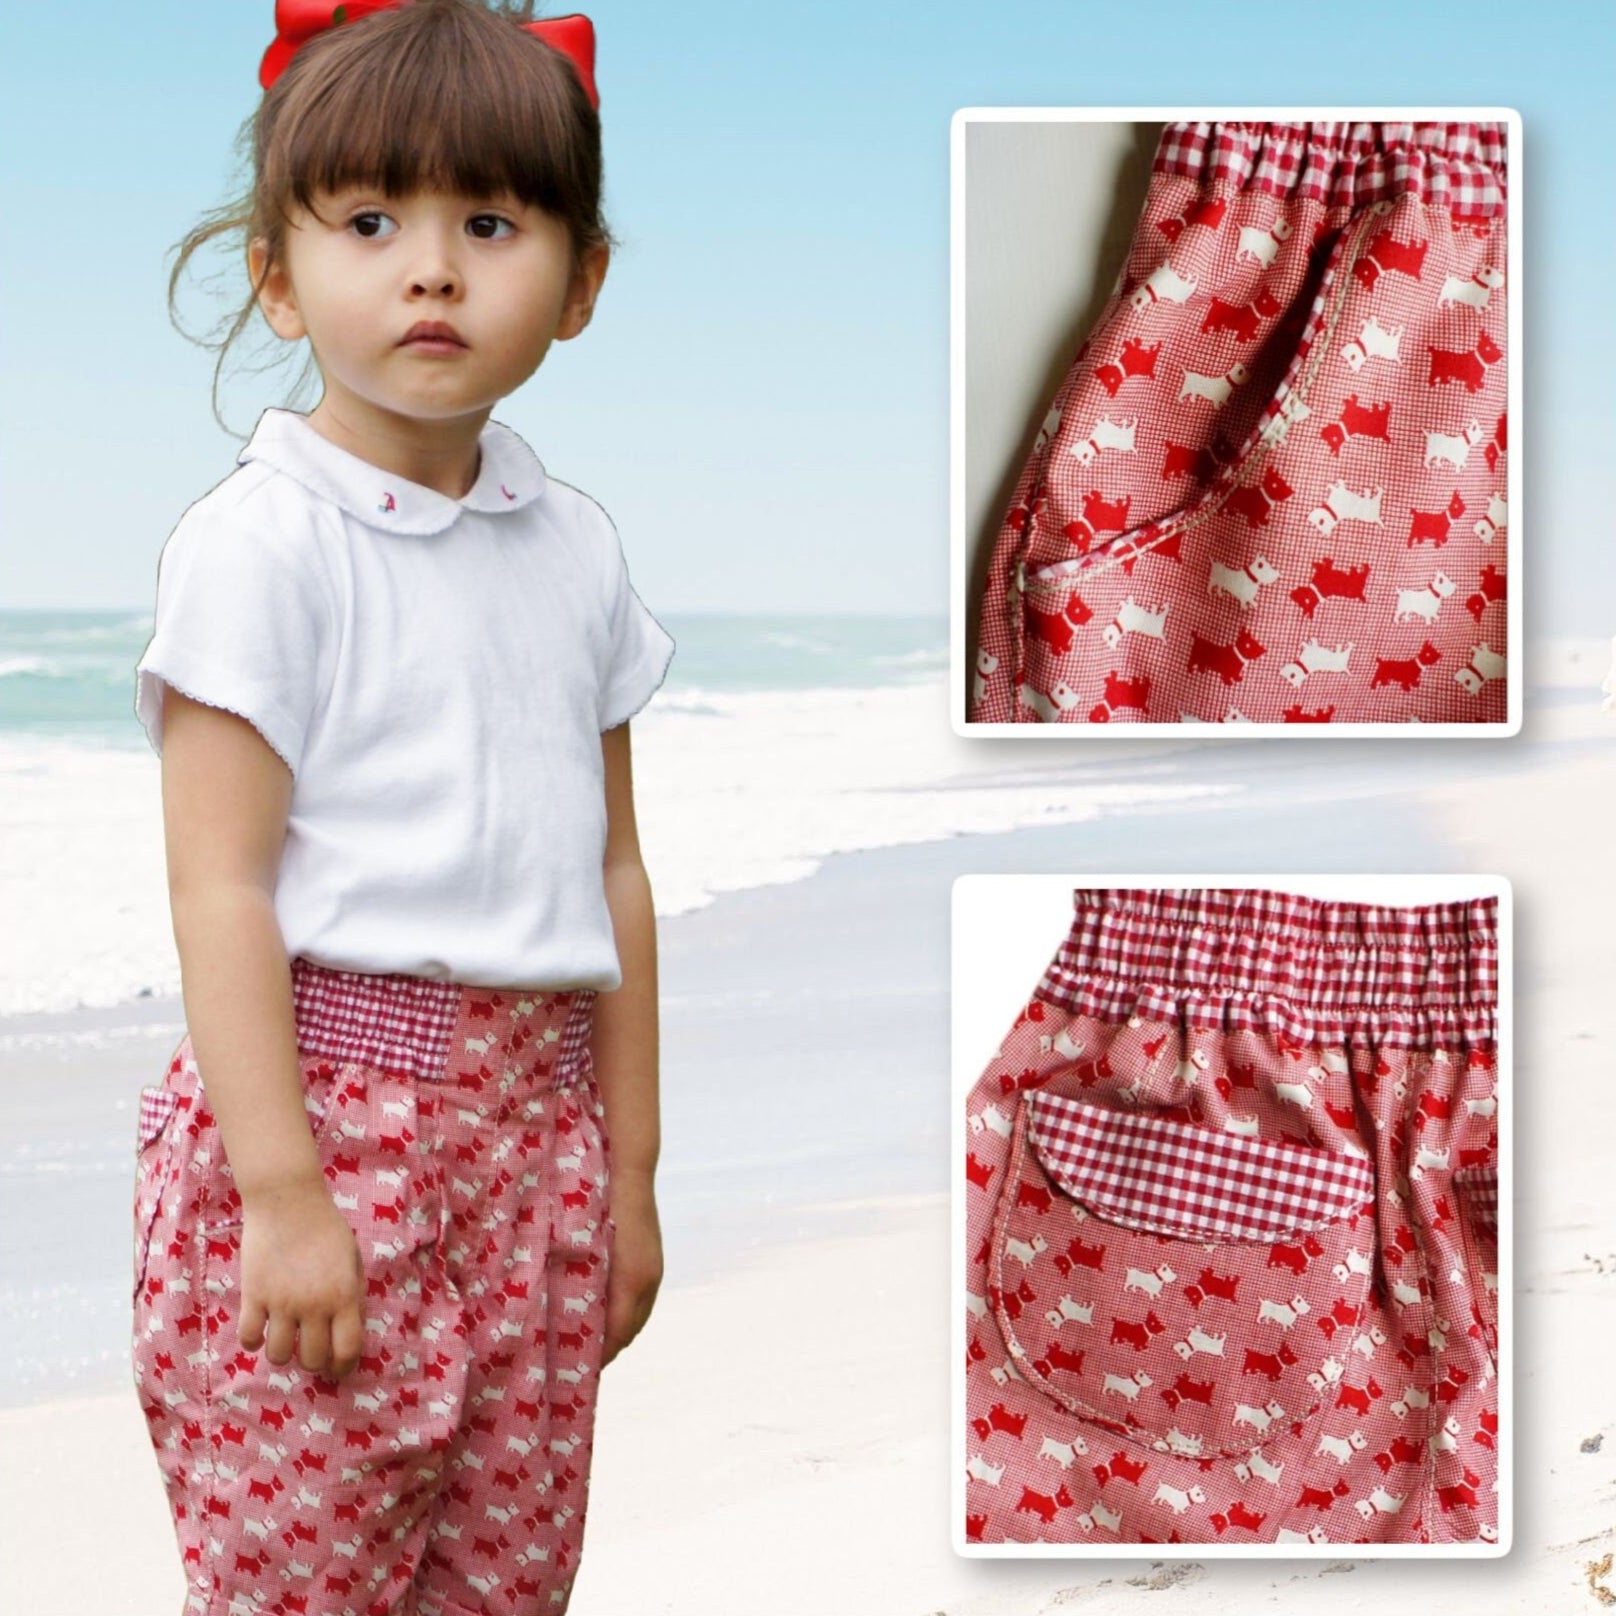
Preparing the Back Pocket

We begin by cutting out the pocket.

The pocket needs to be folded over in the curved area and then made 4 cm longer all the way across.

You also want to cut the pocket out in blue, but of course you cut it just as it is and place it on top. Then we can create that tunnel simply by folding this down, and that will give me space to put my elastic through.

Then it's sewn on like we did before on the other trousers.

Preparing the Hem Trim and Tie

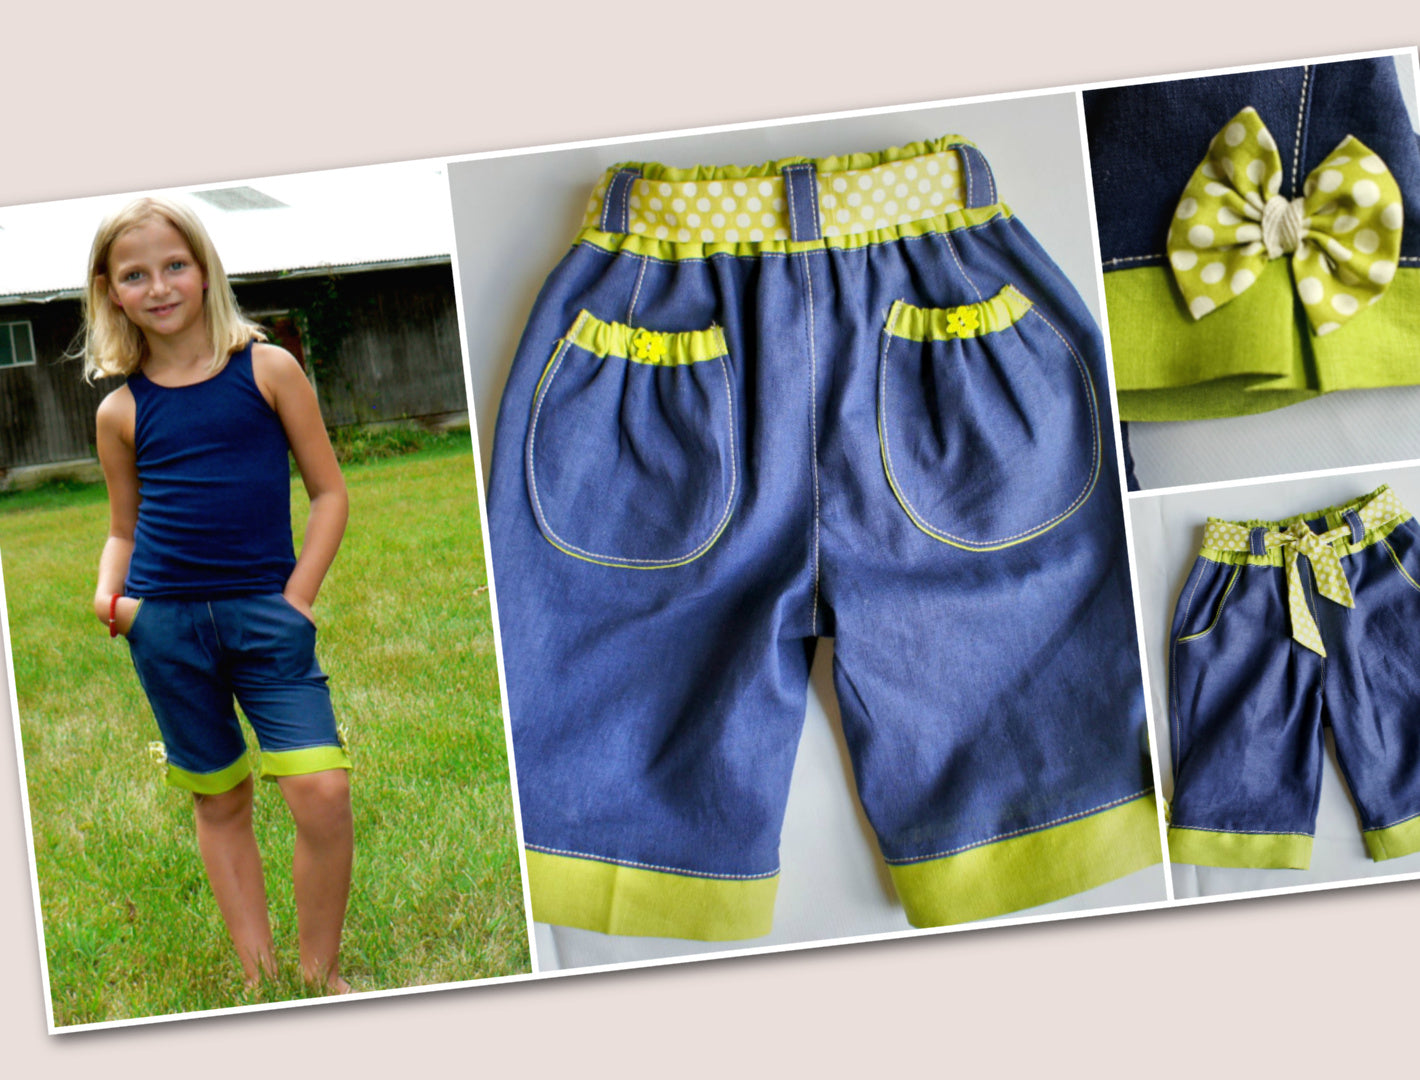
You want to make the hem trim twice as wide as the hem and quite a bit longer than both of these legs together because we're going to put a pleat in.

That means it doesn't really matter if you cut it accurately in the length department because we can put a pleat in later.

For the tie at the top, I would always recommend ripping the fabric and then snipping it again at the right width and ripping it again. Obviously, you have a pattern piece for that in your pattern.

I've had 34 inches in length here, and that wasn't long enough. I would recommend that you make it at least 37 inches long, but if you're in doubt, I would just rip it straight across the fabric so you've got lots and lots. Then tie it around, actually tie a bow, see where that gets to, and cut it off.

Some people might like a bigger bow; some like it smaller. If you do that, then it's absolutely certain that you get the right length.

Then you need a piece 6 inches wide and another 3½ inches wide for your bow. Again, you've got a pattern for that anyway, but if you just want to measure it yourself, those are the dimensions.

Now we have all our pieces together and can get started.

You want to cut a little bit of Vilene just to strengthen the front as well, and we put that on our little pile.

Constructing the Back Pocket

We begin with the pockets.

The pockets are joined right sides facing, and we sew along there with a 1 cm seam allowance.

You can iron the seam apart. Lots of steam. Always iron things, especially when you have linen. You need to iron quite a lot every step of the way.

Then put them together edge to edge and sew all the way around.

I'd recommend that you leave a turning gap here rather than just at the top because we're actually sewing from where the lime fabric starts back to where it ends.

I'm pulling my pocket through through that little hole, but actually I would recommend that you leave a turning gap because it's much easier.

Cut back your seam allowance, but don't cut it back at the front there because that would be really fiddly to put in.

Getting it through that little hole is actually quite hard, which is why I'm saying put a turning gap in. It's much easier.

Now we can press the whole lot again.

Creating the Elastic Tunnel

We need to sew through the top so we get the tunnel for the elastic.

I would recommend that you stitch on the lime fabric edge and not just underneath it because if you're working with a contrast thread and you don't get it absolutely spot on, you'll see that stitching line wiggling all over the place.

Get a fixed point on your presser foot and then line up that seam with it. That will be much easier and it looks really nice.

Now I thread through my elastic and pull it. I would also recommend not pulling it quite as tight as I did for my trousers.

Secure it on one side, pull it—but not quite as much as that—and then secure it on the other side and cut the elastic off.

You can then sew on a couple of buttons in the middle so that looks really cute.

Sewing the Back Section

At that point, you can make your dart at the back, iron it towards the body middle, and top stitch it.

Then you can put your pockets on, and we're going to stitch around them with the triple stitch again, which I really like.

On your sewing machine, that is the stitch with the three lines next to each other. It's like a stretch stitch, really, which you use for jersey fabrics and things like that, but it works really well for this.

Join and overlock the center back, iron that towards the right if I'm standing in front of it, and then top stitch that again as well.

Constructing the Front Pocket

Next, we're going to put the front pocket on and sew it in with a 1 cm seam allowance.

Cut back your seam allowance, turn it in, and iron it so you have a little bit of the contrast color peeping out.

Place the pocket underneath it and pin it. Then flip the fabric back and pin it again underneath.

Stitch it with a 1 cm seam allowance.

After that, you want to top stitch the edge of the fabric as well so that your nice little trim doesn't come loose when you wash it.

Pin it in place, and you also want to do a few little securing stitches there so it doesn't come apart.

Disable your knife and then join and overlock the center front seam.

Iron that seam towards the left this time so that they both go the same direction when they're top stitched.

Joining the Shorts

Now we want to iron on a little bit of Vilene to the center front to give it some stability, and then we can top stitch that as well.

Join the side seam, iron the side seam towards the center back, and then top stitch that as well.

There's an awful lot of top stitching in this, but I do think it looks really nice.

I've pinned on my waistband now, and we iron the seam allowance into the waistband.

Then we turn the whole thing to the wrong side and pin our darts. Remember, the darts are shorter on yours because it just looks better.

Then we join the inner seam and overlock it.

Next, we overlock the darts and also overlock along the top edge.

Don't forget that the darts need to be ironed towards the center front.

Attaching the Hem Trim

Now I'm going to iron over my hem trim. I've got two of those.

Once it's ironed, you want to put the right sides together and join the hem trim like this.

It's much easier to iron it first and then sew it because then the fold is already there.

Now all you need to do is place this onto your trouser leg.

We're starting at the inner leg seam and simply pinning it from either side until we get to the outer leg seam.

There is no measuring involved here. You simply pin it where it naturally wants to go.

With the remaining fabric, we make a pleat. I actually have very little fabric here, so I would aim at making it about 4 cm bigger so you've got a really decent-sized pleat.

I think mine is a bit slim.

Then you put it on the sewing machine arm and stitch all the way around again with a 1 cm seam allowance.

Now we've done that, we can overlock this seam.

When you fold this down, you need to iron the seam allowance towards the top. Then you can top stitch that again with a triple stitch all the way around.

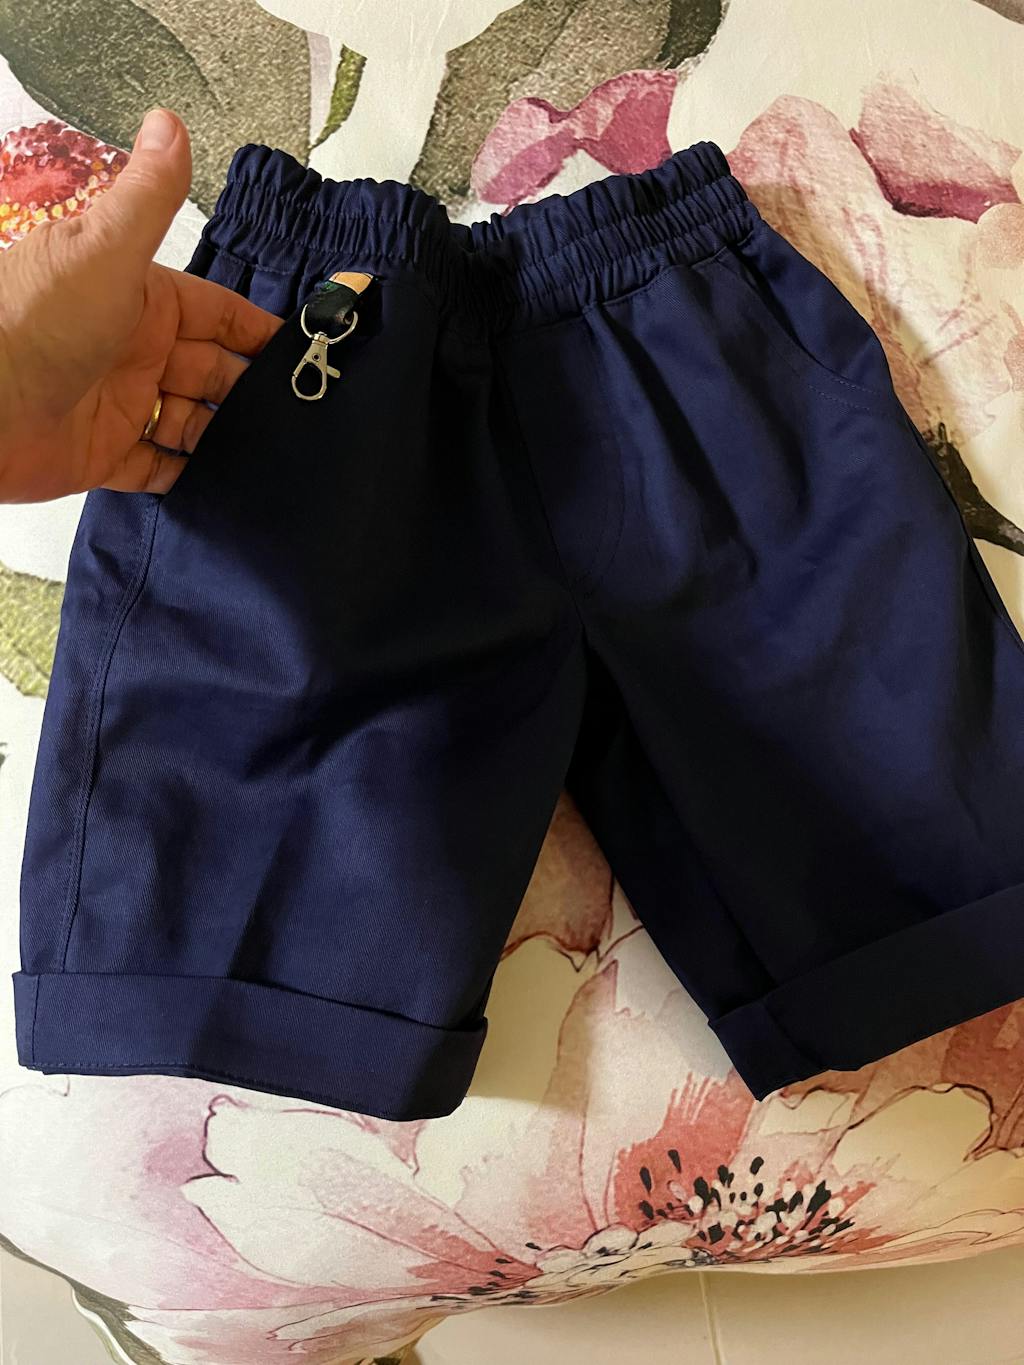
Adding the Waistband Elastic

Fold the waistband over just over 2 inches—it's exactly 2.2 inches actually.

Then sew all the way around just underneath the waistband.

We can then put our elastic in and top stitch it from one side first.

Then we do the same on the other side. As soon as it's about a centimeter over that line where the dart starts, we'll stitch that down as well. That secures it in place.

Then we're going to stitch through, using a distance of just over half an inch from either side.

Making the Tie

Now we're going to make the tie.

I would do a really nice pointed tip, and you need to have the stitch quite small so that it doesn't fray out when you cut it back.

Then we're going to leave a turning gap through which we can turn the tie.

As I said, you might want to check the length of the tie first to make sure it's exactly the right length for your child.

Then we cut back and use a pencil—with the blunt side, of course—to pull the whole thing through.

Put the pencil in, pull the fabric over the top. A wooden spoon also works really well for this if you don't want to use a pencil.

Then we're going to iron this out really well. Get the tip out properly, work the seam out really well, and use your fingers as you iron to create a really pristine edge.

Making the Bow

Now we're going to make the bow.

Fold over the fabric and sew from the top, leaving a turning gap. Move over, start again, go backwards and forwards, and then sew to the end.

That's where we're going to turn the bow.

Then open it out and sew across either side.

Next, we're going to turn the little bow through and work out all the corners with a pin to get them really crisp before ironing.

Then we give everything a really good press.

Making and Attaching the Belt Loops

Now we're going to do the belt loops.

You need a really long strip which is 2 inches wide.

Fold the edges in from either side and press them.

Then top stitch them from either side with a triple stitch.

We're going to make them 2½ inches long each.

Fold them in a little bit more than I have here, turn them in at the top, and stitch them down at the same distance from the edge at the top.

You can also stitch them down at the bottom, but you do want to have a bit of looseness there so that your belt or tie goes through easily.

Finishing the Tie

Hand stitch the little gap shut that you left for turning the tie.

Thread it through one side, and where you come out, go in exactly the same way on the other side and thread it through again.

I devised this when I was an apprentice and was really shocked to see that other people had come up with this idea as well and that I wasn't the first.

You live and you learn.

Do that all the way to the end, secure your thread, and basically your tie is finished.

You can thread it through and tie a really nice bow in the front, and I think that's just mega cute.

You can also see that mine is way too short. I can hardly get it around, so checking the length of that is really important.

Attaching the Decorative Bow

The final thing to do is put the bow on.

I like the bow to run vertically, so you do a running stitch right through the middle using a double thread with a knot in the end.

That will automatically form your bow.

We're going to put a little bit of ribbon around it. I didn't have anything suitable, so I used a little bit of ivory ribbon that I had left over from some of the boys' projects.

Just use whatever you've got, but don't tie it too tightly because that doesn't look good. You want it to be quite loose so that the center remains wide.

Secure that and then sew it to your trouser.

Like everything, I make this look really fast, but actually securing these so they don't fall off takes a little time.

I also wanted to suggest: wouldn't it be nice if you then had a matching bow for a headband as well? That would be so cool because everything would match.

Finished Maisy Shorts

Finally, once the bow is sewn on, we have finished our little trousers.

Obviously, I have quite a few more videos for this pattern because I tend to go overboard and think, "Oh, I can do this, and I can do that, and I can do something else again."

If you want to see more options for this, you can click on the little exclamation mark in the top right-hand corner and find out how to put eyelets in.

If you want the easy option, of course, you can do that too.

This should be done in an afternoon.

Thank you very much for watching again, and I'll see you next time.

Transcript for the video: Maisy Shorts - Perfect Western Pocket

Welcome to the Sewing Workshop. Hello everyone and welcome to the Sewing Workshop. I'm going to show you here how you can add a little bit of bias binding to an opening. If you're already working with a pattern, this is the sort of thing that you're looking for, where we've got a facing and we've got a piece of fabric which goes behind it, and that's essentially this part.

So let's get started with our bound side pockets.

Preparing the Bias Binding

I'm not doing the usual right-side-facing sewing it and turning it, but I'm putting the right side on the outside. This is my bias—it's lovely, 4 cm wide, cut off at the ends, ironed lengthwise and folded in half.

I'm going to stretch that on, but instead of doing it from the right side, I'm doing it from the wrong side of the pocket so it can roll to the outside afterwards.

Attaching the Binding

The key to getting this really well done is to pull the binding as you sew. This is quite tight—none of this loose “just place it on” method.

So you pull your binding, and I just wanted to check how much this actually is so you can get an idea. If I snip this, you can see how much it is.

If I put it on without stretching at all, my snip would be here. So what you're actually doing is gaining about this much—less than 1 cm—but that makes all the difference. We're talking about maybe half a centimeter less than the natural curve.

So I’m going to stitch this on now.

Finishing the Edge

Next step: cut back your seam allowance a bit because it will get in the way.

Turn it over, and now it's going to roll naturally to the outside like that. It's a really simple technique, but you need to press this really well.

Then pin it from the other side.

Now we've got this all very neatly ironed. Cut back, press it flat, and press it over to the outside. I can pin this all the way around, and then I can stitch it.

I'm going to stitch close to the edge all the way around. I have actually decided to sew both sides because I think that looks really pretty. There are no limits to your creativity in sewing—I absolutely love it.

Attaching the Pocket

Now what we can do is put the back pocket piece on here, which is already the right shape. That goes on, and we pin it the same way we would with the standard Maisy shorts pocket, or any trouser pocket you're working on.

You're just taking inspiration from these steps.

Some people actually prefer doing it the other way around—they overlock it first. Just make sure you have no pins in when you overlock.

Then they stitch the whole pocket on, and that gives a really nice look as well. You can do that—you don’t have to.

Finished Result

And there we have it: two finished pockets, overlocked and stitched together, and we're ready to carry on with our pair of trousers.

Thank you again for watching the Sewing Workshop, and we'll be back next week with something else.

Bye for now.

YOU MAY ALSO LIKE