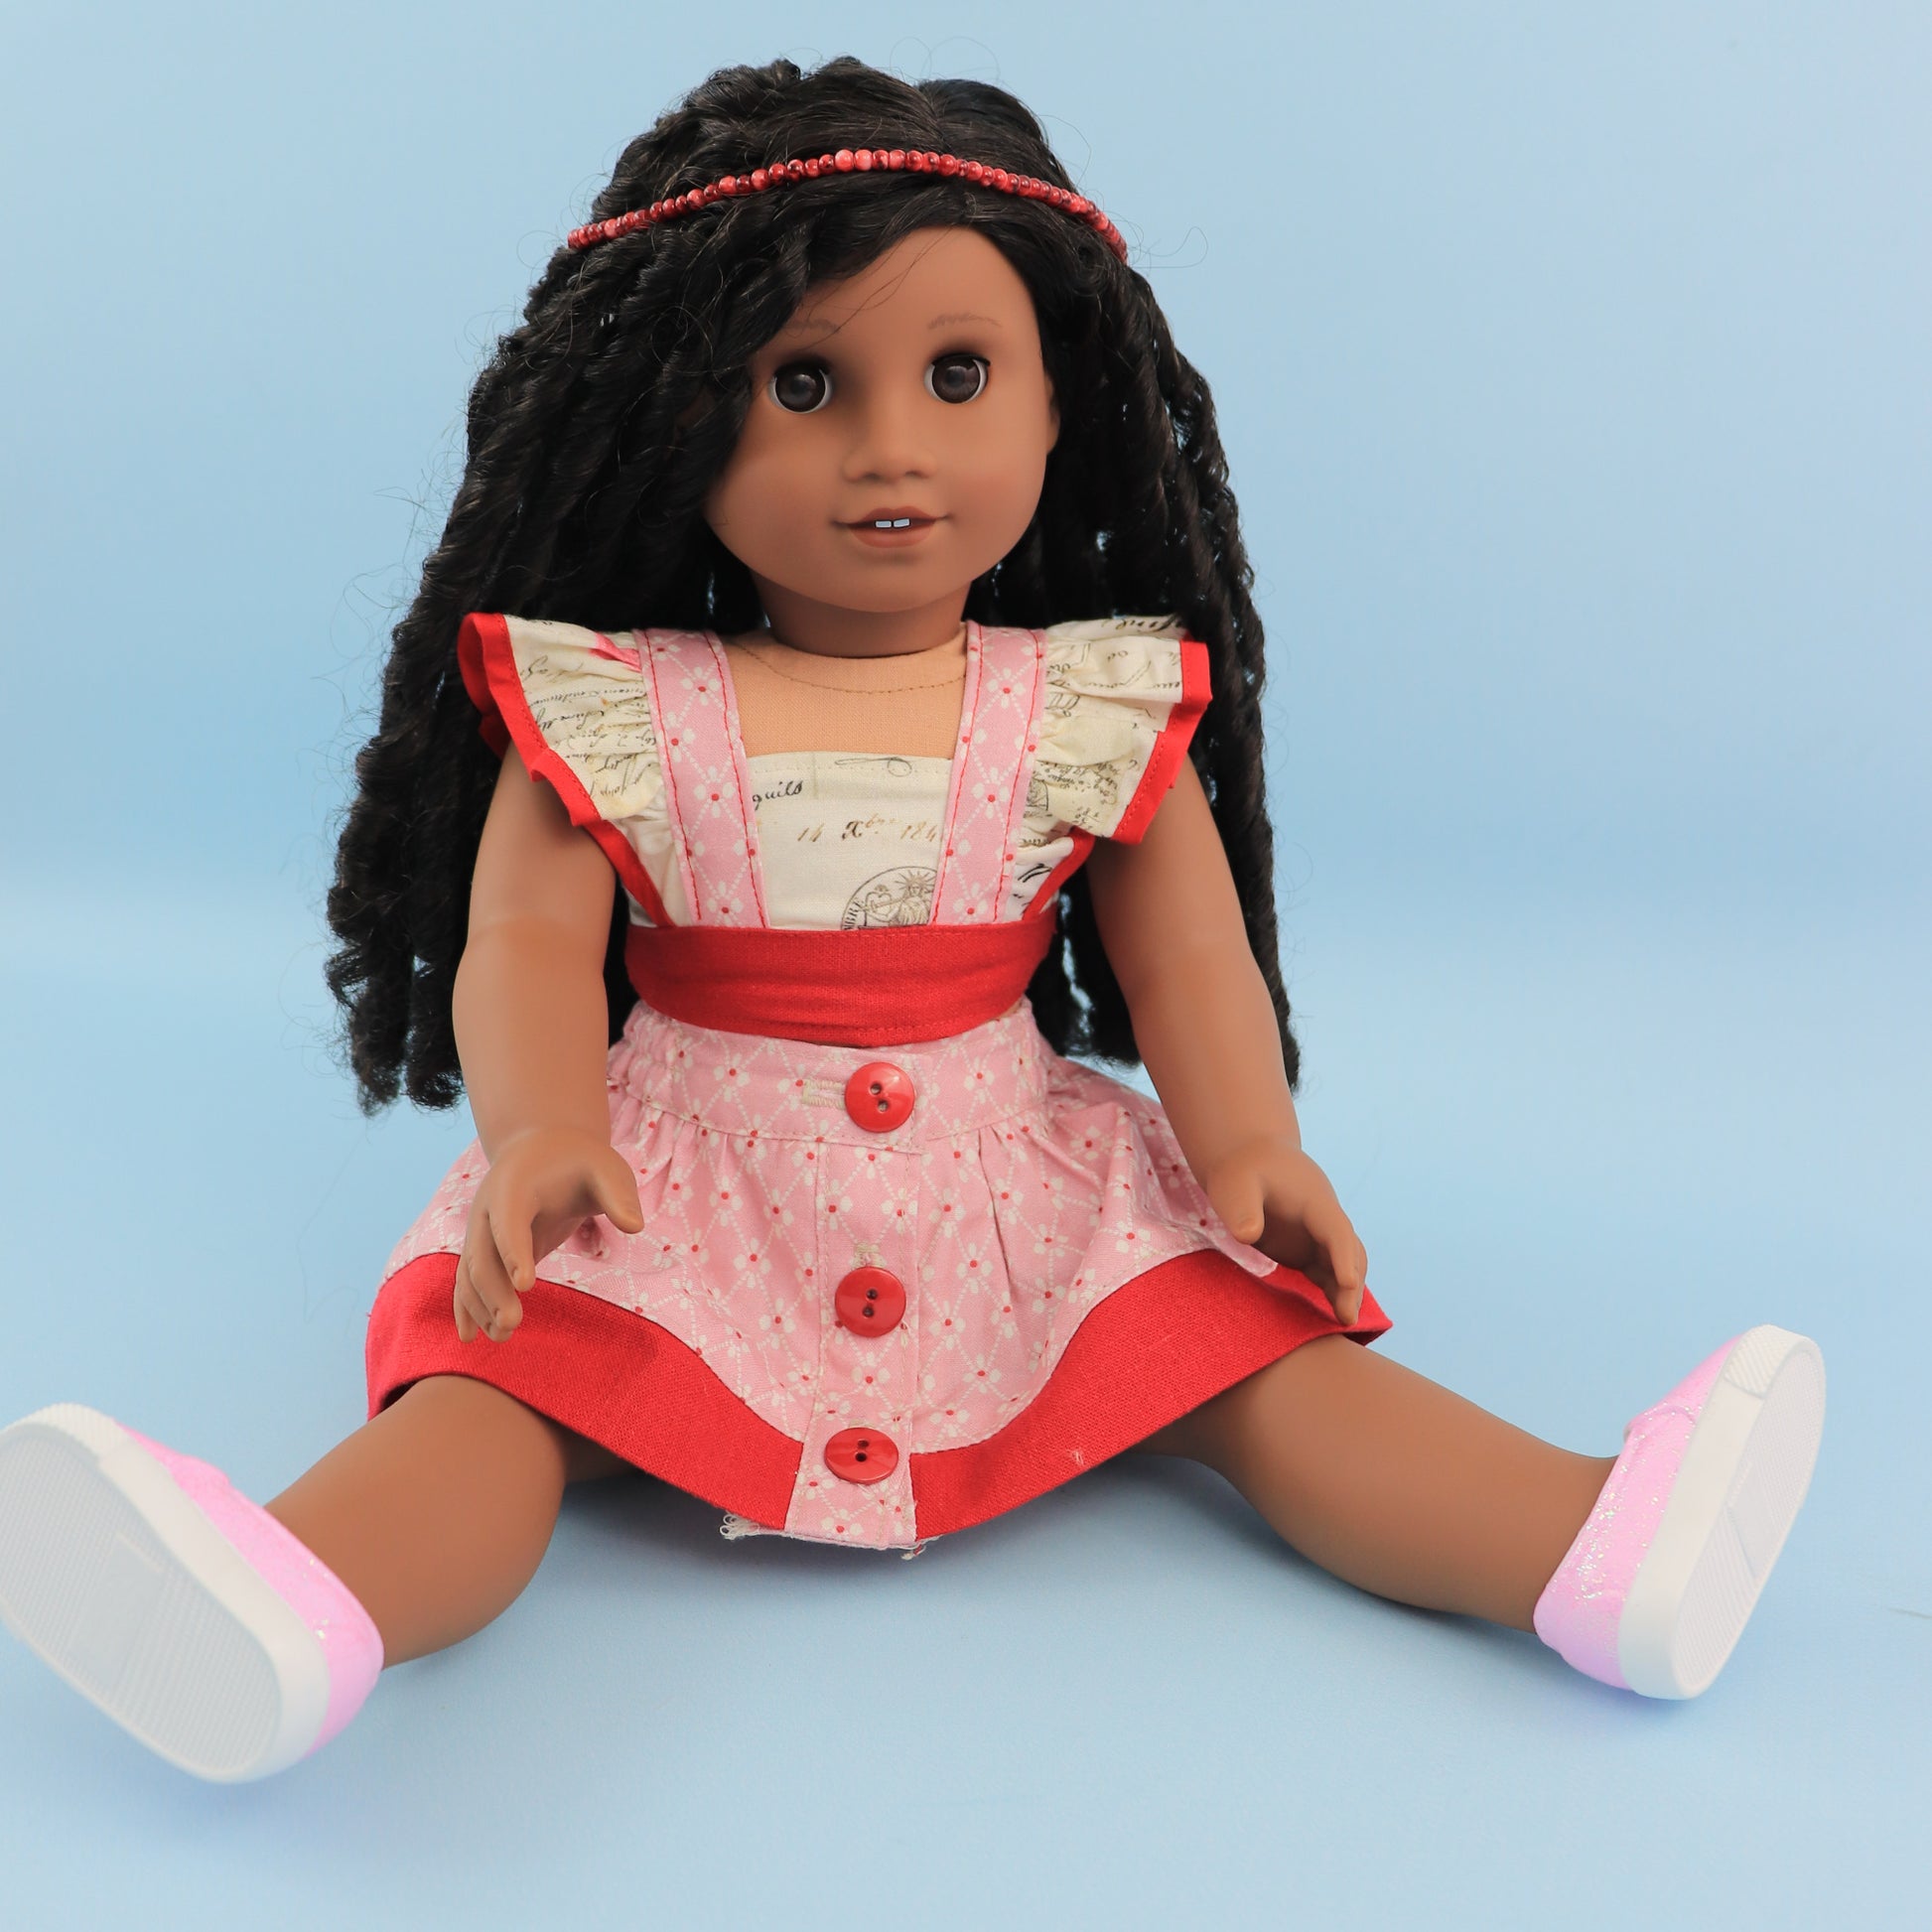
Betsy Doll Skirt
Transcript for the video: Betsy Doll Skirt - All-in-One-Video
Hi everyone, this is Marina from Frocks and Frolics, and we are back for the Tilly and Betsy combo. This time we’re going to sew the Betsy skirt.
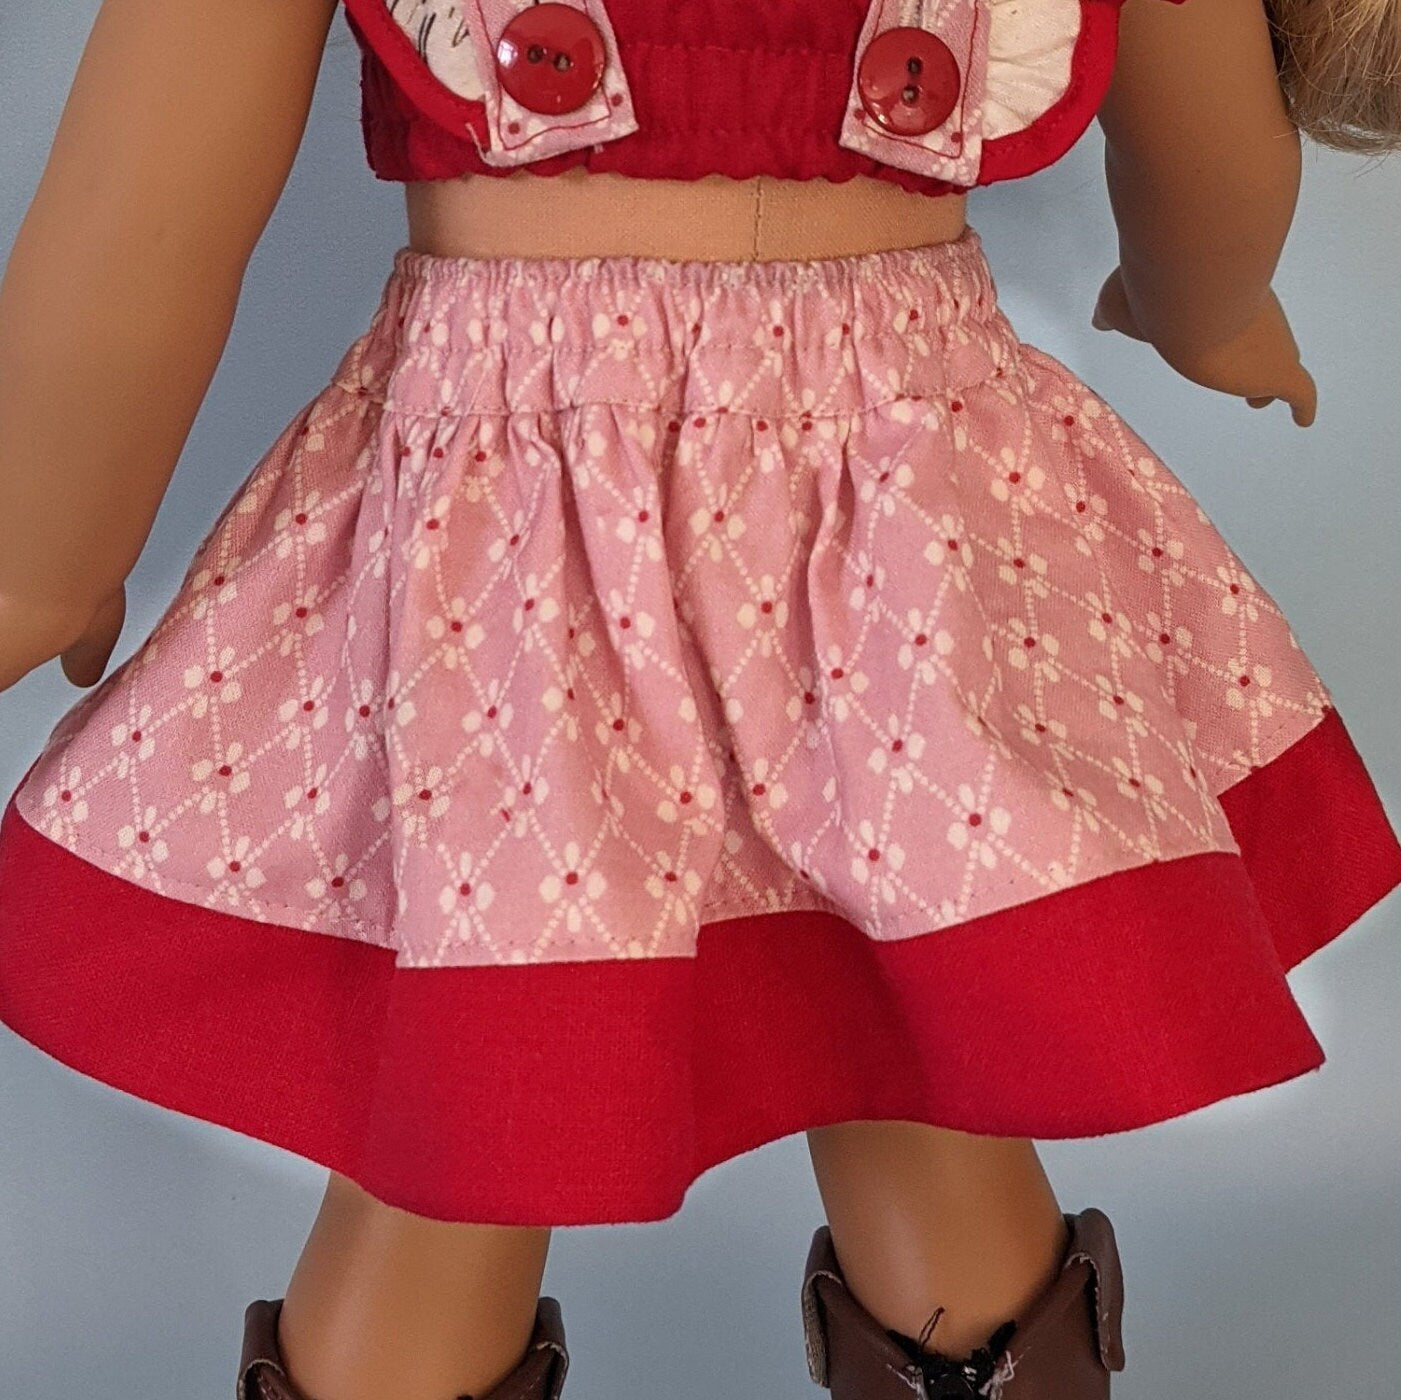
The Betsy skirt is also available in girl sizes from age 1 to 12. I’ve made this very similar to the girl’s skirt, so there isn’t much difference between the two. I’ve even added the pockets, but I just want to point out that you can leave the pockets off if you prefer. There’s no need to add them, but if you would like to practise sewing pockets, then go right ahead. As you can see here, I’ve put proper pockets into the skirt.
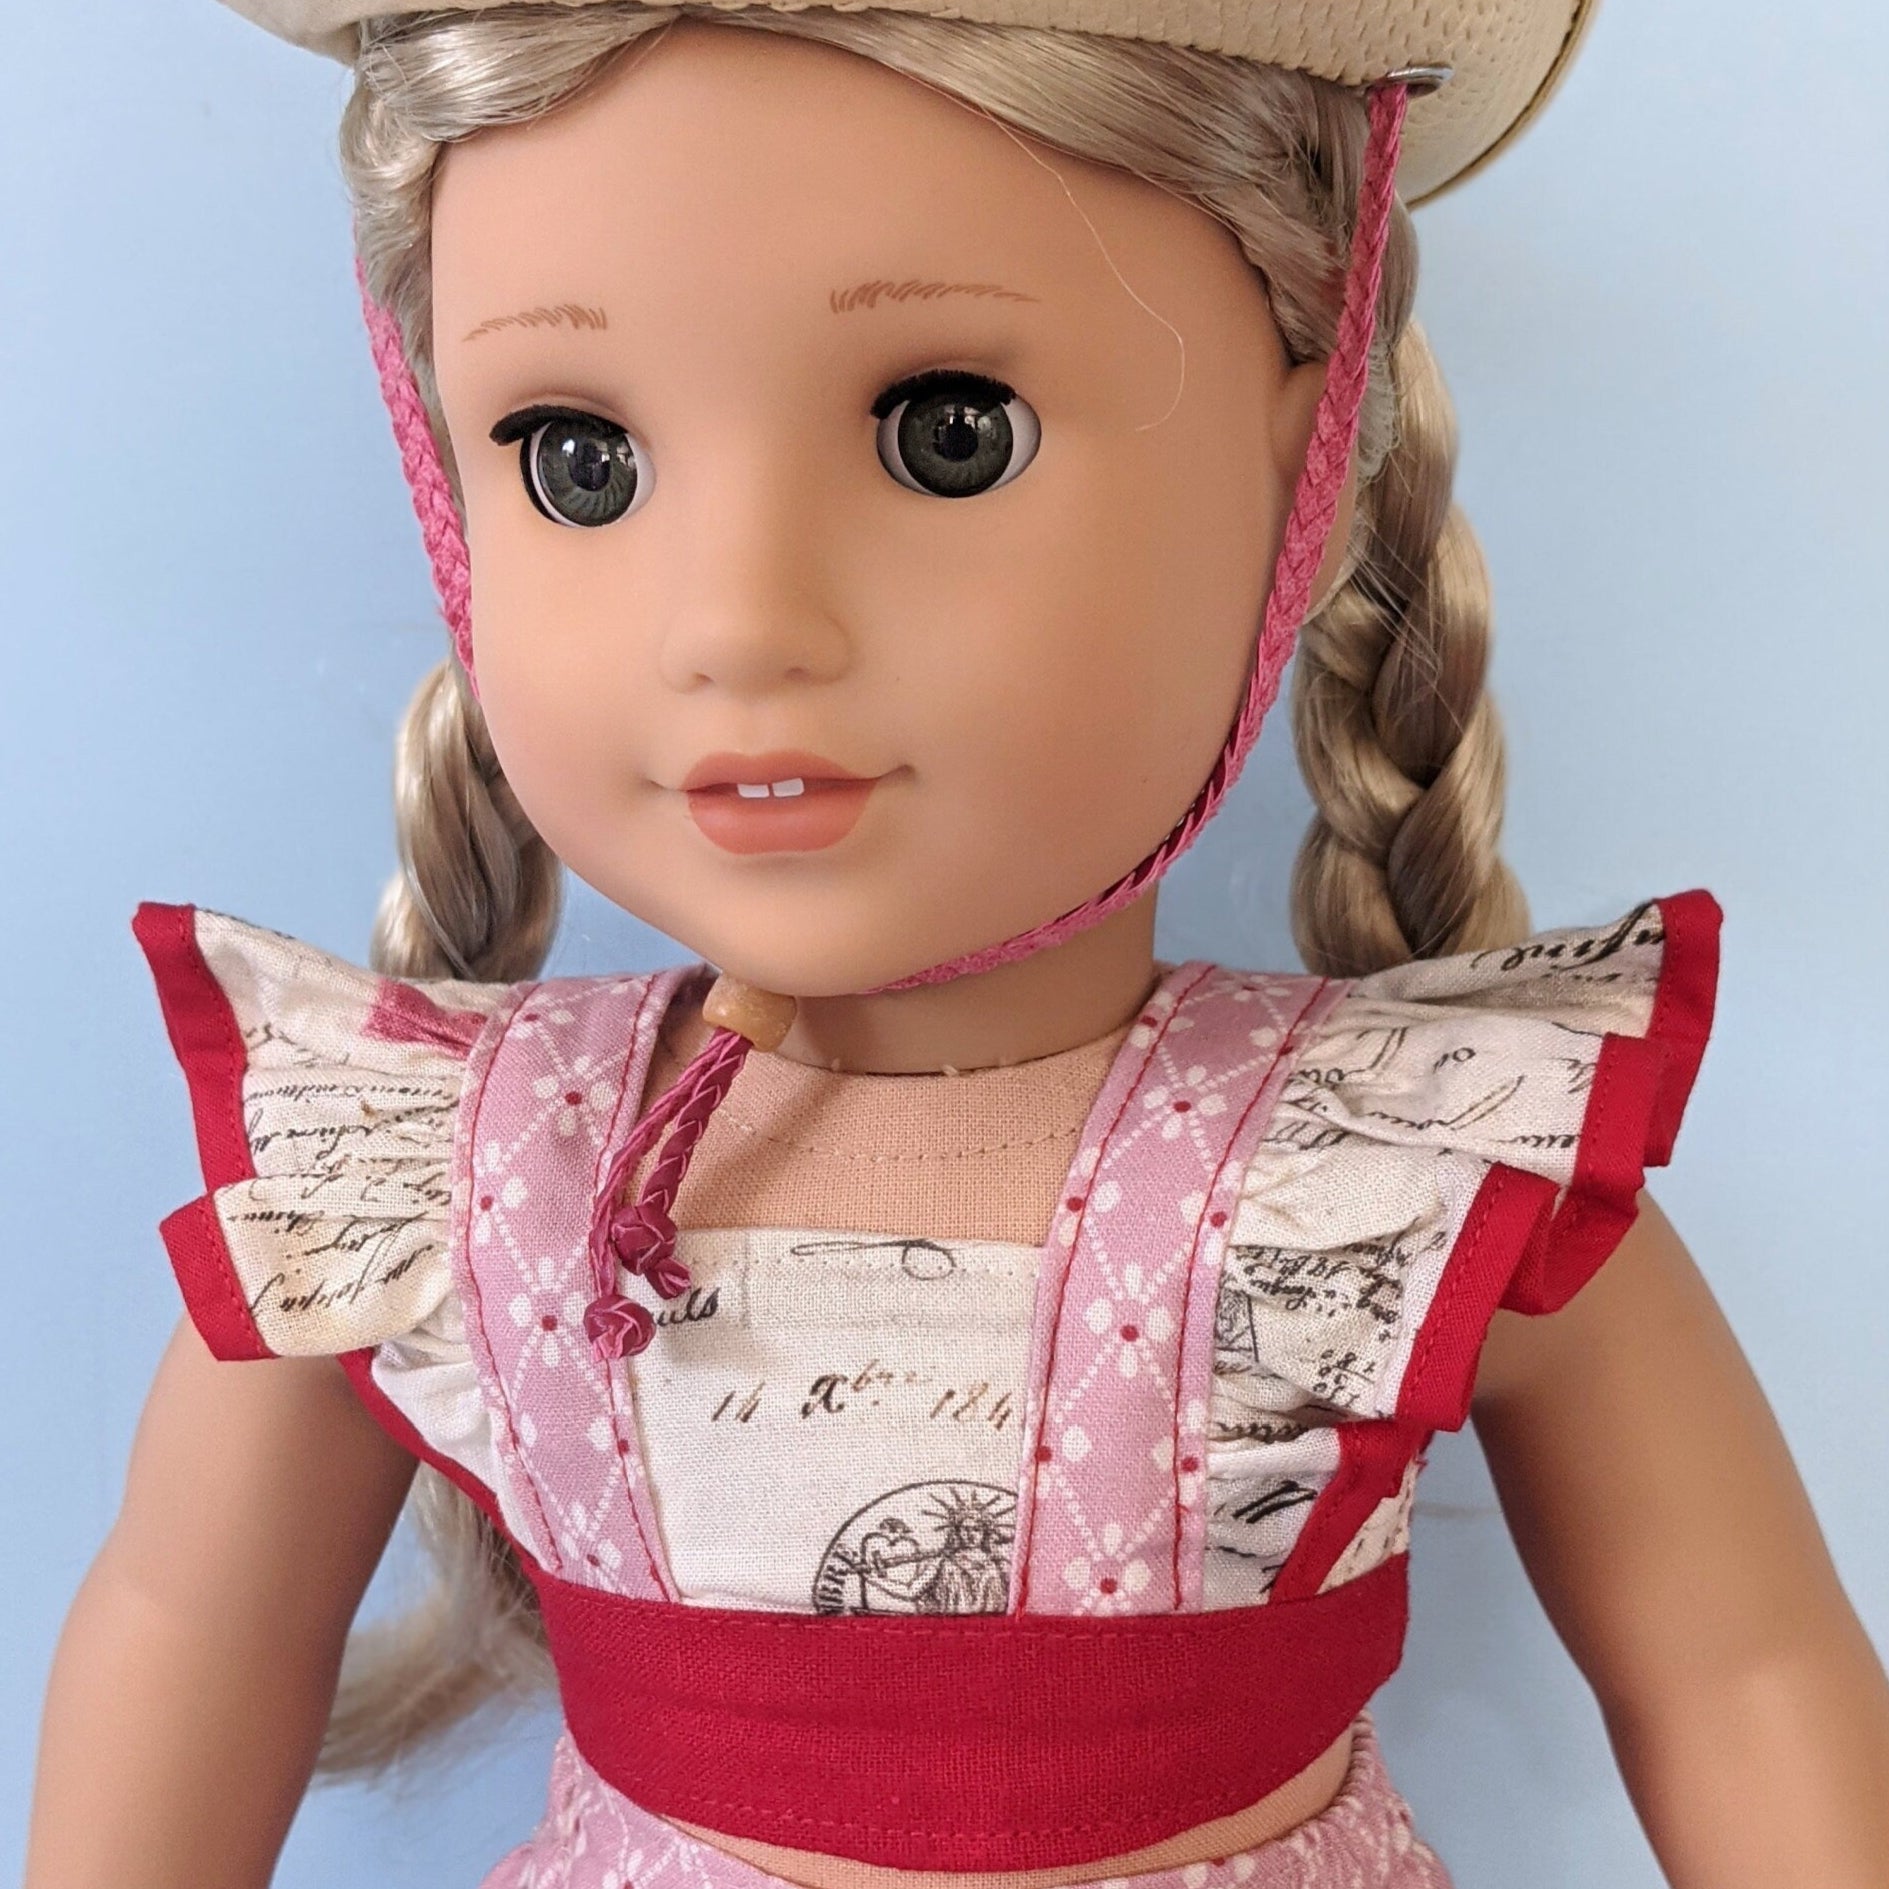
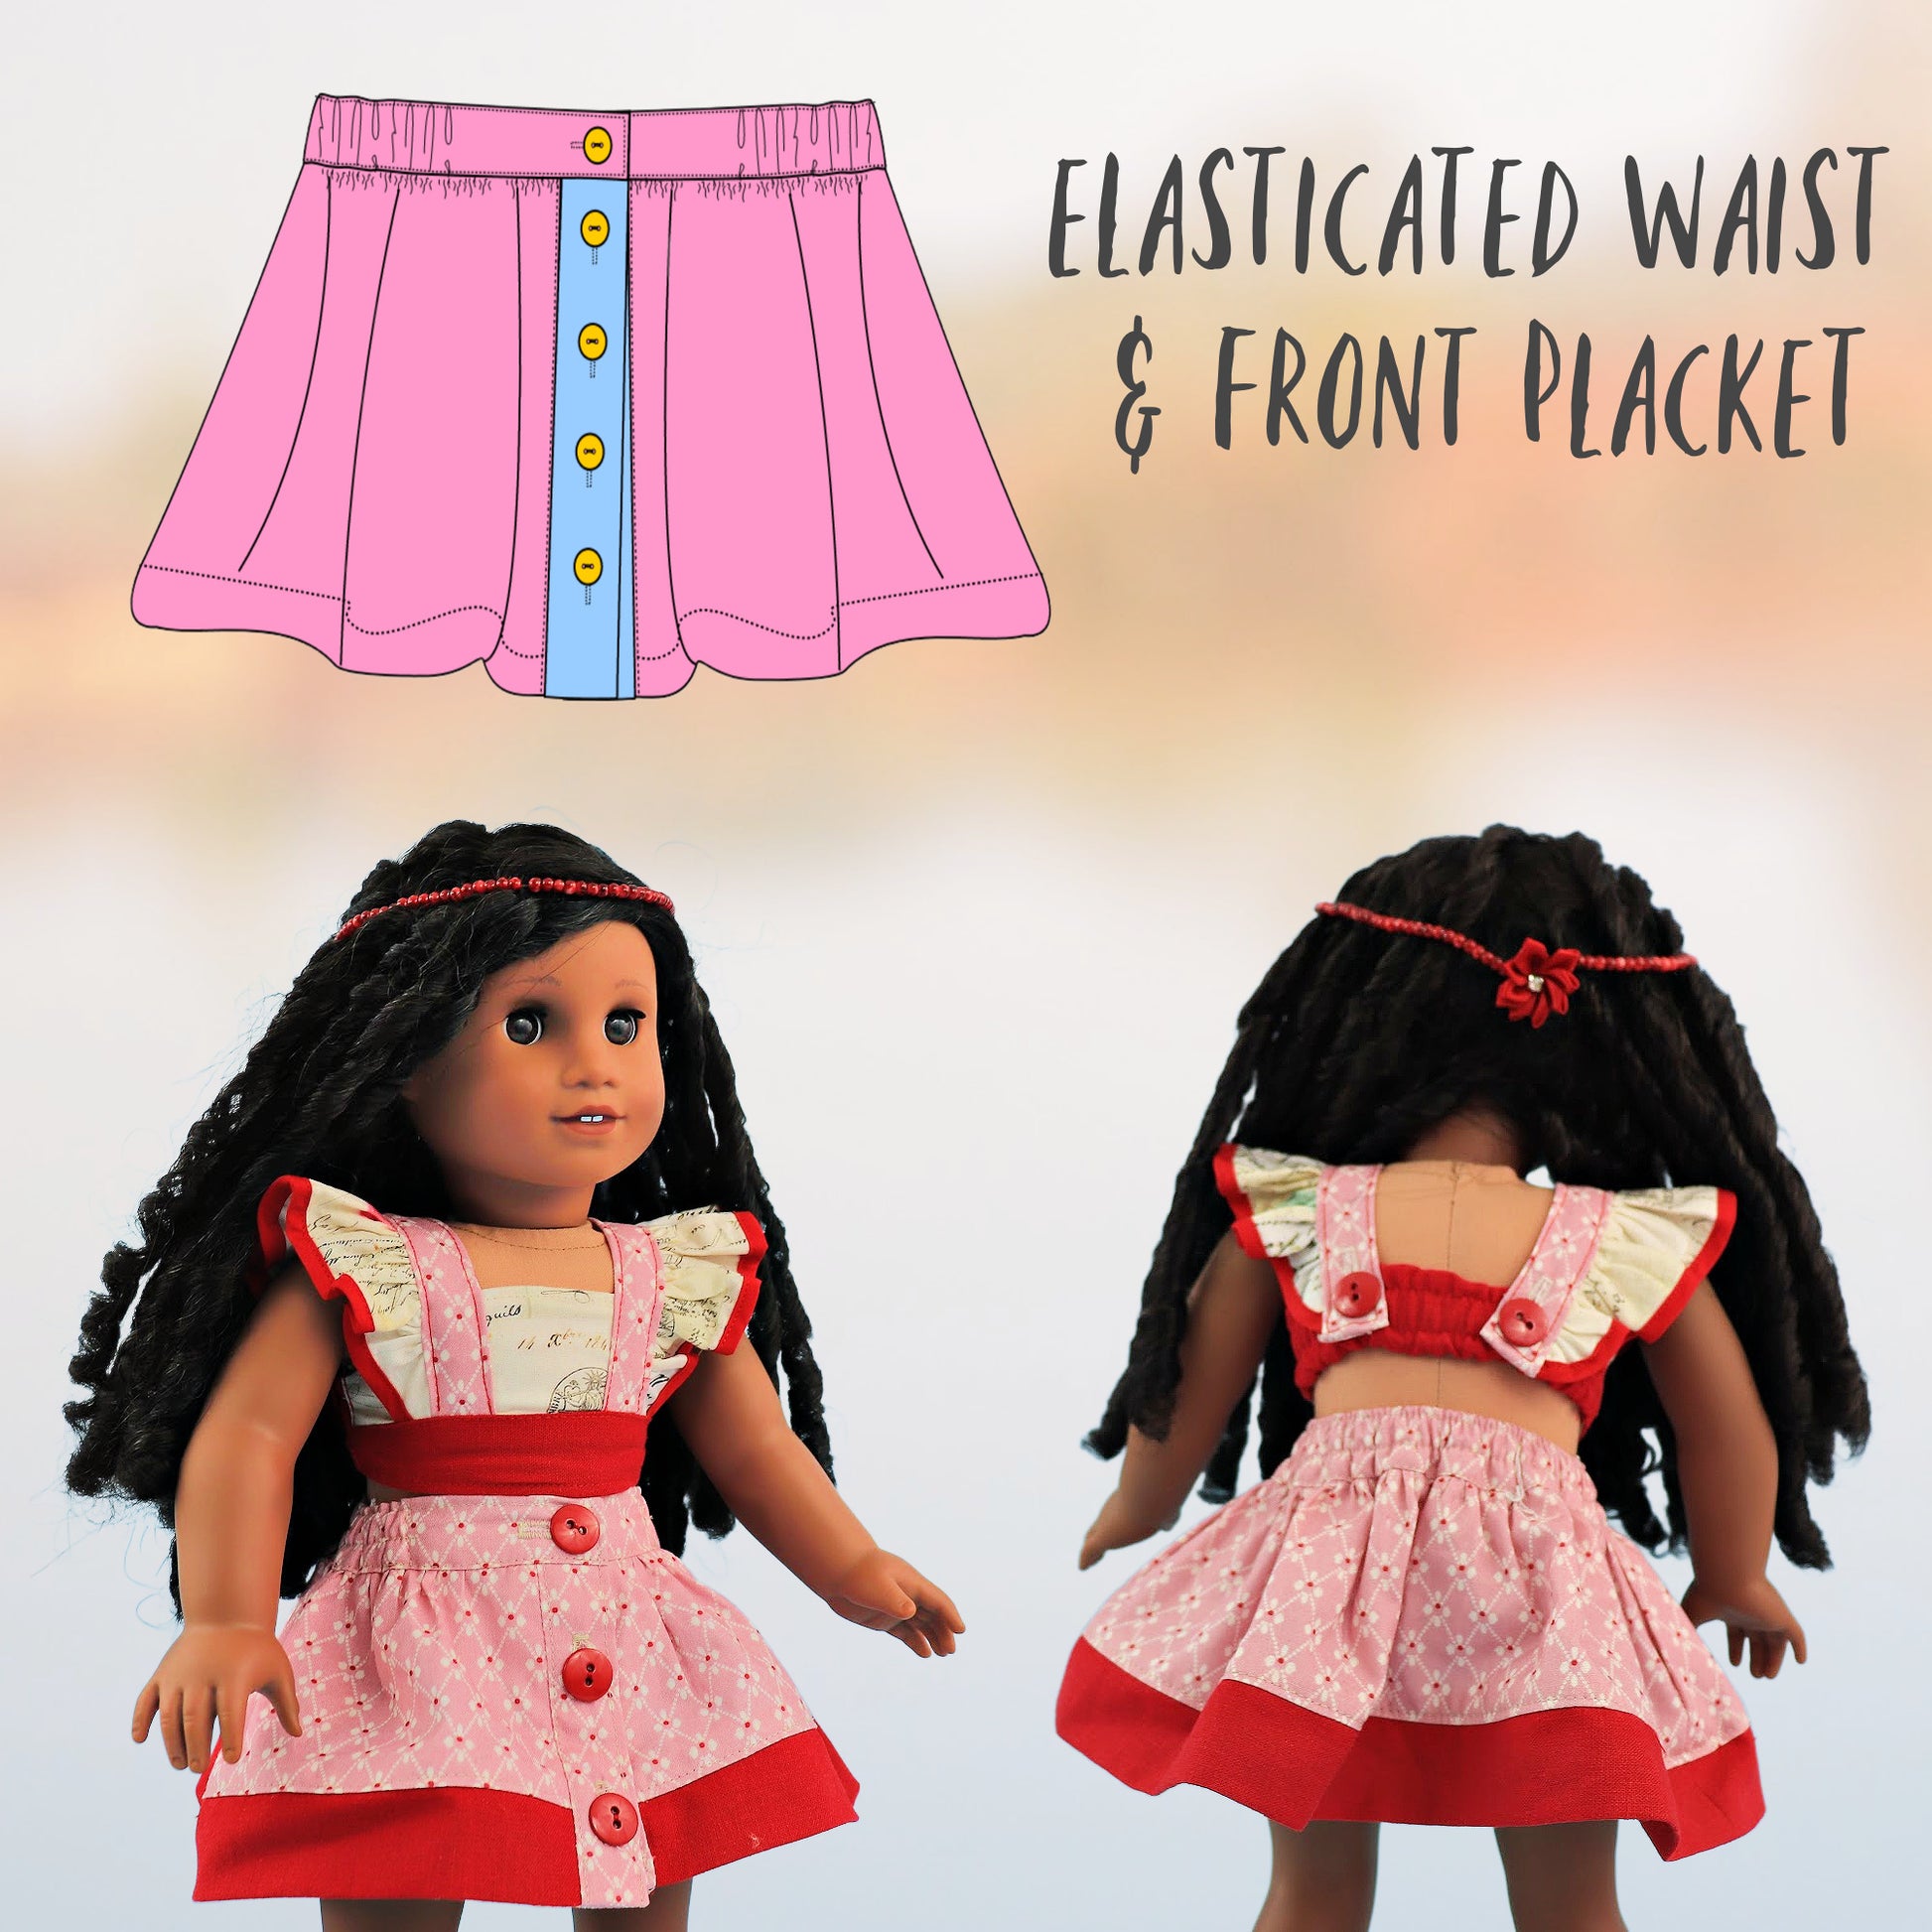
You also have all the same options as with the girl’s skirt. You can add the extra trim here or leave it off. I think it’s super sweet. The skirt has a very flat front, similar to the Bonnie skirt, and I really like that because it makes it look more stylish instead of simply being elasticated. We’ve also got a proper placket on the front. It’s not difficult, and I’m showing you exactly how to make it, so I hope you’ll learn a lot while sewing this.
I’ve already cut everything out and prepared it, so let’s have a look at the pieces we need to make this beautiful Betsy skirt.
Pattern Pieces and Preparation
To make the front closure, we have a placket piece which is cut twice. It will be folded lengthwise in half, and if you like, you can add a little interfacing to one side. It isn’t really necessary for doll clothes, but it makes everything a bit firmer and is good practice as well.
Next, we have the pockets. You can leave the pockets off if you want to, but if you’d like to practise sewing them, it’s a good idea to include them. We need two pairs of pockets. If you don’t want pockets, you simply cut that section away.
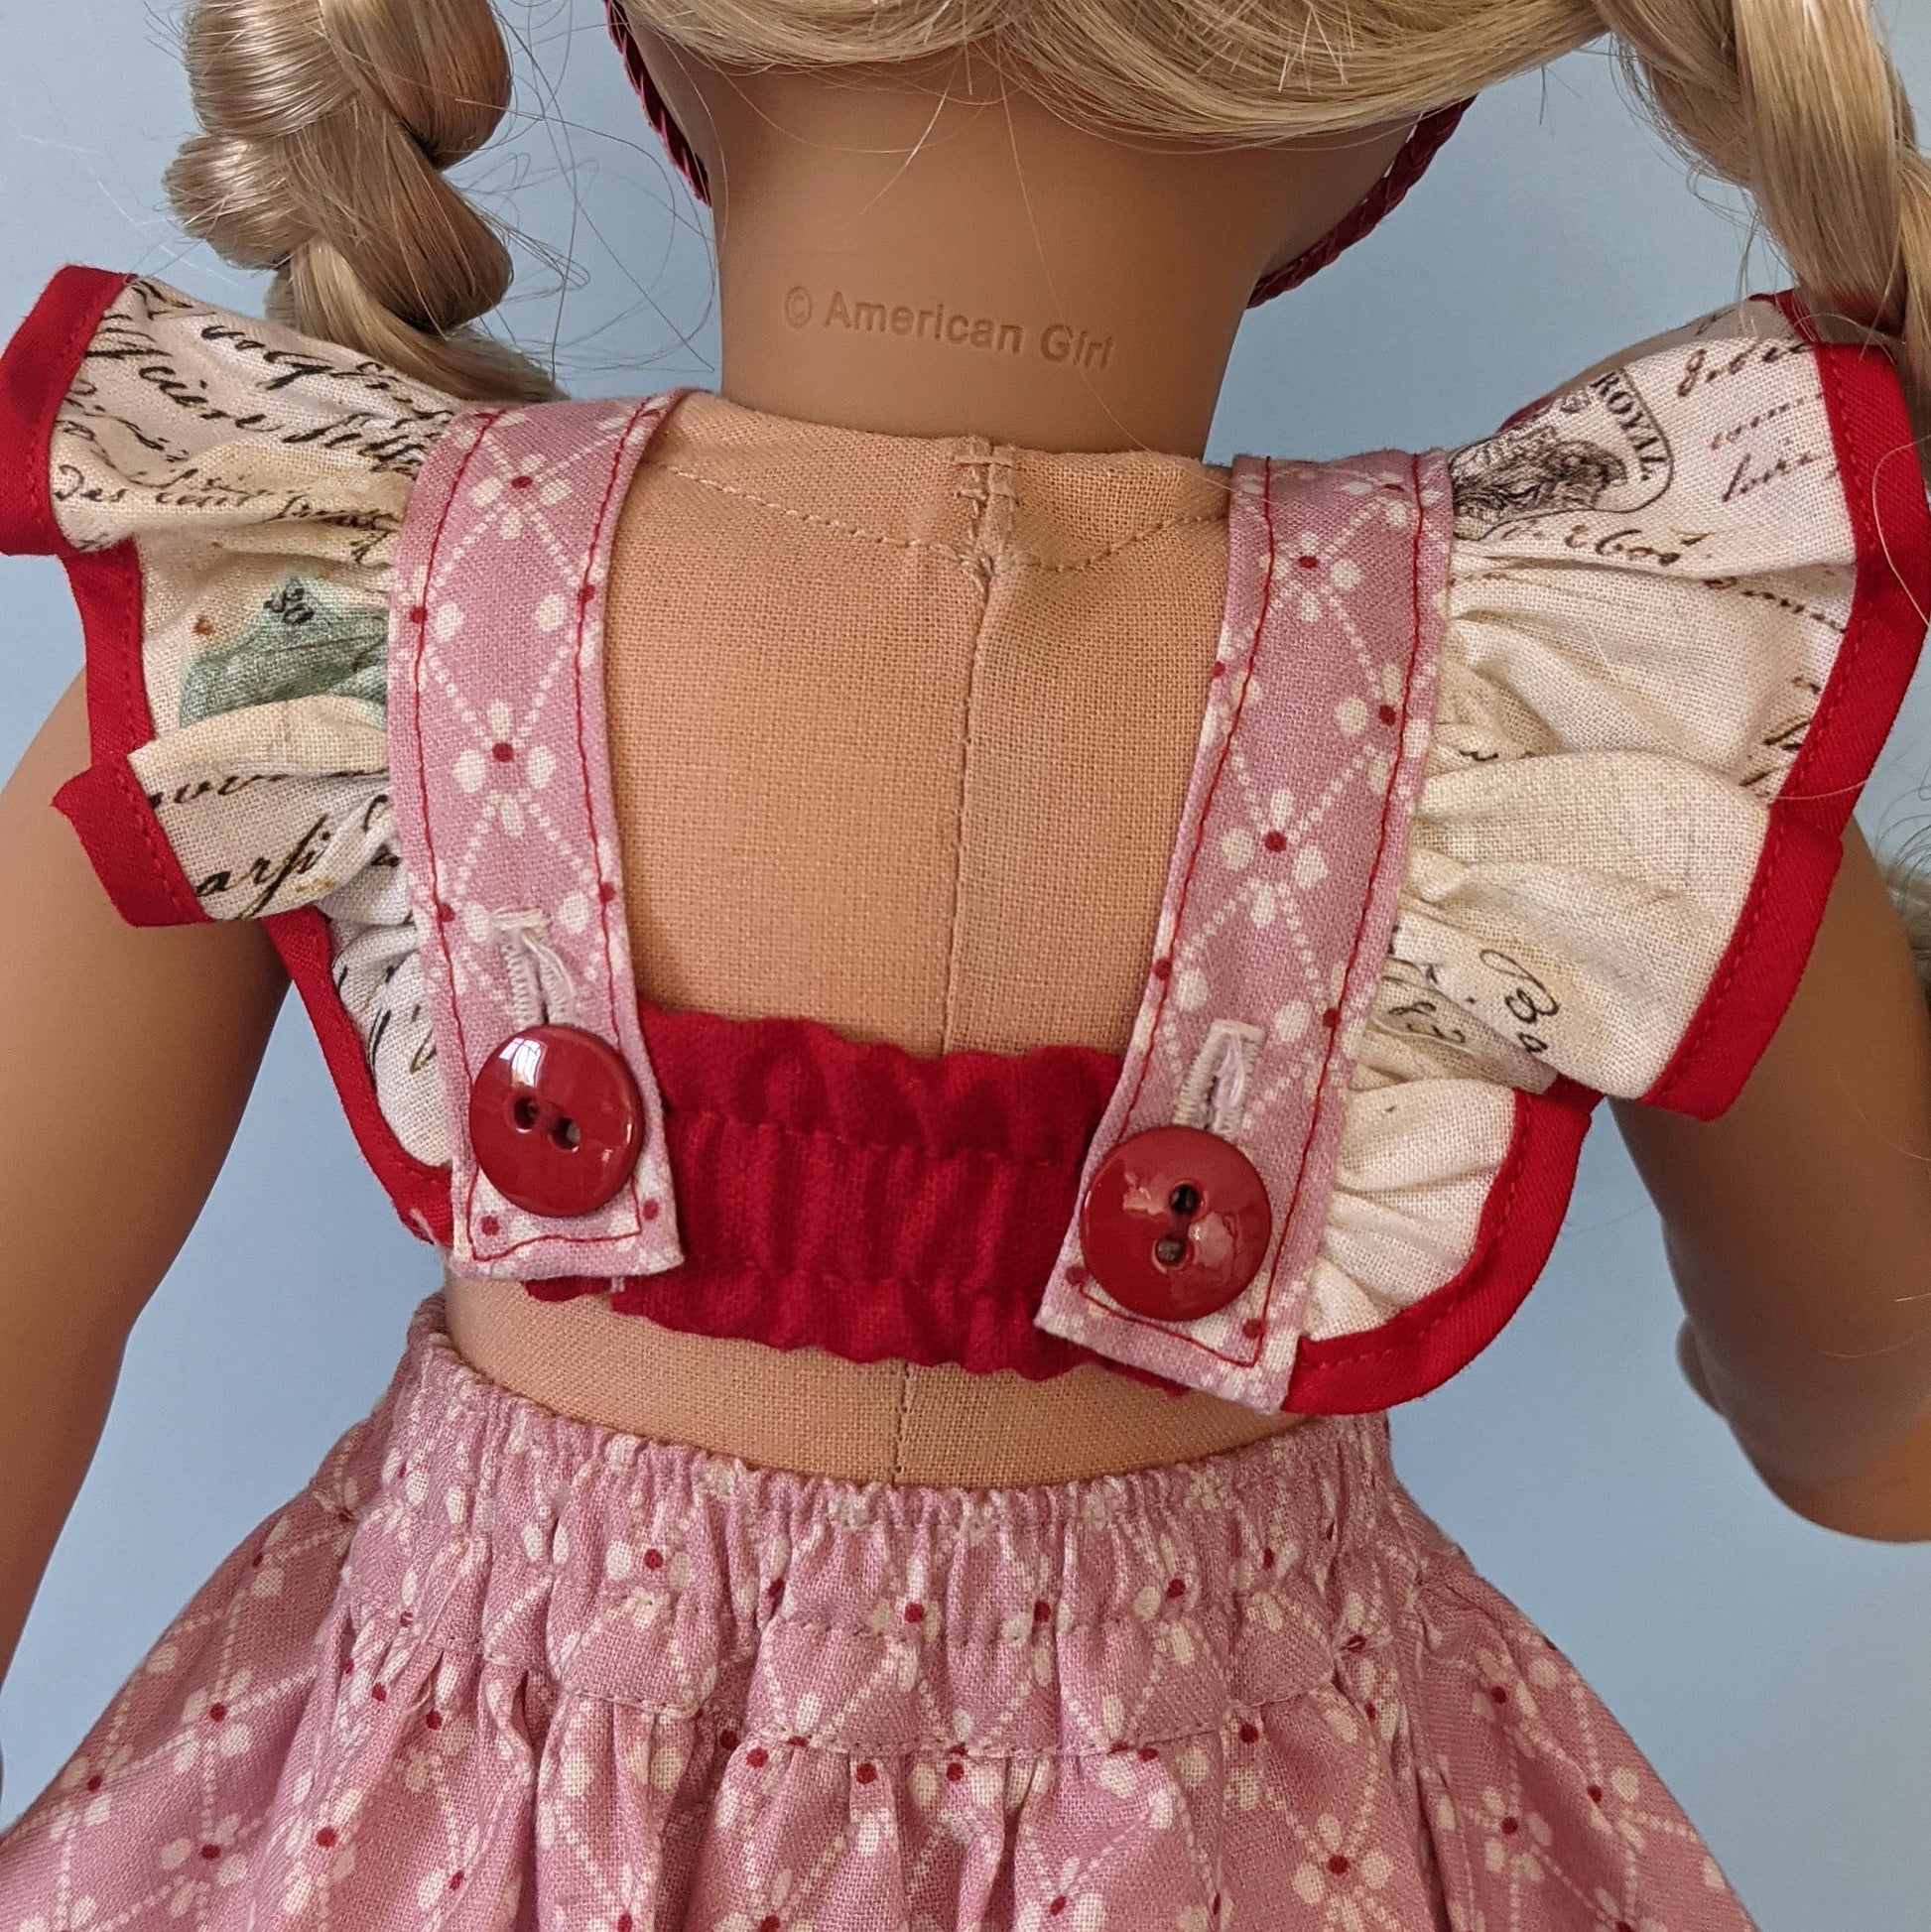
For the back skirt piece, we have a piece cut on the fold or as one full piece. I’m also adding trim, so along this line I’m folding up the pattern slightly to use the red trim. You can also cut this piece as one complete piece if you prefer. If you don’t have much fabric, cutting it on the fold is easier. If you cut it as one piece, make sure to mark the centre back before sewing.
The front piece is cut in two mirrored pieces. Again, we fold along the dashed line to prepare for adding the trim.
The trim itself comes in three pieces: two front pieces and one back piece. It is folded lengthwise in half to create this beautiful finish. If you have enough fabric and aren’t working with a fat quarter, you can cut the trim as one long continuous strip instead.
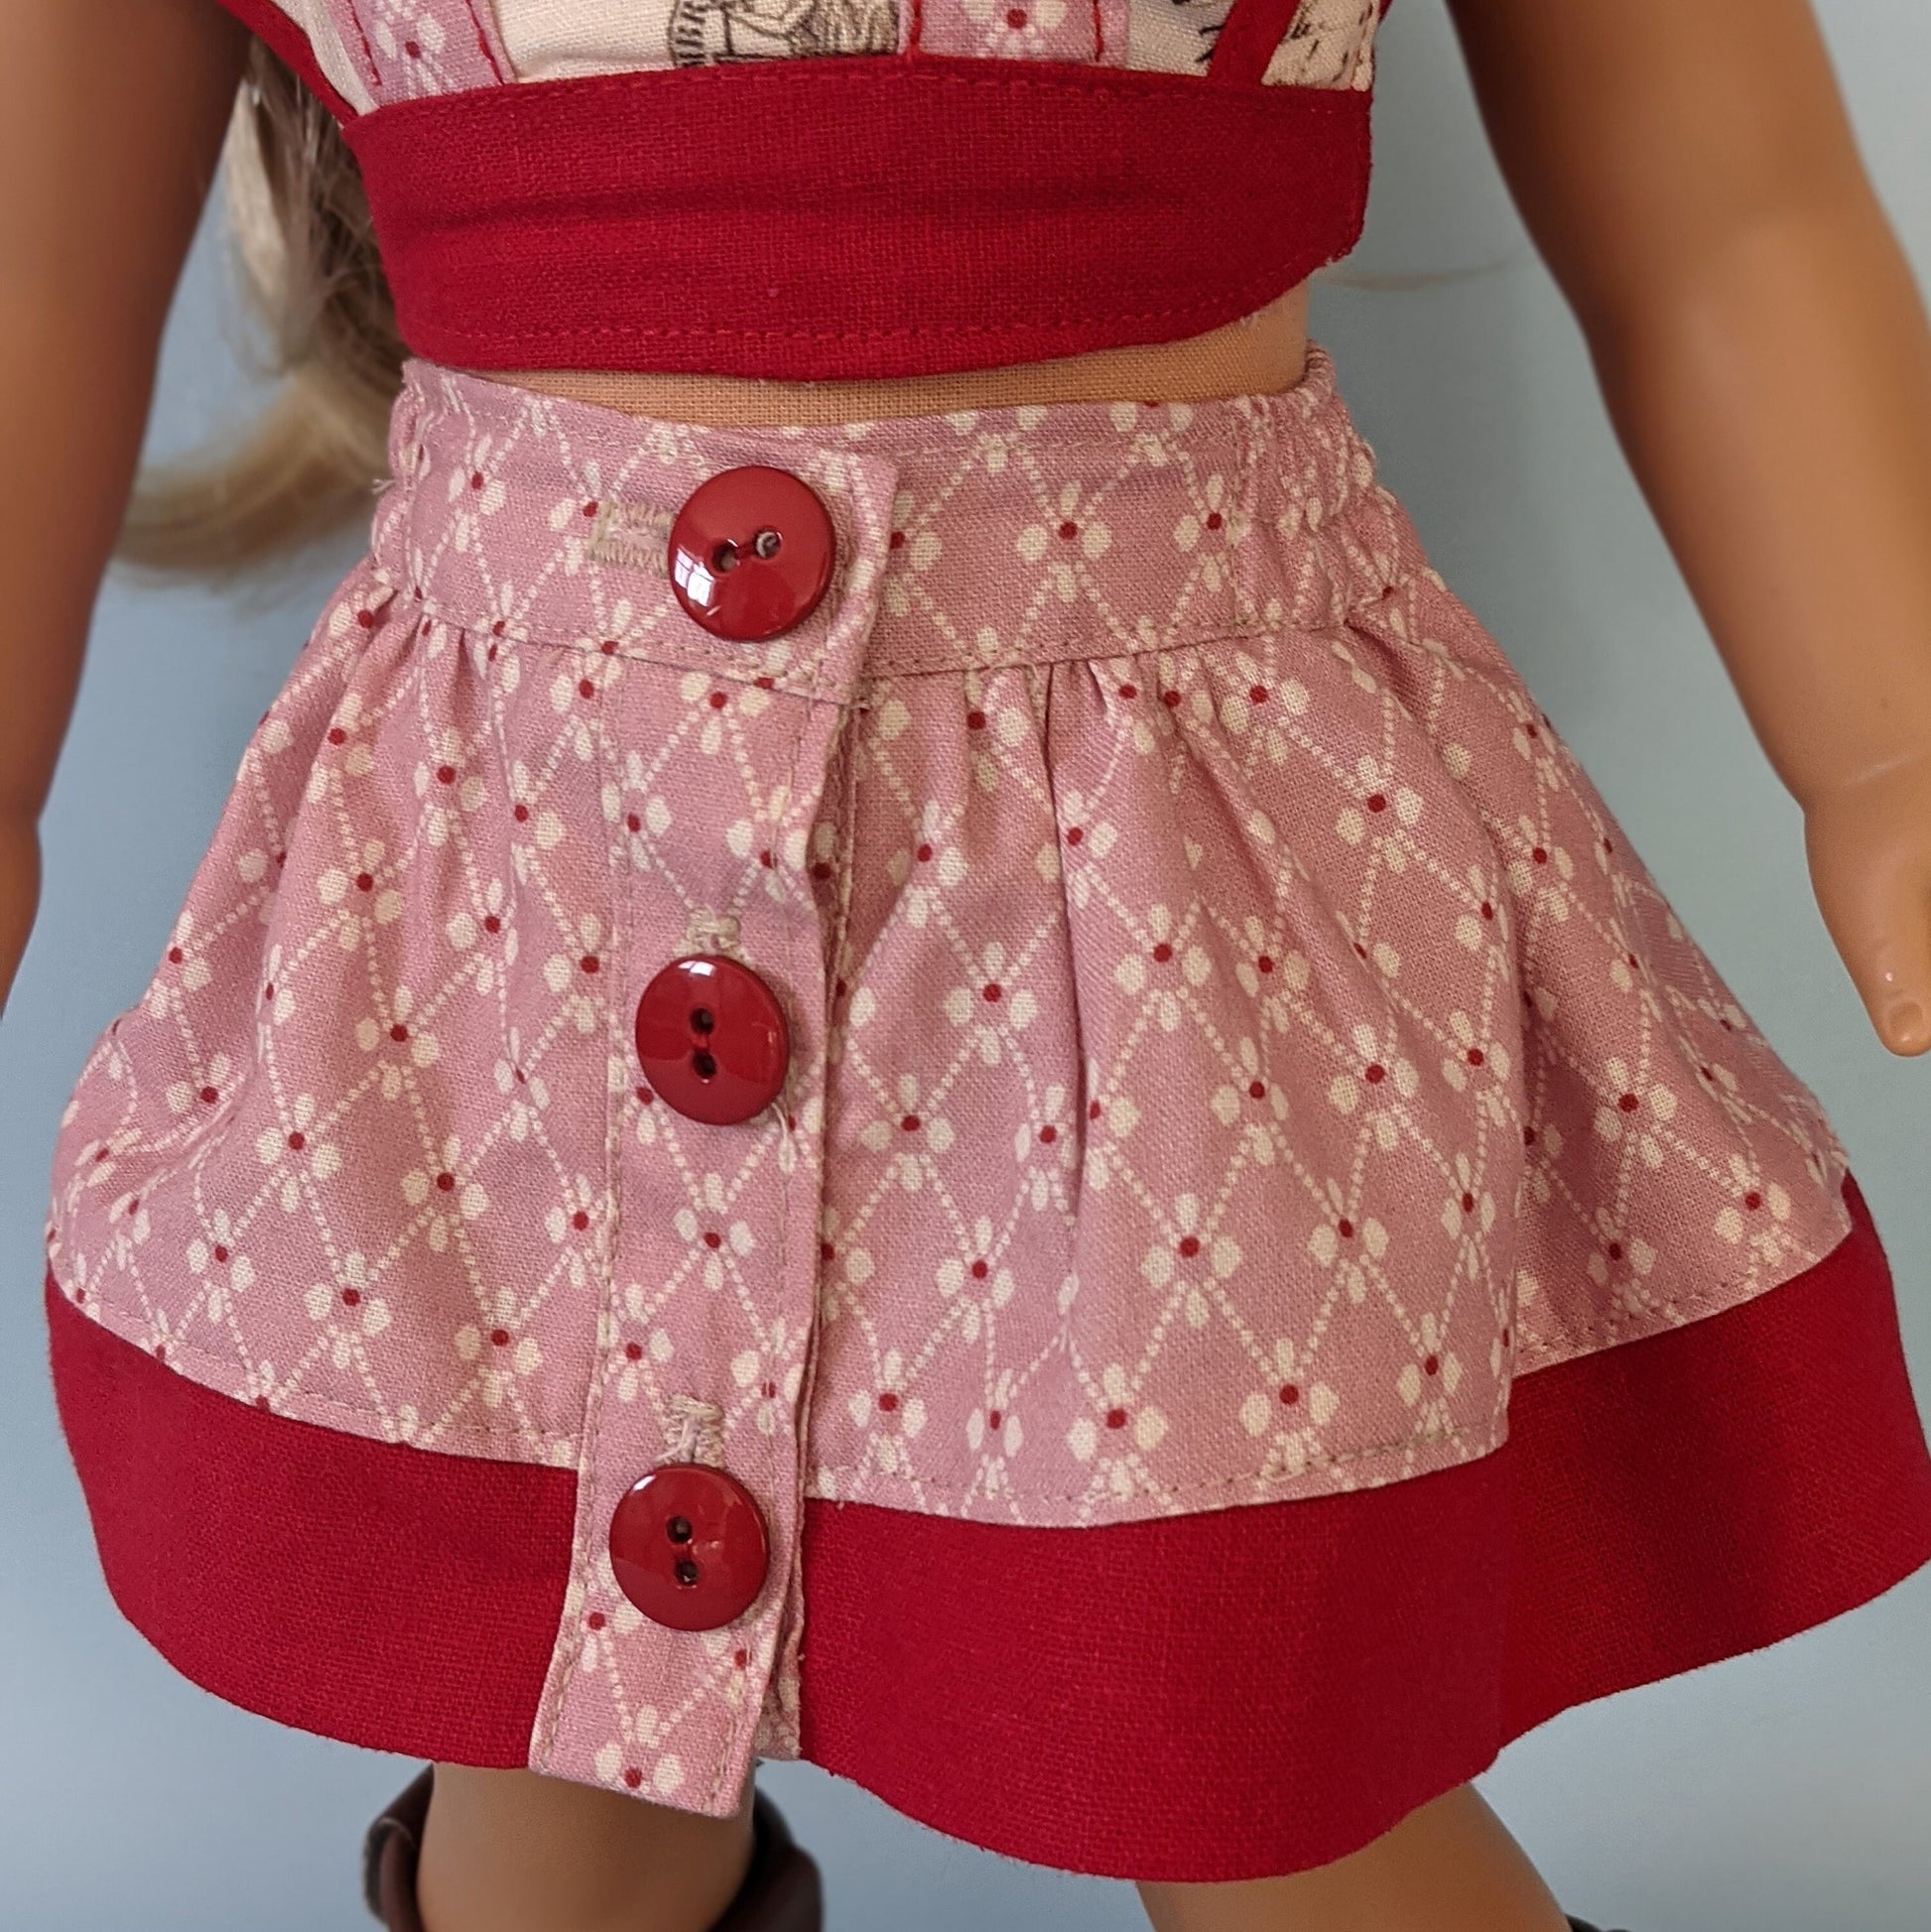
Finally, we have the buttons. One button goes on the waistband and additional buttons go on the skirt itself. The waistband has dashed lines showing where the elastic will be attached. You could also use cam snaps if you prefer.
Attaching the Pockets and Trim
If you are adding pockets, place the pockets right sides together onto the skirt pieces and pin them with a single pin. That’s enough to hold them in place.
Sew them on using roughly a foot-width seam allowance. It doesn’t need to be a full centimetre. Once sewn, serge or overlock the edge, press the seam toward the pockets, and prepare the pieces for assembly.
Place the front piece right sides together onto the back piece. Pin along the pocket area and sew it together.
At the same time, sew the trim pieces together by attaching the front trim pieces to the back trim piece on both sides.
Use a 1 cm seam allowance and sew down to the point where the pocket turns. Leave the needle down, pivot carefully around the curve, and continue sewing down the side seam. Sometimes it feels like you’ve already reached the seam edge, but you may still need another stitch or two before turning fully.
Repeat this process for the other side.
Afterward, overlock the seams. It’s a good idea to switch off the knife on your overlocker so you don’t accidentally cut into the fabric.
The trim sections are also sewn together at this stage.
Preparing and Attaching the Trim
Press the trim seams open, then fold the trim lengthwise in half and press again to create a clean folded edge.
Place the trim onto the skirt with all raw edges aligned. Match the side seams carefully, pin everything in place, and sew the trim to the skirt using a 1 cm seam allowance.
Once sewn, serge the seam, press it upward into the skirt, make sure the pockets are lying flat and not caught in the seam, and topstitch along the edge using a stitch length of 3 or 3.5.
If you like, you can also embellish the trim with decorative stitching for an extra accent.
Constructing the Placket
Next, we attach the placket to both front edges. The interfaced side should face outward toward you.
Leave 1 cm standing at the hem edge because this section will later be turned up. If you begin pinning from the top edge, the hem allowance will automatically align correctly.
Sew the placket on using a 1 cm seam allowance.
The opposite raw edge should ideally be serged before folding, although in this example it’s done afterward. Fold the placket so the top seam allowance sits inside the placket while the back edge remains loose. Serge that loose edge as well.
Close the small seam at the bottom to create a neat finish, turn the placket right side out, shape the corner carefully, and topstitch it down neatly.
Adding Gather Stitches
Now we add gather stitches along the top edge of the skirt.
Sew one line of gathering stitches about 2 to 3 mm from the edge, then sew a second line one presser-foot width away from the first. Leave long thread tails so the gathers can be pulled later without slipping.
Only sew the gathering stitches from placket to placket.
Attaching the Waistband
Mark the center back of the waistband if you haven’t already done so. A small snip works perfectly.
Match the waistband center back with the skirt center back and begin pulling the bobbin threads to gather the skirt evenly. The bobbin threads are easier to pull, which is why the right side of the fabric should face upward when sewing gather stitches.
Once the skirt is slightly smaller than the waistband, place the waistband onto the skirt, leaving 1 cm extending beyond each edge. Pull the gathers to fit and secure the threads with pins and figure-eight wraps.
Distribute the gathers evenly. They do not need to be perfect at this stage because final adjustments can be made at the sewing machine.
Sew the waistband to the skirt between the two gather lines using a normal stitch length of 2.5. Hold the fabric taut with your left hand while adjusting the gathers with a pin in your right hand as you sew.
Repeat on the other side and continue adjusting the gathers as needed while sewing.
Finishing the Waistband
Fold the waistband over with the seam allowances pressed upward into the waistband. Check that both plackets overlap neatly and that the waistband length looks correct.
If everything looks good, remove the lower gather thread while leaving the upper gather thread in place since it will never be visible.
Press the seam into the waistband carefully and press the front neatly as well.
Serge the top edge of the waistband. It is intentionally not folded inward because that would create too much bulk.
Fold the waistband over and sew the ends closed just as before, making sure both sides are even so the overlap sits neatly.
Turn the corners out carefully and press the top edge.
Creating the Elastic Channel
Use a textile marker to mark where the elastic channel begins and ends.
Topstitch close to the edge using a stitch length of 3 or 3.5 to create the elastic casing. This casing is designed for 2 cm wide elastic.
As a general rule, the waistband should be about 5 to 6 mm wider than the elastic so the elastic can move freely inside the casing.
Thread the elastic through the casing using a safety pin attached to one end. Pull it through until approximately 1 cm of elastic remains visible at the edge. Secure it temporarily with a pin.
Repeat on the other side and make sure the elastic lies flat before sewing it down securely.
Topstitching the Waistband
Sew directly on the marked lines to secure the elastic. With the needle down, pivot the fabric and sew along the waistband edge all the way to the end.
Repeat on both sides.
For additional structure, topstitch along the side of the placket, across the waistband, and down the opposite side. You can also sew through the centre of the elastic if you want extra detail, stretching the waistband slightly while sewing to keep the stitching even.
Making the Buttonholes
For this skirt, I would personally recommend using cam snaps next time because the buttonholes are very small and slightly fiddly.
The waistband receives a horizontal buttonhole, while the skirt placket gets vertical buttonholes.
Mark the buttonhole placement carefully, allowing an extra couple of millimetres for the bar tack at the end of the buttonhole.
Electronic sewing machines can struggle with buttonholes over thick layers, especially if anything touches the buttonhole sensor. Mechanical sewing machines tend to perform much better in this situation.
In the example shown, the first buttonhole failed because the sensor touched the thicker area, causing the machine to repeatedly stitch in one spot. After redoing it, the second attempt worked perfectly.
Cutting Open the Buttonholes and Sewing on Buttons
To open the buttonholes, fold the fabric slightly and carefully snip into the centre with scissors. Then cut toward each end.
If using a seam ripper instead, place a pin across the end of the buttonhole to prevent accidentally cutting too far.
To sew on the buttons, line up the plackets and position the buttons carefully. The top waistband button often does not sit exactly in the centre of the placket, which is perfectly normal and common in shirtmaking as well.
Sew the buttons on with a little bit of space underneath the button head so the fabric can sit comfortably beneath the button once fastened.
Final Thoughts
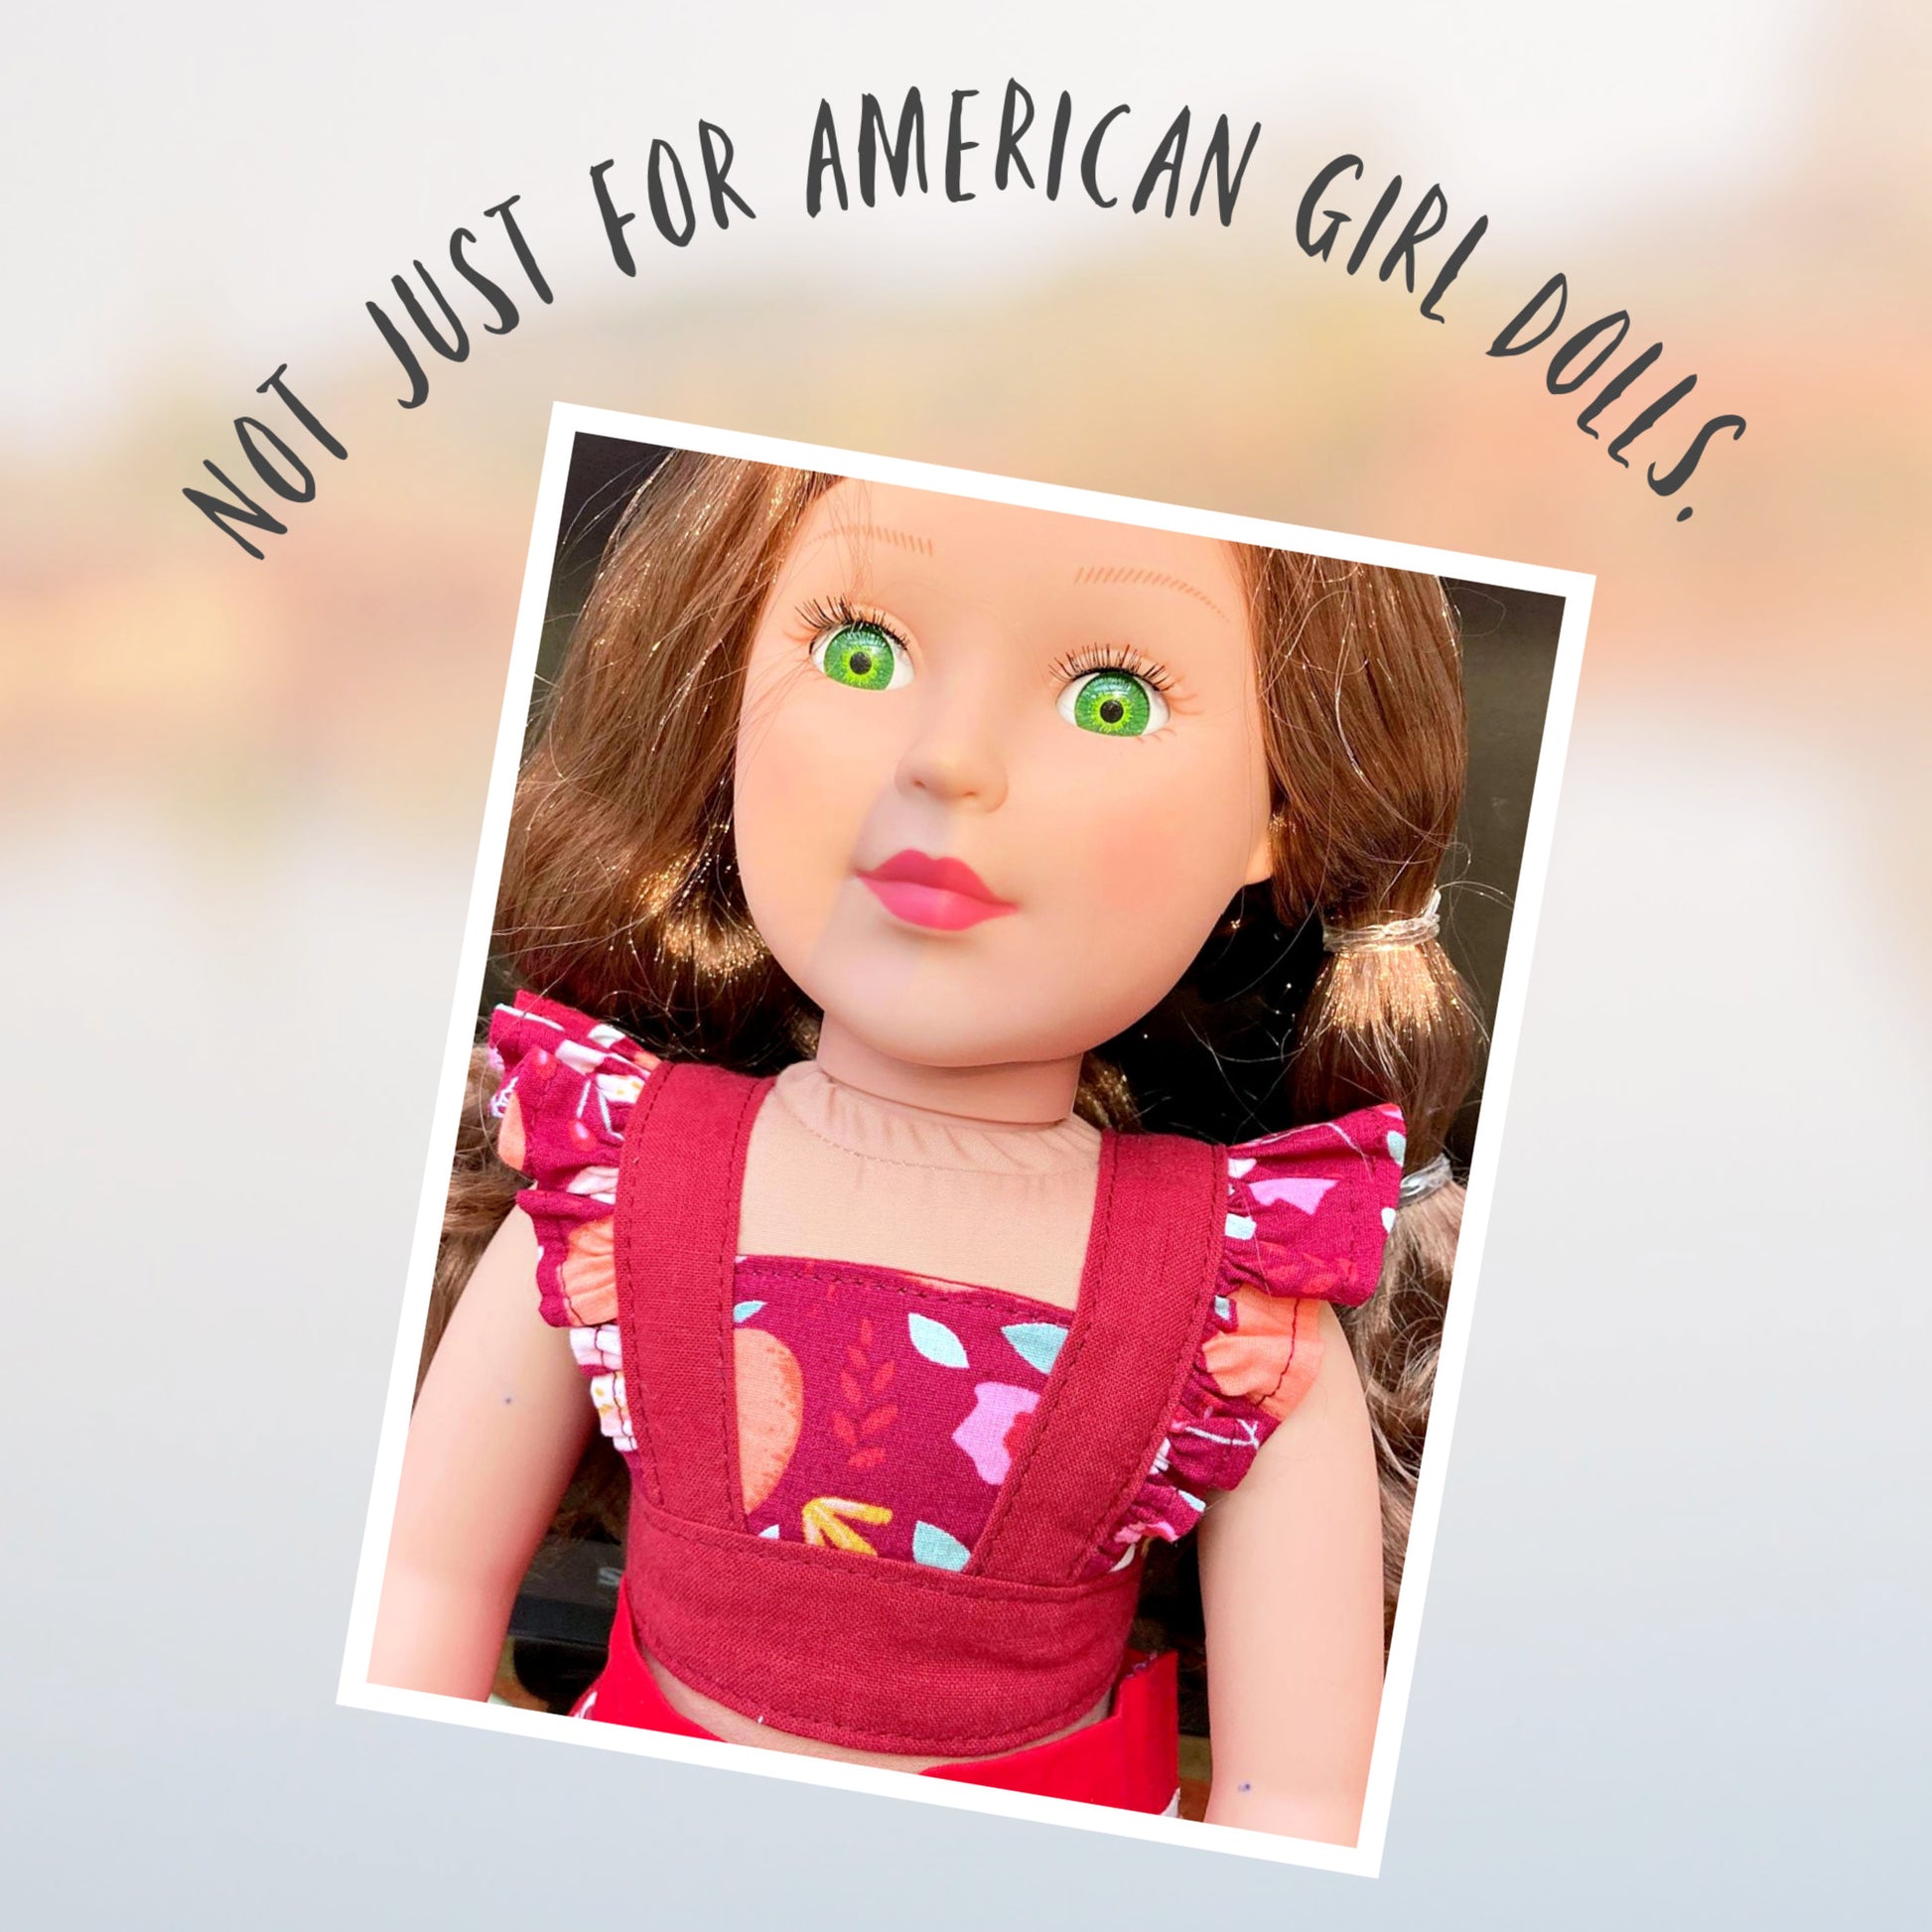
These instructions are very similar to the girl’s skirt version, and I think it would be wonderful to make a matching outfit for a child and her doll.
I absolutely love this skirt, and I hope you will too. It looks adorable on the doll.
And there we are, the Betsy skirt is finished. If you’d like to make either the matching girl’s version or the doll version, you can find them at Frocks and Frolics as part of the vintage collection or the doll collection.
I hope to see you again soon for the next project in our doll collection. Bye for now.