Skip to product information
1 of 24

DAKOTA PEA COAT

DAKOTA PEA COAT

Filled Circle
Filled Circle
Filled Circle
Filled Circle
Empty Circle
Regular price €7,95 EUR
Regular price Sale price €7,95 EUR
Sale Sold out

Dakota is an A‑line winter coat sewing pattern with a choice of large collar or hoodie, sleeves with deep turn up, and three oversized buttons that finish neatly at chest height for a sweet, classic look. Little treasures slip easily into side seam pockets, or tidy single‑welt pockets if you’re feeling adventurous.

The fully lined coat grows beautifully with your child — those turn‑up sleeves mean the toddler coat becomes a chic little jacket before it’s time to sew the next size.

Learn to sew Dakota with Marina’s video sewing course; just scroll down to start watching.

Pattern Download Includes

  • Instant Download
  • DIN A4 & US Letter Size
  • Individual PDF files for every Size
  • All Sizes included
  • Detailed eBook
  • Video Tutorials

Design Options

  • A-line silhouette
  • Option of lined and unlined
  • Statement oversized hood
  • Timeless classic collar
  • Professional-looking buttonholes (standard or bound)
  • Perfectly tailored sleeves with stylish turn-ups
  • Easy side pockets
  • Optional beginner-friendly welt pocket method!

Fabric Requirements

BEST FABRIC CHOICE
Shell Fabrics: This coat can handle medium to heavier weight fabrics like wool or denim and of course laminated cotton fabrics for raincoats.

Lining: Soft brushed cotton for a comfy autumn and spring coat. For the winter you can use a quilted fabric for extra warmth. And for the warmer season you can even make the coat without lining.

FABRIC REQUIREMENTS

  • Shell Fabric: 1.5-2 yards (1.2m-1.6 m)
  • Lining: Max 1.2 yards (1m)
  • Buttons: 3 x
  • Iron-on interfacing: 1.2 yard (1m)

Available Sizes

Sizes: 1-12 Years

Please Read

  1. This is a digital pattern or PDF file, not a physical product. It will be delivered electronically via a download link delivered to the email used for the purchase.
  2. To ensure the pattern prints at its actual size, it's recommended that you use Adobe Acrobat Reader.
  3. The pattern creator, Frocks & Frolics, welcomes small-scale production using their patterns. 

Customers are encouraged to tag Frocks & Frolics when sharing projects made using their patterns on social media.

@frocksandfrolics #frocksandfrolics

View full details

STEP-BY-STEP VIDEO TUTORIALS

Thumbnail
INTRODUCTION TO THE PROJECT
Thumbnail
DAKOTA WITH LINING & HOOD
Thumbnail
DAKOTA WITHOUT LINING & COLLAR
Thumbnail
HOW TO SEW A WELT POCKET
Thumbnail
BOUND BUTTONHOLES

VIDEO TEXT

Dakota Pea Coat (Winter Wonderland Collection)

Transcript for the video: Dakota Pea Coat - Introduction to the Project

Hi, this is Marina from Frocks and Frolics, and I’m going to show you how to make my Dakota winter or autumn coat. It’s available from age 2 to 12, so you can make it for a toddler or for an older child.

For the lining, I’ve used a beautiful quilted fabric that keeps it nice and warm. The outer fabric is a merino and cashmere blend, so it’s very light but still really warm. My daughter actually wore it all last winter.

For the hood, I would normally use the outer fabric, but I ran out, so I used a trim instead—and I actually really like how it turned out. I also had to shorten the sleeves and extend the lining, but this is absolutely an option if you want a slightly different design.

I’ll also show you how to finish the corners neatly. The lining is not fully attached at the hem, so it hangs loosely, and we’ll also do these super cute side pockets. You can also add welt pockets if you prefer—I’ll mark the placement on the pattern for you.

I’ve already cut everything out and I’m ready to start.

Cutting and Preparation

The pockets can be cut from fabric scraps—you don’t need to include them in your main fabric allowance. The hood is cut twice (outer fabric and lining). The sleeves are also cut twice in outer fabric and lining. The sleeve can be finished with a cuff or without one, but if you use directional fabric, make sure the grain runs correctly and feels smooth when you run your hand over it.

The front lining is cut twice, and the back lining is cut once on the fold. There is also interfacing for the facing pieces.

Attaching the Pockets

Start by pinning the pockets onto the front with a 1 cm seam allowance, just like everything else in this pattern. The front already includes an integrated facing, so you simply roll it over.

I’ve added small snips on the pattern pieces so you can match everything easily.

Now we apply the Vilene (interfacing) to the wrong side of the fabric. Place it on the pocket area and press it on with a warm iron (not too hot or it will melt). Hold the iron in place for about eight seconds until it bonds properly. If it doesn’t stick, just repeat the process.

Sleeves and Hood

Next, sew the sleeve cuff with a 1 cm seam allowance, right sides together. Press or finger-press the seam open, then top stitch all the way around using a slightly longer stitch length.

Now attach the pockets. Sew them with the same seam allowance, then fold them over and top stitch down on all sides.

For the hood, place the outer fabric and lining right sides together and pin carefully. Make sure both sides match exactly. Then top stitch using a longer stitch length.

Next, sew the hood pieces together, right sides facing, all the way around. You can also use a collar instead of a hood if you prefer.

Eyelets and Front Assembly

Mark the eyelet positions on the hood. Fold over 1 cm seam allowance so the eyelet sits centered. It can also be placed about 2 mm closer to the inside edge for better alignment.

Use a tool to cut the eyelet hole, then insert the eyelet pieces and secure them with the setting tool and hammer.

Now attach the lining to the outer fabric, right sides together. Be careful not to shift the layers, especially when working with different fabrics.

Do the understitching with the seam allowance pressed toward the lining, then top stitch neatly along the edge.

Overlocking and Construction

Overlock all raw edges, including pocket edges and side seams. When working around pockets, make sure to stop the knife to avoid cutting into the fabric.

Close the sleeve seams with right sides together, then press them open. Repeat for the lining.

Attach the front lining to the front facing, matching snips carefully. The lining is slightly shorter, which helps it sit neatly inside the coat.

Now close the shoulder seams, joining the lining and facing sections together first, then attaching the back.

Side Seams and Hood Attachment

Close the side seams, working carefully around the pocket area. Mark your turning points if needed. Turn the coat right side out and check that both sides match.

Attach the hood into the neckline, matching notches and center points. Pin thoroughly and sew with a 1 cm seam allowance. Trim seam allowances and snip curves for a smoother finish.

Hem and Corner Finish

At the hem, fold the coat right sides together and mark about 4 cm from the edge to create a clean corner finish. Adjust if needed so both sides are even.

Turn the coat right side out and fold the hem up evenly. Slip stitch the hem in place, making sure it is not pulled too tightly, so it hangs naturally.

Sleeves and Final Assembly

Gather the sleeve head slightly or use easing stitches to help it fit into the armhole. Match snips and pin carefully, then sew with right sides together.

Attach the lining sleeves in the same way, making sure the front and back are correctly aligned.

Finally, secure the lining at the side seams so it doesn’t shift.

Buttons and Finishing

Add buttonholes about 1.5 cm from the edge, then sew on the buttons securely. You can also use poppers or fake button details if preferred.

Be careful with eyelet cords for safety if the coat is for a small child—elastic alternatives are safer.

Finished Coat

And that’s it—you’ve made the Dakota coat. You can choose between a hood or collar, different fabrics, and multiple pocket styles.

Thanks for watching, and I’ll see you next time.

Transcript for the video: Dakota Pea Coat - With Lining & Hood 

Hi, this is Marina from Frocks and Frolics, and I’m going to show you how to make my Dakota winter or autumn coat.

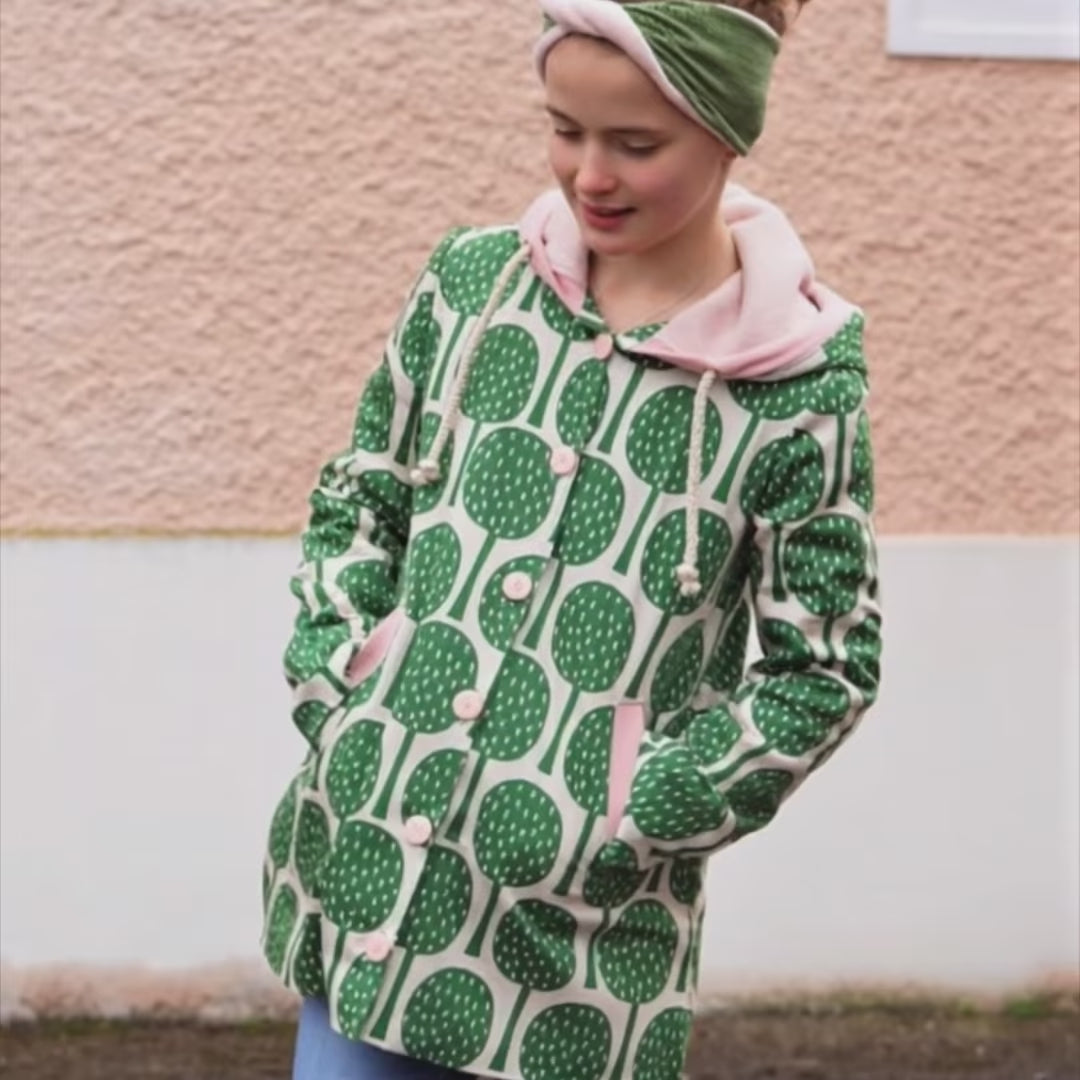
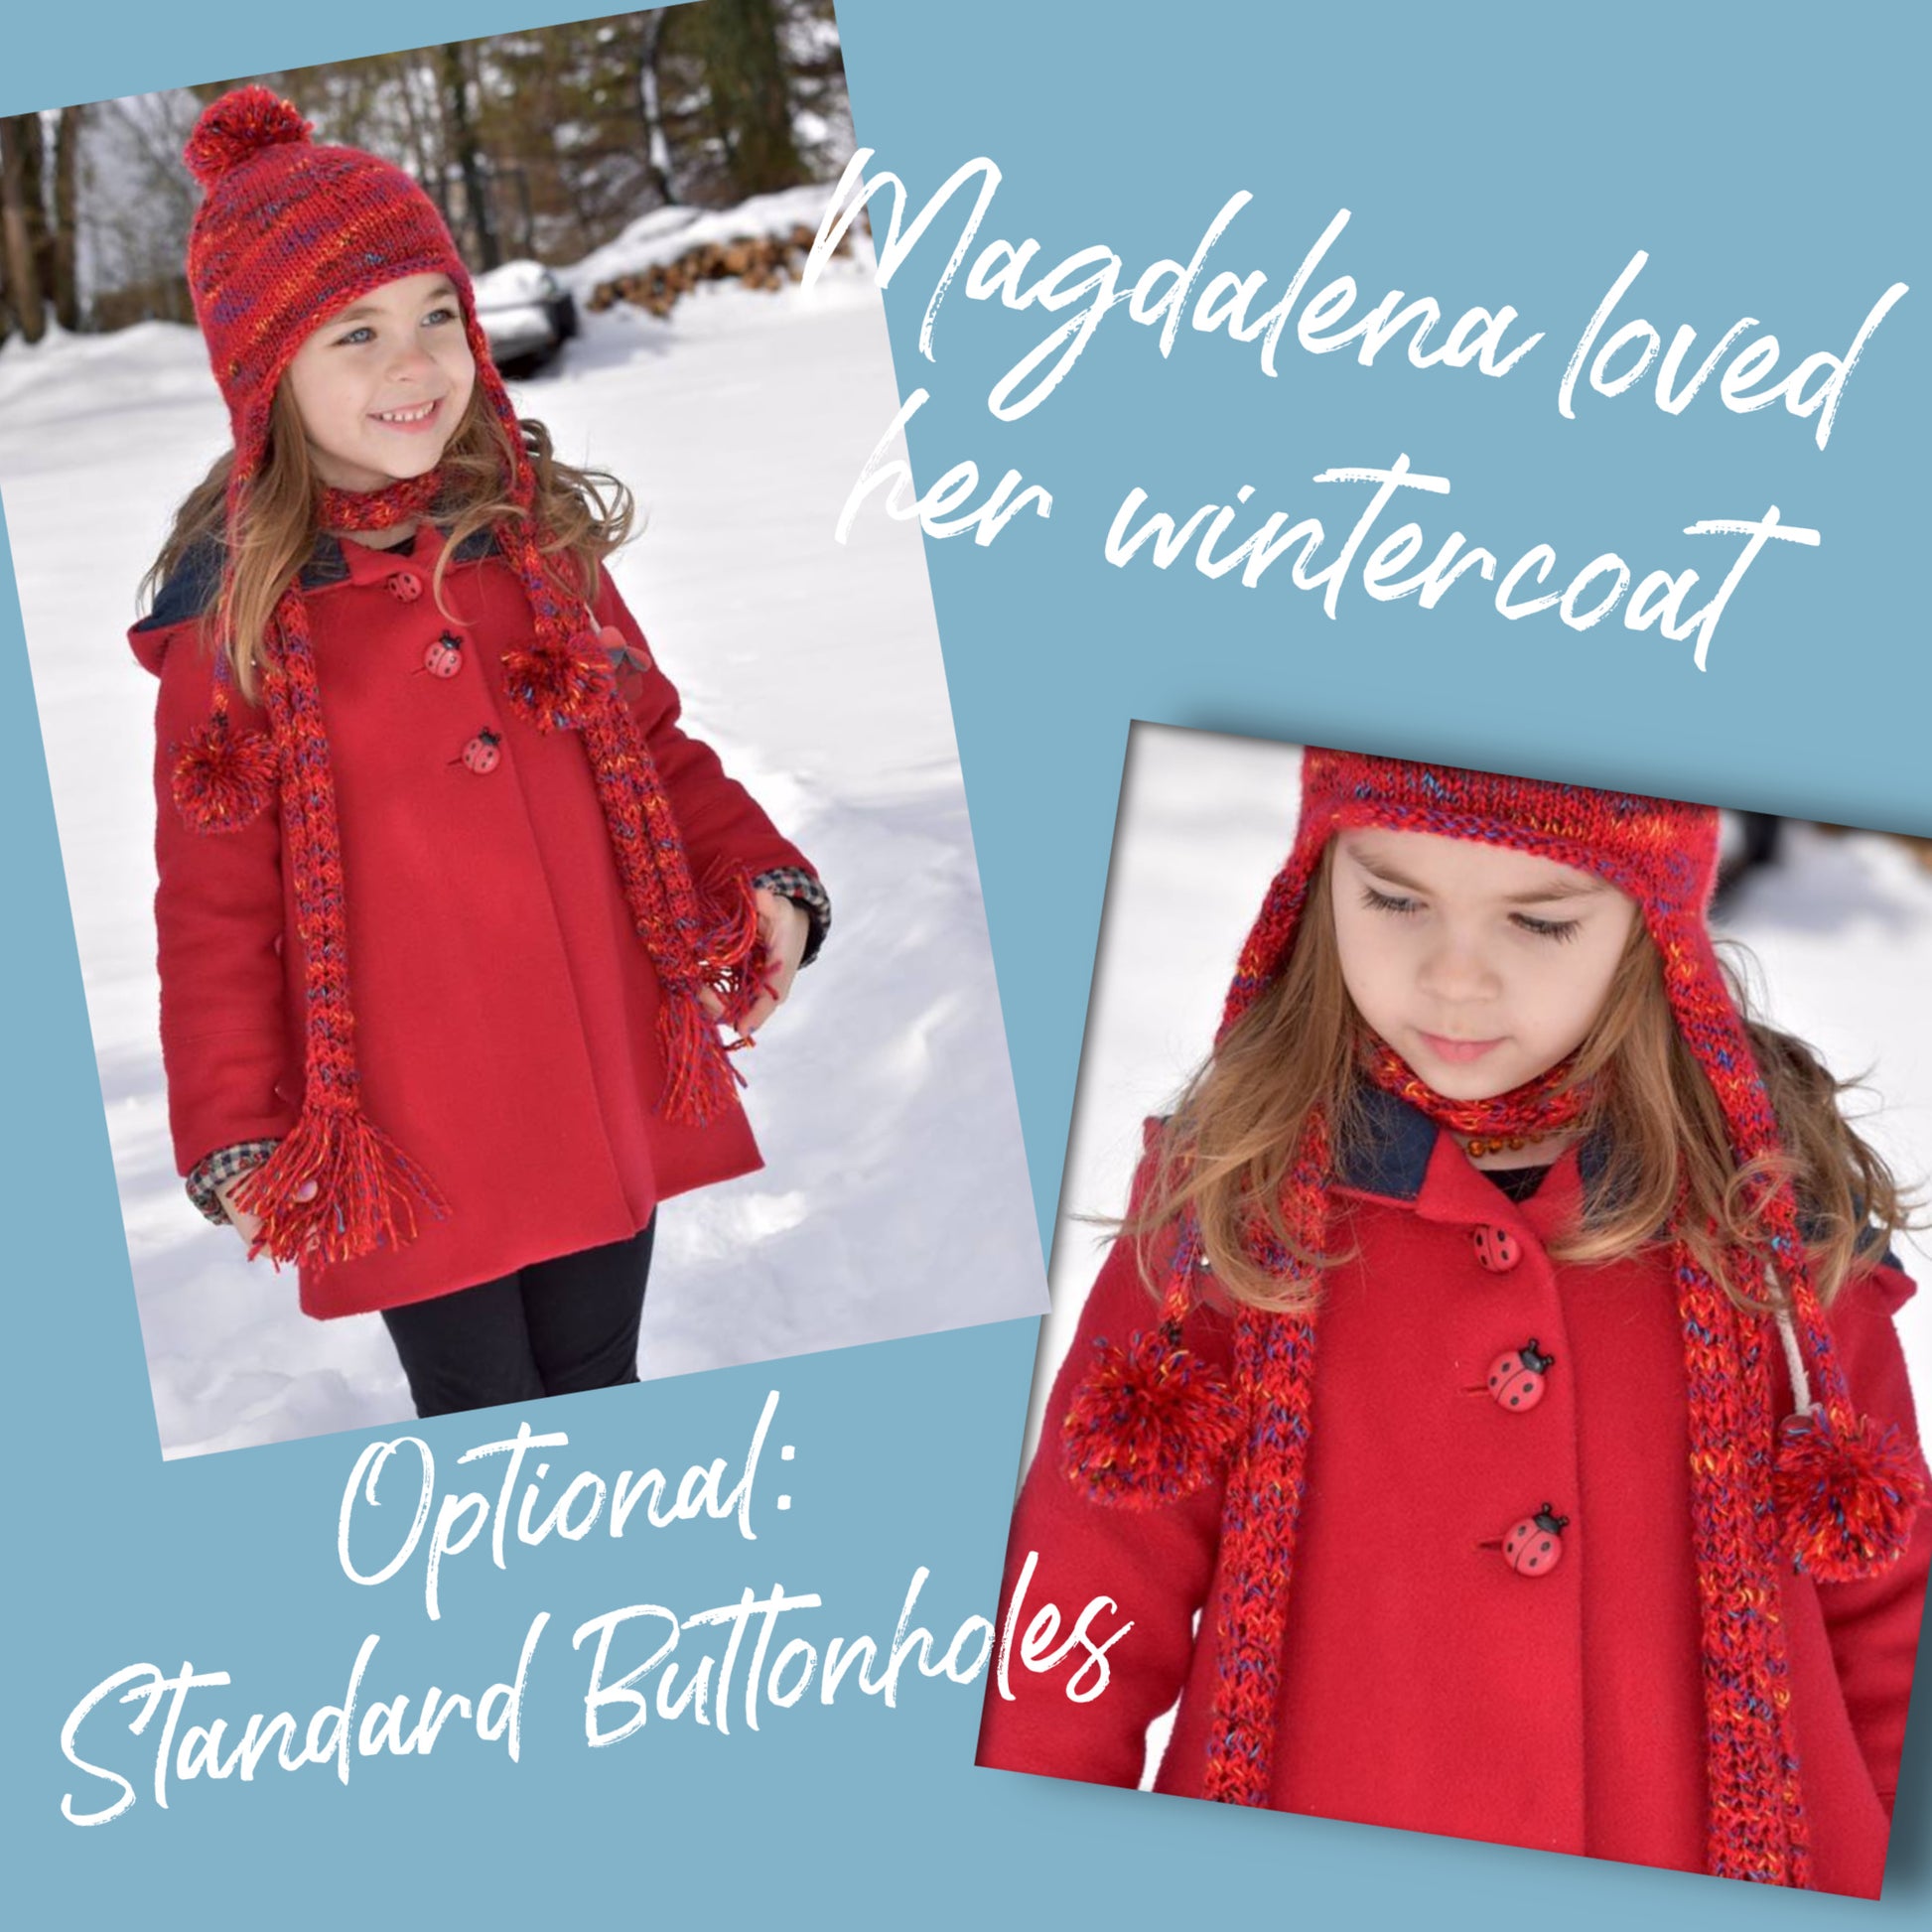
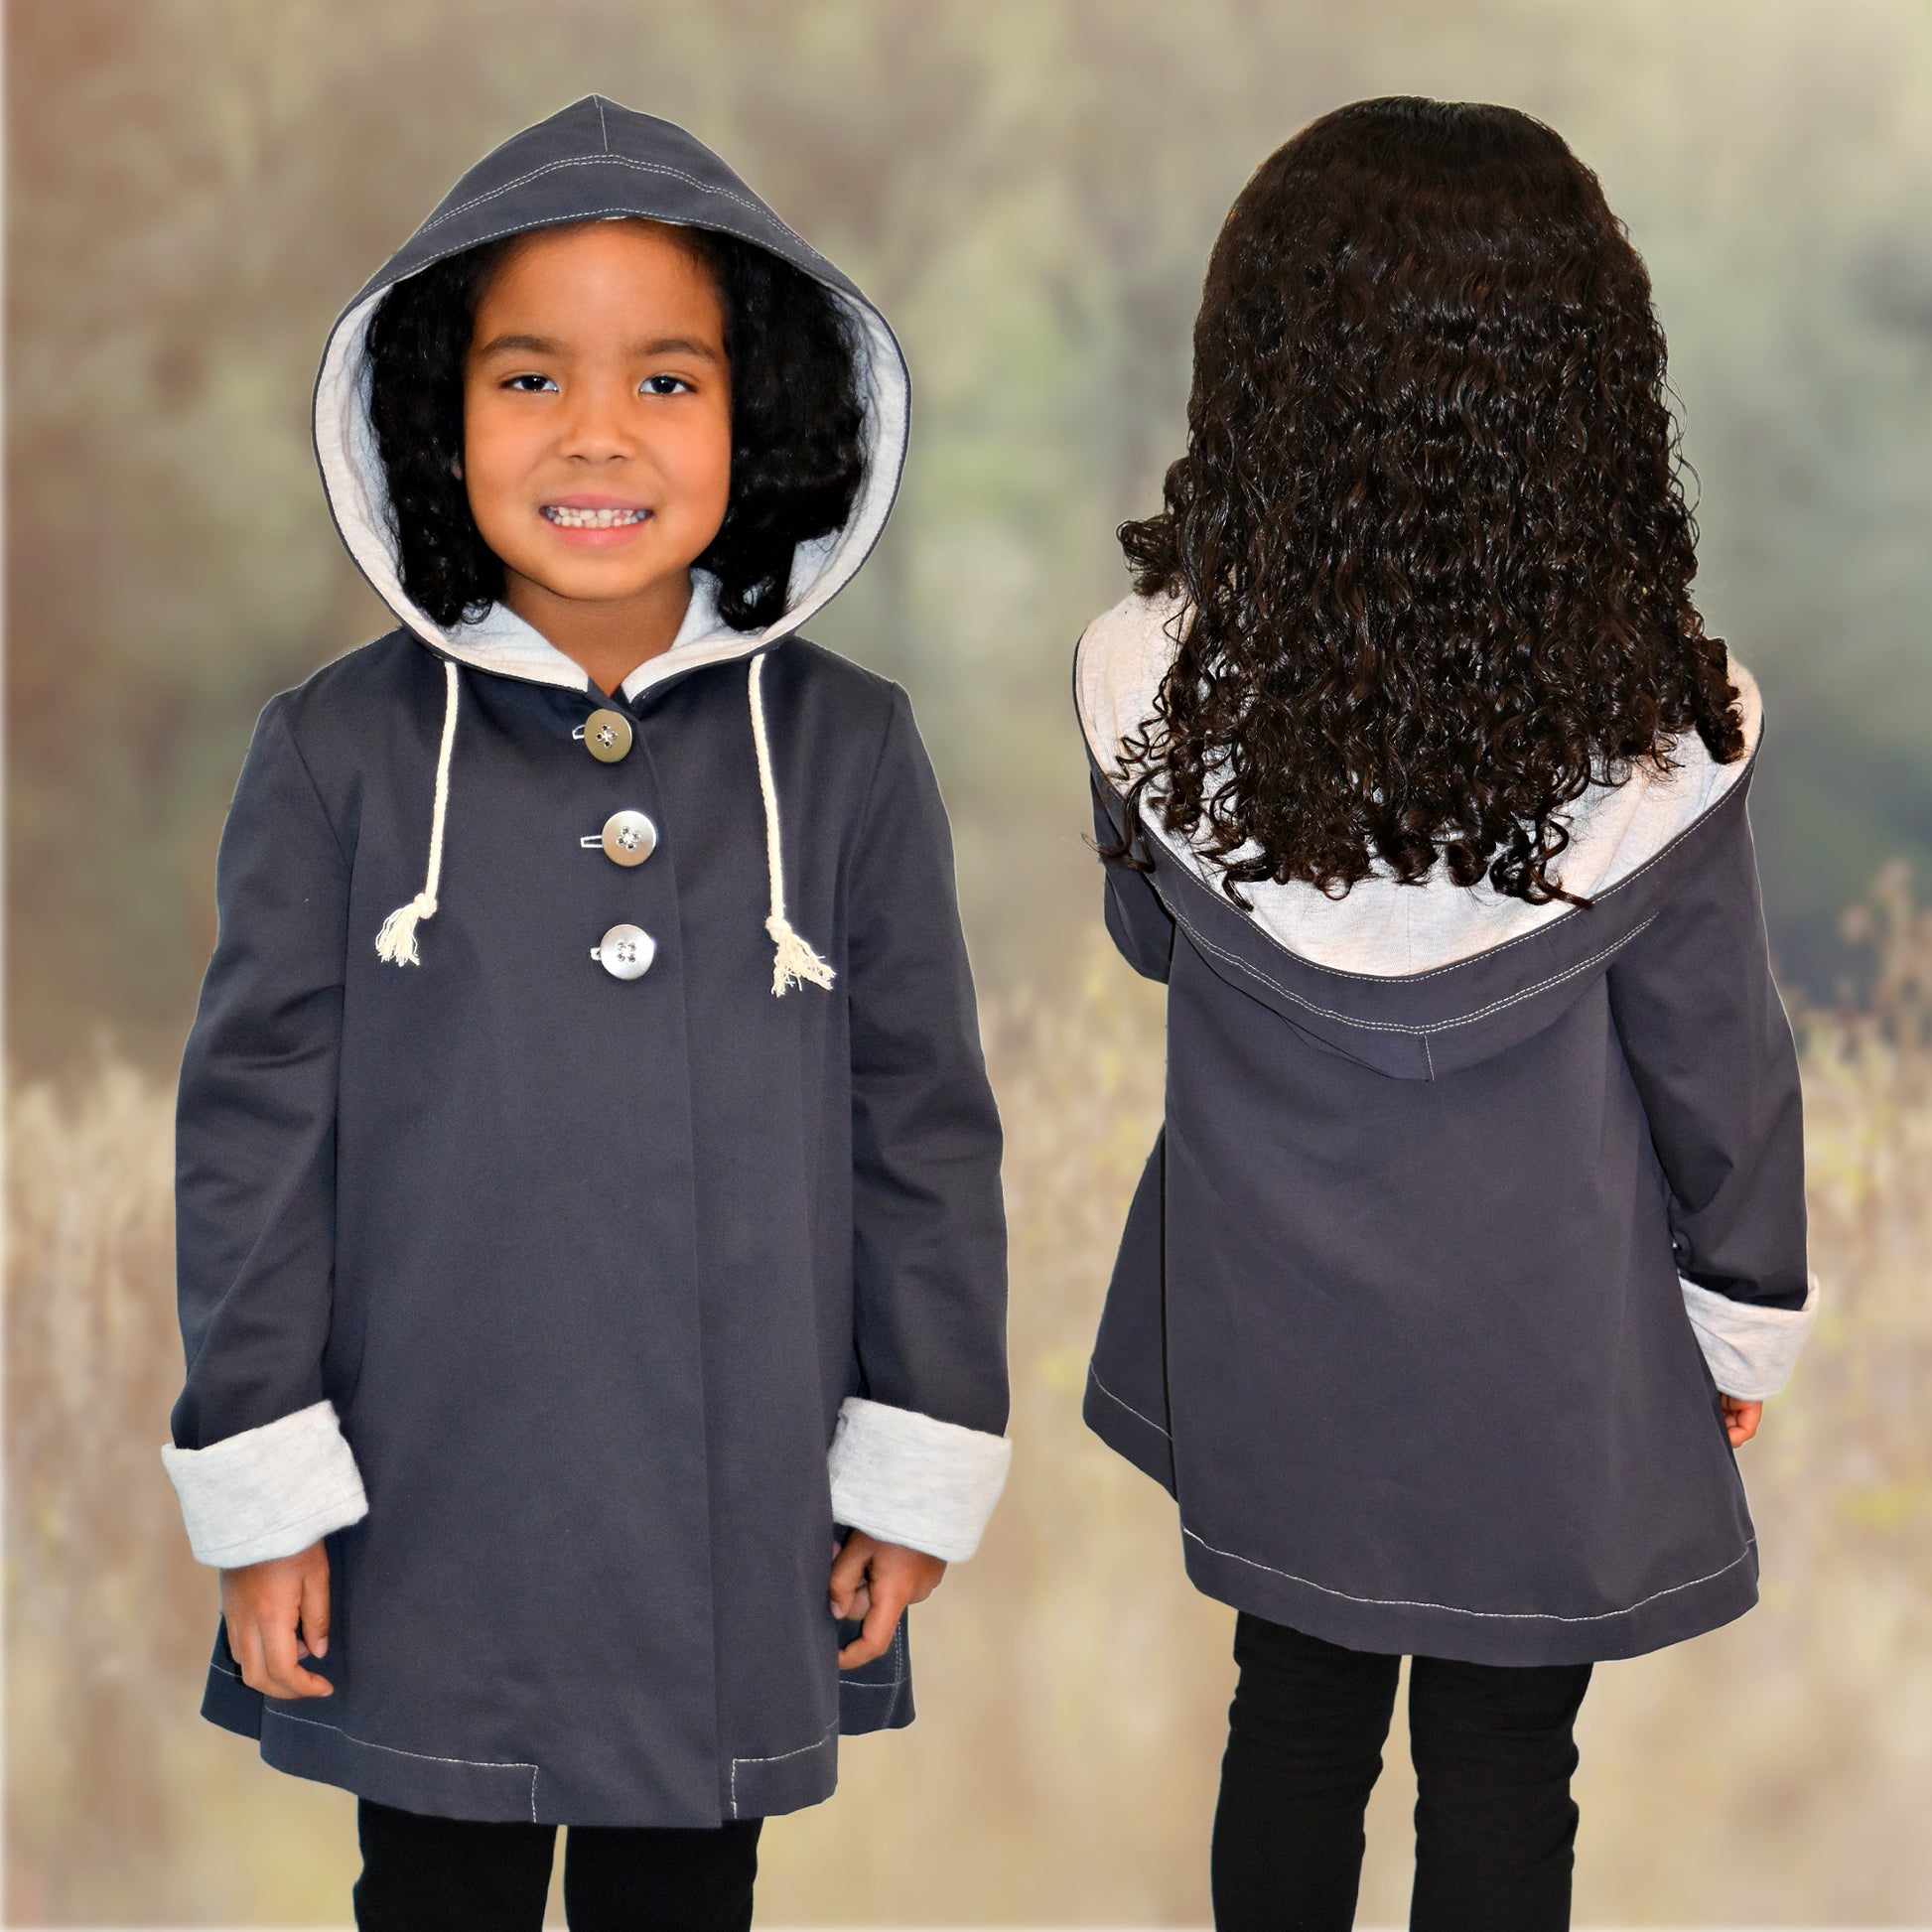
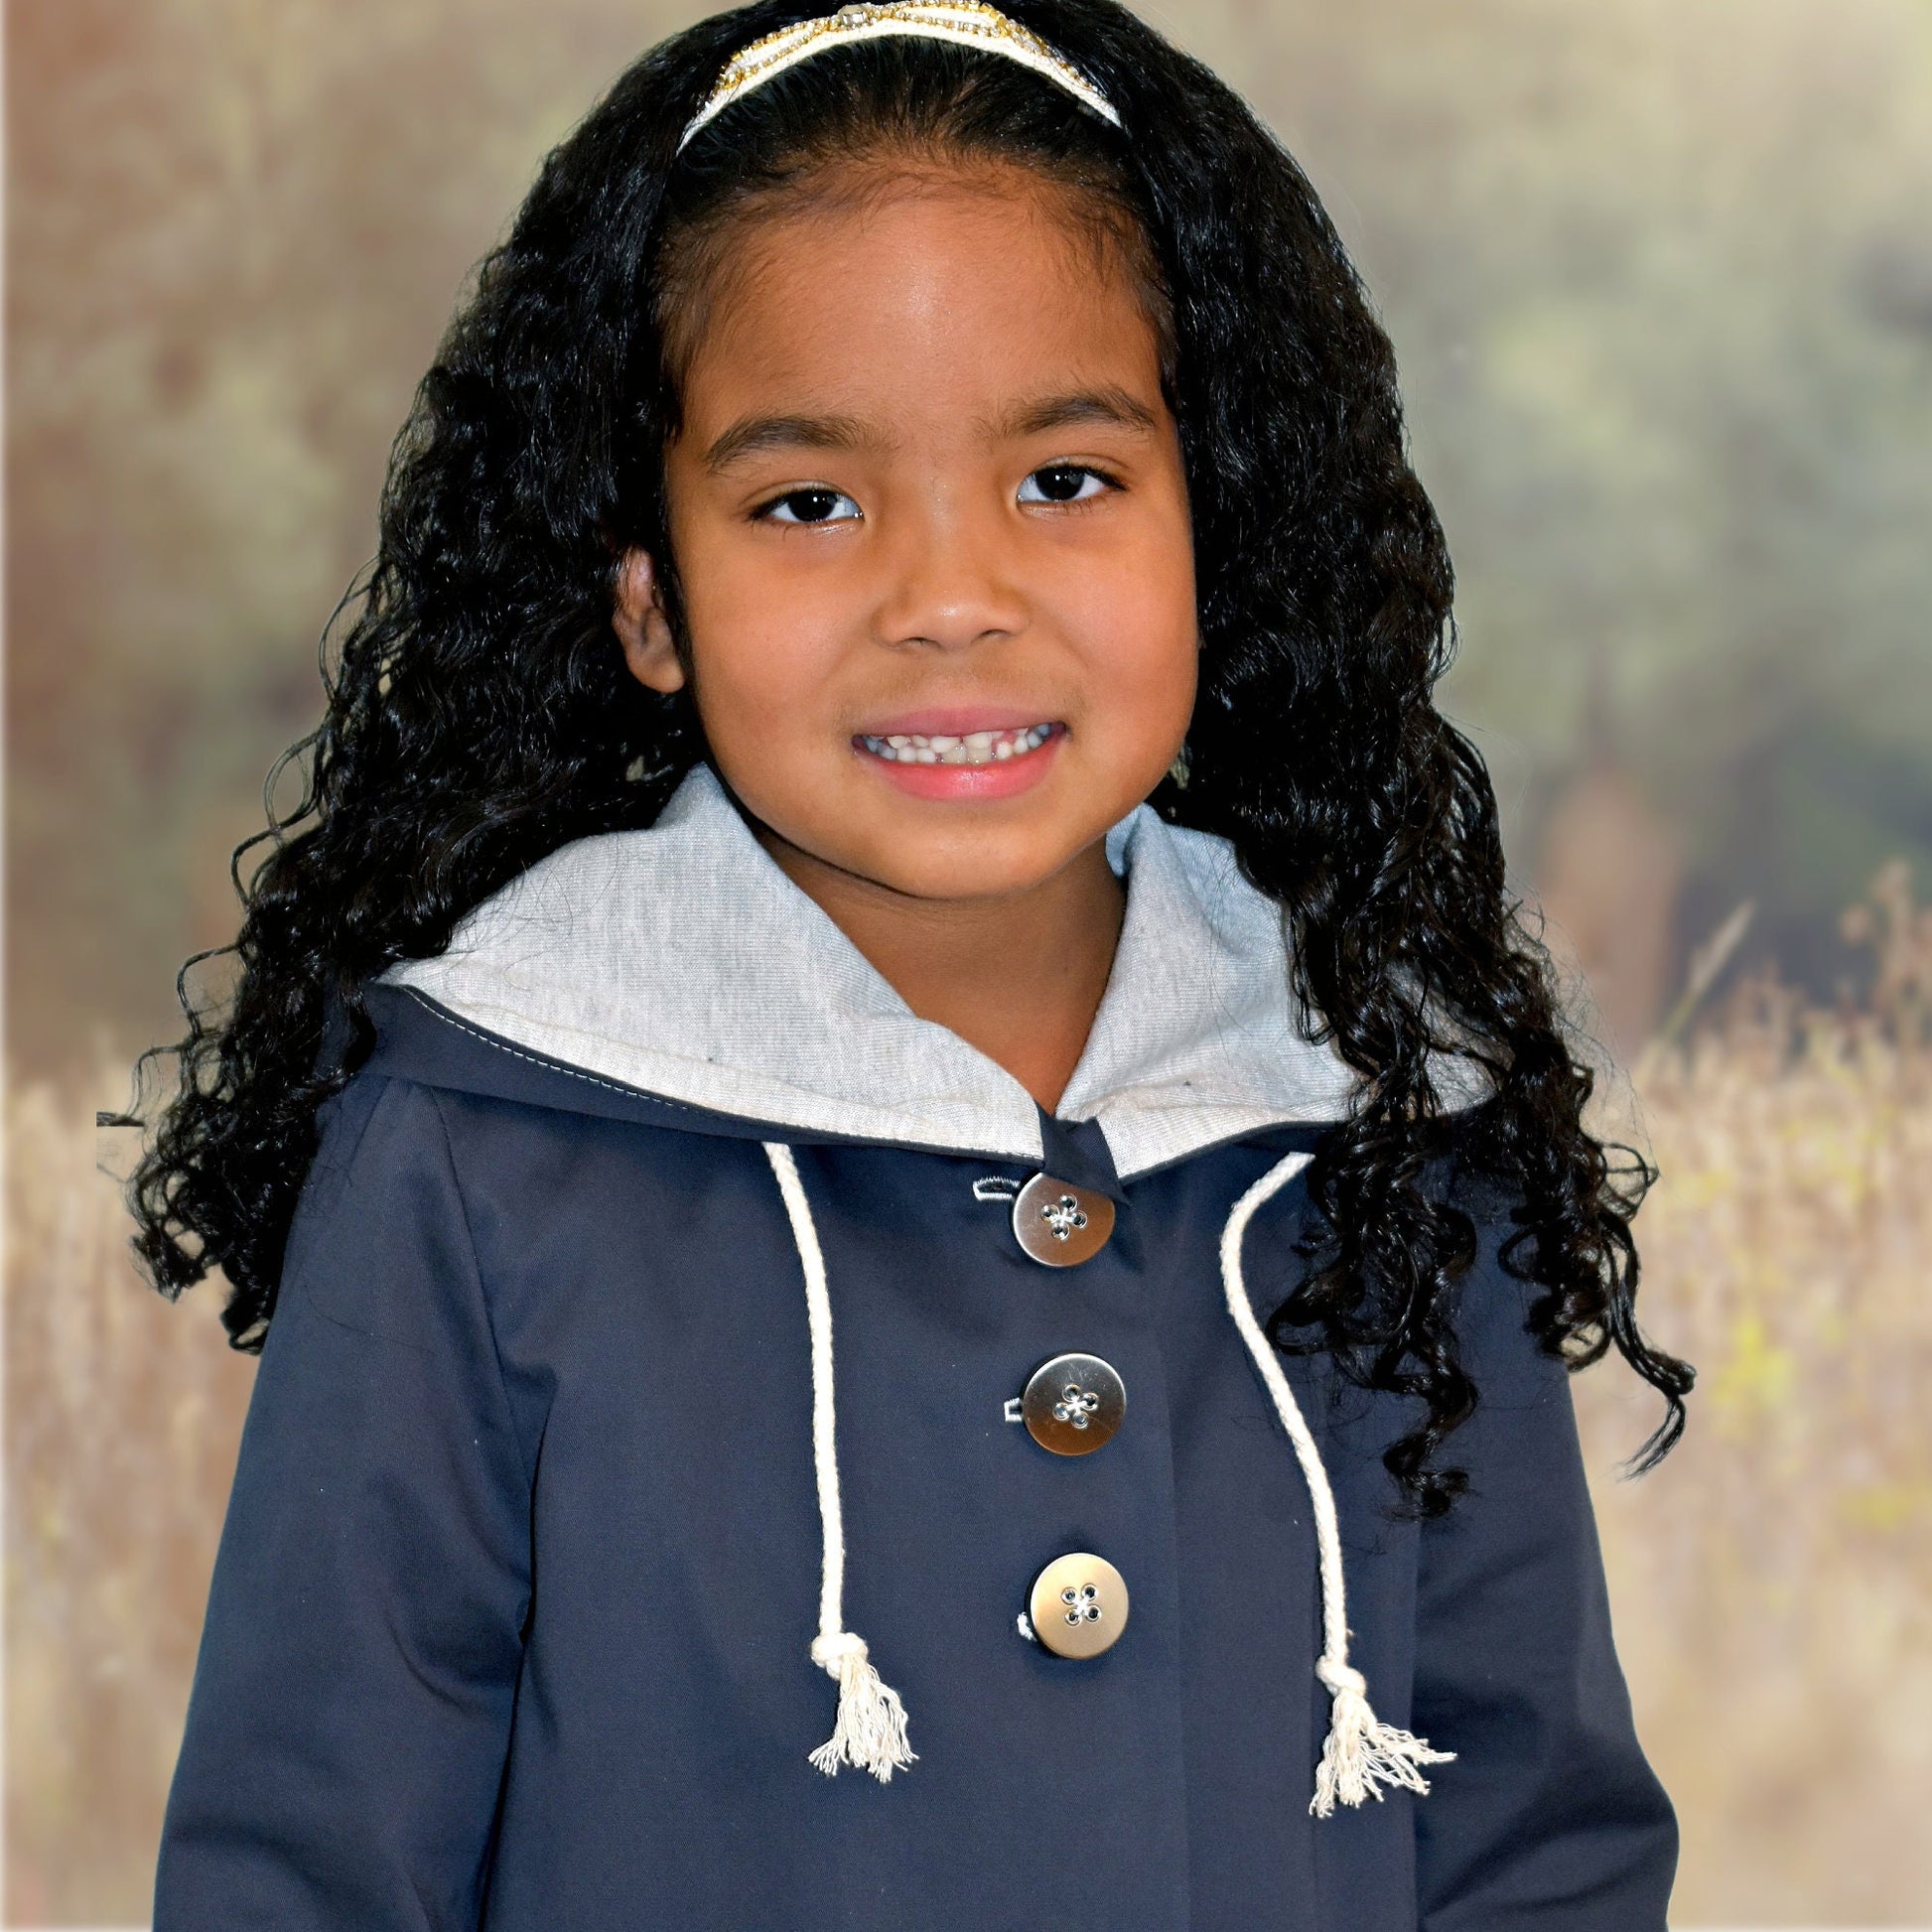
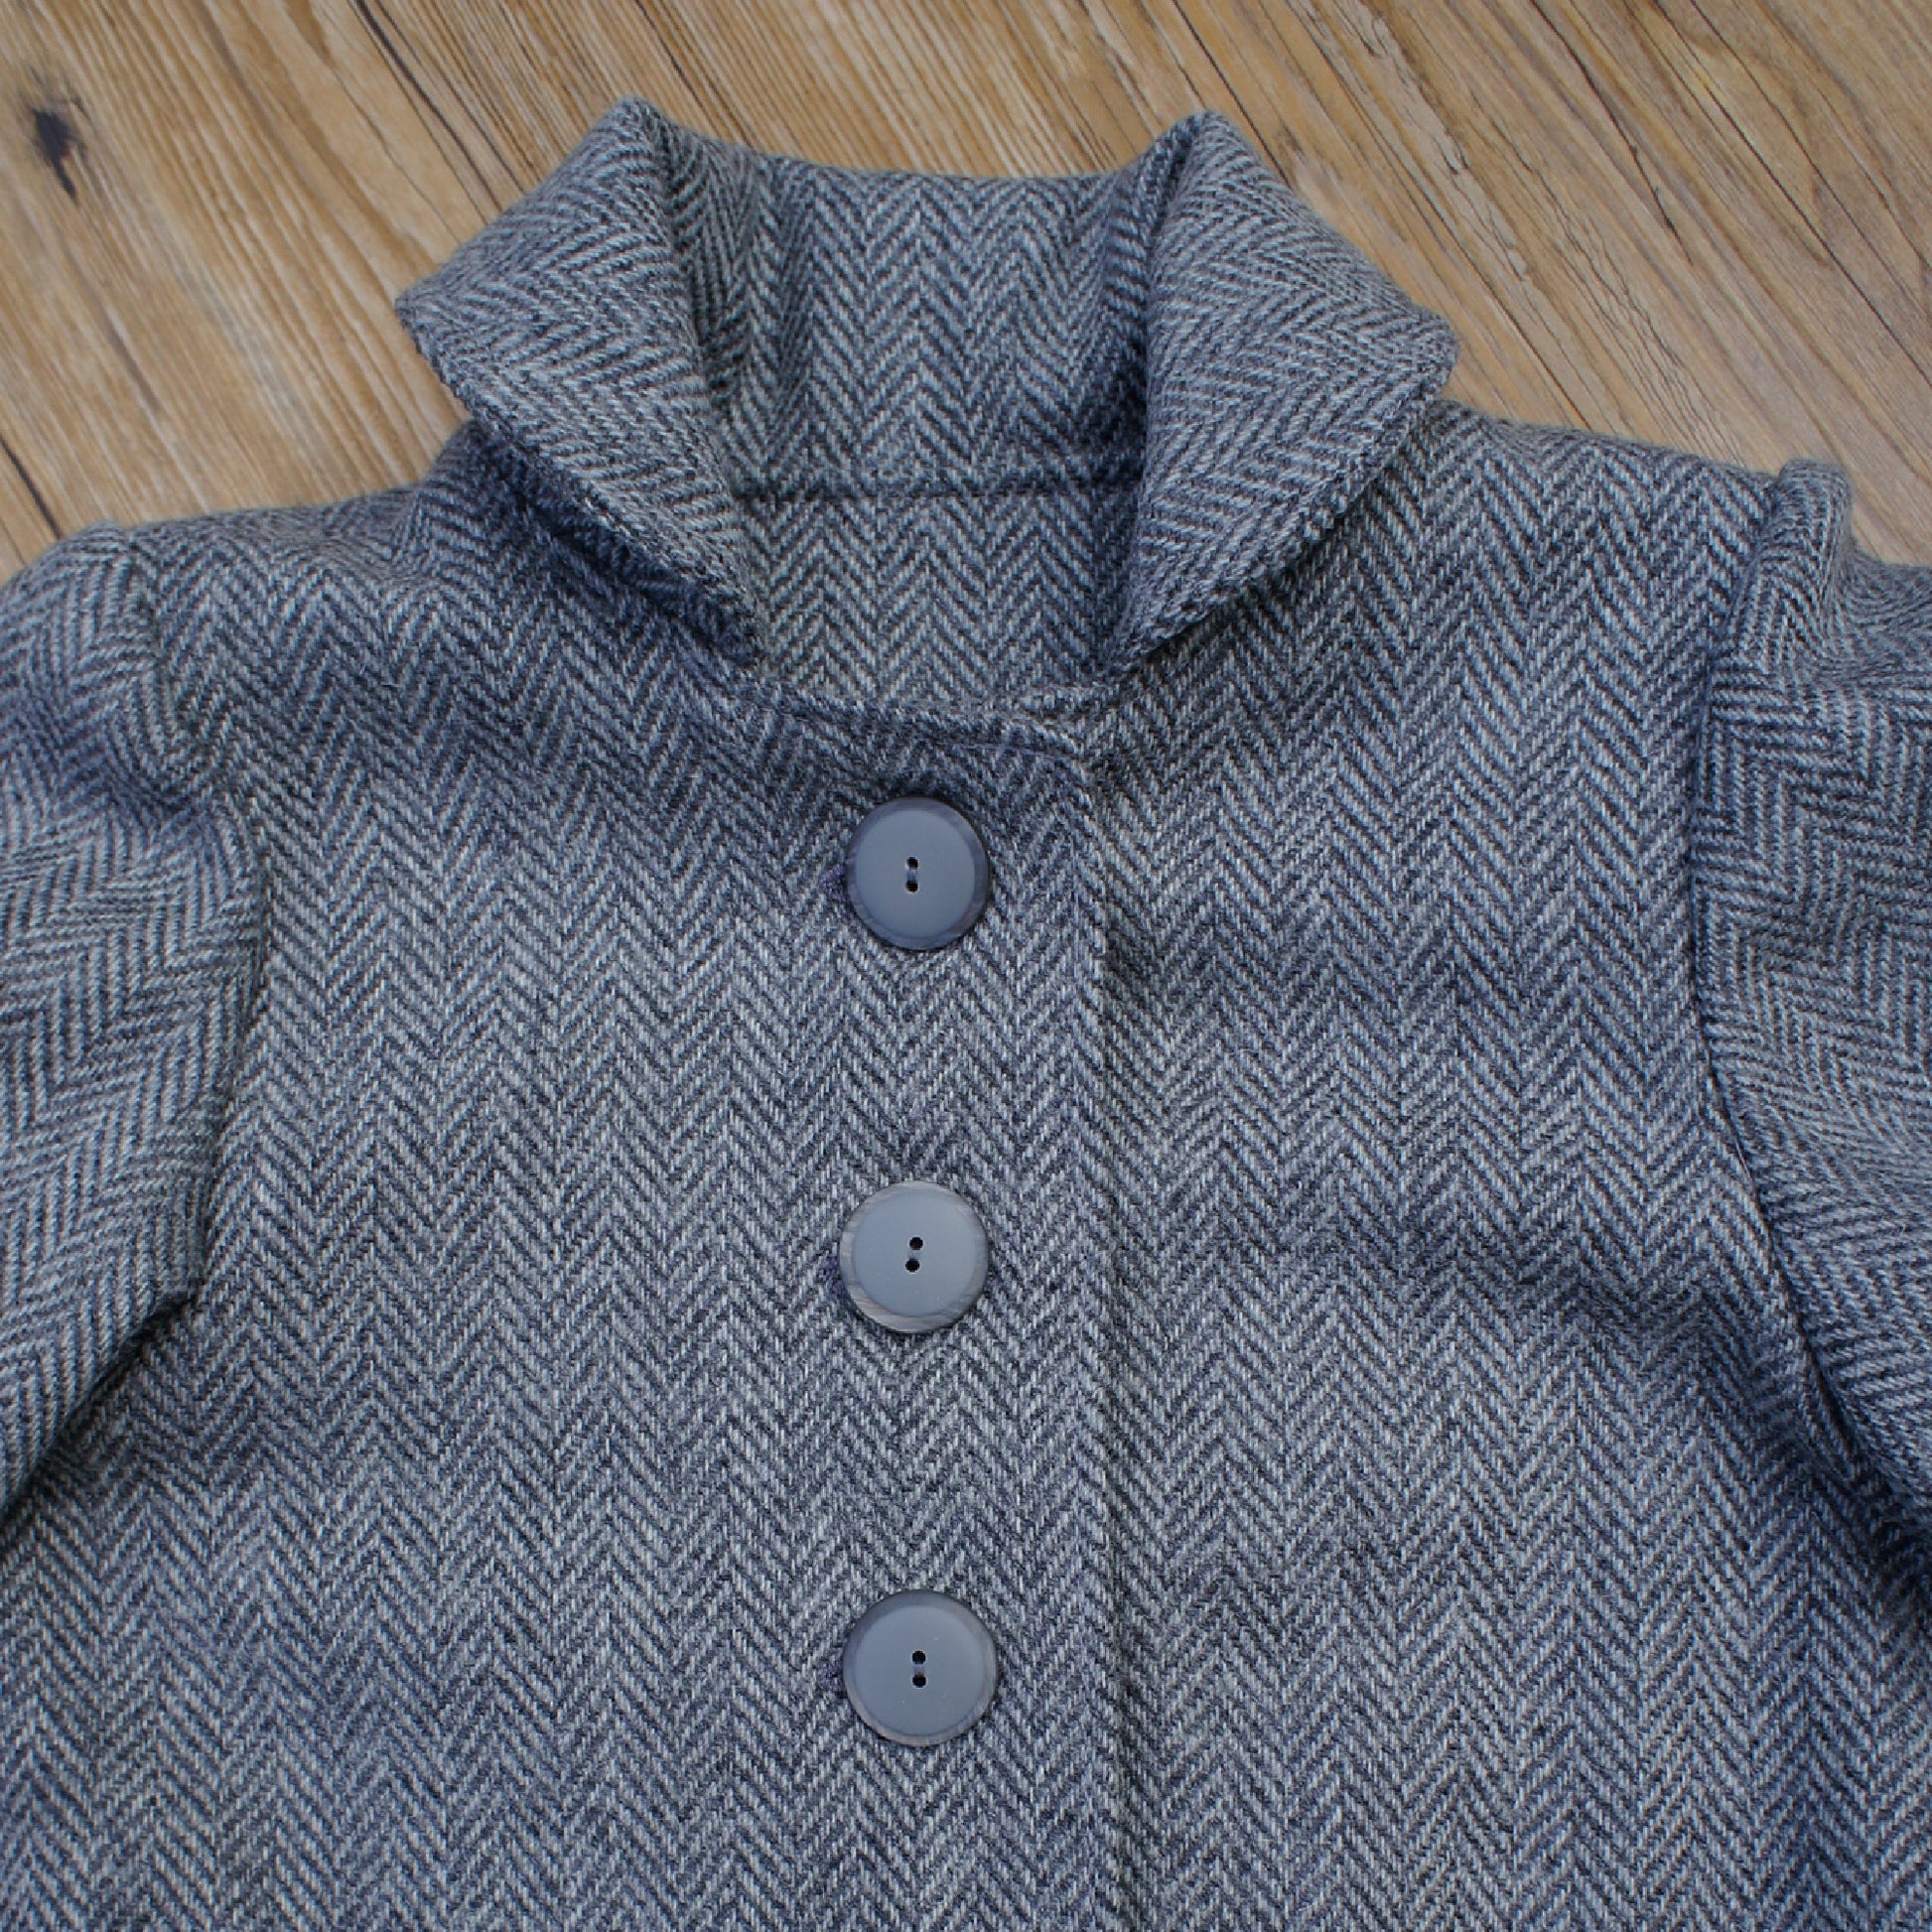
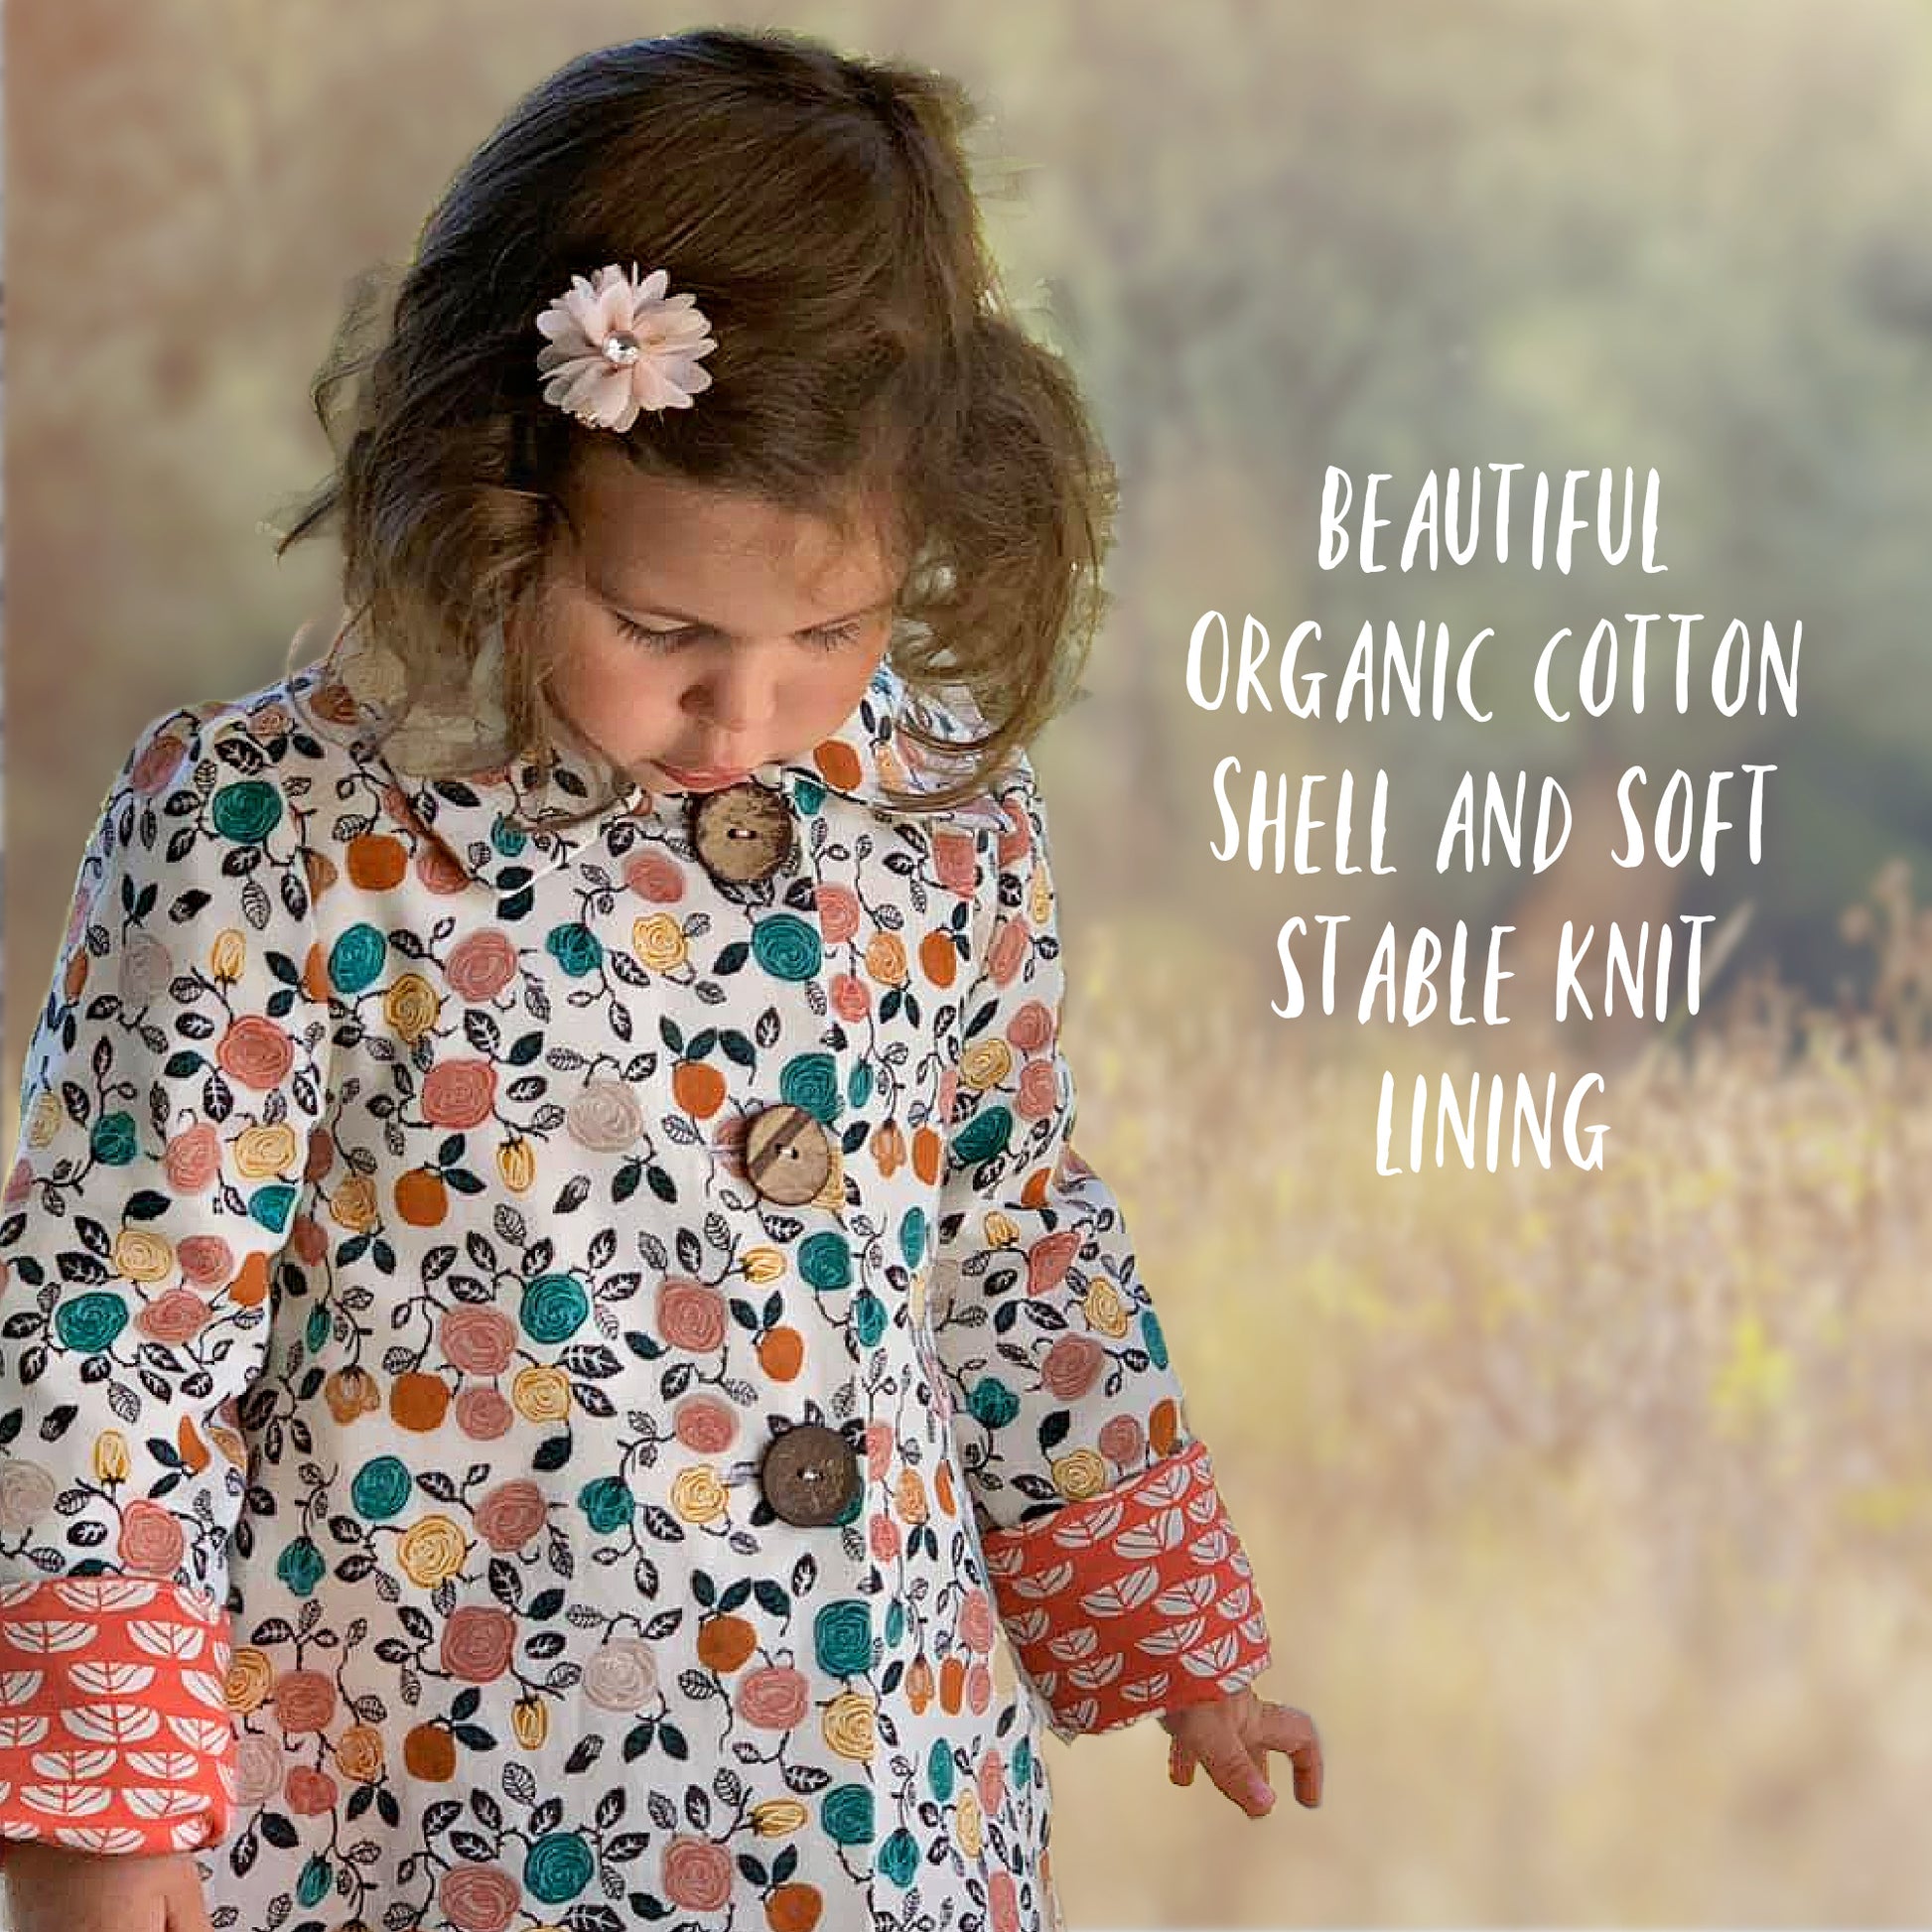
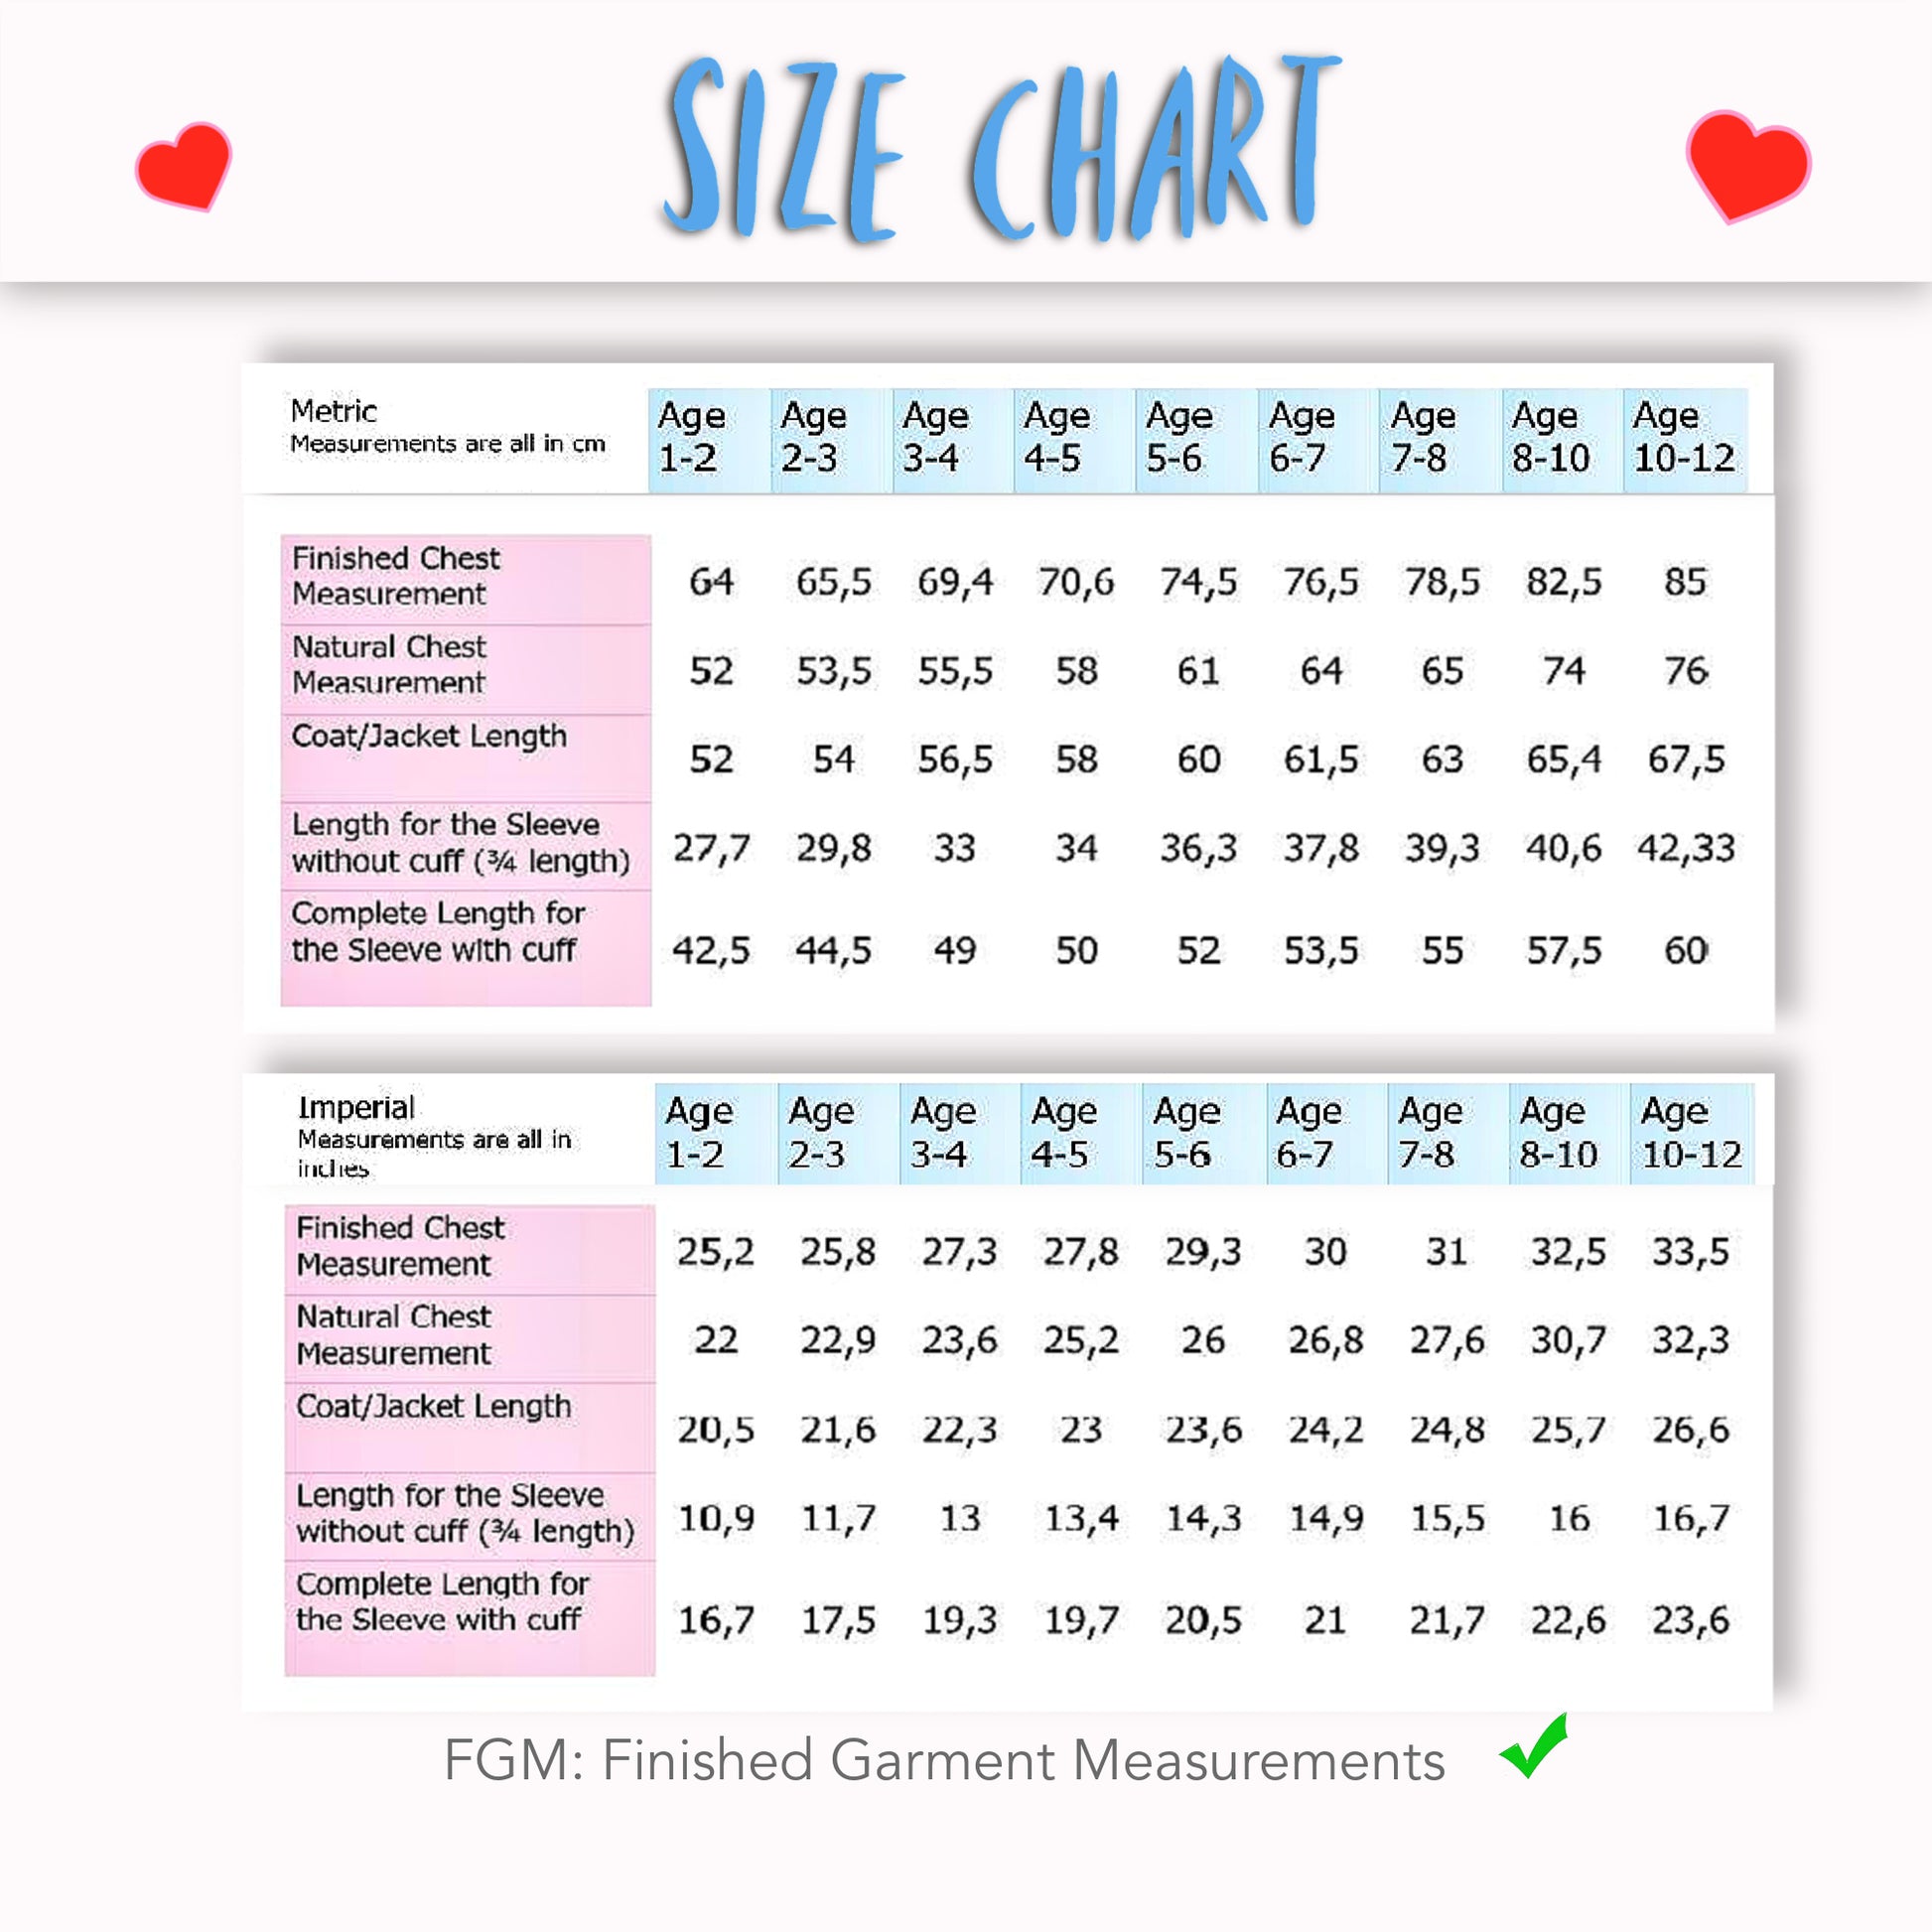
It is available from age 2 to 12, so you can make it teeny-appropriate or really cute for your little one. For the lining, I’ve used a beautiful quilted fabric that will keep her nice and warm. The upper material is a merino and cashmere mix, so it’s very light while still keeping her warm—or it did, she wore it all last winter.

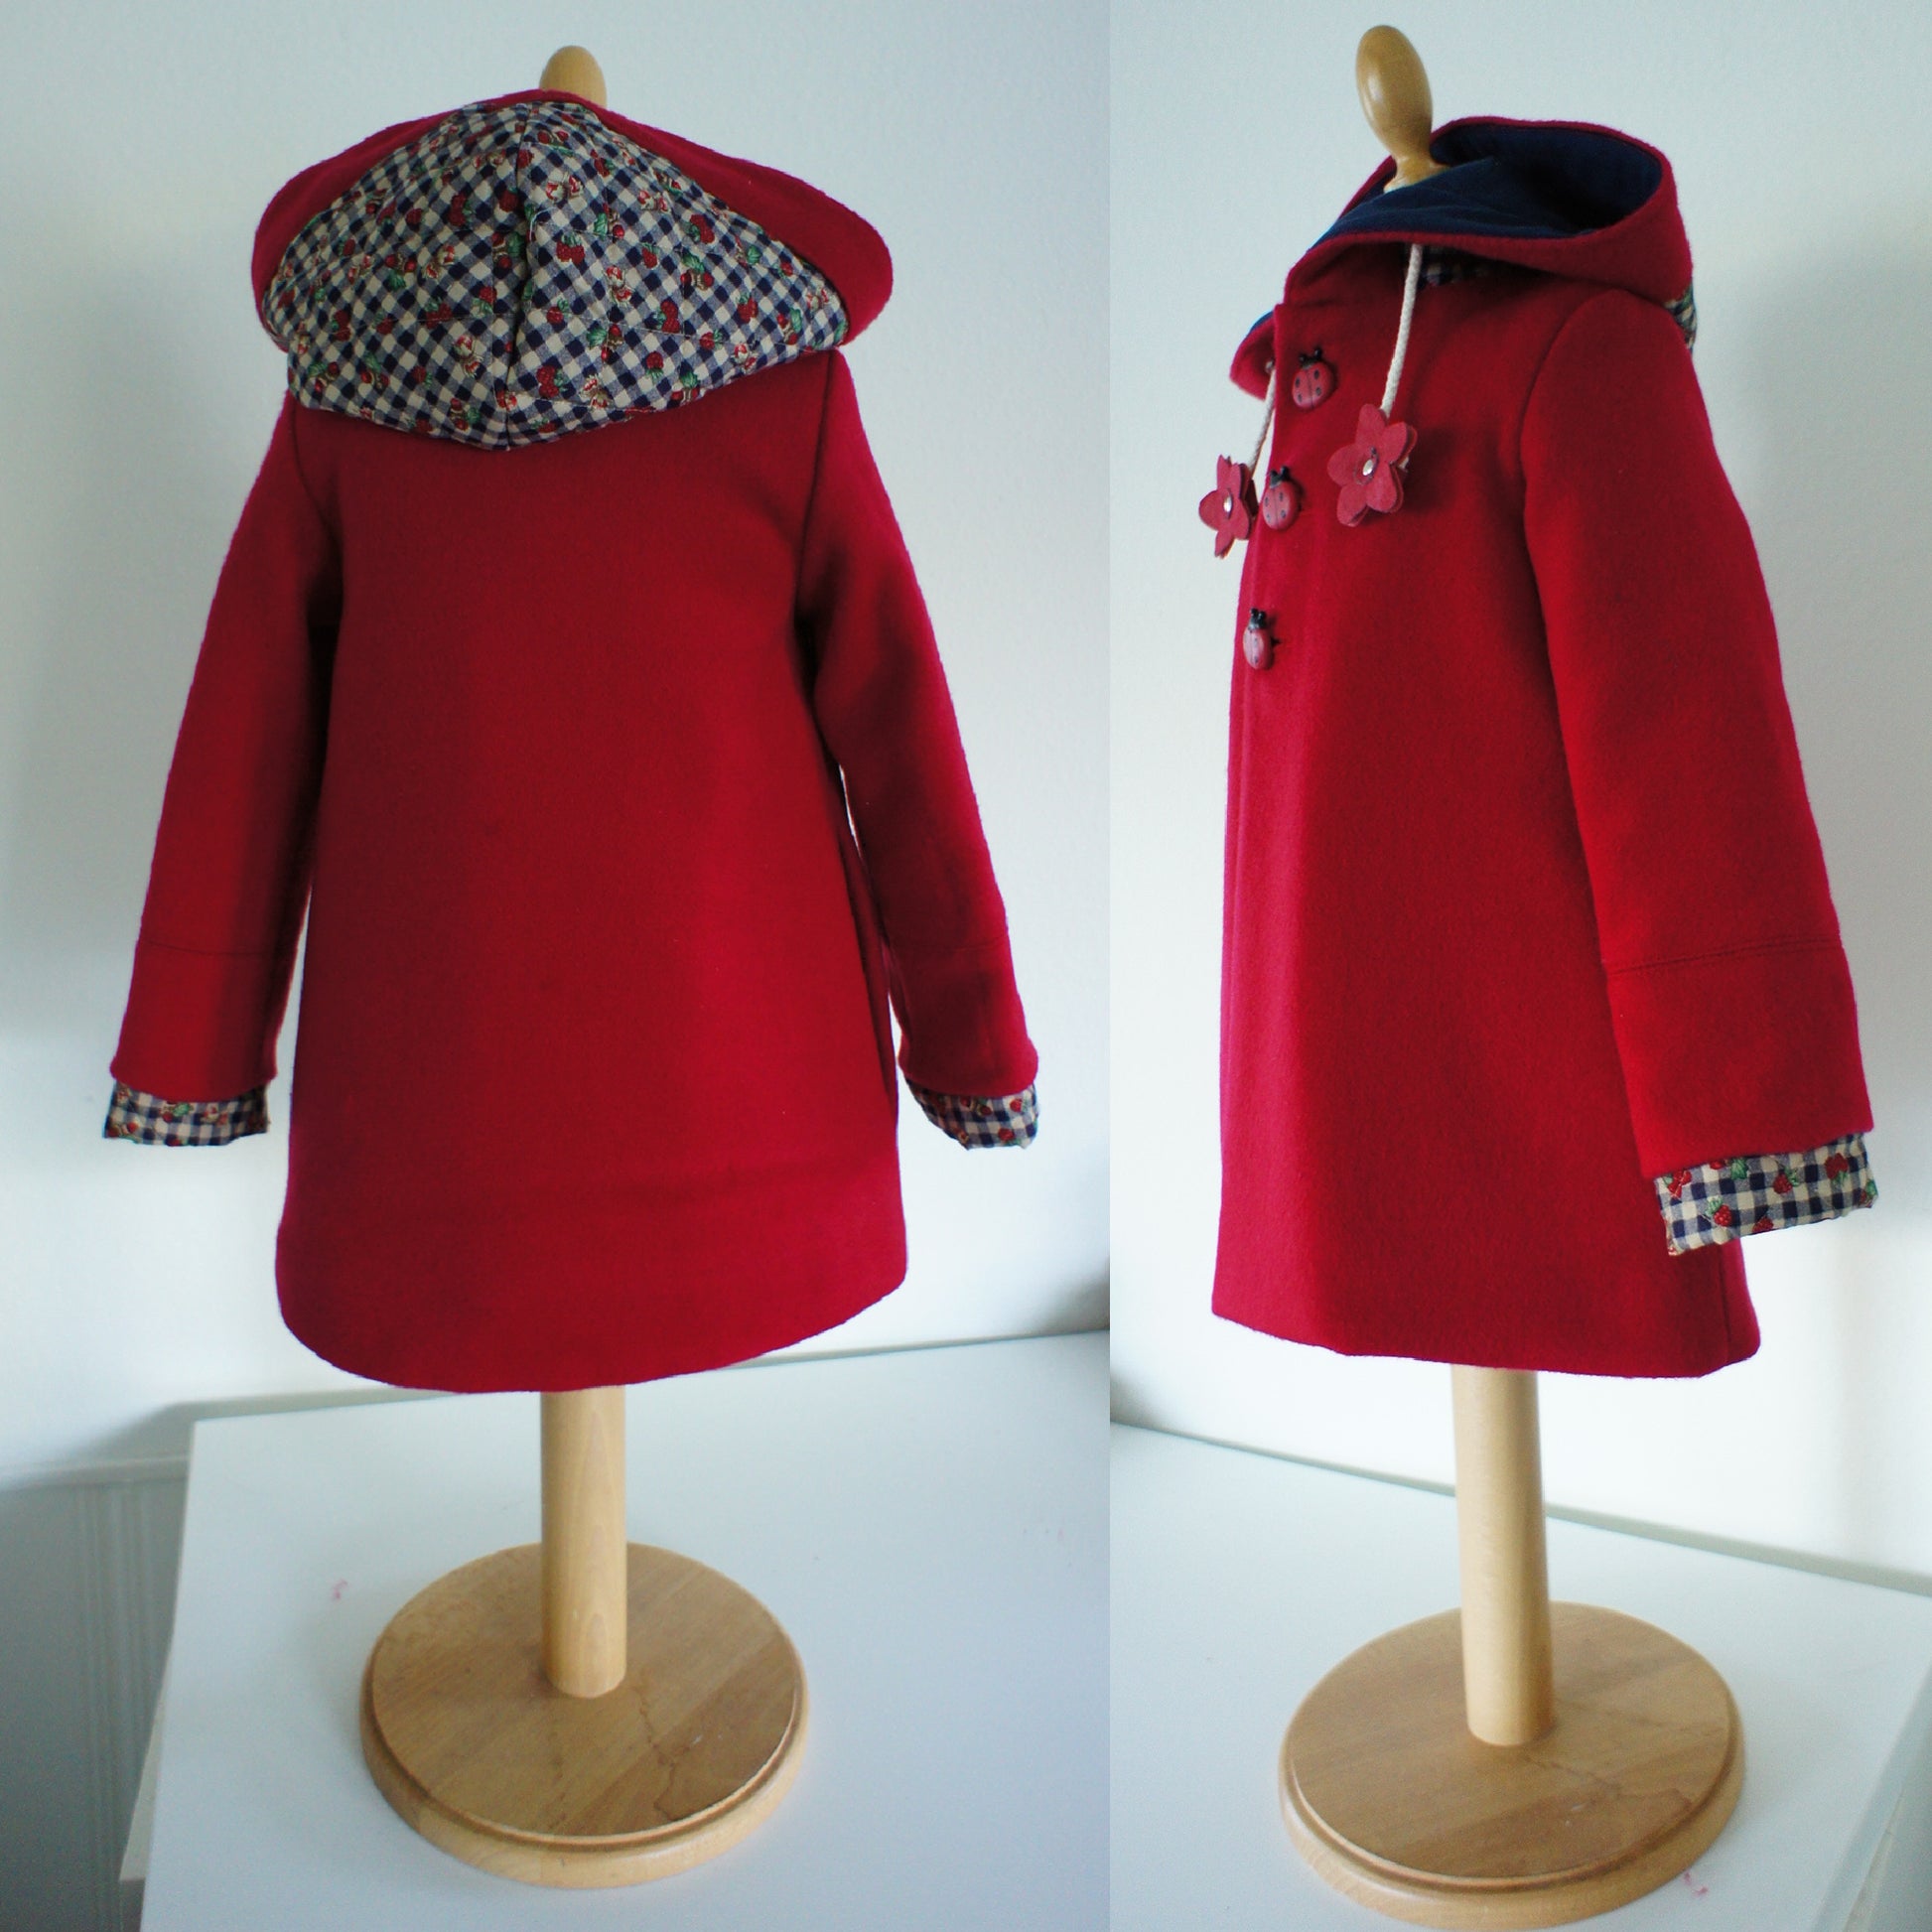
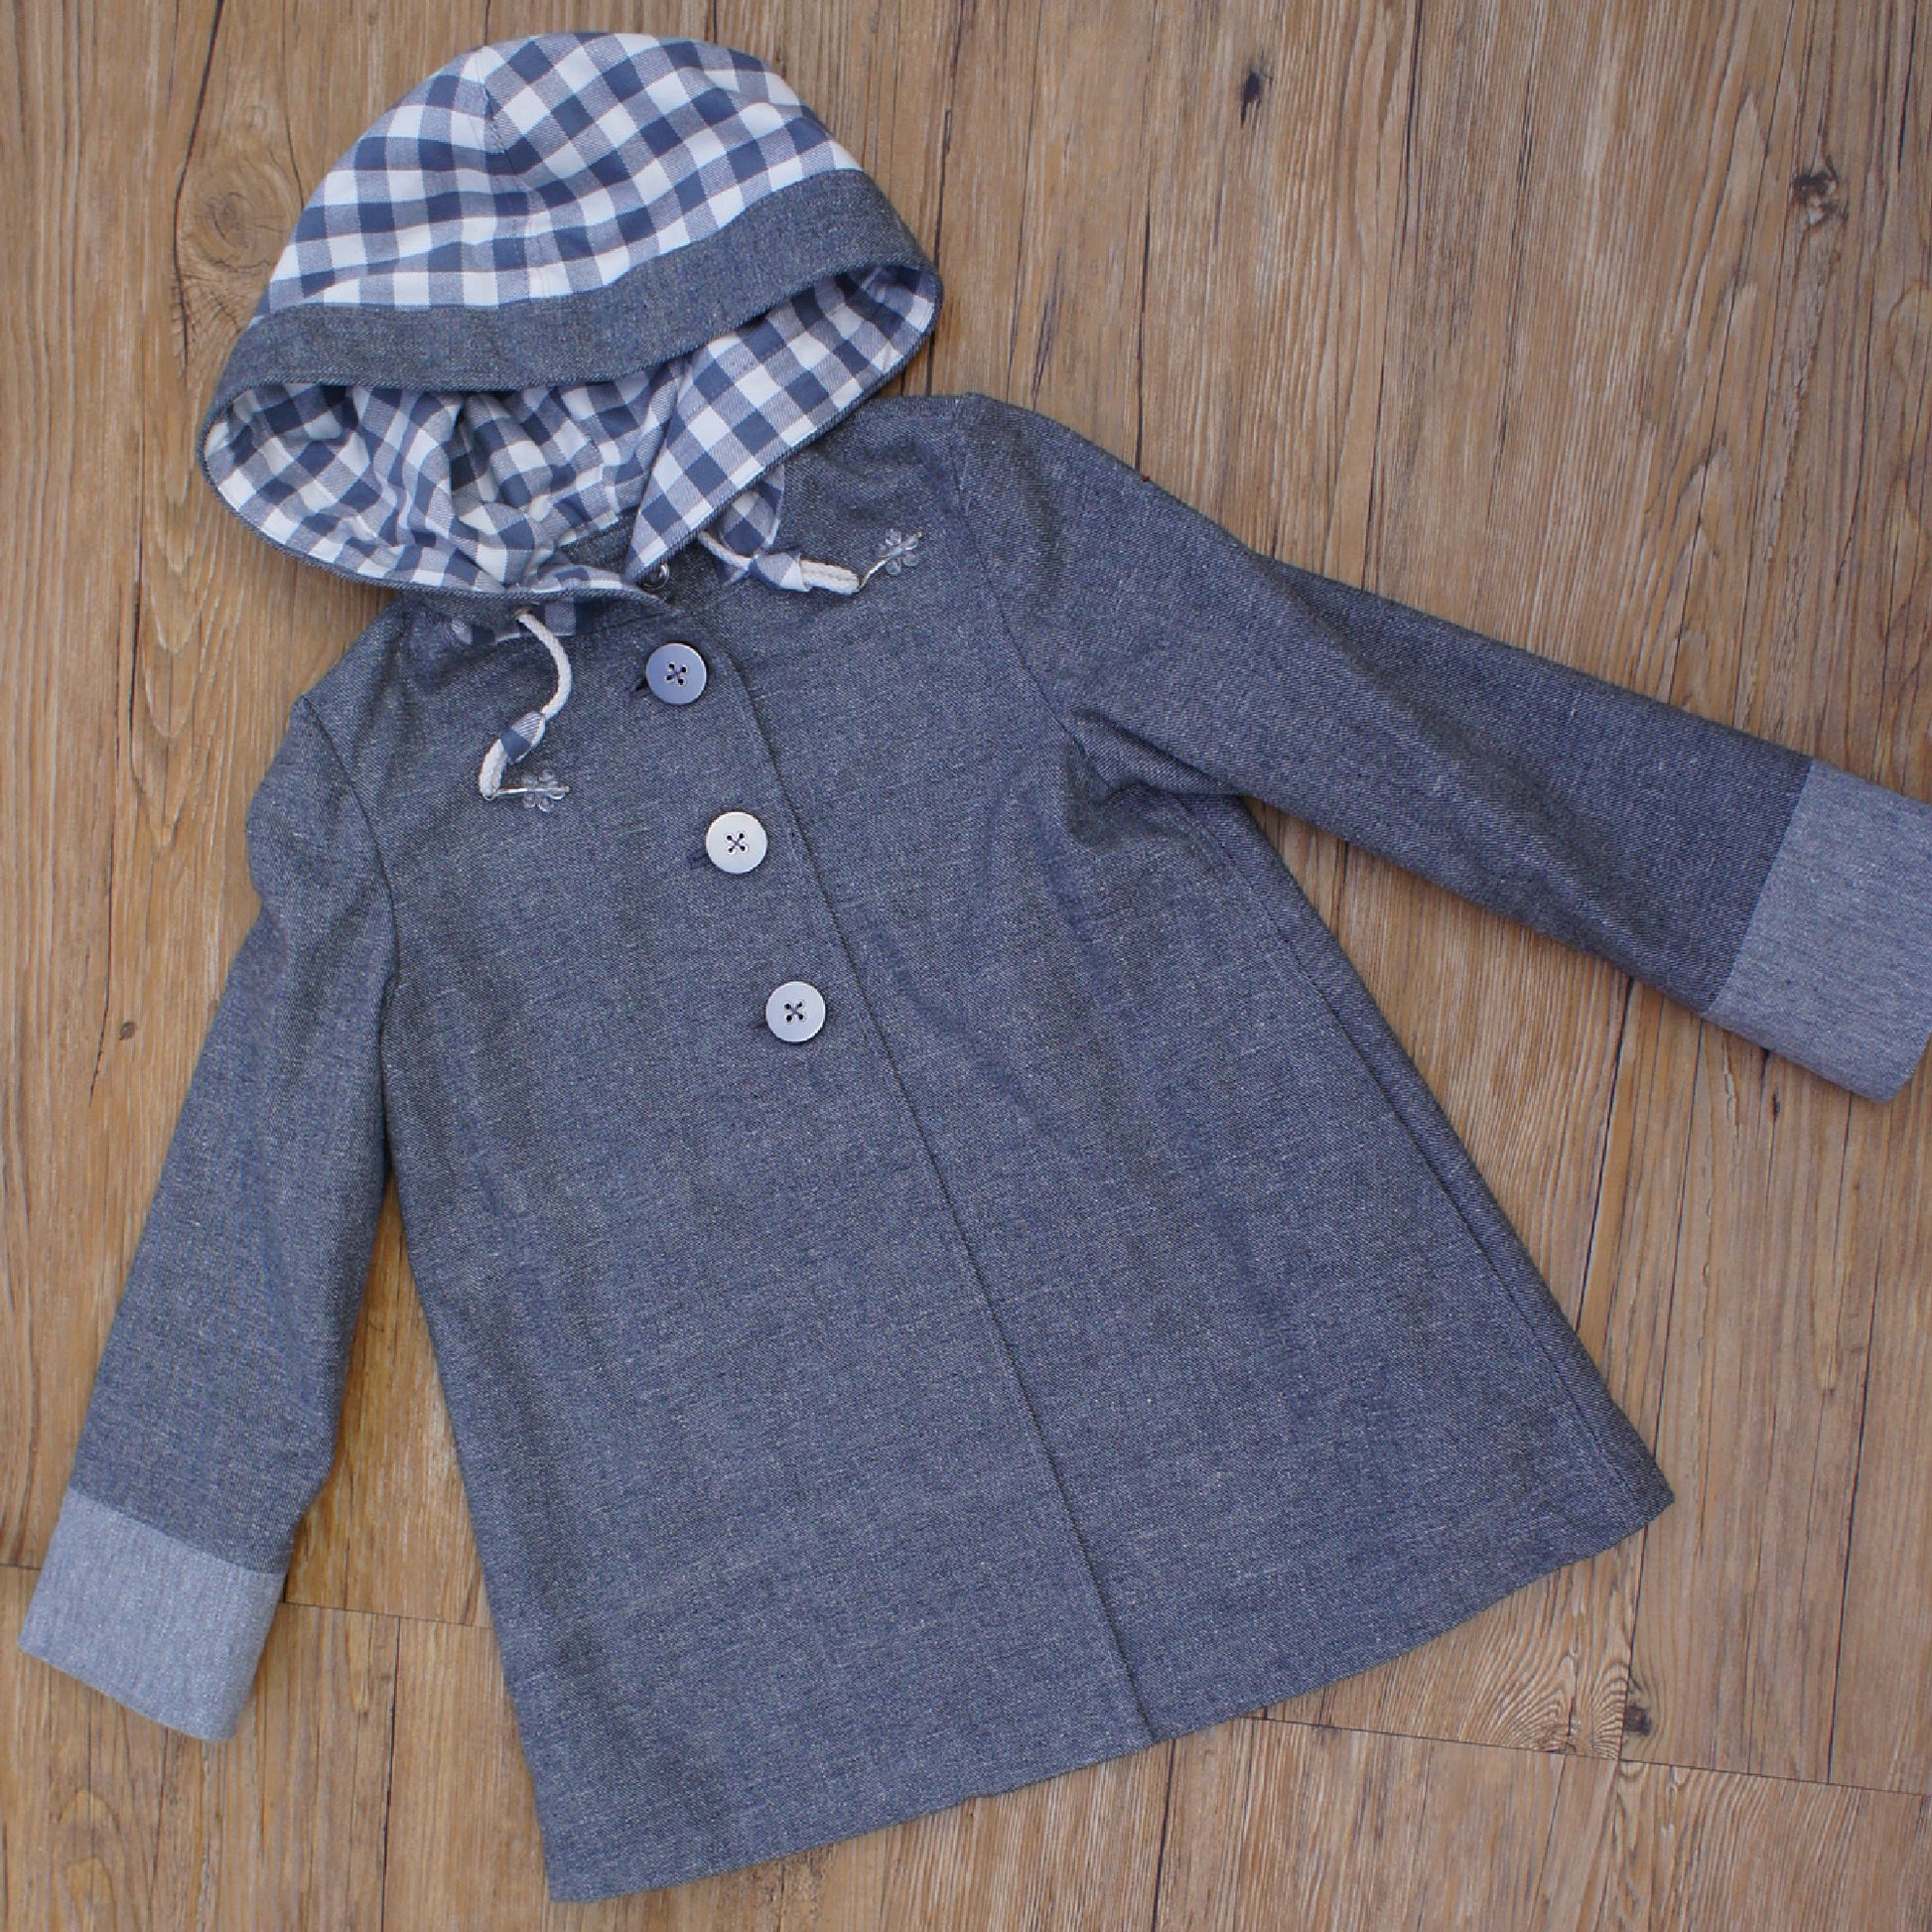
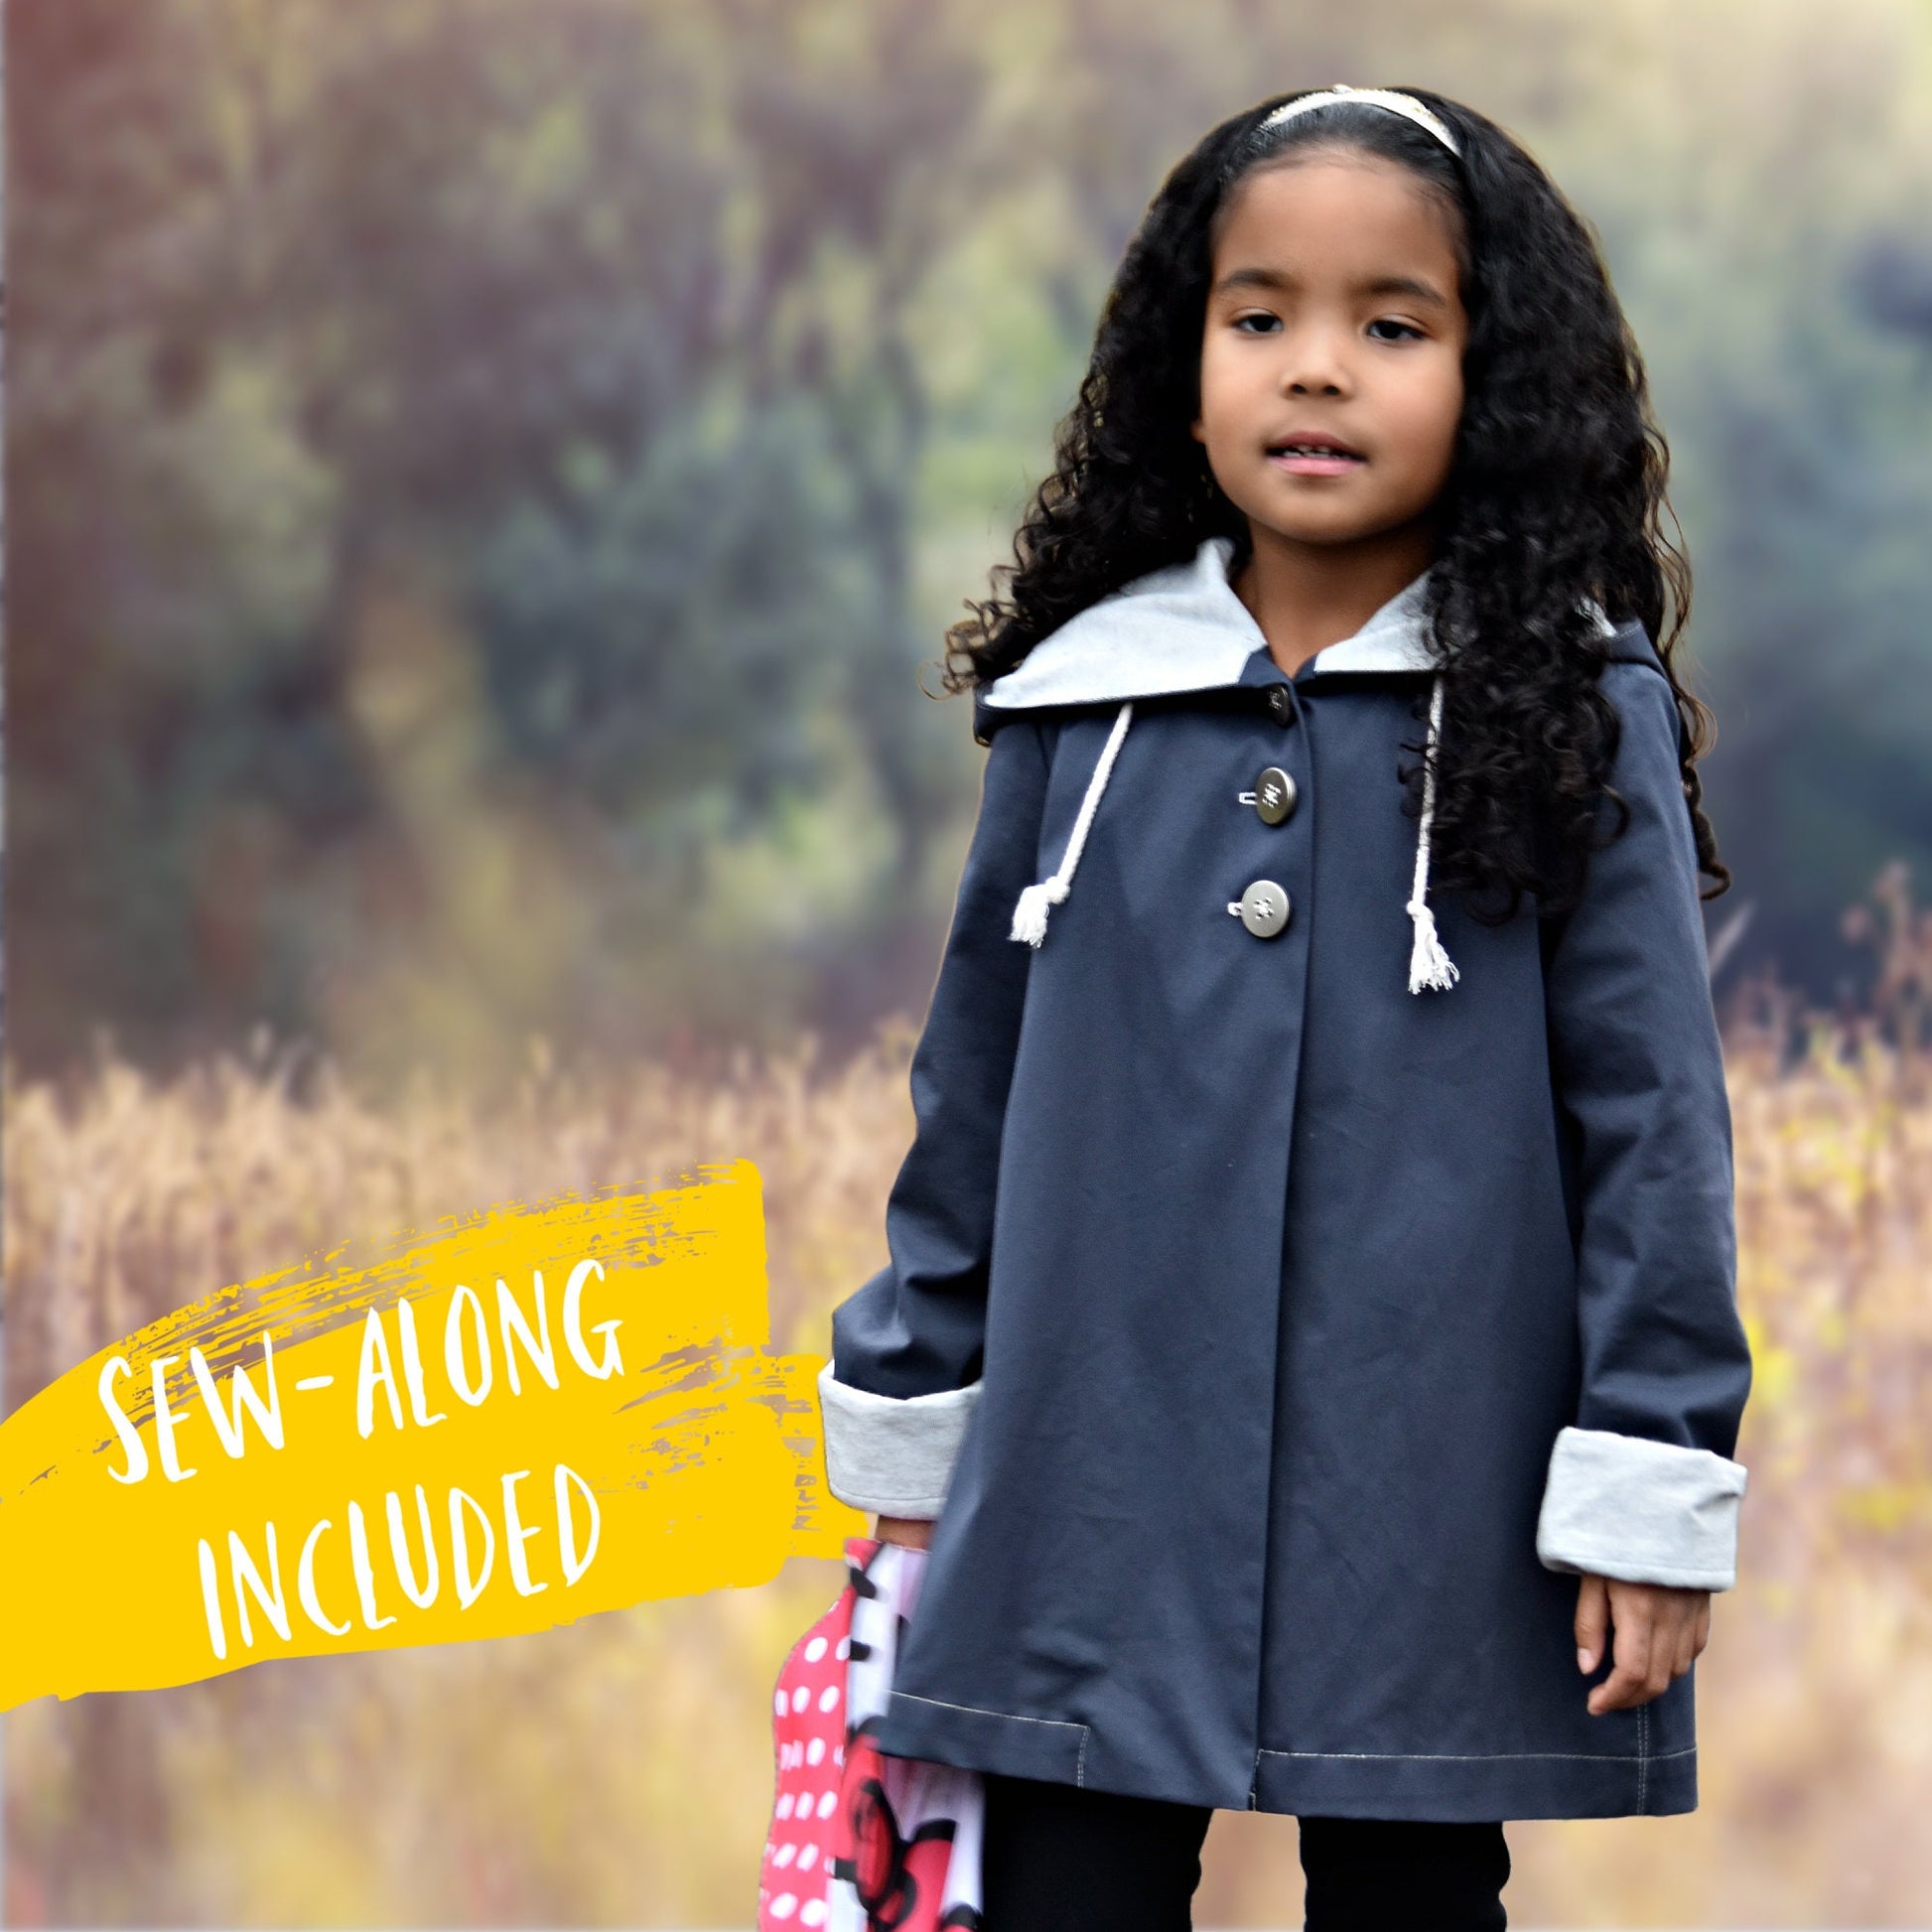
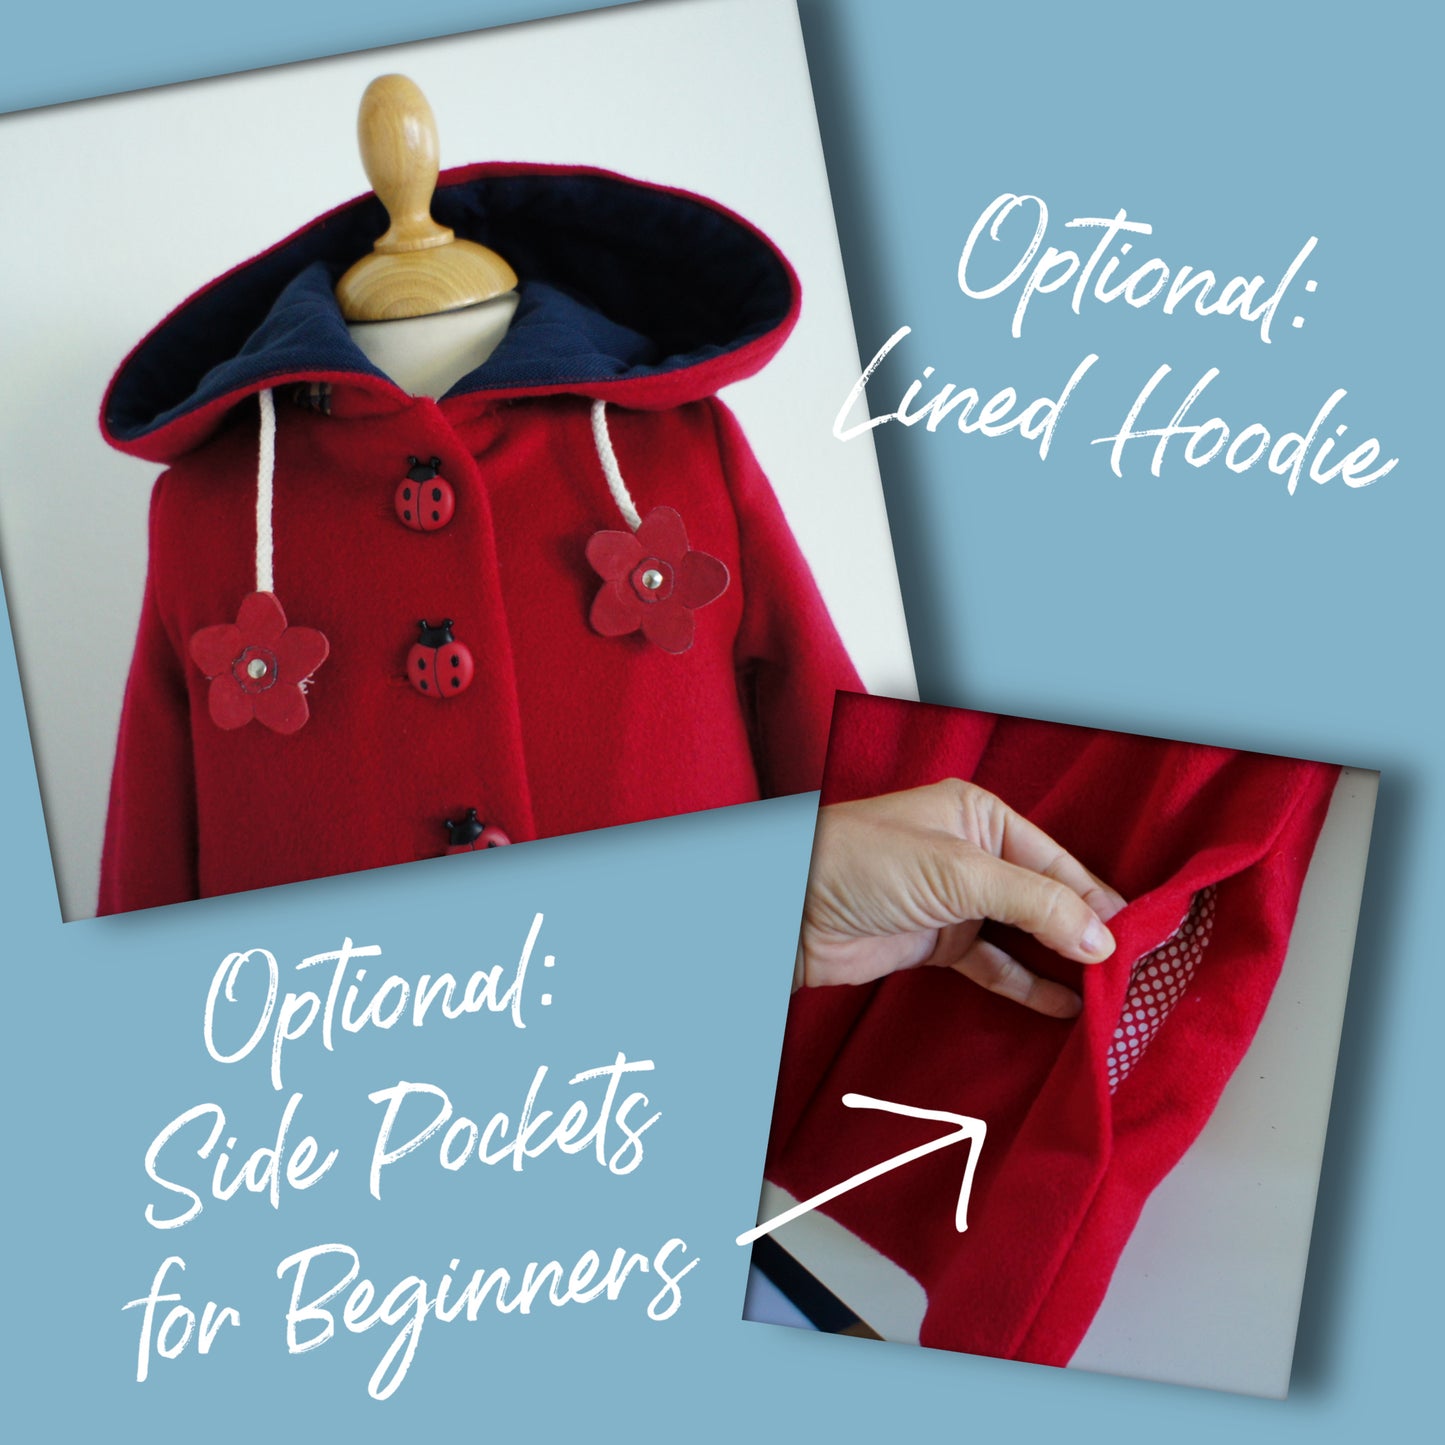
The hood is usually made in the upper material, but I ran out of fabric, same with the sleeves, so I made the sleeves shorter and the lining longer instead of the other way around. This is how it would normally be, of course, but I actually think this looks really nice too, so that’s absolutely an option if you want something a little different.

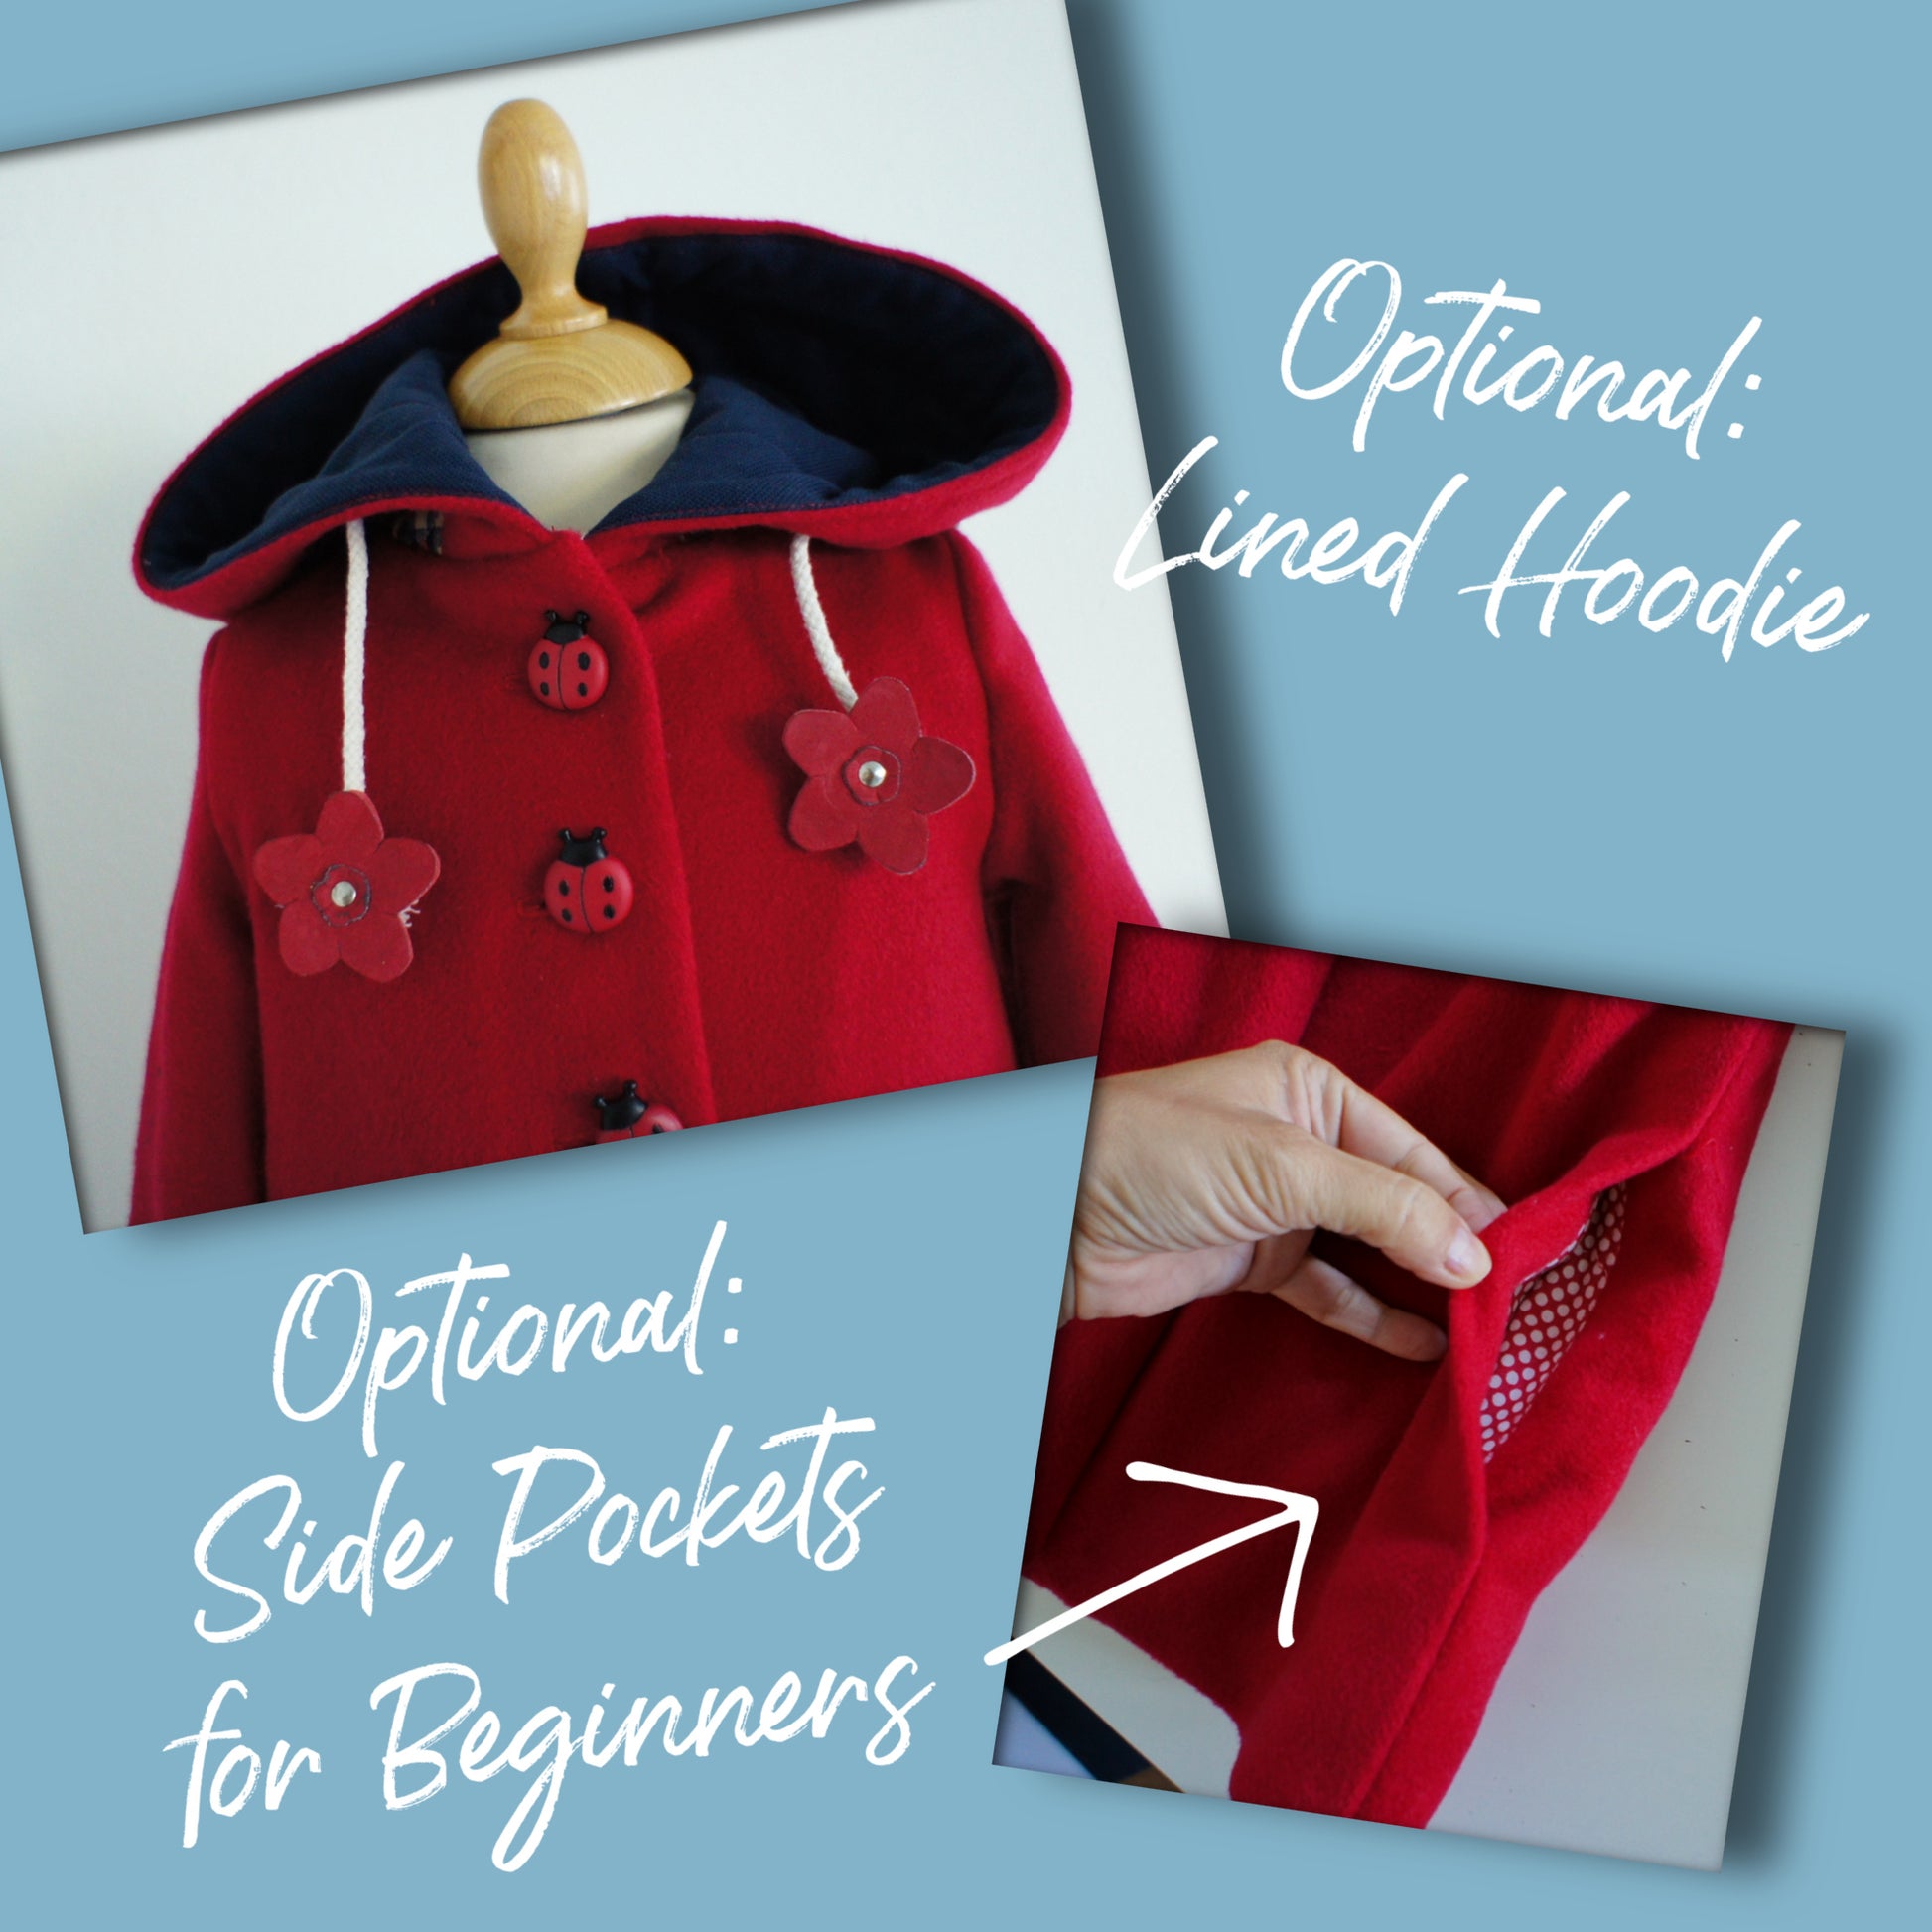
I’m also going to show you how to do this little corner detail, which I think is interesting for most of you. The lining is not attached, so it hangs loose, and then we’ll do these super cute side pockets as well. You can of course also add proper welt pockets if you like, and I’ll put a positioning mark on the pattern if you choose to do that.

So I’ve cut everything out and I’m ready to go.

The pockets I would usually cut from a fabric scrap—I wouldn’t include that in my fabric allowance.

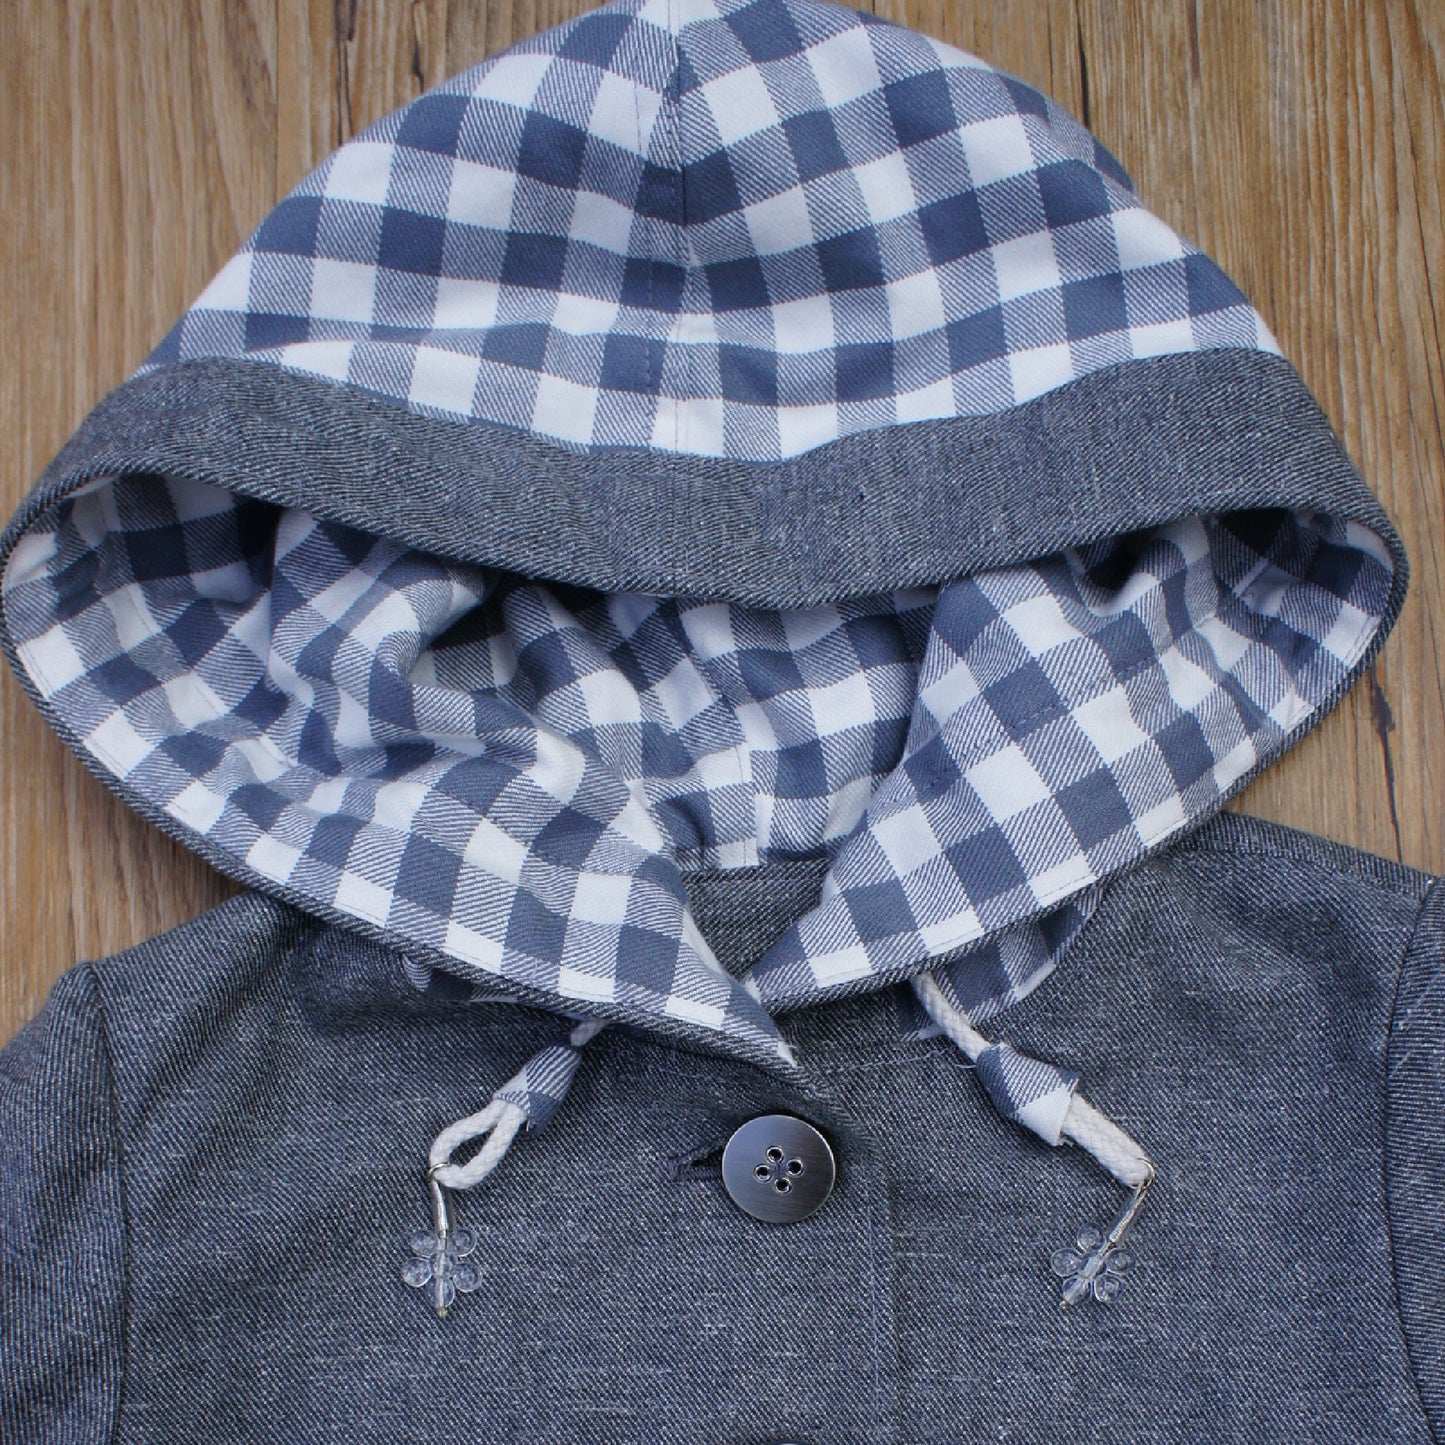
The hood needs to be cut twice, in both upper fabric and lining, and I used jersey for the lining. The sleeve is also cut twice in both upper fabric and lining. In my case, it’s folded up, but normally you wouldn’t see that.

The sleeve can be made with a cuff or without. If you use a directional fabric like I did, make sure it runs in the same direction and feels smooth when you run your hand over it.

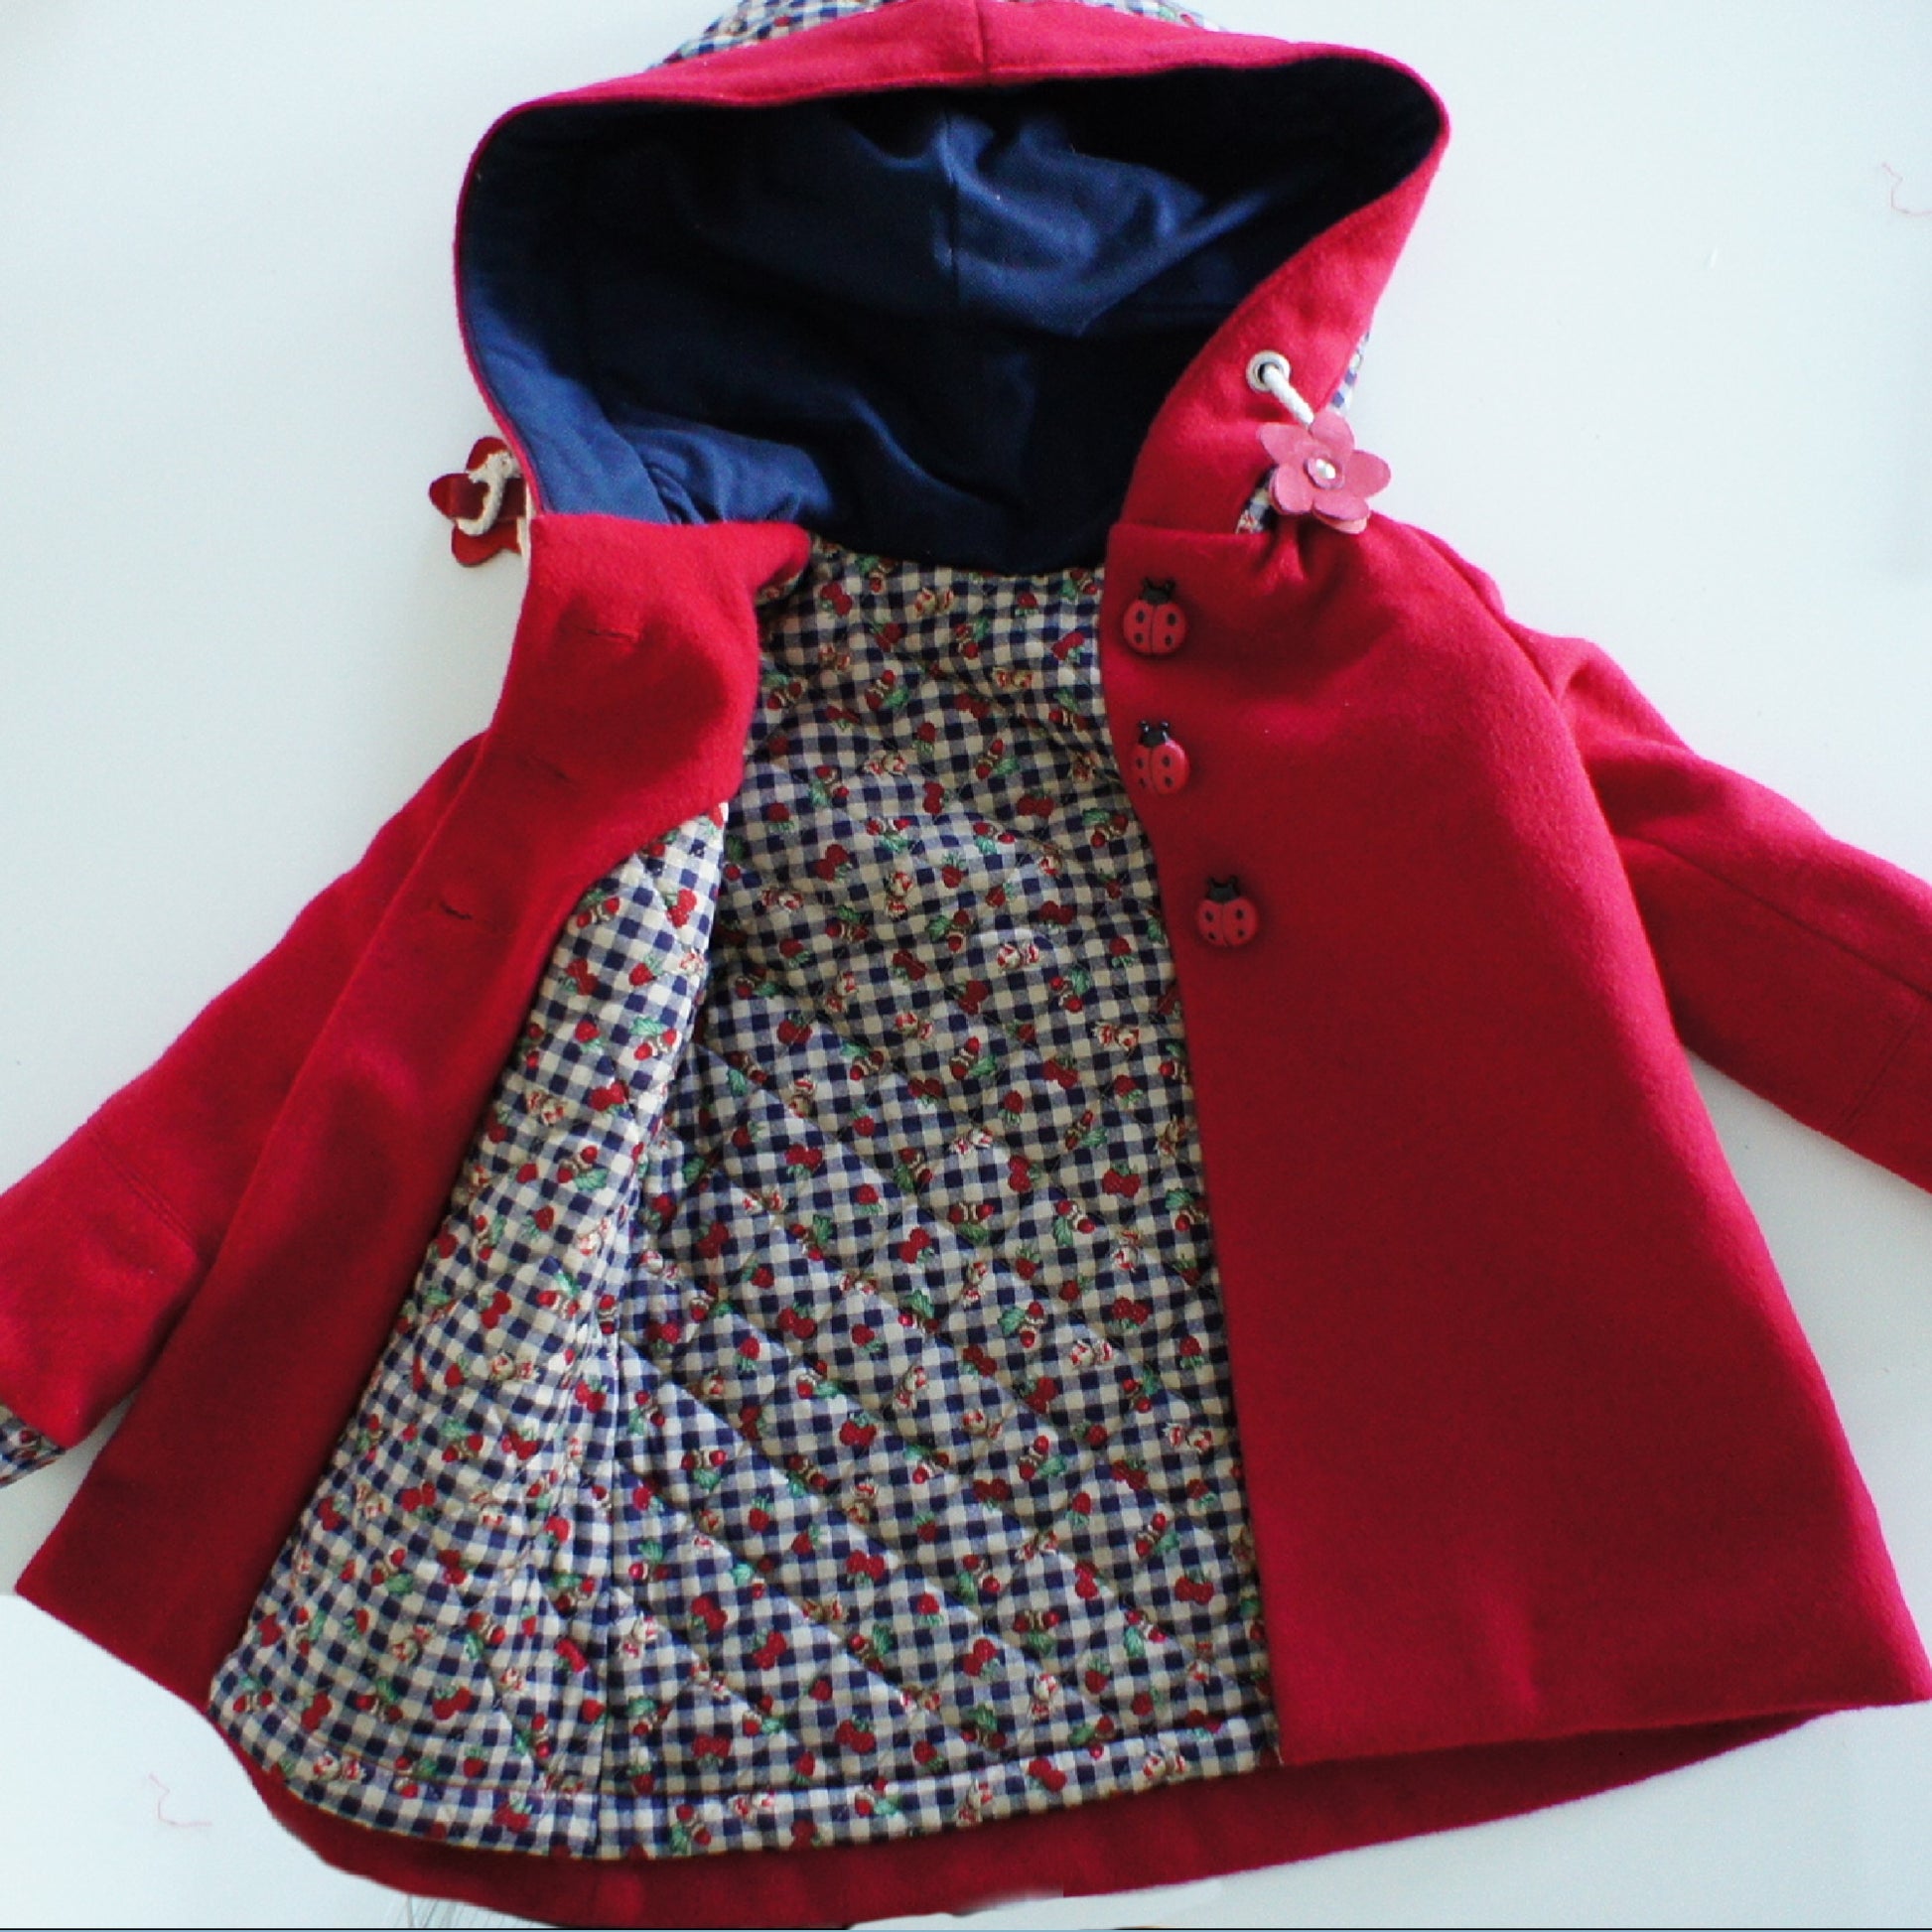
The front lining comes in two pieces, and the back lining is cut on the fold. We also have interfacing for the facing.

Attaching the Pockets

The pockets are pinned on with a 1 cm seam allowance, like everything else in this pattern. The front also includes an integrated facing, so you simply roll it over, and then the lining is attached on top.

I’ve added little snips so you know where everything lines up, which makes it much easier to assemble.

Now we apply Vilene to the wrong side of the fabric. Make sure your iron is not too hot, or it will melt the interfacing. Once it’s at a lower heat, press it down and count to eight—1,000, 2,000, 3,000, and so on—until it’s bonded. Don’t be afraid of this step; if it doesn’t stick properly, just repeat it.

Constructing the Sleeve Cuff

Sew the sleeve cuff with a 1 cm seam allowance. It’s already pinned right sides together. You can press the seam open or finger-press it, then sew around with a slightly longer stitch length.

Sewing the Pockets

Sew the pockets in the same way. Then simply roll the fabric over and topstitch all the way around. Repeat for all sides.

Constructing the Hood

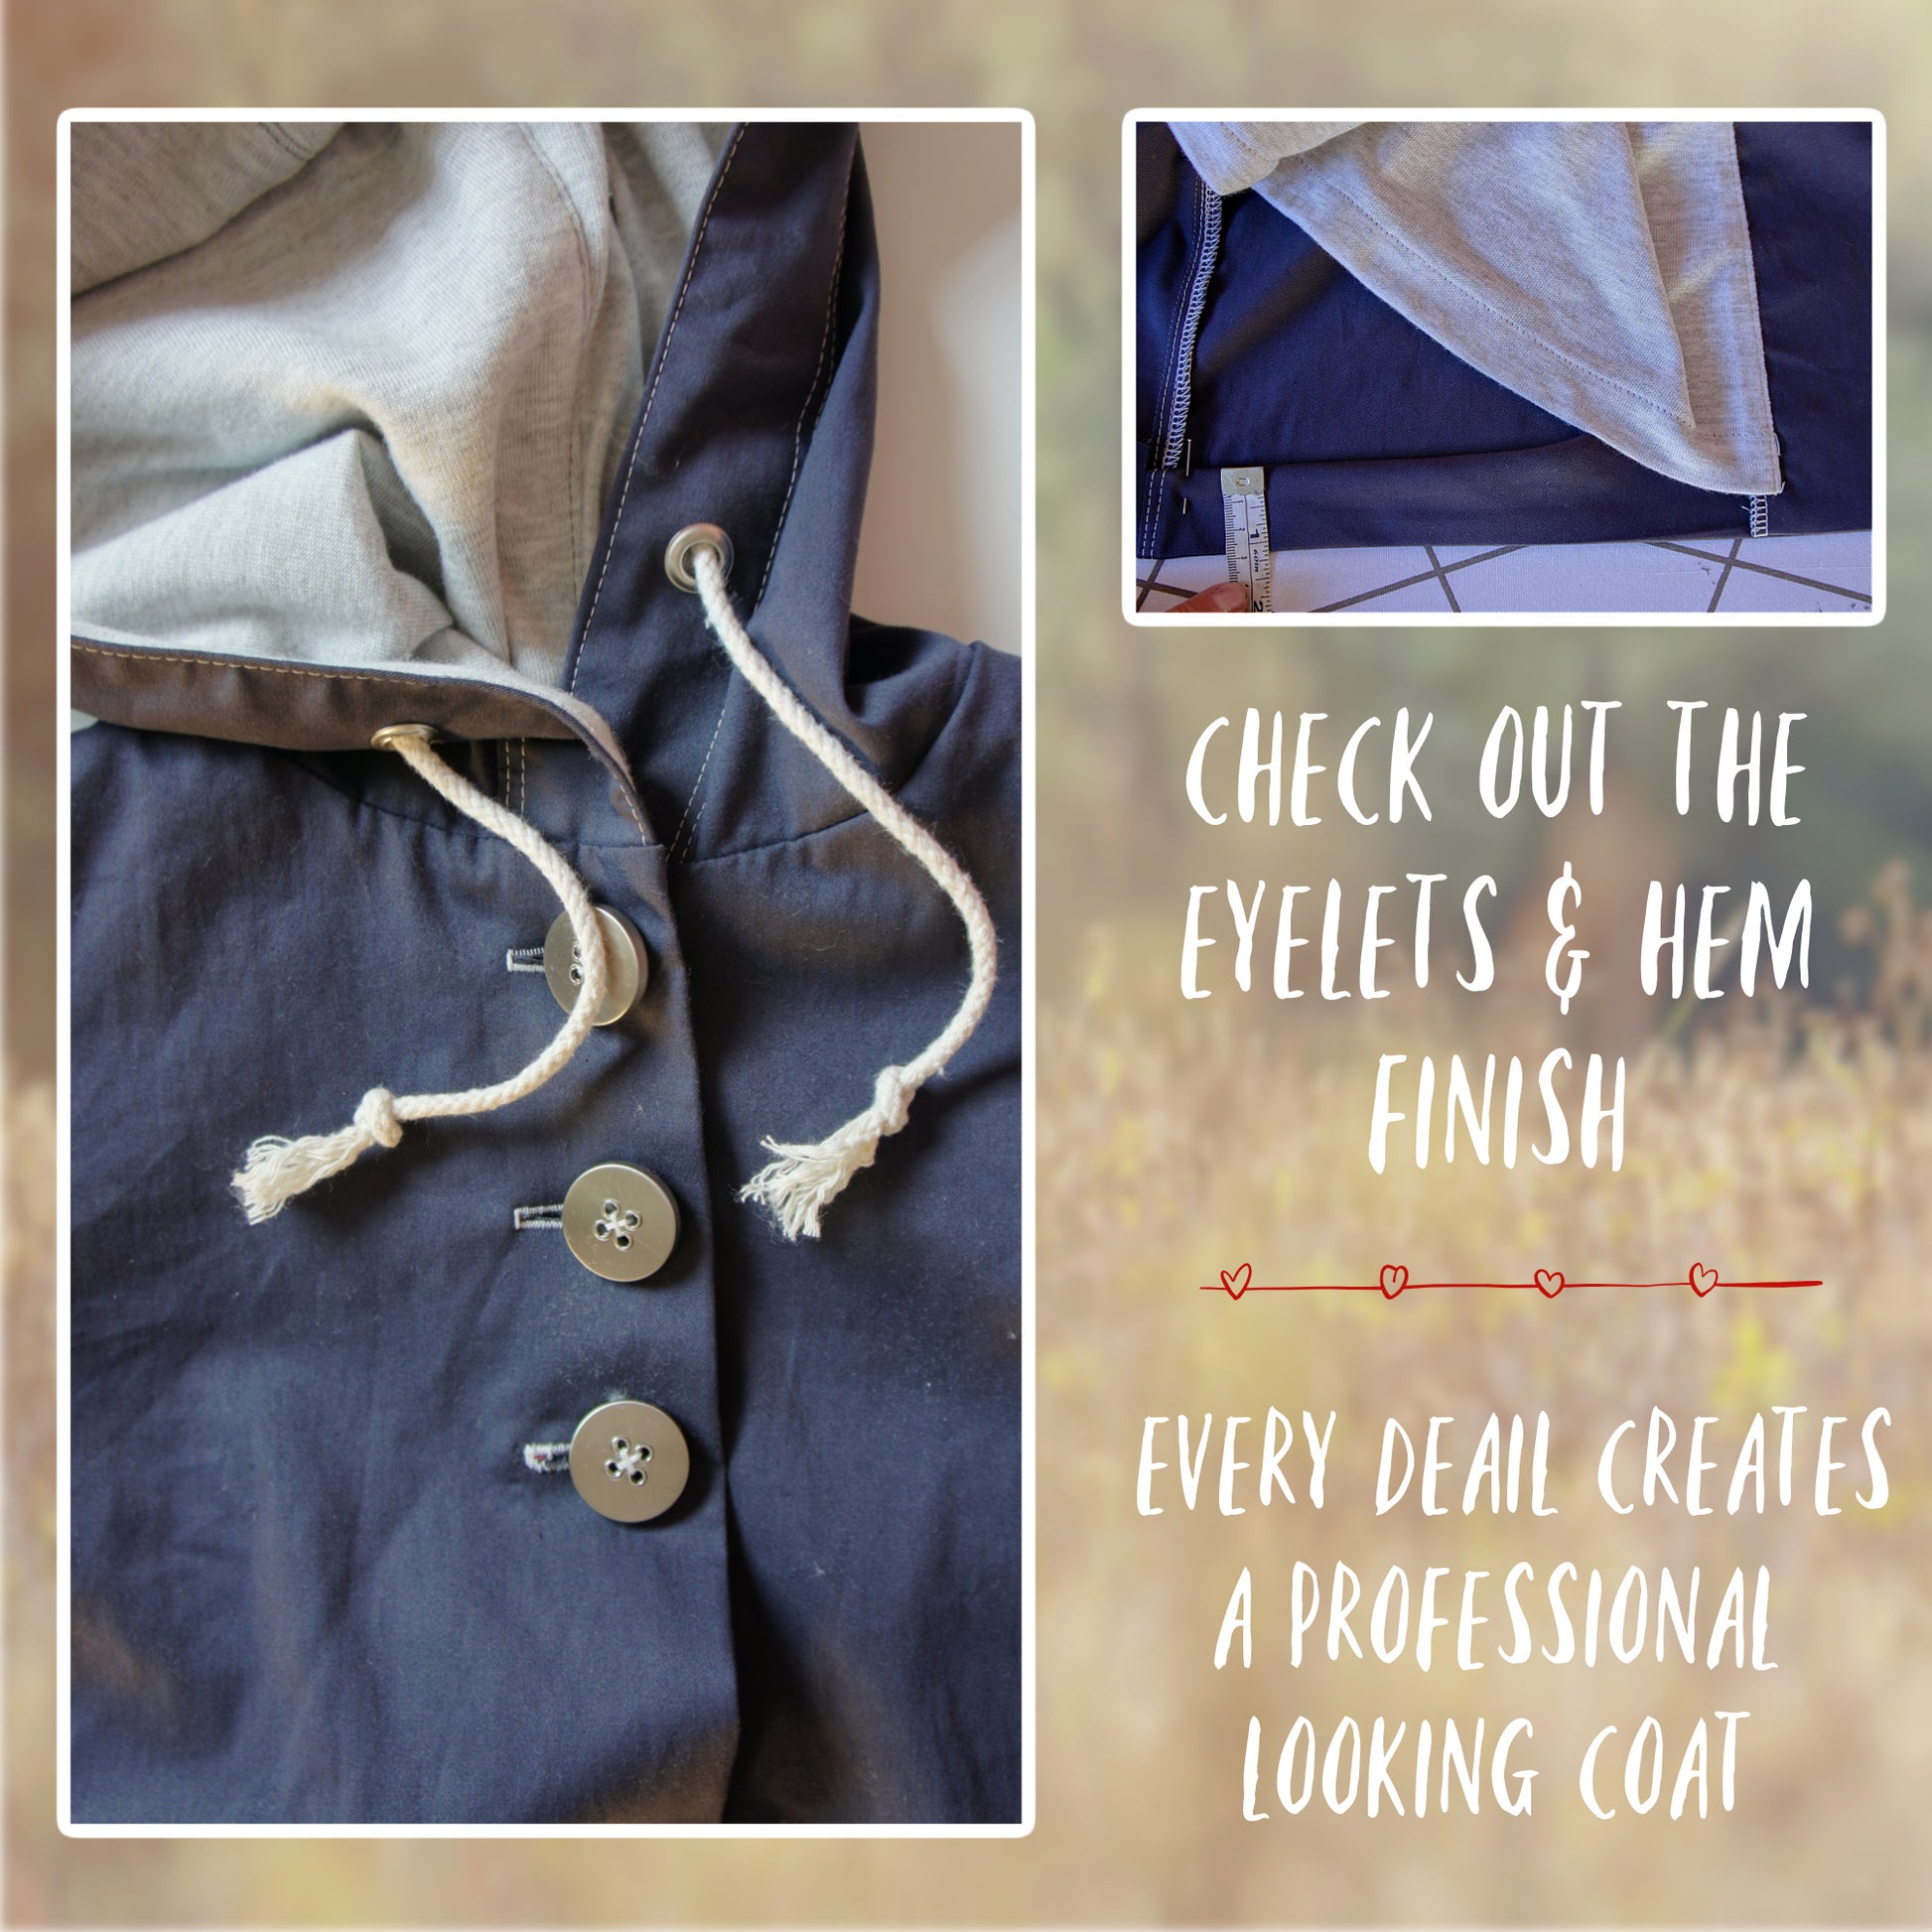
Take your hood outer fabric and lining, pin them together, and tuck in the edges. If you’re using eyelets, make sure everything aligns properly on both sides.

Topstitch around the edge using a longer stitch length and avoid stitching too close to the edge.

Next, sew the hood right sides together all the way around, making sure all edges align.

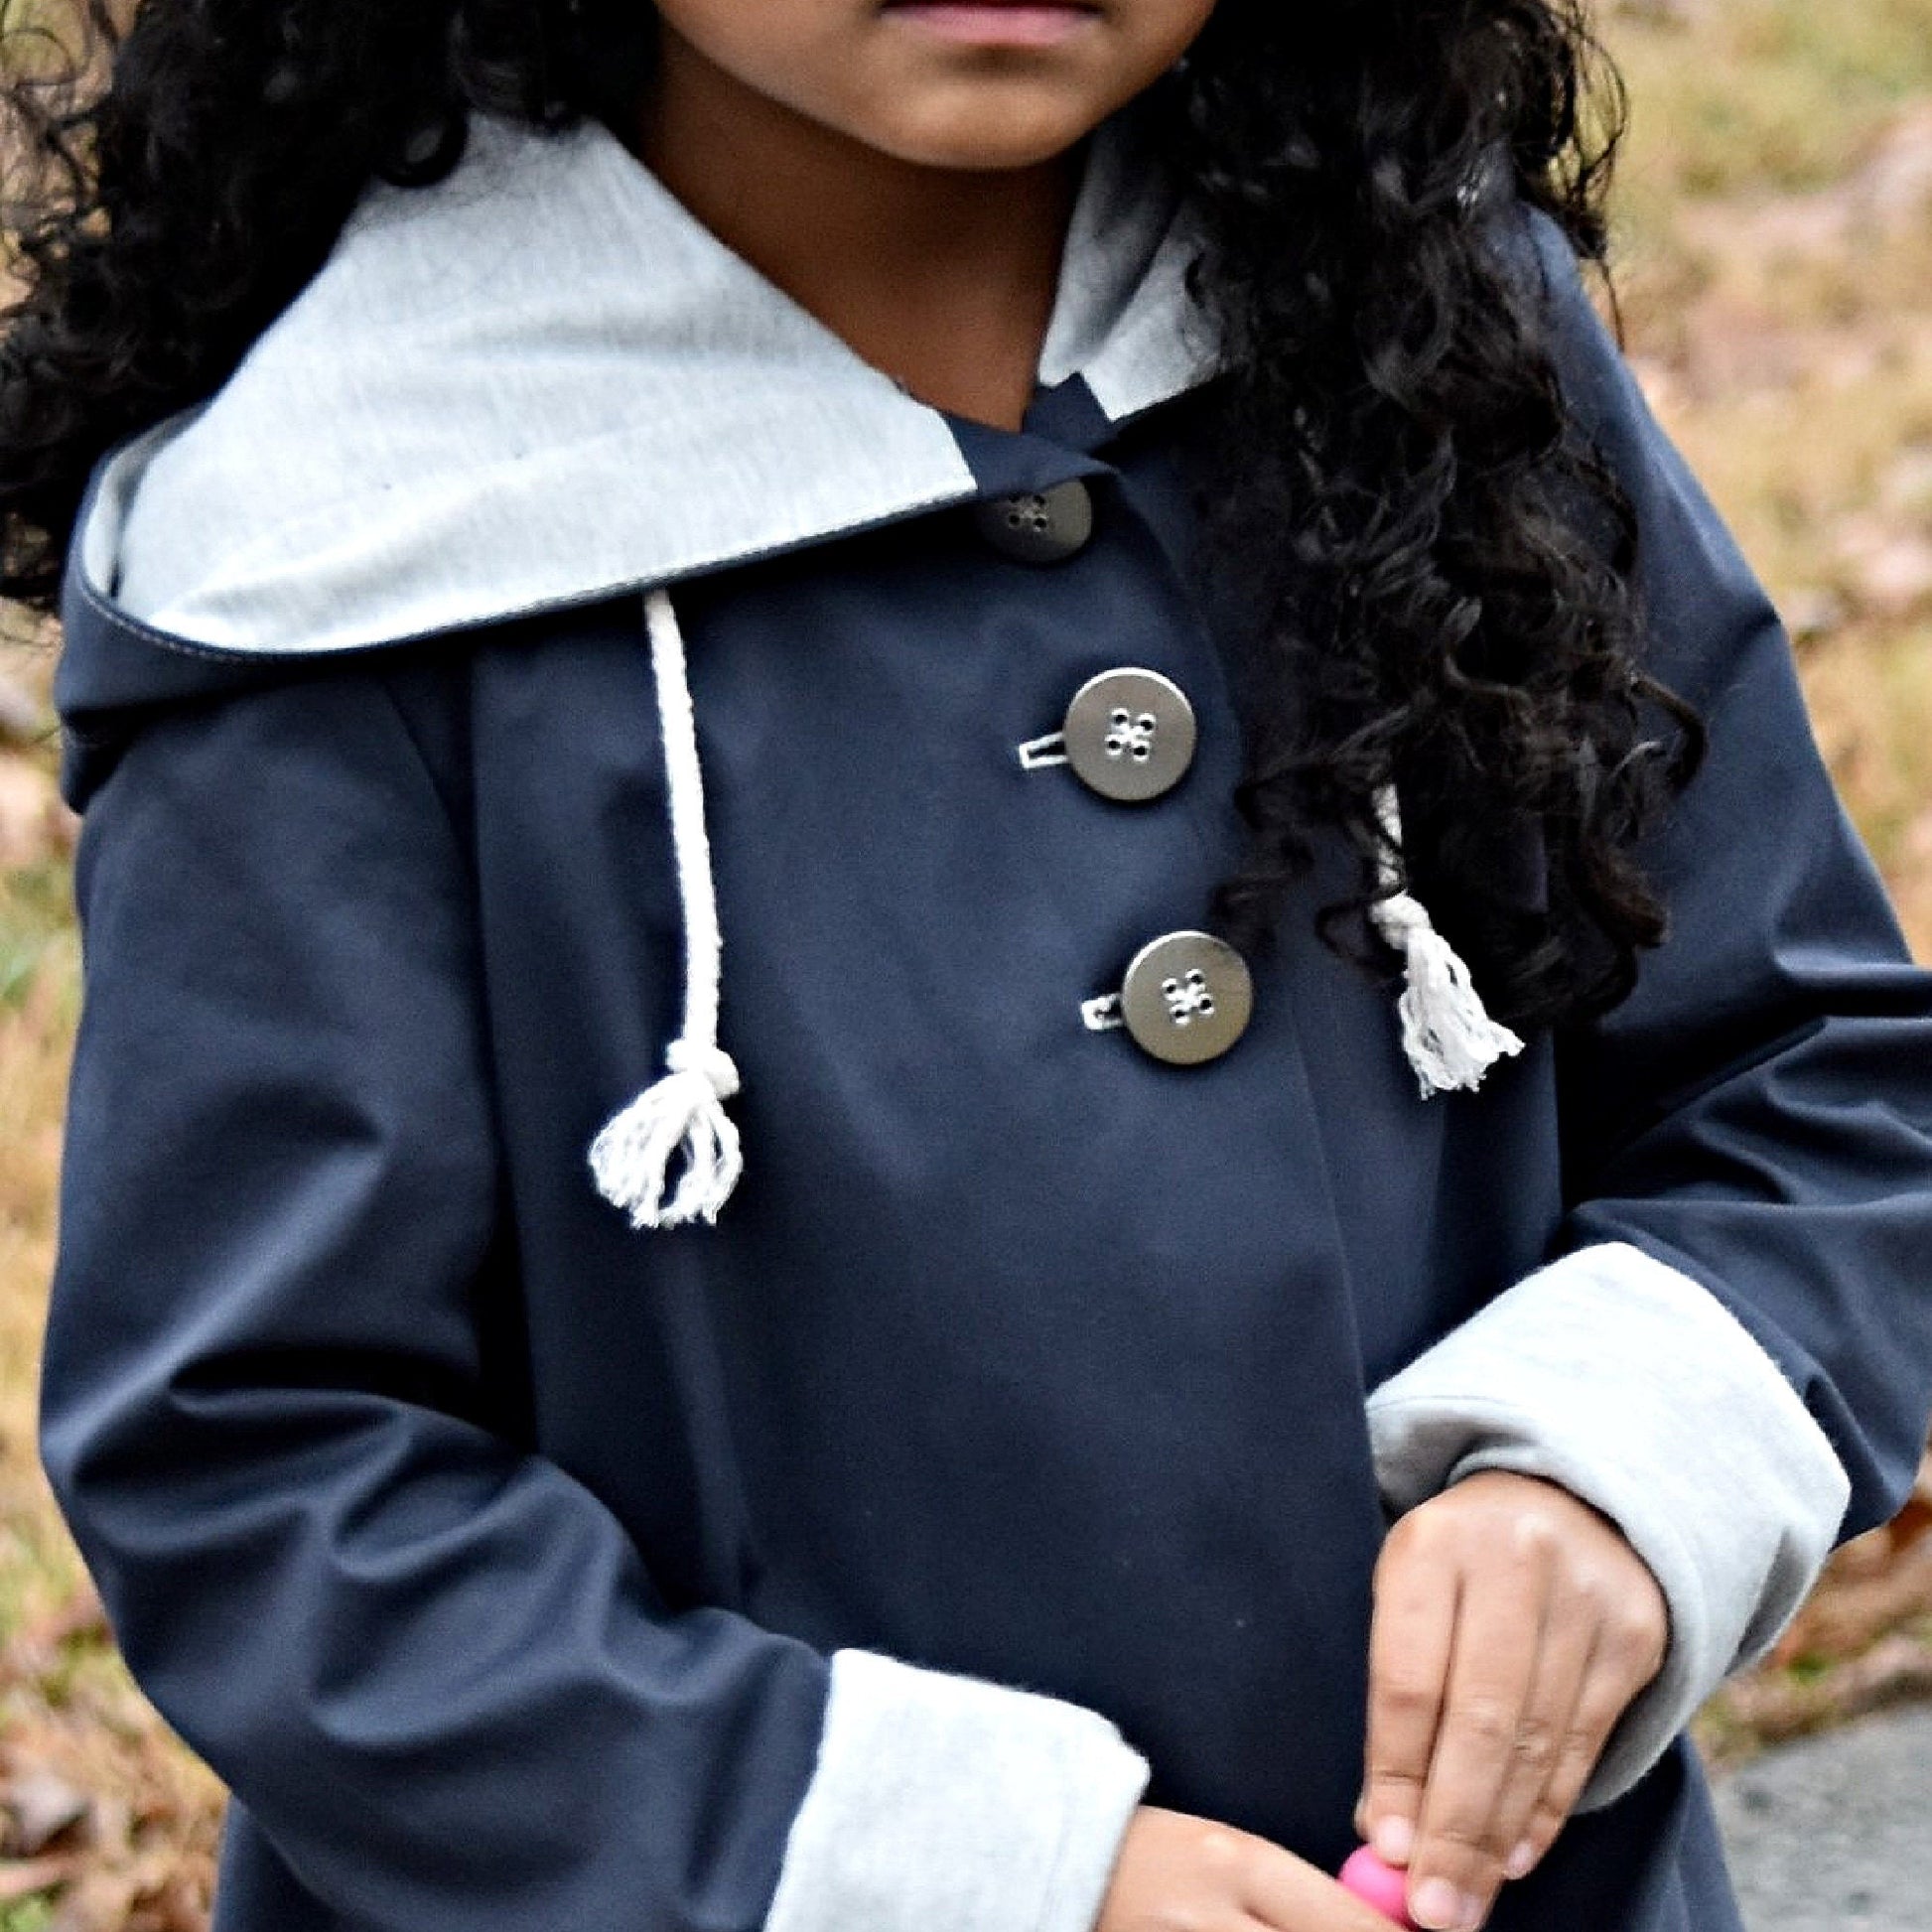
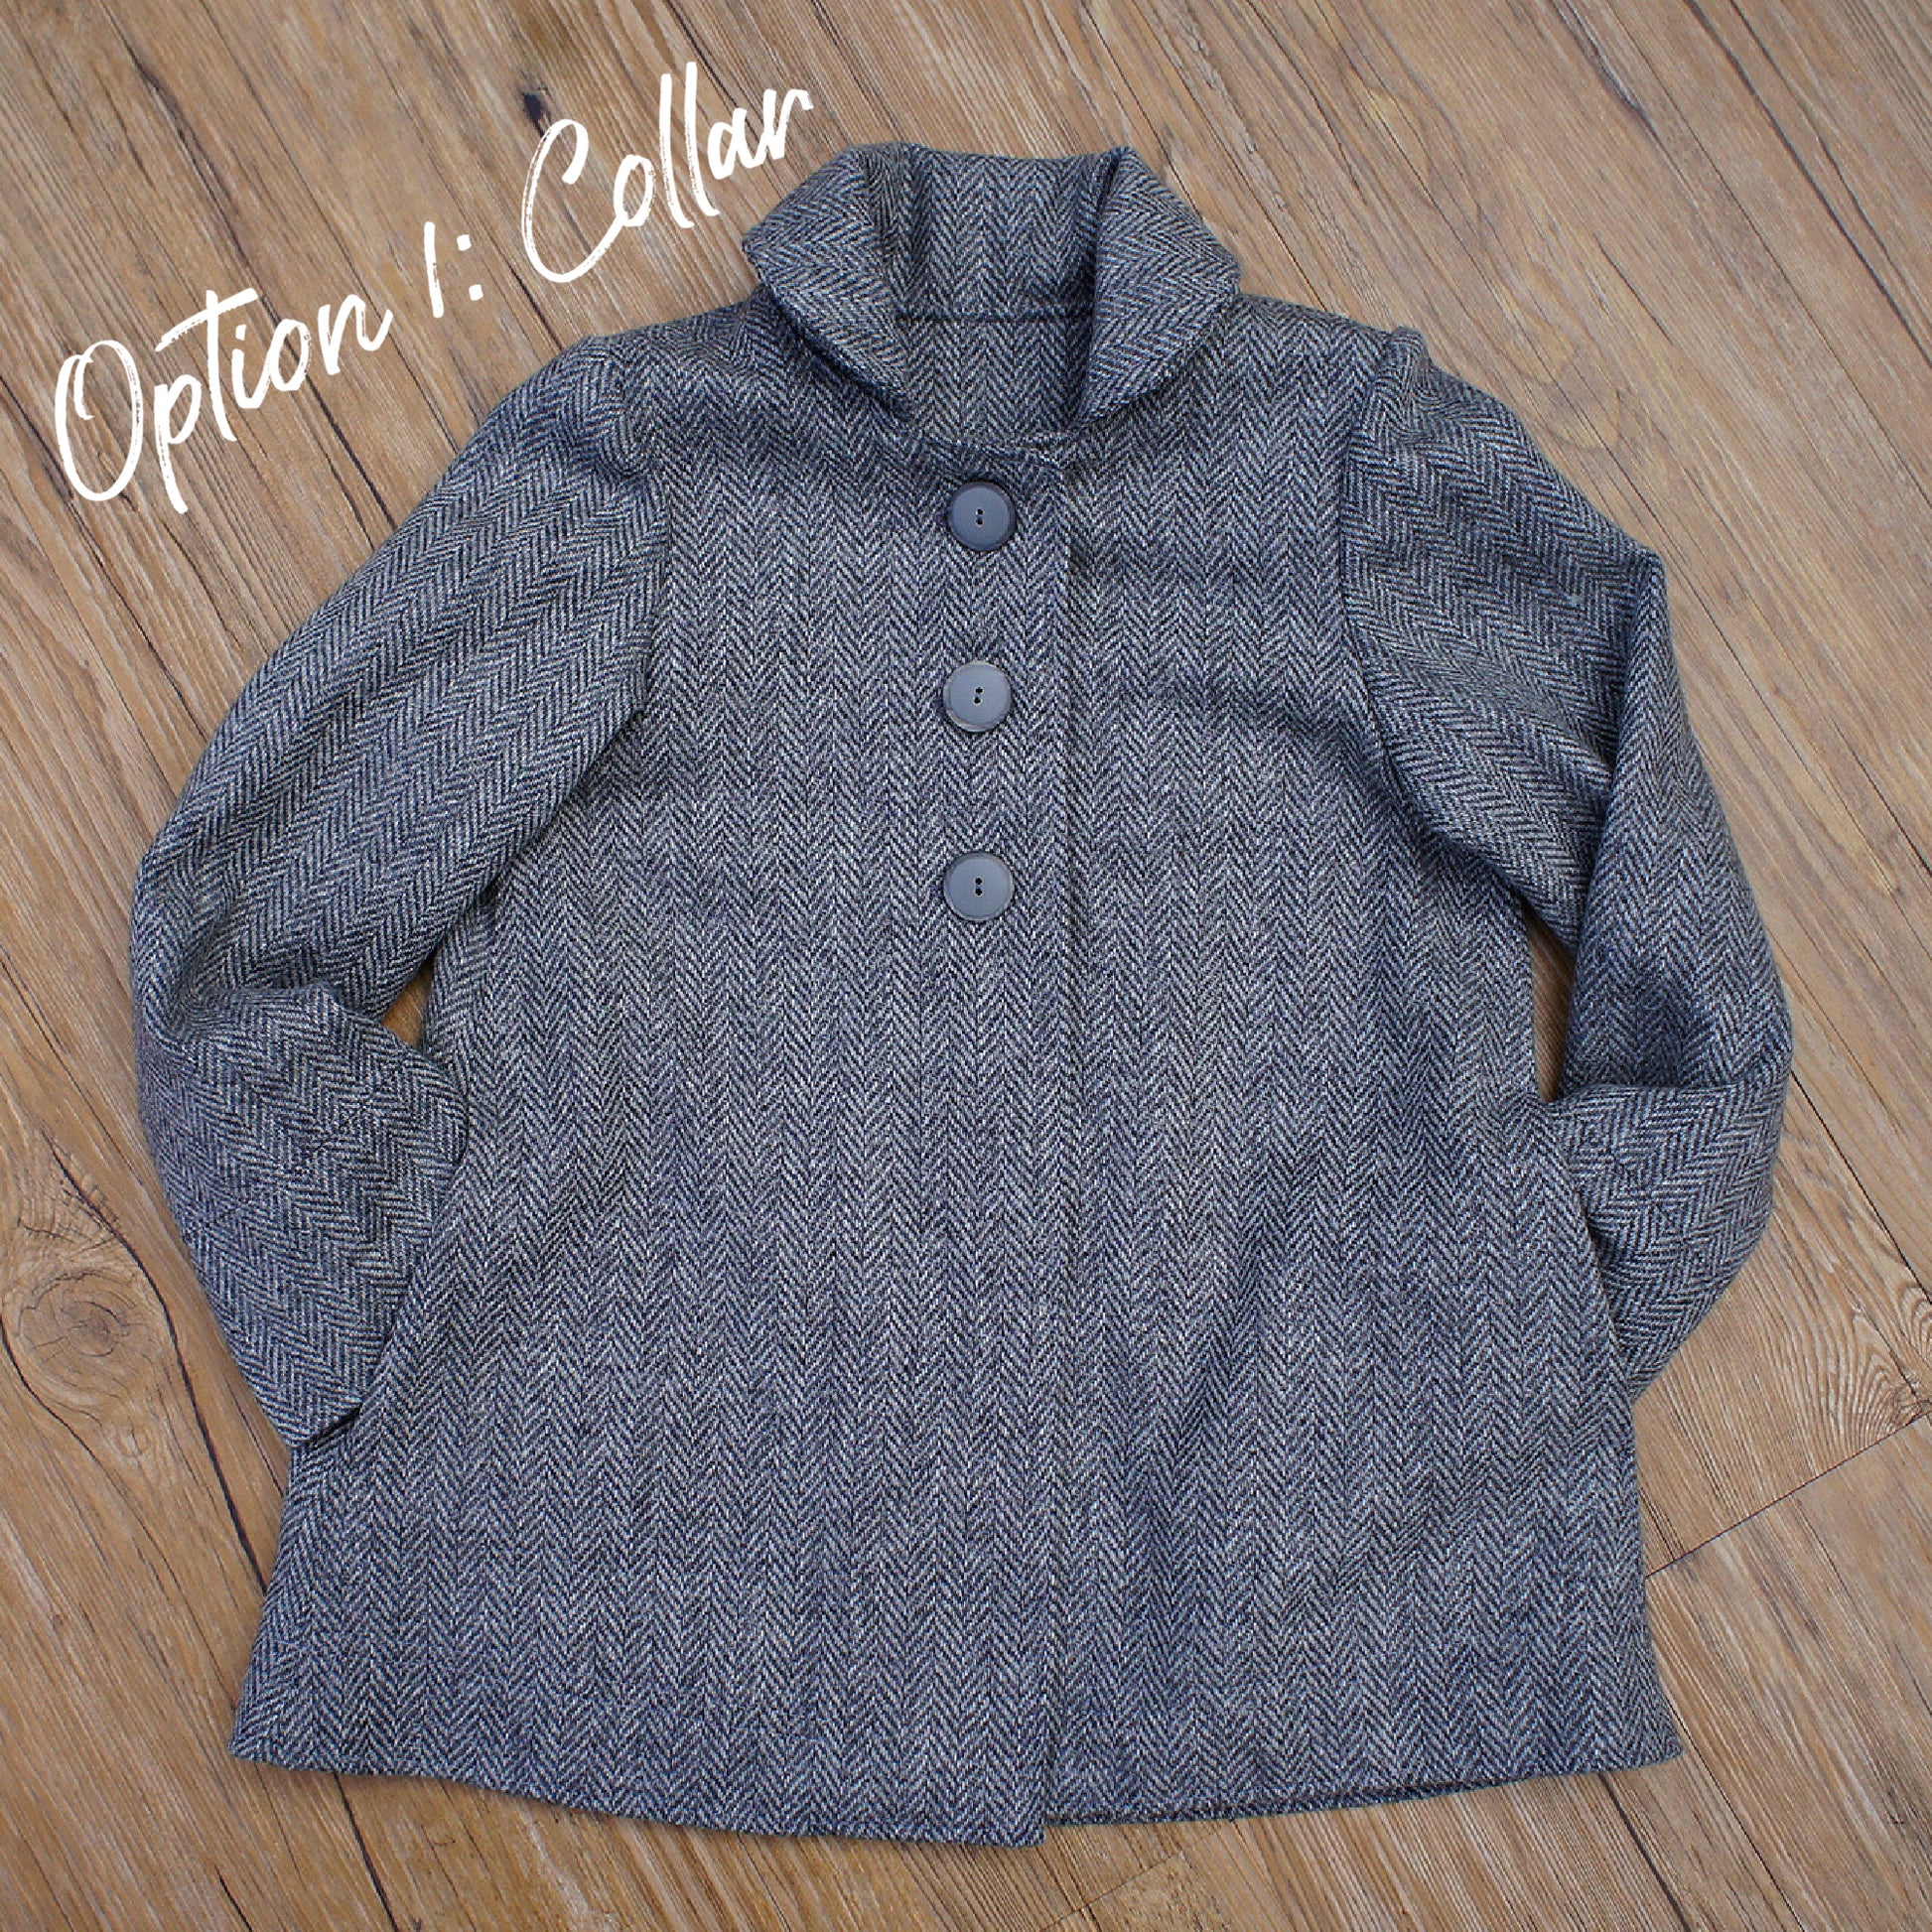
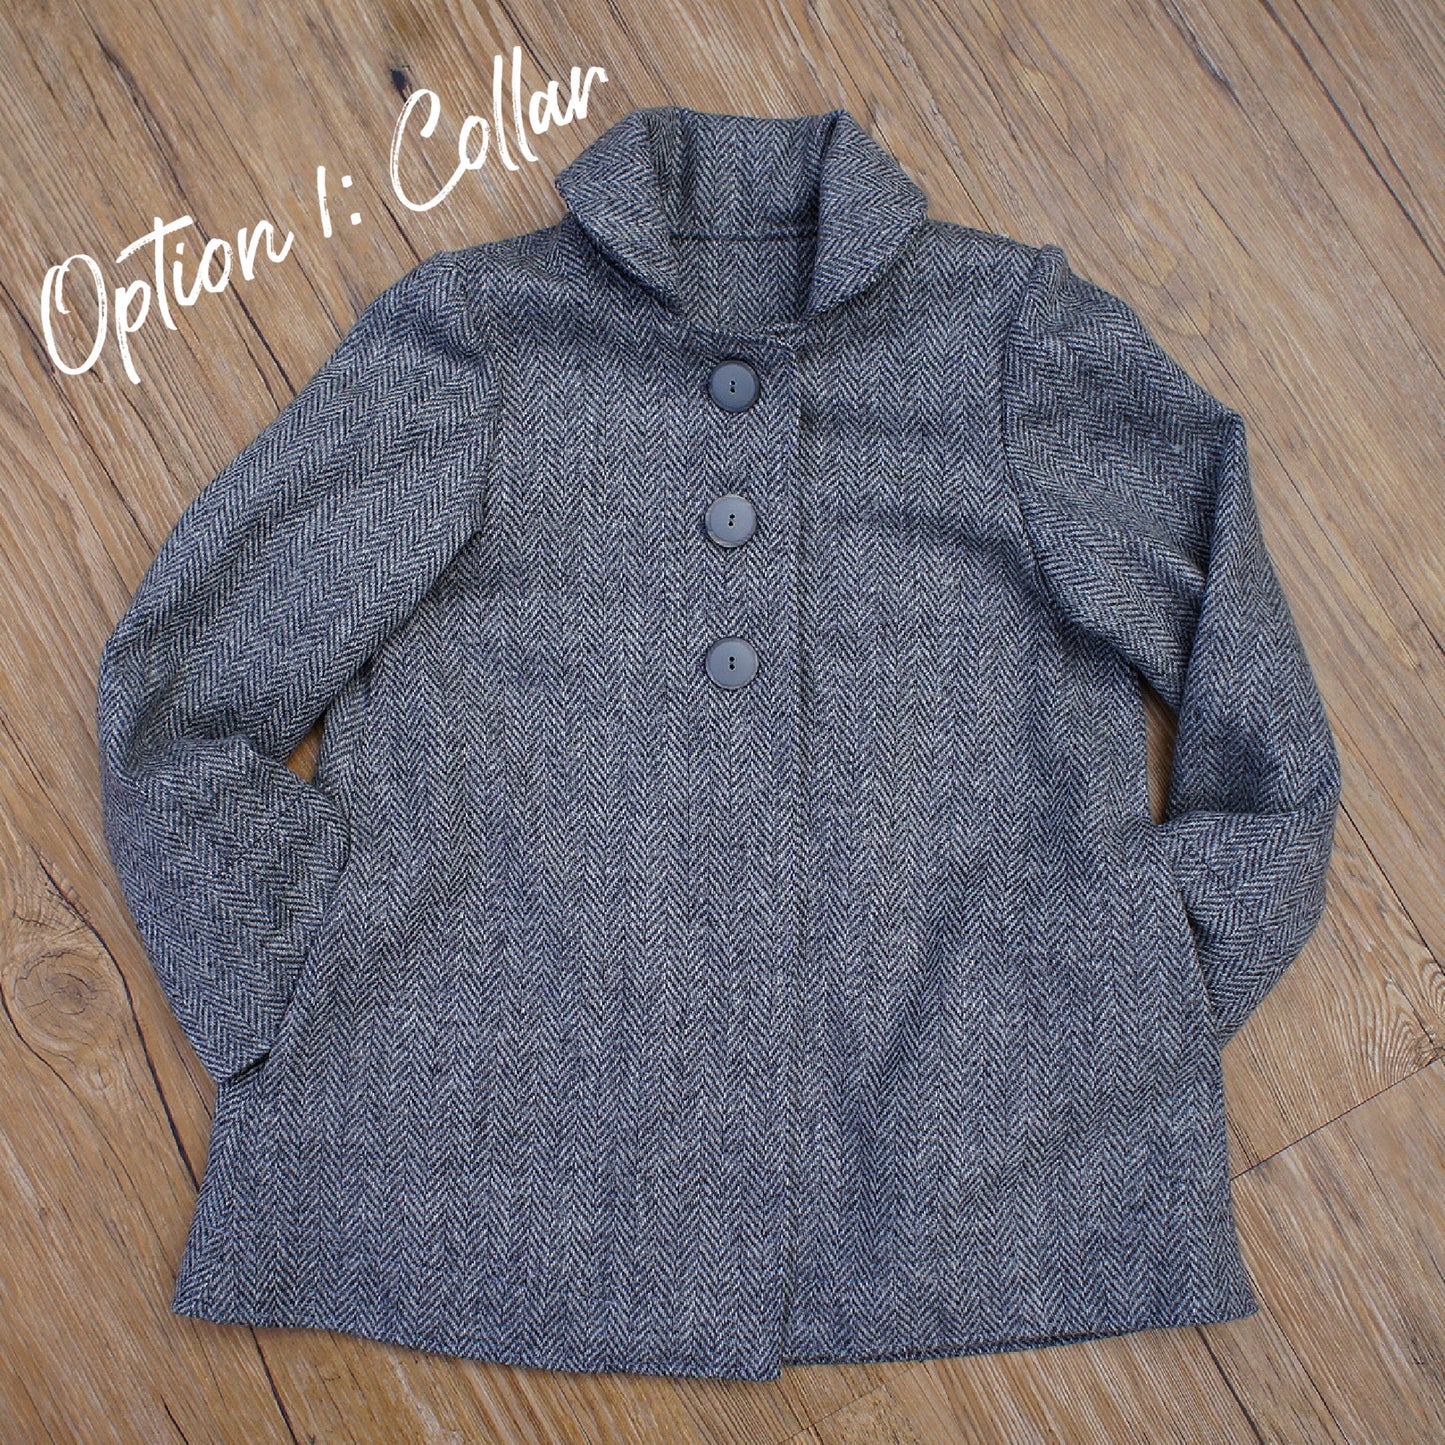
You can also make a collar instead of a hood if you prefer—it’s just as simple.

Installing the Eyelets

Mark where your eyelets will go, then fold over 1 cm at the seam allowance so the eyelet sits centered.

Cut the hole using your tool, then insert the eyelet pieces and secure them with a hammer or setting tool. Press everything afterwards so it sits flat.

Joining the Lining and Outer Fabric

Place the lining onto the outer fabric, right sides together, and sew.

This is why the eyelet needed that extra allowance. The fabrics shift slightly when layered. Use pins to prevent movement and avoid cutting off excess later, as this will distort the shape.

Now do under-stitching so the seam allowance stays inside the lining, then topstitch neatly along the edge.

Overlocking and Finishing

Overlock all edges carefully, especially around pockets. Turn corners slowly and disengage the knife when needed.

Sew sleeve seams right sides together, then press open. Repeat for the lining.

Attach lining pieces together at the side seams, then press again using an ironing cloth if needed.

Hem and Finishing Details

Overlock the hem and turn it up by 2.5 cm. Stitch it down from the wrong side using a guide on your machine.

Interface the side seams if needed, especially for soft fabrics, so pockets don’t stretch out over time.

Attach front lining to facing, matching snips, then sew with a 1 cm seam allowance.

Assembling the Coat

Now we join everything together.

Sew shoulder seams, then attach the back. You now have a complete coat shell.

Next, close the side seams, including around the pockets. Mark carefully where you turn into the pocket area, then continue sewing.

Overlock the lower edge and finish neatly.

Attaching the Hood

Place the hood into the neckline, matching notches and center points. Pin securely along the neckline.

Then place the lining over it so everything is sandwiched inside. Sew with a 1 cm seam allowance.

Snip seam allowances slightly to reduce bulk.

Hem Corner Detail

Fold the hem and mark a 4 cm corner. Sew along the line, adjust if needed for even length, then turn through.

Finish the hem with a slip stitch for a clean invisible finish.

Constructing the Sleeves

Sew sleeve seams right sides together.

Ease the sleeve head using gathering stitches or steam. Insert into the armhole, matching notches and seams. Repeat for lining.

Attach cuffs by sewing right sides together, then turning through.

Buttonholes and Finishing

Mark button positions and sew buttonholes. Open carefully with a seam ripper.

Attach buttons securely, making sure to create a thread shank so the fabric sits properly under the button.

Closing

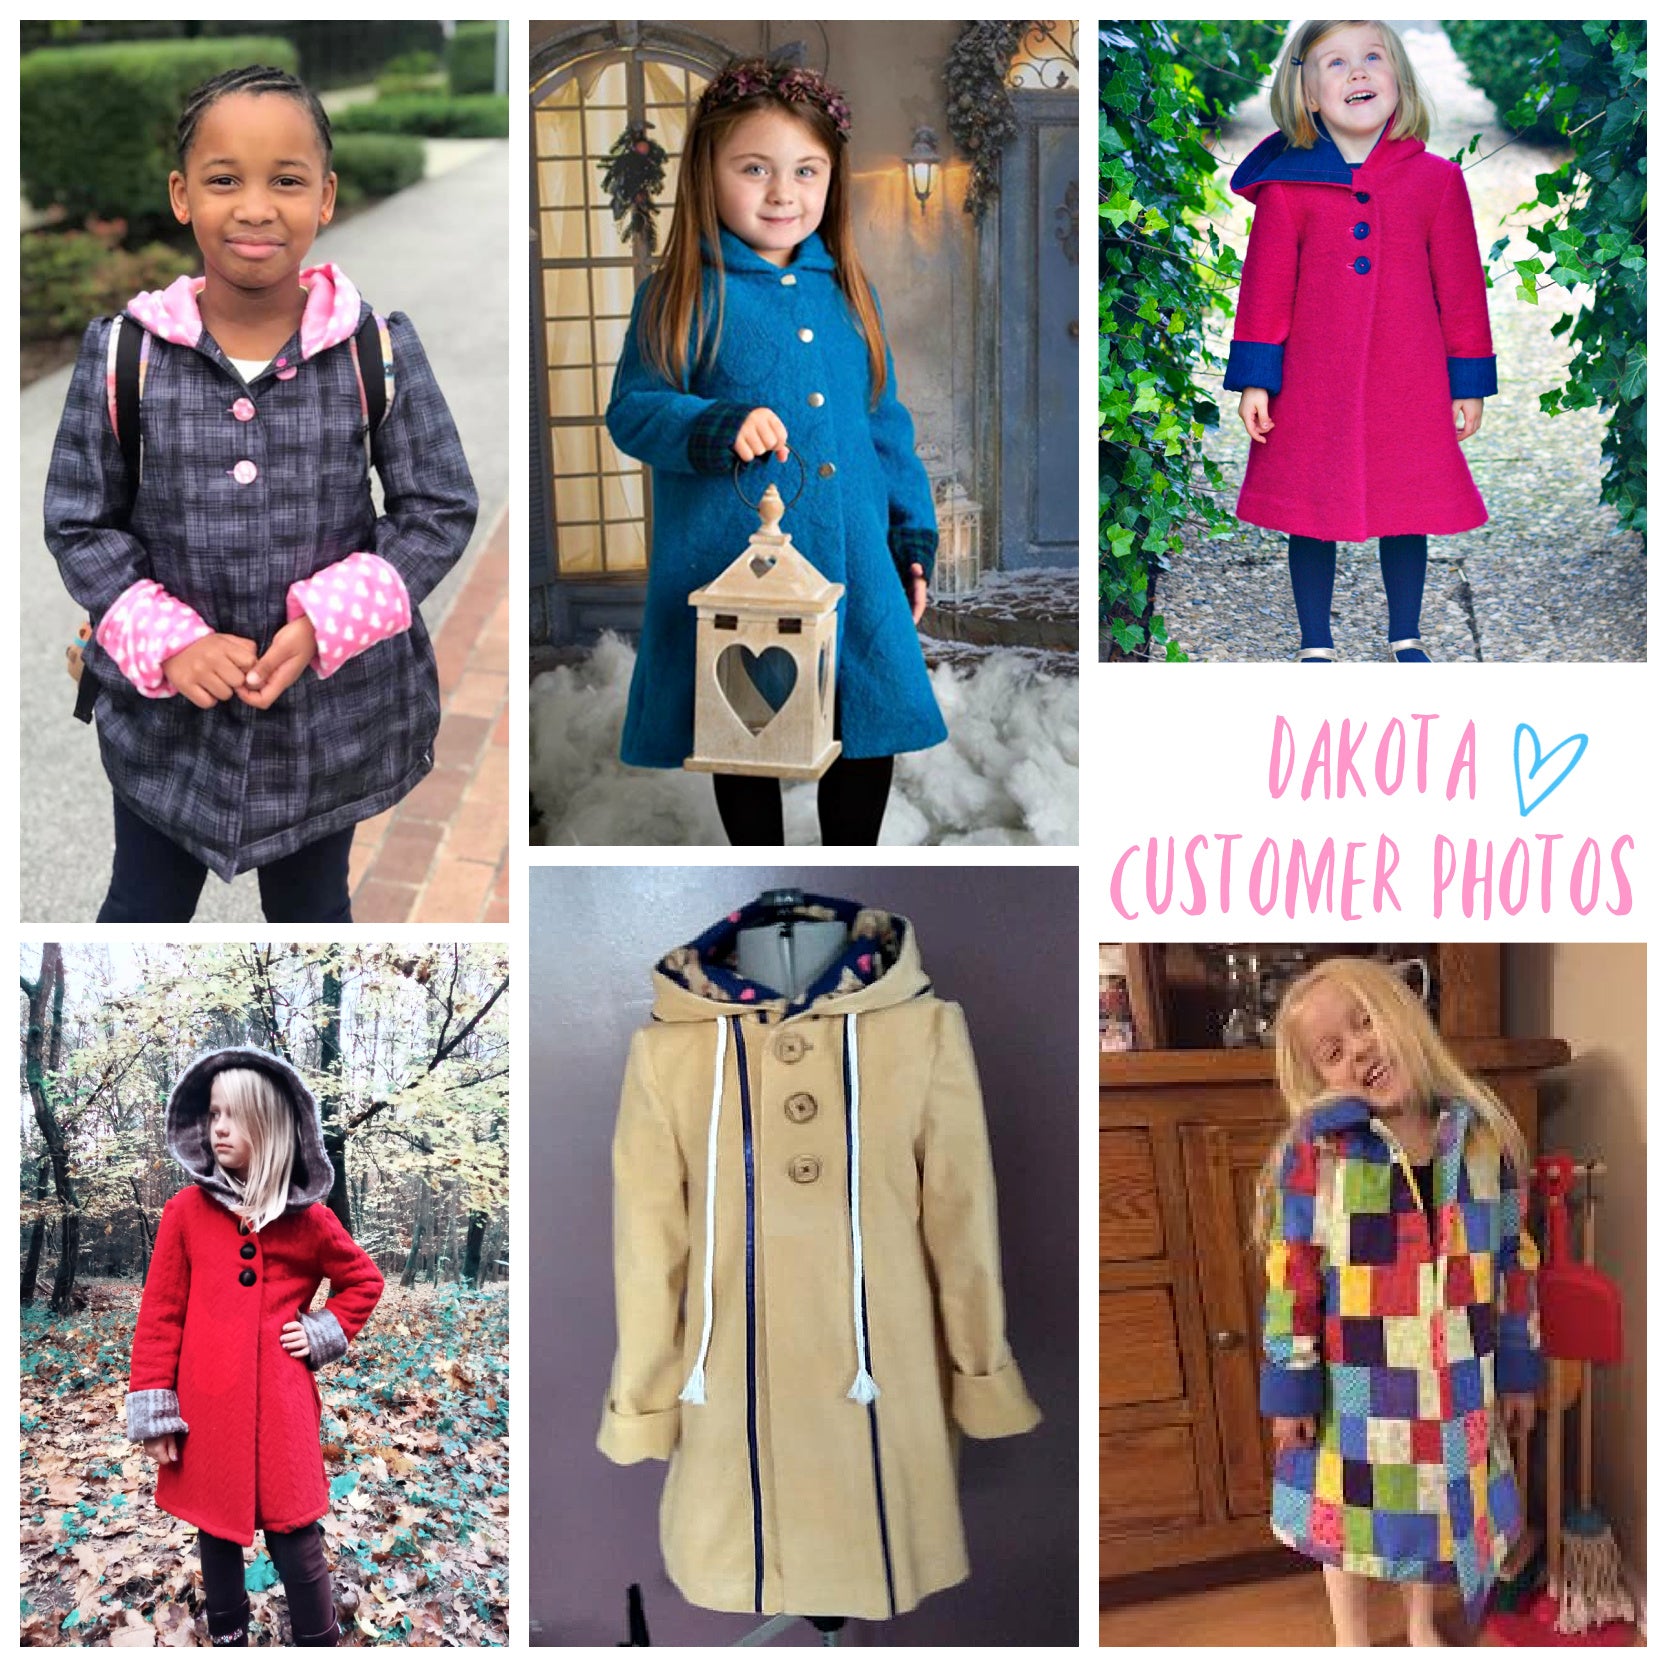
And that’s the Dakota coat finished. You can make it with a hood or a collar, and there are plenty of variations in the full pattern and video playlist.

Thanks for watching, and I’ll see you next time.

Transcript for the video: Dakota Pea Coat - Without Lining & Collar

Materials & Pattern Pieces

Hi everyone, this is Marina from Frocks and Frolics, and I’m going to show you how to sew the Dakota coat without a lining.

For this project you will need front pieces cut twice, the back cut once on the fold, sleeves cut twice, collar cut twice on the fold, cuffs cut twice on the fold, and the back facing cut once on the fold. The front facing is cut once and also used to cut the Vilene/interfacing.

You can also prepare optional elements like pockets from separate tutorials, but this version focuses on the main construction.

Preparation & Overlocking

Start by overlocking the shoulder seams and side seams. On the sleeves, overlock only the lower edge, and on the cuffs, overlock both sides.

Lay all pieces out neatly so everything is ready for assembly.

Constructing the Body

Begin with the shoulder seams and side seams. The back shoulder is slightly wider than the front, so ease it into the front shoulder using a 1 cm seam allowance.

You can often guide the fabric edge-to-edge without pins, but use pins if needed. As you sew down the side seams, gently ease the fabric to match the overlocked edges, especially for the spring version so the hem doesn’t become too tight.

Press seams open after sewing. Snip into curves where needed so everything lies flat, and reduce bulk at sharper points.

Bias Binding Finishing

Finish the front facing edge and back facing edge with bias binding. Place the shorter edge of the binding on top and the wider edge underneath so everything is caught cleanly.

Sew carefully, then press flat. This creates a much cleaner finish than simply turning and overlocking.

Facings & Collar Setup

Join the back facing to the front facings at the shoulder seams. Once sewn, the facing will naturally curve into shape.

Press seams open and check everything lies flat. This structure will hold the collar later between the layers.

Collar Construction

Interface the undercollar with Vilene. Place the interfaced side up and the upper collar right sides together.

Sew from the interfaced side for better control. Use stitch length 2 on straight sections and reduce to stitch length 1 at corners.

After sewing, clip corners carefully and trim seam allowances in stages. Turn the collar through and press so the edges stay sharp and clean.

To help the collar roll properly, push the upper collar slightly inward (around 3 mm) before finishing.

Attaching the Collar

Pin the collar into the neckline. The upper collar should face you. Match notches and shoulder seams carefully, and align the collar start point with the neckline seam allowance.

Check both sides are symmetrical before sewing. Stitch using a narrow seam allowance, then press.

Front & Facing Finish

Attach facings and ensure the neckline lies flat without puckers. Fold the facing over and stitch along the 4 cm hem allowance line.

Trim excess seam allowance after stitching so everything sits cleanly and flat.

Hem

Turn the hem up by 3 cm plus a 1 cm fold, or finish with a full 4 cm if you prefer bias or overlocking.

Sew evenly and press carefully to keep the line smooth.

Sleeves & Cuffs

Attach sleeves using a 1 cm seam allowance. Overlock seams and topstitch for a clean finish.

Add two rows of gathering stitches at the sleeve head. For cuffs, close the seam, attach to the sleeve, and ease in the gathers evenly before sewing.

Press carefully so the cuff sits neatly.

Inserting Sleeves

Pin sleeves into the armholes, starting with the underarm seam and shoulder seam. Distribute gathers evenly at the sleeve head.

Keep the lower sleeve area flat and only gather the top section. Sew carefully while adjusting gathers as needed.

Finishing Touches

Attach pockets securely to the facing if required. Topstitch the front edges and collar if not already done.

Add buttons with a small thread “stem” so the coat doesn’t pull when buttoned. Press lightly to finish.

Final Notes

This coat is highly versatile and works across different ages and fabrics. It can be adapted with a hood, lining, or different sleeve and collar variations depending on your version.

Thanks for watching, and I’ll see you next time!

Welt Pocket (Dakota Coat) Sewing Guide

Transcript for the video: Dakota Pea Coat - How To Sew a Welt Pocket

Hi everyone, this is Marina from Frocks and Frolics, and I’m going to show you how to sew a welt pocket. This pocket is part of my Dakota coat pattern, and it’s a really clean, professional finish once you know the steps.

Preparing the Fabric

Start by cutting out your pocket template.

Place the template on the wrong side of your fabric and mark the area where the interfacing will go. Iron on your Vilene/interfacing carefully so it sits exactly within the marked area.

Place the template back on top and mark the corners precisely. These marks define your stitching rectangle, so accuracy is important here.

Marking the Pocket Opening

Turn the fabric to the right side and place the template again in the same position. Mark the pocket opening clearly.

Take the small lip piece, fold it in half lengthwise, and lightly crease it. Place it centrally over the marked opening and pin it securely.

Once everything is aligned, remove the template.

Stitching the Welt Opening

Turn the fabric to the wrong side. Using a small stitch length (1 to 1.5), sew exactly around the rectangle you have drawn.

Start at the top or bottom, but do not backstitch at the beginning. Instead, overlap your stitches slightly at the end to secure them neatly without creating bulk.

Keep your needle down when turning corners for accuracy.

Cutting and Turning the Welt

Cut open the pocket through the center of the rectangle, stopping about 1 cm before the edges.

Cut carefully into the corners without clipping the stitches.

Push the lip fabric through to the inside and turn it neatly. Press so the welt forms a clean, even edge. This creates a sharp, structured opening.

Securing the Pocket Bags

Fold the upper pocket bag down and stitch it to the welt seam allowance using a 1 cm seam allowance. Then overlock the edge for a clean finish.

Repeat the same process for the lower pocket bag, aligning both sides so they finish evenly. Trim if necessary for symmetry before stitching.

Topstitching the Pocket

Secure the top area so no fabric gets caught during stitching.

Topstitch around the pocket opening using a longer stitch length (around 3 to 3.5), sewing about 1–2 mm from the edge for a clean, professional finish.

You can either backstitch at the ends or pull threads through to the underside and knot them for a cleaner look.

Do this in two stages so you don’t accidentally catch the upper pocket bag.

Closing the Pocket

Pin the pocket bags together neatly, then stitch around the full pocket edge using a 1 cm seam allowance. A slightly longer stitch length (around 2.5) works best here.

Overlock the raw edges to finish.

Some makers prefer to stitch the pocket directly onto the garment front before closing it—both methods are fine depending on your preference.

Final Finish

Give the pocket a good press and remove any stray threads. The welt should now sit flat and clean with a professional finish.

And that’s it—the welt pocket is complete. It may look advanced, but once you break it down into steps, it’s very straightforward and incredibly satisfying.

Transcript for the video: Dakota Pea Coat - Bound Buttonhole

Hi everyone, this is Marina from Frocks and Frolic, and today I’m going to show you how to make a welt buttonhole. It works like a tiny welt pocket and is used here on the Dakota coat, with a facing on the inside.

Preparing the Template and Fabric

Start by cutting out the buttonhole template. If you want a larger buttonhole, you can slightly enlarge it, but the pattern will typically give you around 2.3 cm.

Fold the fabric along the center front and mark the buttonhole positions on both the outer fabric and the facing. The facing opening should be slightly smaller than the outer buttonhole so the button can pass through smoothly.

Interfacing and Marking

Apply lightweight iron-on interfacing to the facing area and also a strip where the buttonhole lips will sit. This stabilizes the fabric and prevents fraying.

Place the template and carefully mark the corners and guidelines. On the outside, use a fabric marker; on the inside, a pencil works better since it won’t show later.

Draw the horizontal and vertical lines precisely. Accuracy here is important because all buttonholes need to align consistently.

Cutting and Preparing the Lips

Cut the lip pieces slightly larger than the opening (for example, around 4 cm by 7 cm). These will form the visible part of the buttonhole.

Pin them carefully in place, making sure not to catch them with the machine needle later.

Stitching the Buttonhole Rectangle

Set your stitch length to 1 or just above. Sew around the rectangle slowly and accurately.

Instead of reversing at the start and end, you can stitch around and slightly overlap your starting point to avoid bulky corners.

Cutting Open and Turning Through

Cut the centre opening carefully, stopping short of the stitching and clipping into the corners without cutting through the stitches.

Push the fabric through to the back and form the lips. This is the same principle as a welt pocket.

Pressing and Shaping

Press the lips neatly into place. You can press them together or apart depending on fabric thickness.

Check the front side to ensure the opening is clean and even, then test with the button to confirm it passes through smoothly.

Securing the Ends

Fold and stitch the small triangle corners at the ends of the buttonhole to lock everything in place. A small stitch length of around 2 works well here.

Top Stitching the Buttonhole

Trim any excess fabric and top stitch around the buttonhole for a clean, tailored finish. This also reinforces the structure.

Adding the Facing Opening

You can now repeat the same opening process on a lightweight backing or facing layer. This ensures the inside aligns properly with the outer buttonhole.

Cut, turn through, and press so everything sits flat and neat.

Final Check and Finishing

Fold the centre front to check alignment. Make sure the buttonhole sits correctly and matches on both sides.

Slip stitch the facing if needed and give everything a final press. The result should be a clean, professional welt buttonhole that looks like a tailored coat detail.

Closing

And that’s it—your welt buttonhole is complete. It looks neat on both sides and gives a very high-end finish to your garment.

YOU MAY ALSO LIKE