

VIRGINIA BLUSE
VIRGINIA BLUSE


Verfügbarkeit für Abholungen konnte nicht geladen werden
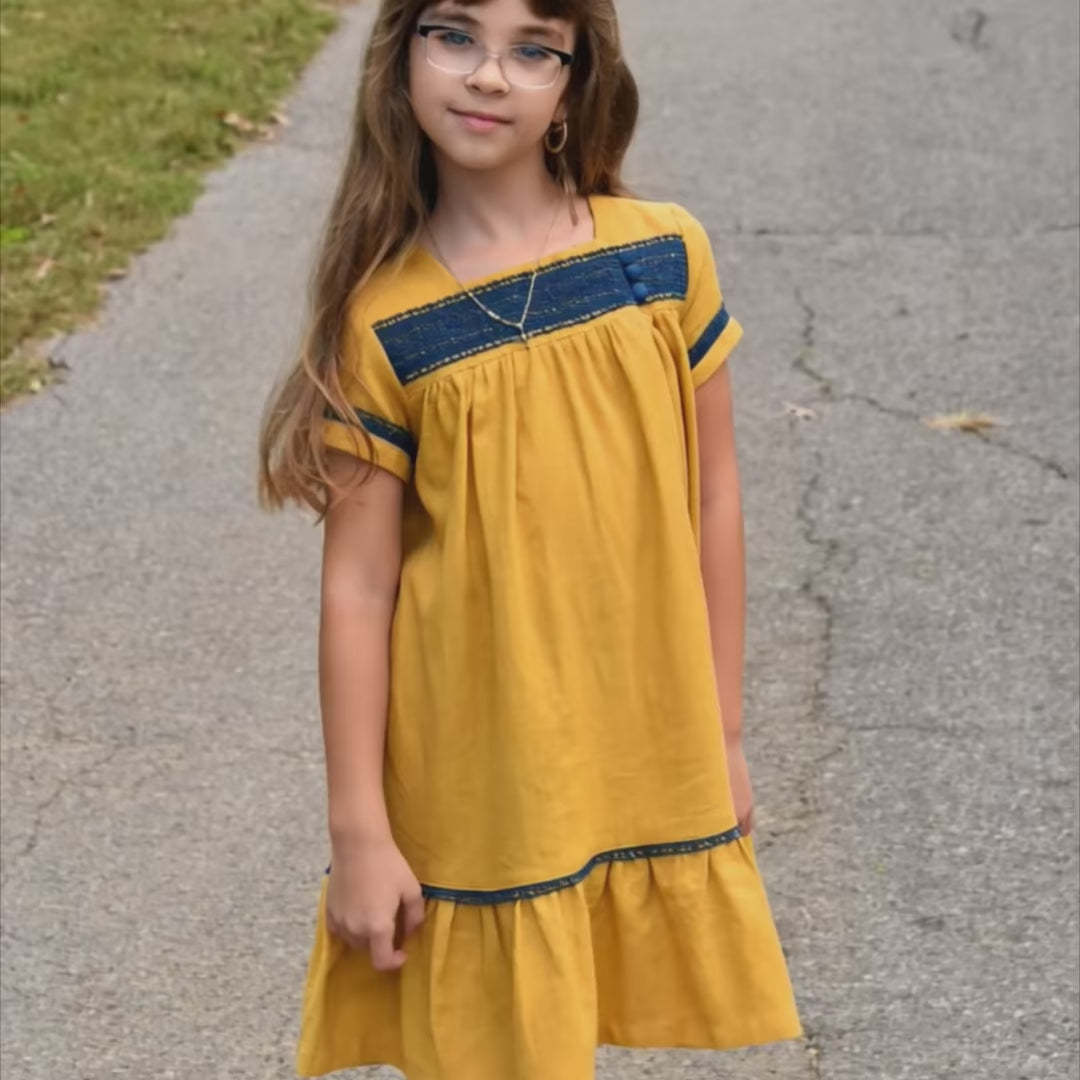
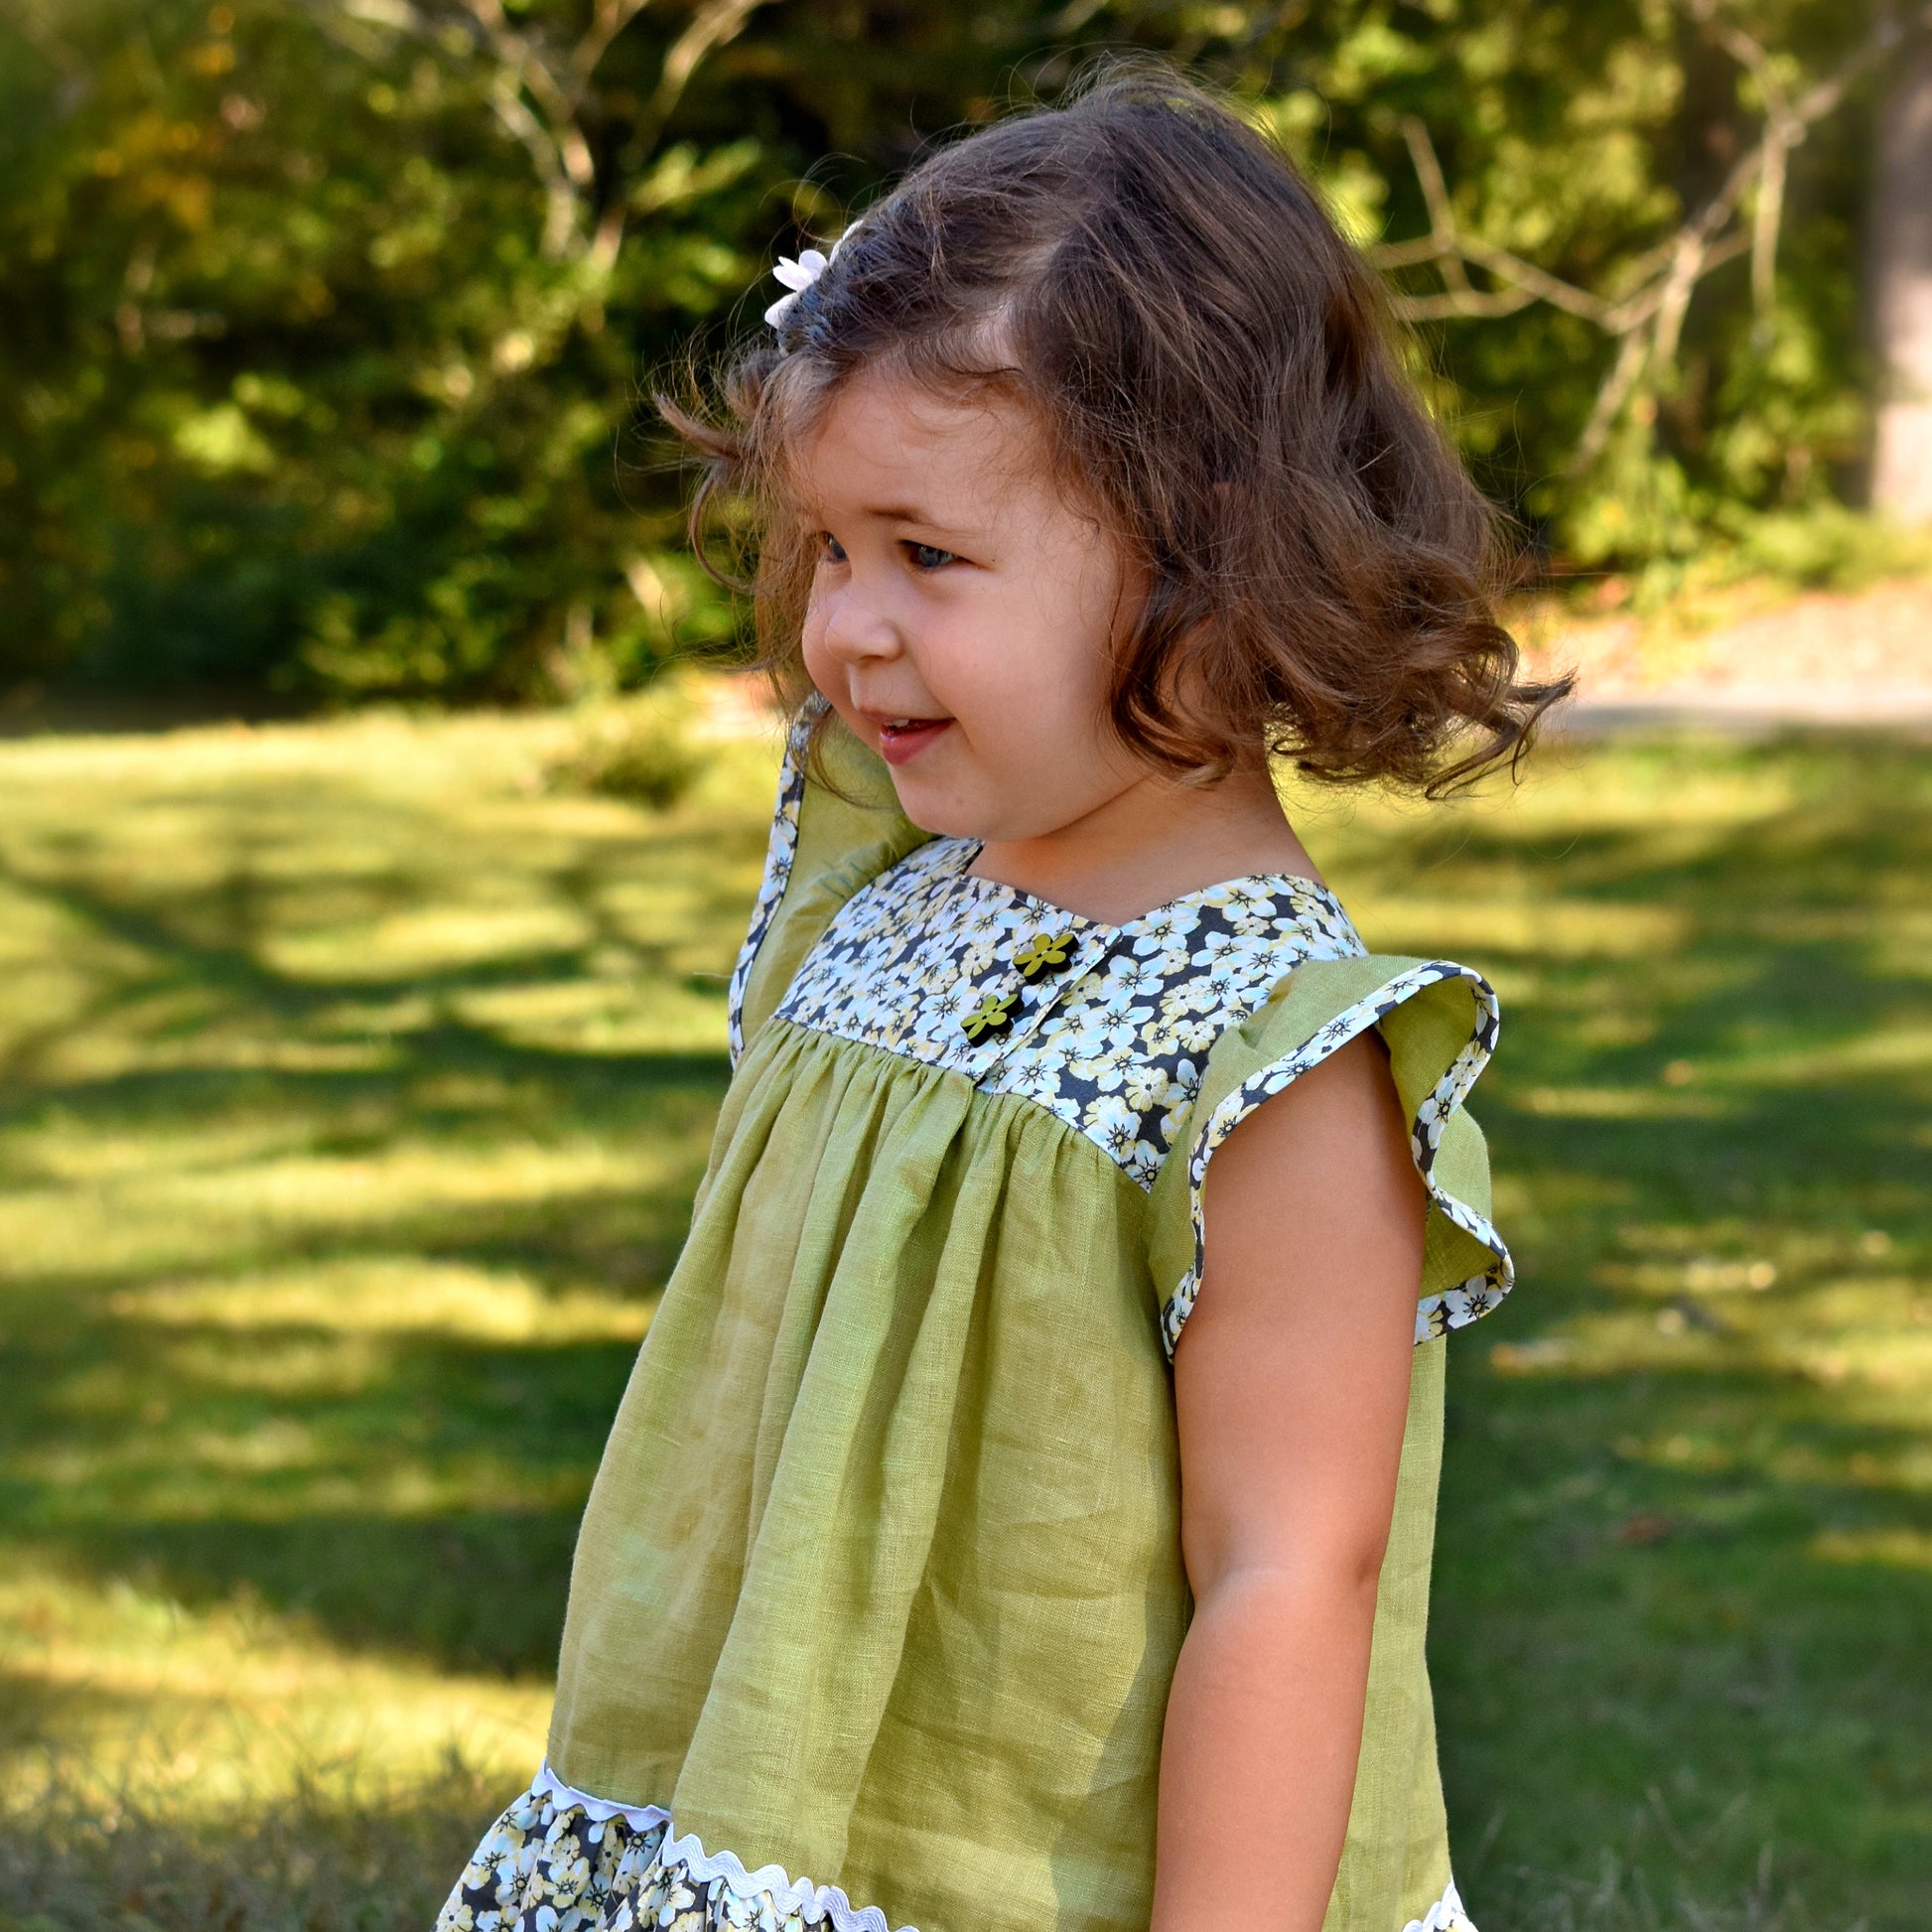
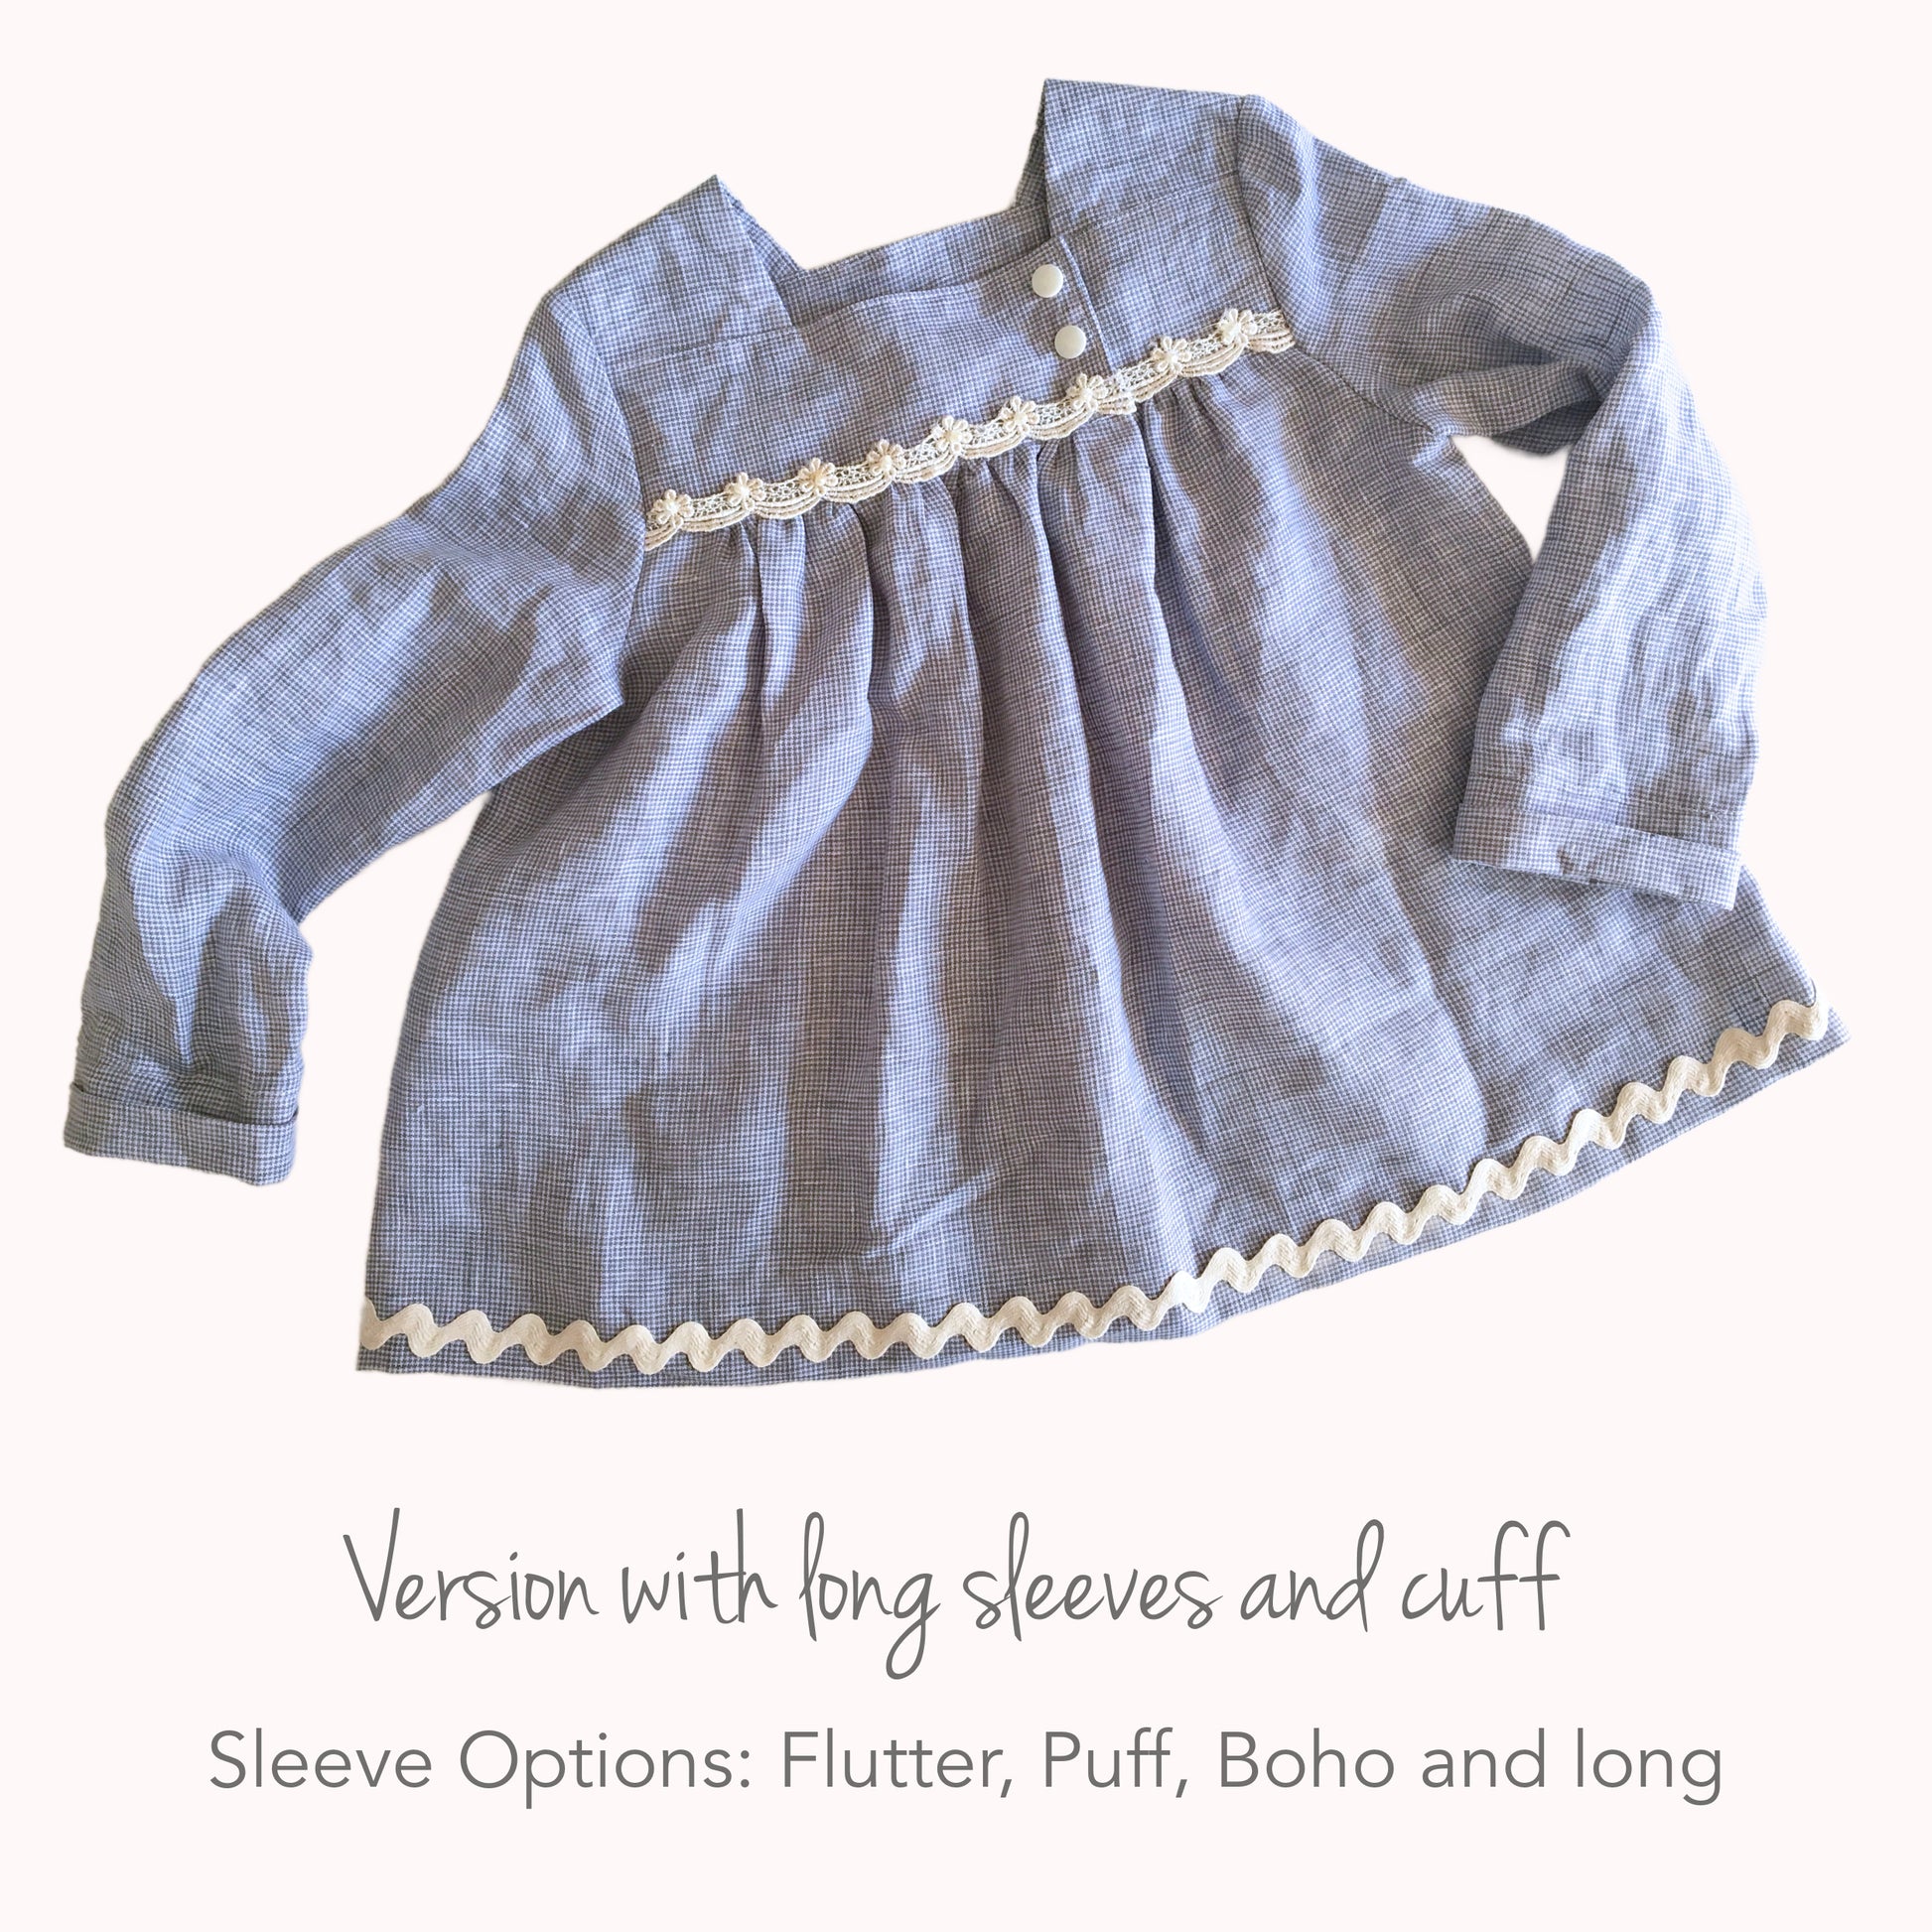
Virginia ist ein wunderschön gearbeitetes Blusen Schnittmuster für Mädchen im Vintage-Stil, mit einem kurzen Oberteil und einem leicht eingereihten Rock, der genau diese romantische Silhouette zaubert, die wir alle lieben. Du kannst das Kleid mit Flügelärmeln, kurzen Ärmeln oder Puffärmeln nähen.
Zusätzlich zum Video-Nähkurs bekommst du einen Bonus‑Sew‑Along, in dem Marina dir weitere Ärmelvarianten und hübsche Rock Optionen zeigt.
Was ist beim Schnittmuster dabei?
Was ist beim Schnittmuster dabei?
- Sofort-Download
- Digitale PDF Schnittmuster
- DIN A4 Format
- eBook
- Schritt für Schritt Video-Anleitungen
Design
Design
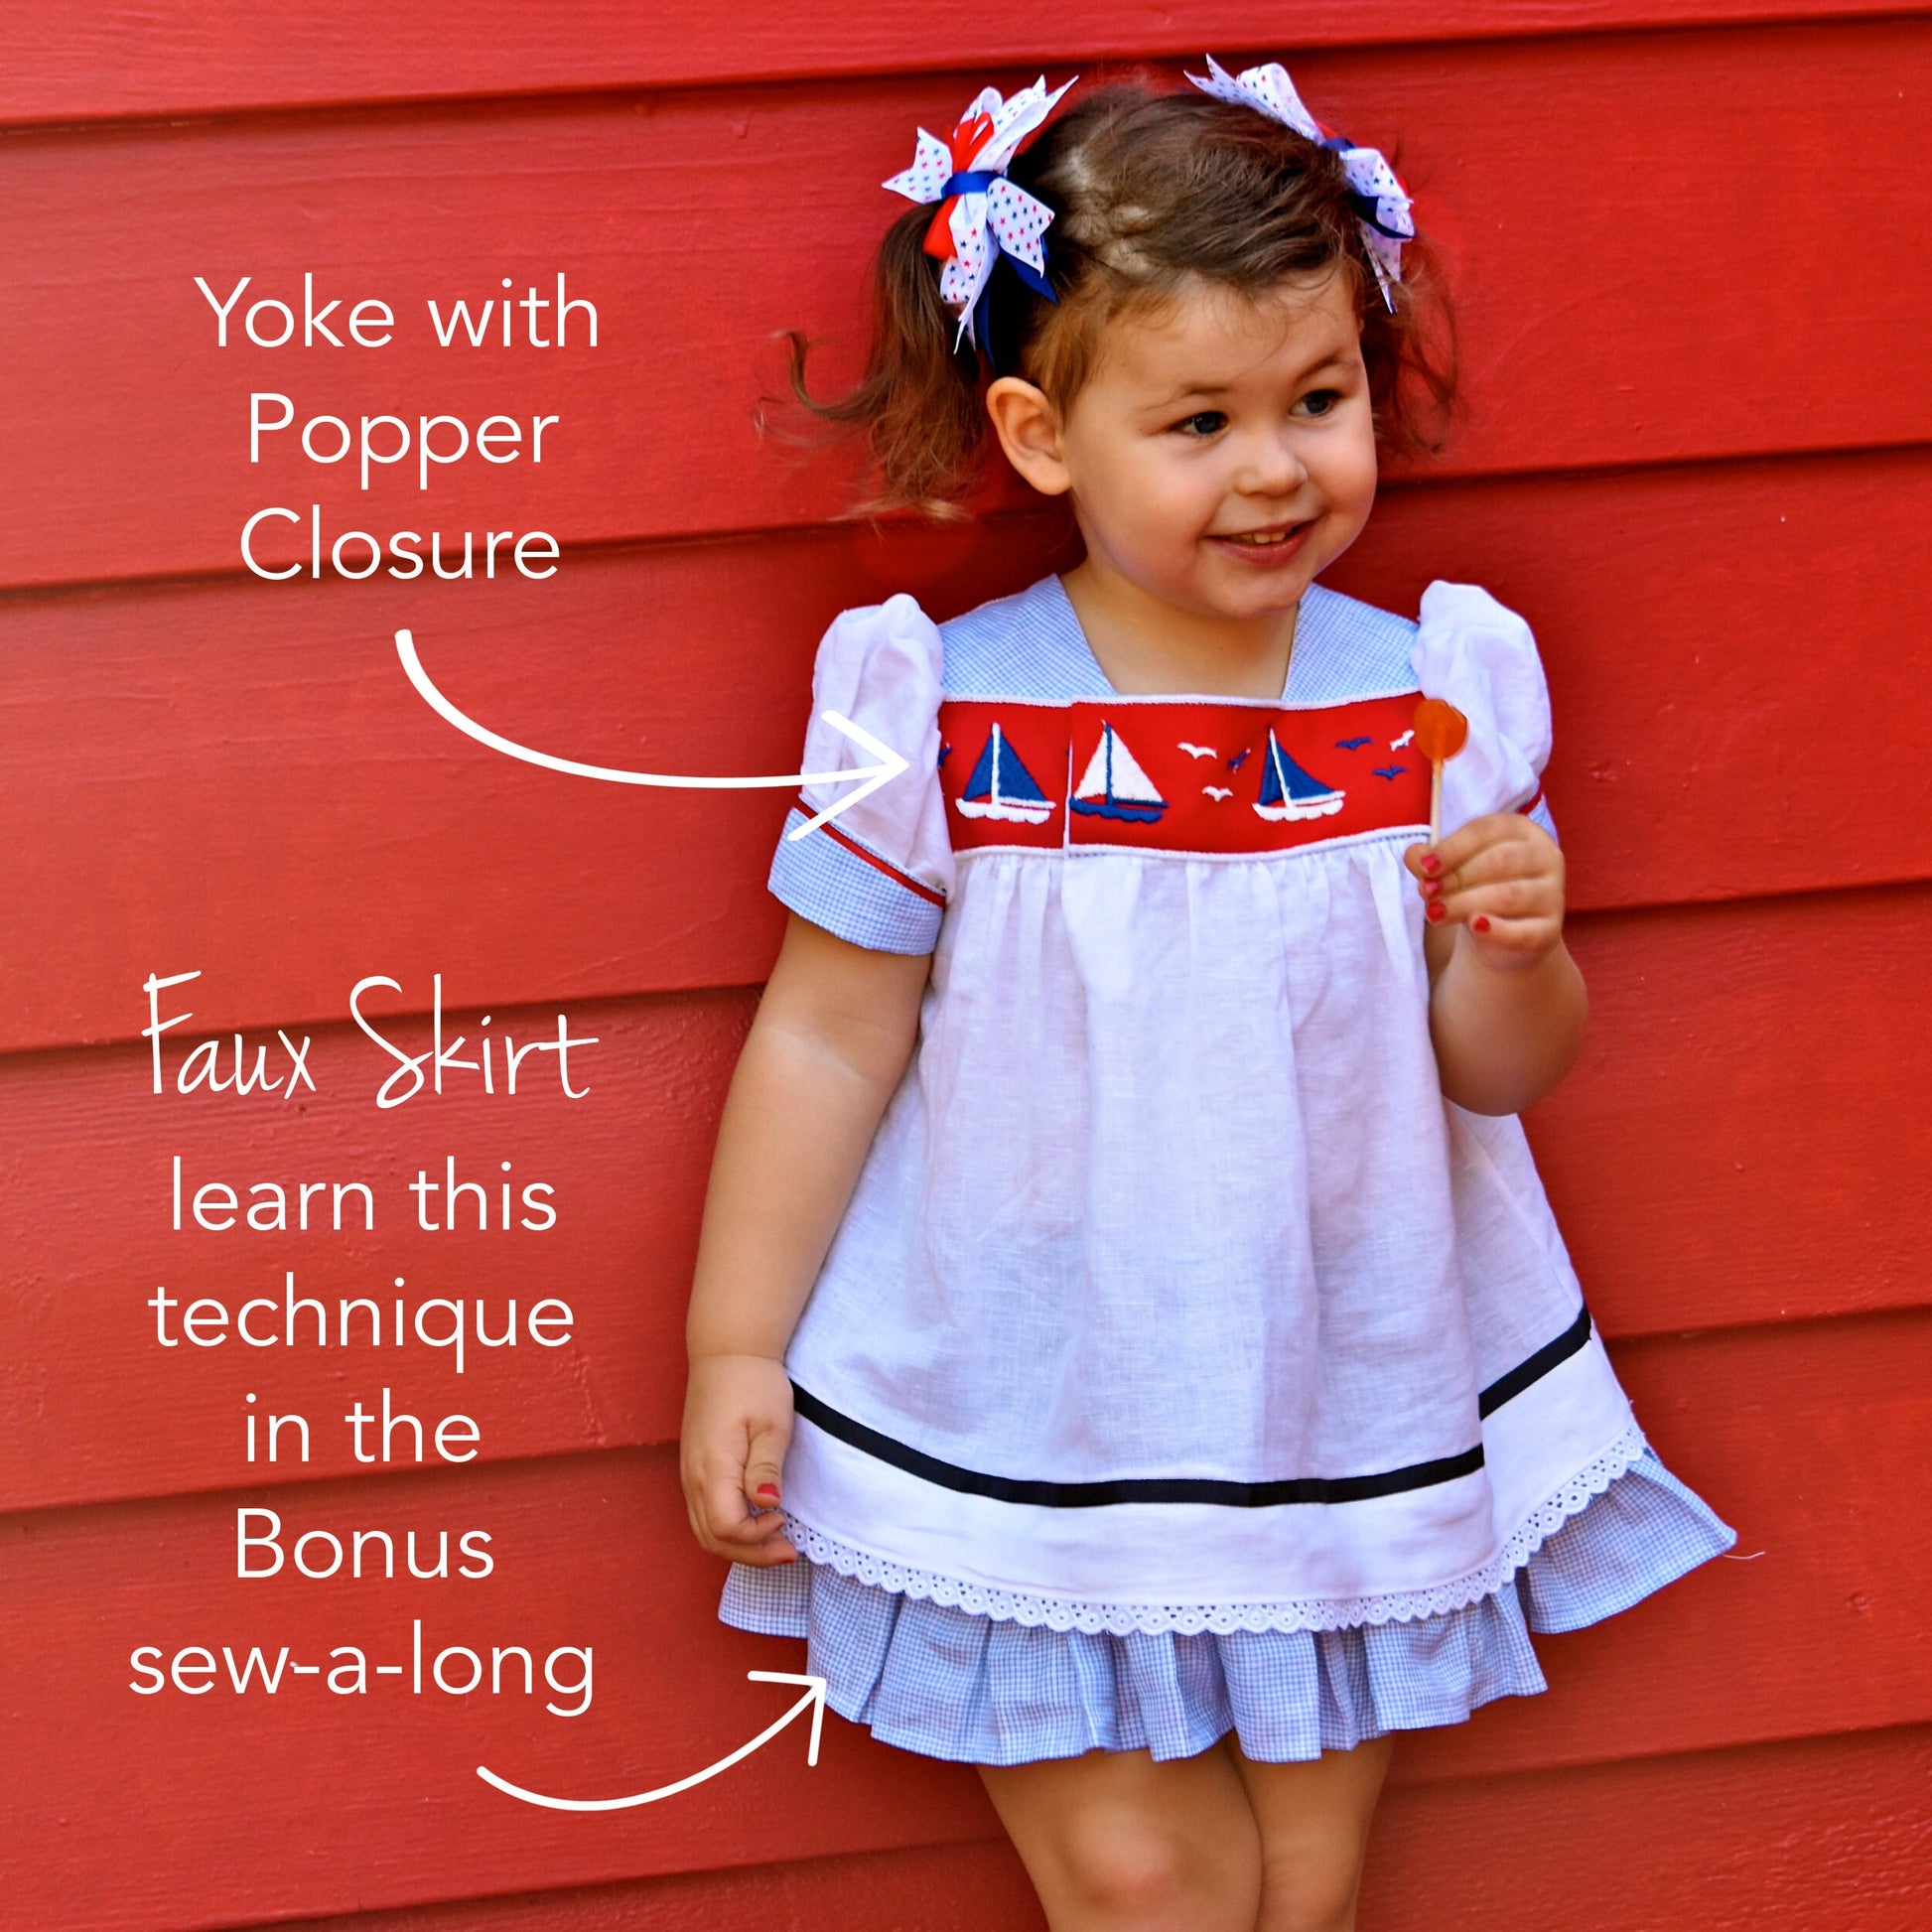
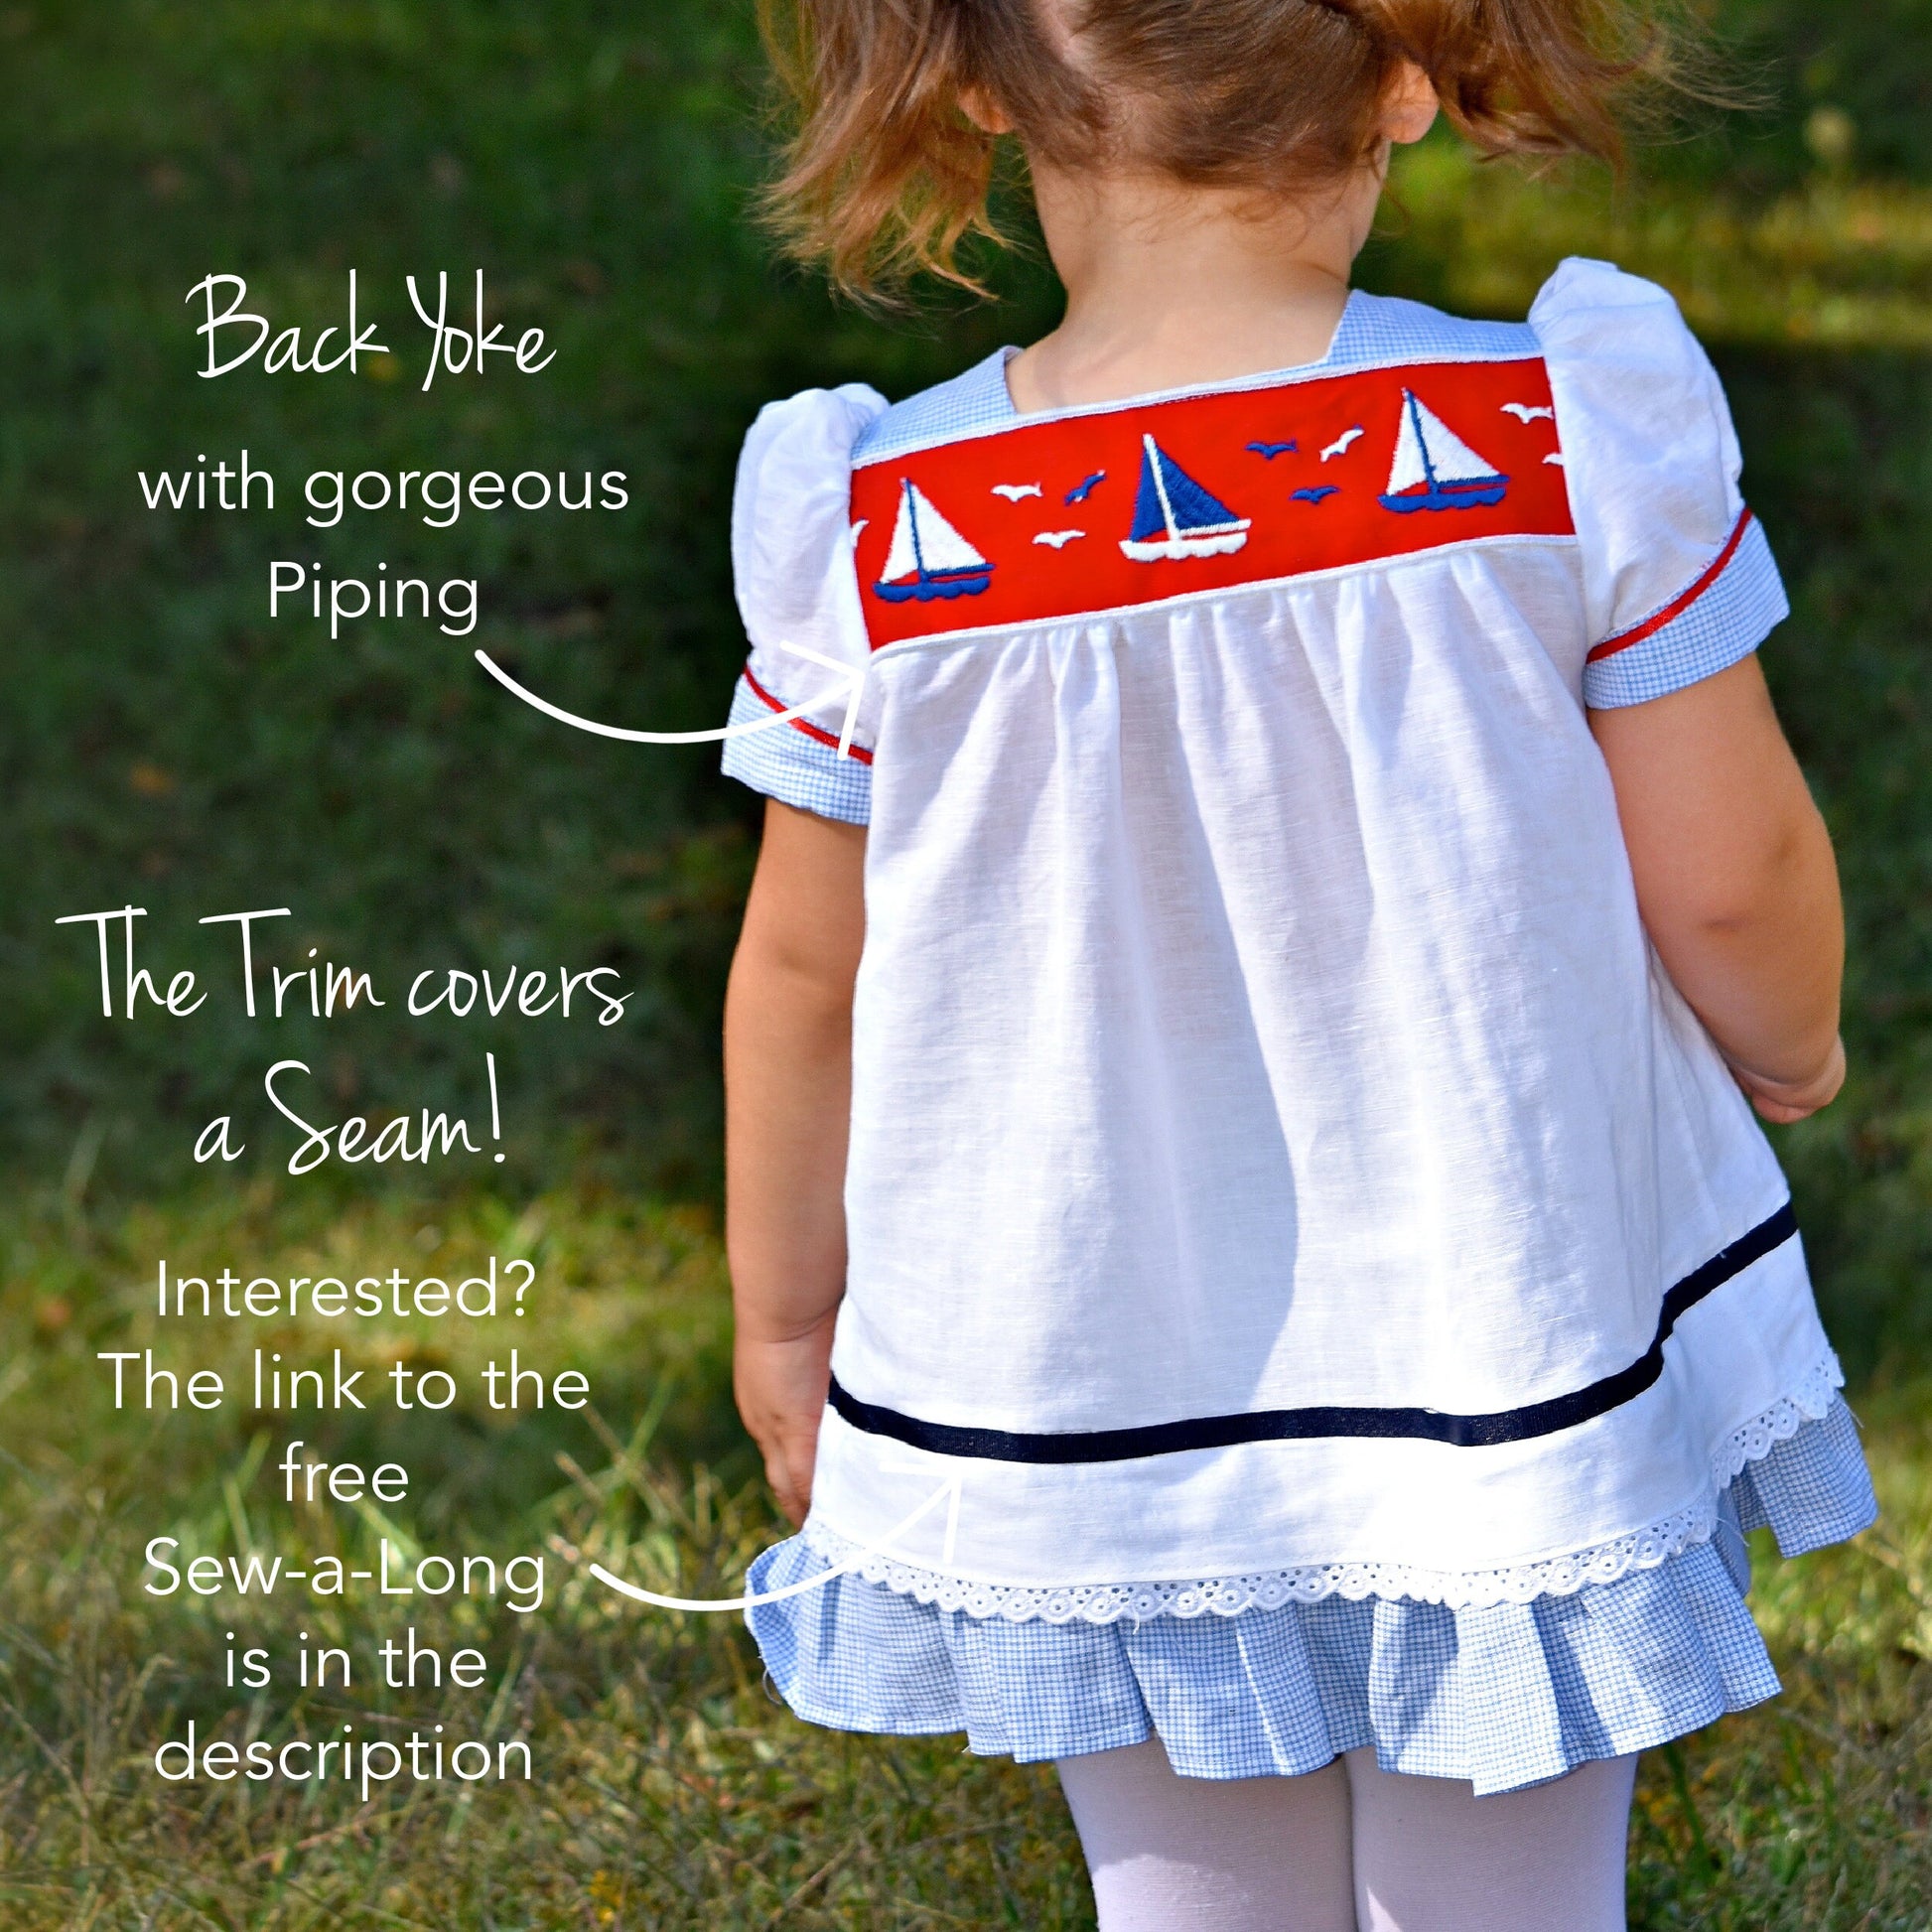
- Schönes Vorderteil mit KamSnap-Verschluss
- Gerafftes Vorder- und Rückenteil
- Tudor-Karree-Ausschnitt
- Puffärmel zum Umschlagen, optional mit Paspel oder Spitzeneinsatz
- Wahlweise langer Ärmel mit einfachem Gummizugtunnel
- Optional langer Ärmel mit weiter Rüsche
• Optional Flügelärmel
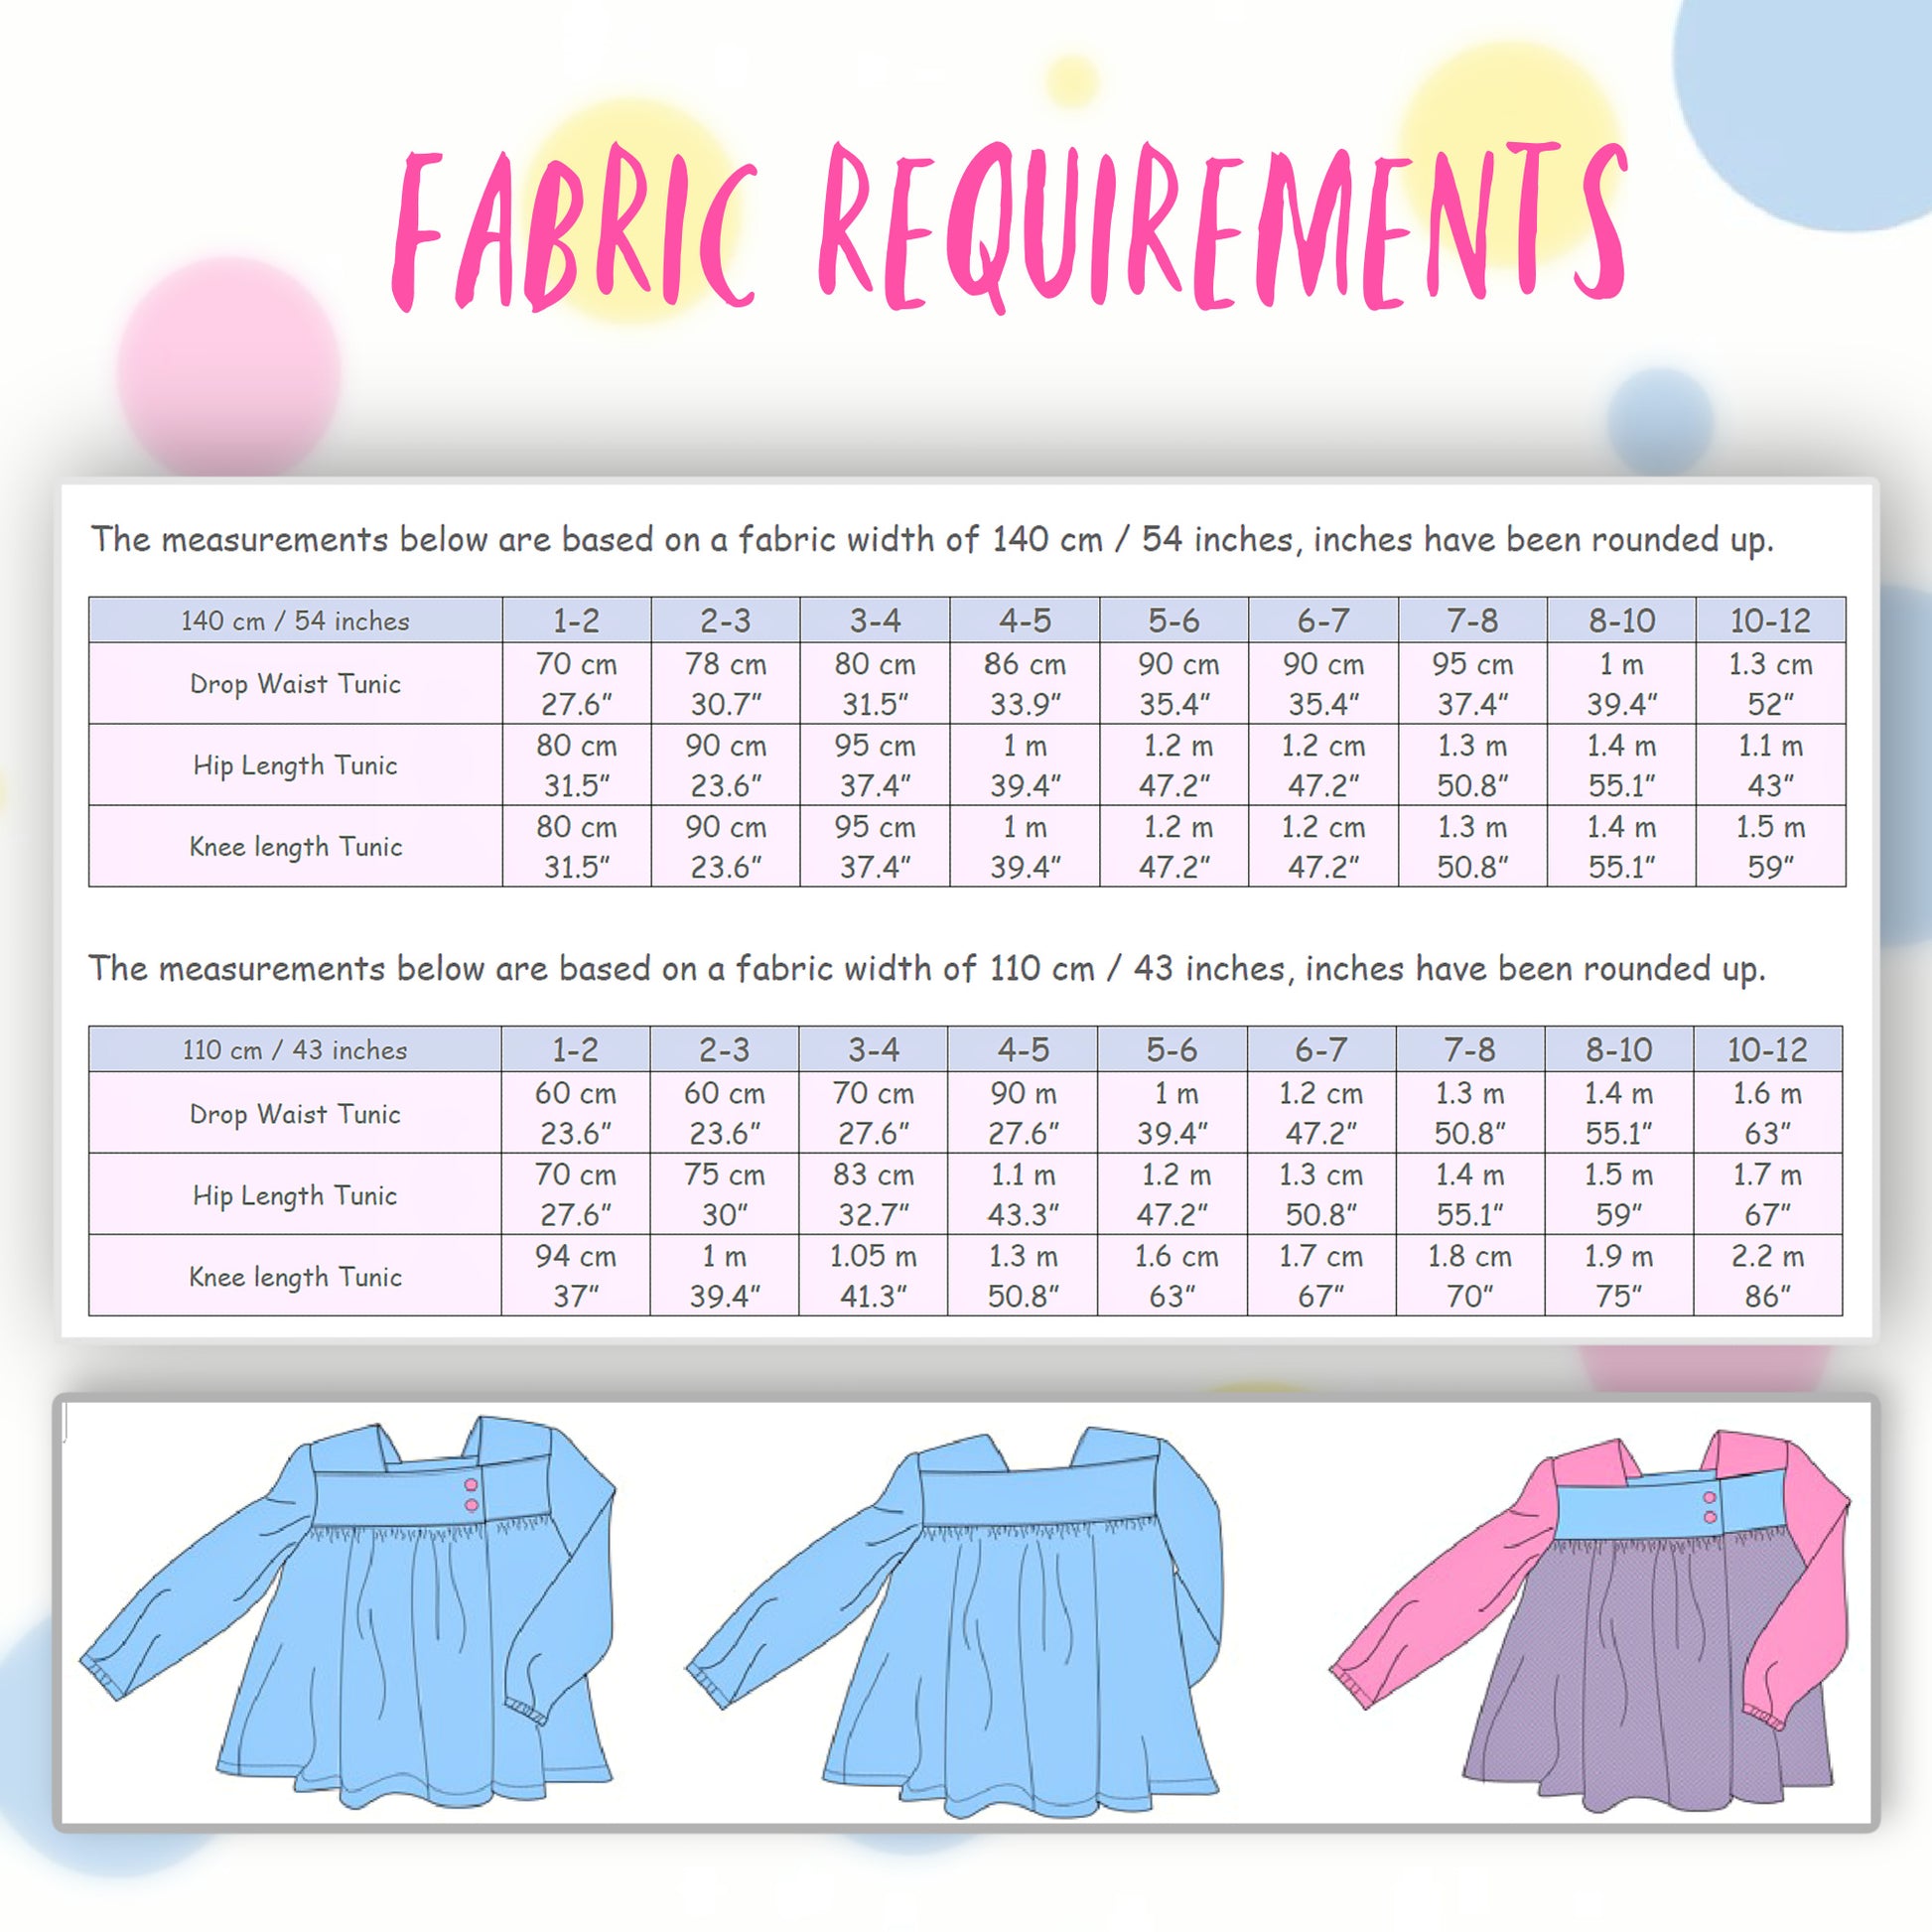
Stoffverbrauch
Stoffverbrauch
STOFFEMPFEHLUNGEN
Leichte bis mittelschwere Stoffe aus Baumwolle, Leinen, Cord, Chambray, Denim.
STOFFVERBRAUCH
- Obermaterial: 1 - 1,5 m
- Passe: 20 cm
- Leichte Vlieseline
Verfügbare Größen
Verfügbare Größen
Größe: 92-152, Alter 1-12
Bitte beachten
Bitte beachten
- Dies ist ein digitales Schnittmuster oder eine PDF-Datei, kein physisches Produkt. Die Zustellung erfolgt elektronisch über einen Download-Link an die beim Kauf verwendete E-Mail-Adresse. Zusätzlich kann das Schnittmuster von deinem Kundenkonto heruntergeladen werden.
- Um sicherzustellen, dass das Schnittmuster in seiner tatsächlichen Größe gedruckt wird, wird die Verwendung von Adobe Acrobat Reader empfohlen.
- Kleine Betriebe: Ich freue mich wenn meine Schnittmuster dir helfen, tolle Bekleidung für deine Kunden zu nähen. Industrielle Produktion ist untersagt.
Kunden werden ermutigt, Frocks & Frolics zu verlinken, wenn sie Projekte, die mit meinen Schnittmustern erstellt wurden, in sozialen Medien teilen.
@frocksandfrolics
#frocksandfrolics
Teilen


SCHRITT-FÜR-SCHRITT ANLEITUNG


VIDEO TEXT
Transcript for the video: Virginia Blouse All-in-One Video
Hi, I’m Marina from Frocks and Frolics and I’m going to show you how to sew the Virginia tunic today. It is for girls from age 2 to 12.
The pattern includes elasticated sleeves which are really super cute. It is plain at the top, but any of my patterns with a puff sleeve will also fit in here if you want to use that instead.
It is gathered across the front and has a facing inside, which makes it easy for kids to get in and out quickly. This is great for little ones who like to dress themselves.
We also have a beautiful panel on the back.
Materials and Fabric Options
You can use quilting cotton, lightweight jersey, denim, or chino, basically any fabric as long as it is not too heavy or too light.
For this project I am also using ribbon for the hem, which I will show you later.
You will need:
- Slim elastic
- Matching thread
- Buttons
- Knitted interfacing (recommended, especially for jersey)
Pattern Preparation
The first step is to print your pattern and check the scale. Make sure it is printed at 100 percent or actual size to avoid sizing issues.
Then cut out all the pieces, including the attachment lines.
- Sleeve has a yellow flower
- Back has a pink flower
You can sort pieces in alphabetical order, A, B, C, D, etc. The sleeve pieces are A and B, and C and D are the lower parts.
If you are using larger sizes, follow the assembly plan included in the pattern.
Sleeve Options
We start with the sleeve. The hem uses elastic, which is the simplest method.
You also have an option for a turned-up cuff, which is sewn in two pieces and attached to give the same length.
Another option is a jersey cuff, which is slimmer and stretched into place.
The sleeve has a front marking so you do not attach it backwards. If you get it wrong, the sleeve will hang incorrectly.
Make sure you mark:
- Front: one snip
- Back: two snips
The sleeve head also has markings for overlap and direction.
Front and Back Construction Overview
The front is cut on the fold and includes a slit where the yoke attaches. There are different length options available.
The back is also cut on the fold and is slimmer. Do not gather from the edge, move slightly inward as marked.
Mark all important points, including center back and yoke attachment points. This prevents mixing up left and right sides.
Leave pattern pieces on until you are ready to sew to avoid confusion.
Interfacing
Apply interfacing carefully:
- Place fabric face down
- Iron interfacing onto the wrong side
- Mark orientation before ironing so pieces are not flipped
The shoulders also need interfacing. You will have pairs for left and right sides.
Use pins to mark corners and orientation before fusing.
Once interfacing is applied, overlock edges where needed.
Neckline and Yoke Preparation
Draw the neckline seam line carefully. All patterns use a 1 centimeter seam allowance.
Sew yoke pieces to the neckline, making sure lining is positioned correctly.
Sew with lining underneath so the seam allowance sits neatly inside.
Trim corners where needed to reduce bulk.
Press well so the shape is clean and stable.
Repeat for both sides of the front and back yoke pieces.
Facing and Front Slit
Attach the facing to the front piece.
Mark the center line and sew with a small stitch, about 1.5 length.
Cut carefully into the center point of the slit. Do not be afraid to cut right up to the tip.
Press and turn to the inside. Press again for a clean finish.
This can be topstitched, but I prefer leaving it as is for a cleaner look.
Gathering the Front and Back
Add gathering stitches using the longest stitch setting on your machine.
Run two rows of stitches about 4 millimeters apart.
Pull threads gently and distribute gathers evenly.
Repeat for both front and back sections.
Secure gathers using a figure-eight method with a pin.
Attaching Yoke
Attach gathered sections to the yoke.
Adjust gathers evenly so they sit in the center between stitching lines.
Pin carefully before sewing.
Check that both sides are even before stitching.
Sewing the Yoke
Stitch the yoke to the gathered pieces.
When sewing, guide fabric carefully and ensure seam allowance stays consistent.
Press after sewing to set gathers in place.
Trim and neaten if needed, especially with thicker fabrics.
Topstitching
Topstitch along the yoke seam.
Start on one side and sew around slowly, removing pins as you go.
Keep stitches even and smooth.
At corners, lift the needle, turn, and continue sewing.
A longer stitch length (around 3.5) works best for a professional finish.
Side Seams and Hem
Sew side seams and overlock edges first.
The small corner detail at the hem is important for proper alignment when folded.
Press seams open and neaten edges.
Turn hem up about 2.5 centimeters and press.
Sew along the folded edge for a clean finish.
Ribbon Detail
Add ribbon along the hem if desired.
Place it so it covers the first stitching line.
Stitch carefully around, starting at a side seam.
You can also add a second ribbon higher up for extra detail.
Make sure both layers are even and secure.
Sleeves and Elastic
Cut elastic according to pattern length.
Turn sleeve hem twice to create casing for elastic.
Leave enough wiggle room so elastic can move comfortably.
Mark sleeve head and gather line 1 centimeter from edge.
Sleeve Shaping
Steam sleeve head before inserting to help shape it.
Pin sleeve carefully and distribute fullness evenly.
Sew slowly around sleeve head, avoiding puckers.
Leave opening for elastic insertion.
Inserting Elastic
Thread elastic through sleeve casing.
Ensure it is not twisted.
Overlap ends by about 1 centimeter and sew securely.
Close opening and finish stitching.
Setting Sleeves
Insert sleeves into armholes.
Match front and back markings carefully.
Pin underarm seams and distribute ease evenly.
The sleeve should naturally curve slightly forward.
Sew carefully around armhole.
Buttons
Mark button placement based on button size.
Start buttonholes slightly in from the edge so they do not overlap.
Sew buttons with a little thread shank so they sit neatly.
Wrap thread around base to create a stem for better movement.
Alternatives and Closing
You can also use Kam Snaps instead of buttons if preferred.
This pattern works beautifully with different fabrics, including jersey.
Thank you to the testing group from the Facebook community for their support.
Thank you for watching, and I’ll see you next time.
Transcript for the video: Virginia Blouse - KamSnaps
Hi, this is Marina from Frocks and Frolics and I'm going to show you how to insert some Kam Snaps. They're super easy to do and my example here is from the Virginia top which is available from my website from ages 2 to 12. They're super super easy as you can see here and come in all sorts of different colors so you can really make whatever you're making up.
What You Need
So what do we need for this? I'm using Dritz pliers to put the Kam Snaps together. You also need an awl and then your Kam Snaps. For each one of the snaps you need two cap snaps, one rounded edge socket and one sharper edge stud.
Marking Placement
First thing to do is to see where I want them to go. Once you know where you want them to go you can mark them. I always go by 1.5 centimeters down from the top and 1.5 centimeters up from the lower edge of whatever I do. I do the same for shirts by the way. Then I take the remainder of what's in between, I'm doing three buttons, mark the center of that and I'm done. That's really easy to do, especially if you're not very good at division.
Then we are also going to move over one centimeter or one point two, it depends of course on the size of your popper. You don't want the popper to go over the edge so make sure that it doesn't. You also want to make sure that you cut back your seam allowances so they don't interfere with a Kam Snap.
Making the Holes
Next I'm taking my awl and I'm moving over for the Virginia top it's one centimeter further over than the shoulder. I push through the awl all the way to the other side and you have to do that fairly straight, not angled. Then remove the awl from the lower layer.
Inserting the Snap
Take the cap snap, push that through from underneath, make sure the prong comes through and stands up, and then put the rounded socket on top.
Now we're going to use the pliers and put the snap between the dies and just press down. You don't even need to press hard. What will happen is the prong is flattened and spreads out, and that's what holds your snap fastener in place. It's very very simple technique, absolutely love it.
Securing the Top Snap
Now we're going to do the top one. Again we take another cap snap and press that through, make sure the prongs go through properly. Then we take the stud, put that on, and again place it between the dies of the pliers. The black plastic part always goes underneath.
Do up that button before you do the next one so everything sits perfectly. Then take your awl again and go straight through from the top and repeat the same technique to put the rest of your poppers in.
Finishing Up
And that's it, we are done. It looks fantastic, it's so simple and so easy. Just don't iron on them, they're not very good with hot irons. If you want to purchase them, I've used these Kam Snaps for the Virginia top and you can get that from foxandfrolics.com. The link is in the description of this video and under the info button as well.
Thank you very much for watching and I'll see you next time.
Transcript for the video: Virginia Blouse Sew-Along Introduction
Hi YouTubers, it's Marina from Frocks and Frolics and I want to invite you to our sew along that we're running in our Facebook group. I'm going to use the Virginia pattern to do a hat that is really really special. We're going to go through using loads of new sleeves which I've designed for you, and they come free when you are a member of the Academy and you're on the Virginia course.
Pattern and Sleeve Options
You can download four different sleeve patterns in Chapter 2, which I think is worth having, because I'm going to take them back out of that then about a week later and then they're going to go on sale as well. The Virginia you can already see blended in, and my helper Emily has made two of those, one with a ruffle sleeve and one with a turned-up sleeve, which I think is super cute. That wasn't in the original pattern but I'm going to show you how to do that all in the sew along.
We also have a plain sleeve in here with a little facing which will look very effective, I'm going to make one of those. Then we've got a flutter sleeve, now I've not done flutter sleeves before so I don't know how that's going to go but we're going to do it. Then this is the puff sleeve which is really gorgeous, and then we're going to put the contrast collar and as you can see blended in, that's really cool. Then we have a really nice flared sleeve with a ruffle, same as I did on the Paris jacket but obviously it's a slightly different cut because it's not for a jacket, so very excited about that.
Virginia Pattern Overview
The Virginia itself has got these two pieces, front and back. Here in my big special fabric is the bodice, and the bodice looks like this. It was all in pieces and I've put them together so that we can have this bonus all in one instead of lots of different pieces. When we start on Monday I'm going to show you exactly how that works.
How to Join
You can of course tune in here on YouTube or you can join the Facebook group, the link to that is below in the description so you can join us there and you can get your own pattern. Or if you just want to see how something like that is done then just be back Monday through Friday, every day a new video, and hopefully I can share a lot of stuff with you that other people have done as well.
Fabric Suggestions
Fabric wise, what do you need? You can use any cotton or linen, it needs to be woven and medium to lightweight, so nothing too thick. You want to get yourself some nice embellishment as well. When you do this it's best to have a combination of three different types of fabric, or two fabrics and an embellishment.
Our brain really likes groups of three, like when you put buttons on. Two looks strange, three is fine, so three is the number that works best visually.
Final Invitation
So what you want to get yourself for the sew along is a couple of good fabrics and embellishment. You can use all sorts of really fabulous trims and embellishments, and if you want to know more about that the video is up in the Facebook group in its full length.
The link is in the description here so you can just ask to join us at the Frocks and Frolics sewing circle. Then on Monday we get started and the first video is already up there because I wanted to make sure everybody's ready to do some sewing.
If you want to get yourself the Virginia pattern and those four sleeves before we start on Monday, then you need to visit academy.frocksandfrolics.com and join the Virginia course. In Chapter 2 you will find all the sleeves.
So that's it for now. I'll see you again Monday and I hope you are as excited as I am about getting this started. Bye for now.
Transcript for the video: Virginia Blouse Sew-Along Cutting Out
Hi YouTubers, it’s Marina from Frocks and Frolics. On day one of our Virginia sew-along hack, we’re going to change the bodice pattern so it becomes a complete piece instead of separate sections. You can still use the original separate pieces if you prefer, but I’m going to show you a modified version.
We’ll also make some adjustments to the skirt, talk through different design options, and go step by step through cutting out your first Virginia top.
I recently went to the market as I mentioned in my Friday video and found some really nice buttons from a great button shop in LA. I also worked ahead and already cut out two dresses, which I’ll show you quickly.
Fabric and Design Choices
For one dress, I’m using a lovely green fabric at the base. I’ve pre-washed it, which is very important, even though ironing linen afterward is a bit of a pain.
I’m combining it with another fabric I got from Joann’s. Both fabrics are from there. For contrast, I’m still deciding between a ribbon option or another trim. The buttons I found in LA are absolutely gorgeous and will be part of the design.
For another version, I’m using a fabric with an already finished trim, which makes things much easier because no hemming is needed. When cutting it out, I made sure both sides matched in length so one side doesn’t end up shorter than the other when sewn together.
Sleeve and Ruffle Decisions
For the ruffle sleeve, I’m making it a bit more grown-up since it’s for a child who is not a toddler anymore. I’m using a ruffle at the bottom, and it is about twice the width of what I would normally suggest. It looks fuller and works really well with patterned fabric.
You could also make it 3/4 length or full length instead, but I wanted to highlight the ruffle effect. Always feel free to adjust based on your fabric and design instead of following instructions too rigidly.
Bodice Construction Idea
For the bodice, we are cutting everything in one piece. I’ll show you how to combine the pattern pieces shortly.
I’m cutting one version on the straight grain and the other on the opposite direction so that when they are sewn right sides together, the structure stays stable and doesn’t stretch unevenly.
I also used white linen underneath some fabrics so nothing shows through. This helps the pattern stand out better instead of getting darkened by layered fabric.
Design Options and Embellishments
I also have a velvet ribbon that I might place along the edges for decoration. I’m still deciding whether to use it along the bodice edge or where the ruffle starts on the sleeve.
There are so many possibilities with this design, and it really develops as you go. You can change your mind as you sew, which is completely normal.
For another version, I’m keeping things more simple and grown-up with a plain short sleeve and facings. I’m planning to use contrast buttons and possibly run a trim through the center or along the ruffle area.
Cutting and Pattern Adjustments
We are now adjusting the bodice pieces so they become one continuous piece instead of separate sections. You can also slightly widen the front opening if you want.
We are also modifying the skirt pieces to create a ruffle effect at the bottom.
Step: Copying the Shoulder
Take the Virginia tunic shoulder and trace it onto scrap paper. Mark it carefully and cut it out.
Mark 2 cm seam allowance down, then align the shoulder pieces and tape them together. Make sure everything lines up correctly on both sides.
Do the same for the front yoke. Always double-check alignment before moving forward.
Skirt Adjustments
We are splitting the skirt pattern at the hip height line so it becomes two pieces.
Once split, you can either add seam allowance or leave it as is depending on fit. In my case, I’m not adding extra length.
For gathering, the rule of thumb is:
- 2x fabric = light gather
- 3x fabric = fuller gather
For this project, I’m using about twice the width, but you can adjust depending on your desired effect.
Sleeve Cutting
When cutting sleeves:
- Always mark front and top
- Identify sleeve head
- Make sure grain direction is correct for woven fabric
Even if fabric looks even, grain direction matters for structure and stability.
I’m cutting one sleeve in checked fabric and lining it up carefully so it stays consistent. The lining is cut on the straight grain for stability.
Interfacing and Preparation
Before cutting main fabric, cut interfacing first. It saves time and ensures consistency when making multiple pieces.
When ironing interfacing:
- Do not use steam
- Press firmly and evenly
A good rule is to hold heat for a few seconds to ensure proper bonding.
Ruffle Cutting
For the ruffle, we only need the width, not a shaped edge. I use the fabric fold and let the pattern guide me, especially with checks, which help keep lines straight.
Measure carefully so the ruffle is not too long or too bulky. I’m using about 2.5 cm extra for shaping.
Mark front and back ruffles separately so you don’t confuse them later.
Final Prep Notes
Once everything is cut, you are ready for the next day where we will start constructing the bodice and adding finishing details.
If you have questions, feel free to ask and share your fabric choices. I love seeing your creative versions, and I’ll be selecting winners based on your hacks at the end of the sew-along.
See you tomorrow for the bodice construction.
Transcript for the video: Virginia Blouse Sew-Along The Yoke
Hi YouTubers, welcome back to Day Two of our Virginia Sew Along with Marina from Frocks and Frolics. If you haven’t seen the previous videos, you can go back to the playlist where you’ll find the introduction and Day One, where we cut everything out.
Today we’re starting on the bodices. We’ll be assembling them and adding different decorative finishes: velvet ribbon, lace, and a wide decorative ribbon. Each version uses a slightly different construction approach, so you can choose the finish that suits your design.
Preparing the First Bodice (Ribbon Version)
For the first bodice, where we’ll be adding velvet ribbon afterward, we begin by sewing all the way around the neckline and front edges to close everything neatly.
We use a 1 cm seam allowance and stitch carefully around the curves.
Key reminders:
- Lock stitches at the start and end
- Keep the needle down when turning corners
- Do not stretch the fabric while sewing
- Ease bias and straight grain transitions carefully
Where bias meets straight grain, take extra care and guide it slowly so nothing shifts.
Turning and Finishing the Corners
Once sewn, we trim and clip into the corners so they turn cleanly.
The turning method:
- Fold seam allowance one way, then the other right at the corner point
- Use fingers to push the corner outward neatly
- Avoid over-trimming thick fabric unless necessary
This creates a sharp, professional corner without bulk.
After turning:
- Press all edges flat in one direction first
- Then press fully for a crisp finish
Pressing before final shaping makes the structure much cleaner and easier to manage.
Adding Velvet Ribbon (Hand-Sewn Technique)
Now we attach the velvet ribbon along the edge.
Instead of sewing it all at once, we:
- Pin it in place gradually
- Create small pleats where needed to follow curves
- Adjust placement carefully as we go
This is a more controlled method, especially for thicker or less stable ribbon.
Once pinned:
- We hand stitch the ribbon in place
- Use small hidden stitches for a clean finish
- Work slowly around curves and corners
This gives a neater result than machine sewing for this type of ribbon.
Adjustments and Fit Check
Before finishing:
- Check alignment so the bodice doesn’t shift out of shape
- Trim any uneven edges
- Ensure both sides remain symmetrical
If the ribbon affects thickness or structure, it’s better to adjust early before adding buttons or final closures.
Alternative Construction: Lace Version
For the lace version, we take a different approach.
Instead of fully closing the neckline first:
- We sew the bodice pieces together leaving the top open
- This allows us to insert lace neatly afterward
Steps:
- Sew with 1 cm seam allowance
- Clip into corners for easier turning
- Turn and press carefully
- Position lace between layers before final stitching
The lace is aligned carefully so motifs match on both sides.
Aligning Lace and Decorative Placement
When working with lace:
- Match pattern repeats carefully
- Ensure both sides align evenly
- Adjust positioning before final stitching
This prevents uneven spacing or misaligned motifs after sewing.
Once aligned:
- Pin securely
- Stitch along the seam allowance line
- Turn and press for a clean finish
Final Bodice Options and Closures
At this stage, you can choose different closures depending on thickness and design:
- Buttonholes (for simpler or lighter versions)
- Popper snaps (for thicker layers or hidden closure)
- Rouleau loops (for decorative, couture-style finish)
Rouleau loops are especially useful for lace versions and give a very refined look when aligned with decorative elements.
Making Rouleau Loops (Quick Version)
A quick method used here:
- Stitch a narrow tube
- Trim close to stitching
- Turn the tube carefully
- Cut into even loop sections
- Space evenly along the edge
They should be large enough for buttons to pass through comfortably.
Final Check and Next Step
At the end of Day Two:
- All bodice versions are assembled
- Decorative trims are attached or prepared
- Closure options are chosen or started
Tomorrow we’ll continue building the garment and start bringing the full Virginia design together.
See you on Day Three.
Transcript for the video: Virginia Blouse Sew-Along The Front & Back 1
Welcome to Day 3, where we're just going to put the skirt on. A lot of the work for the various bits I've already done to show you my thoughts and how it works, but we're going to work this one together and we're going to work a little bit on the green one.
I have actually put on already, as you can see here, the little frill on the bottom, and I've put a really voluminous frill on this one because I wanted to see what it's like and I wanted to show you. Now, I'm not entirely convinced by the volume of that. I think less is more sometimes, but it'll still be cute.
Now, the other thing that I did was I put on my ribbon, but I haven't stitched it down yet. This is so much easier to do now. I also haven't stitched down the facing on the inside, so I can do that in one go. I have pinned it, and all I have to do is sew close to the edge there and it'll get stitched down. I just sew across the edge on the top as well on both sides, and then on the back, if I want to, I can just put a strip over as well, so that would be quite easy and simple to do.
So I'm just going to take my strip here and pop that on there. Again, it fits on perfectly, so I can just sew this down without paying much attention to anything else, and again, it'll probably catch that too.
The Lace Dress and Stitching in the Ditch
I have put together, as you can see here in the back, the little dress which has got the lace already attached to it. I think that came out really, really beautifully, and it looks just great.
I've stitched down the facing already. What I did here differently to what you mostly do, because I've already got the velvet here and it's hand stitched, I didn't want any top stitching there. So what I did was I sewed in the ditch.
When you say "stitch in the ditch," maybe you can see it here. You stitch right next to the seam so that it's literally not visible, and then on the other side you're catching it as you go. That's a really nice way to do it. You need to be quite accurate, but I think if you pin it okay, then that's absolutely fine.
So this I'm very pleased with. I also like the fact that you've got this gorgeous lace on the bottom. It's just incredibly pretty.
Preparing the Green Dress Ruffle
So I can put this to the side. We're not going to do anything to this today because we only need the sleeves for that.
On this one here, the green one, again such a cute little combination. I'm going to make this into a dress, so I've prepared my ruffle which is going to go on here. If you can see that, I didn't even do it twice. I think that sometimes less is more. I didn't want a super, super frill on this, just a little bit more so it's kind of pretty.
I made this frill very deep and then I prepared another one which I've already hemmed. I would always recommend that you hem first. This one is simply going to go over the top of that one, so we've got three layers.
Now, the one thing I did want to show you guys here is that I've prepared this one and that one, and instead of doing gathering threads around the top here and there, I'm just going to put them on top of each other because that'll make it so much easier. I'm going to gather the top in one go, and that will make it easier.
So I made these the same length. I'm just going to put a pin in here, put these together, and now I'm just going to sew this with a gathering stitch all the way around, two stitches, so that I can put it on here.
Gathering and Attaching the Ruffle
When we've done that, we can get on with the other one. I just wanted to show you this because you can put it together, then put your gathering stitches on and attach it.
You need the biggest stitch length on your sewing machine, but I think you already know this. We're going to do one row close to the edge and another one a little bit lower down.
If you find you have a little pleat in here, or one is a little bit longer than the other, never mind. It doesn't matter. It's going to get gathered, isn't it? I have seen people do that when I gave sewing courses.
Now I've got this, I can gather it. My front is gathered slightly more than my back. I'm just looking if I can see my mark for the center front. No, so I'm just going to put a little snip in here. If it's really hard to see, just put a line down there with your pen. It's going to go away afterward again, so I wouldn't worry too much about that.
Then I can do the same around here. Make sure that I've got the front marked on this one as well. So I put one here and one there. Front goes on the front.
I'm just going to do that and stick it on here. That's how I always do it. It's just my way. You can have a different way of doing stuff, of course.
Sewing the Gathers
Now I'm going to have to gather this to fit onto this here. I can start pulling my gathering threads, and you've got to be doing this really gently because the last thing you want to do is rip your thread, because then you have to do it all again.
So I am ready. I've got everything pinned in and I'm now going to stitch it in all the way.
Because I never really pin it very much, I thought I'd show you this method again because it might be a little bit different to what other people do. What you really need is one more pin first. Let's do one from here because I haven't got one.
I arrange my frills or my ruffles as I go along. It's so much easier to do. You lock in your stitches, make sure that your stitch length is right back down, and then I'm just going over this and moving them so that they look really, really nice.
Most people try to pin them in really nicely, but it's such a waste of time. You can do a much better job on your sewing machine.
There you go. We've got some more which have been put in rather ugly, as you can see here. So what do I do? I just get to work and spread them out nicely.
Finishing the Ruffle
Now I'm going to go and overlock this. Before I go and overlock it, I make sure that I have no pins. The best way is to do this, because if you hurt yourself, you had a pin in there.
I'm going to quickly overlock it and cut off the excess. Here you can really learn how to sew with me.
I can now pull out all the excess threads here that I pulled before that I didn't want to pull. Try not to rip them, but you see how much easier they come out when you have a bit of tension on it.
When you put gathering threads in, it really pays not to use the cheapest thread you've got. Having it rip is so disheartening when you have to do it all again.
This is a little bit like Little House on the Prairie. Oh my word, quite cute. All I have to do is really top stitch this here. Look at that. Oh, that is adorable, I think.
The next step here will be going back under the sewing machine and just pushing this apart and top stitching it down if you want to, or we could just iron it. That's up to you.
I'm just not going to do it now because of time reasons, but that's another one done and ready to go for the sleeves, which we'll do tomorrow.
Transcript for the video: Virginia Blouse Sew-Along The Front & Back 2
Hi everyone, welcome to Day 3 in our sew along. Today, I'm going to finish and catch up on everything that I didn't manage to finish during yesterday's sew along.
So today we're going to go straight back to my little yellow dress. If you want to watch the other videos, all you need to do is go back a bit. If you're watching from YouTube, you can just go to the playlist, you'll find it there. If you're watching on Facebook, you can just go into the unit and watch it there.
This is the Virginia 1/2 to 12 pattern. You can get the pattern in the Academy, where you'll also find the sew along and, of course, all the standard videos that went with this pattern.
Let's get on with it straight away.
Stitching Down the Lace
The one thing I hadn't done yet was to stitch down my lace. I'm going to put a blue thread at the top so that's not visible on my front. I think if I put the tension up a tiny little bit, I won't have to change the bobbin. I can just have the blue on the top and leave the yellow on the bottom. That should be fine.
On some sewing machines, especially cheaper models, you might have to actually change both, but on this one I think you can do it quite nicely without having to do it because sometimes it brings up a little bit of the lower thread, and that won't be looking nice. It might not work on this either, but I'm going to at least try it.
Also, good news, it's not so hot today, so I am quite comfortable in here.
Right, so I'm going to put this under and find myself a point on my lace which will be very easy to stitch through. You don't have to do any of the zigzag stitching. All you have to do is find a space that will allow you to sew straight through it.
Here you can see that I can just sew through that little gap. Put your lace tidy and then make sure that whatever you lined up with is going straight into your sewing machine.
There we go. Now looking at the needle, just doing that. Look at that, you can't even see it.
Now I'm going to do the other side as well. Again, not even starting very much at the front because it's just going to get stuck if I did that.
There we go. Excellent. Make sure it's the same distance. It might be a good idea actually to start this side first because that's the most obvious if there's a little error.
A Little Mistake and Learning from It
Just a little sneak peek before we do the back, look how that looks. It looks really, really nice.
Look at that. It did come up a little bit here, but I think in the big scheme of things, I don't think anybody really notices too much. I think it's very, very pretty.
So we are going to put that down to experience. I would actually say, because even I made a little whoopsie there, that it probably would be best to start on the back and not on the point that everybody really sees.
Now I'm going to put the lace on the back as well, make sure that the right side is facing up. Actually, I will put a pin in. It slipped, so live and learn.
I'm just going to put the pins so they're not in the way. I think it works better, so I eat my hat. Pins make it a lot easier.
Sewing the Side Seams
That looks really good, people. I think this would be okay.
I am still checking all my cameras and I'm sorry, the Day 2 one was just blurry in parts. So I'm being super vigilant. I have all new cameras and spent a fortune on them and I can't work them.
I'm not the one that's filming me, they're just there. The one I have from Sony that I've had for ten years, that camera is brilliant. I never had an issue with that.
If you ever come to LA and you're really good at this camera business and can set this up, I'll cook you dinner. If you're new to LA, you need a good home-cooked dinner, and I know how it works.
That was really for young people. Most of the people who watch these videos aren't really young, but there we go.
We're going to start sewing this together with a one centimeter seam allowance. Now I'm going to iron the seams apart, sort of steam them, and while I'm here, cut off some more threads. Threads everywhere.
On the other side as well, put the ruffle together on both sides. Because this is so thick, I shall overlock it either side and then put the side seams together.
Now that they're overlocked, I just have to put the sides together again. I do a one centimeter seam allowance.
I'm just doing this with a pin so that I don't twist anything. You don't really need to pin this. Line up the edges, twist the thing around, and over to the other side.
That's how it's done in an industrial setting anyway. You just go one piece after the other.
I worked in that environment for quite a long time. I loved working as a manufacturer for other designers, and I also loved pattern testing for other designers, especially early on in my career.
What I mean is not PDF designers, but clothing designers where a shirt might cost $300. So that's the kind of work I did, and of course it had to be really good. That was where I learned all my tips and tricks.
Adding the Lace Trim
I do want a little bit more of this lace showing. I've got the option of just attaching that there or having another strip up here. I think it would be overkill to have that there unless I do a tiny bit.
What do you think? That would be nice, wouldn't it?
So if I insert it into the seam, I think that would be very, very nice. In order to do that, I have to cut into this lovely lace.
I'm going to cut this off. It's about a centimeter that I'm doing here, quite evenly, right next to my design.
Let's see if I've cut enough because I don't want to waste any of this. Yes, it does go to the other side.
Back out comes my sewing machine. I'm just going to start on one of the side seams. It's slightly exciting. I love this. I love this pattern too.
What I'm doing is overlapping it a little bit on the seam here, and that will turn down and over it.
Oh, that's beautiful. Make sure that the right side is facing underneath. That would have been the wrong way around.
The rough side faces down. Put it underneath your sewing machine and make sure that it's at the same level all the way around so that when it hangs down, it sits evenly.
I line it up with this line here and also with the side, but what's more important is when I sew it together with my other pieces. I'm just going slightly up from that halfway, and that way it'll be absolutely perfect.
Hemming the Dress
At the ends, don't forget it comes down like that. What you want to do is just let this go over that bit, or you could sew it together, but I think I'm just going to do it like that.
Then I fold one over, overlap it a little bit, and cut it off. There we are, we've got the lace in.
I love this. When this falls down, it's going to be super cute like that, and then you've got the ruffle underneath it as well.
I'm going to turn it up three centimeters and stitch it through.
Now I'm going to take my ironing board and iron it. I think a really good turn-up is about two and a half centimeters. You can sporadically check yourself to see whether you've turned it up right.
I don't pin this sort of stuff, especially not with fabric like this. There is no need for it.
Very rarely do I actually measure it. I've got this kind of measurement in my head after doing it for years.
Any carpenter would be exactly the same. They can just look at something and say, “Oh yes, that's that much.”
Sewing the Hem
Now I've done it, I go back onto my sewing machine and I will do my hem.
Most of you know how to do a hem, but for any beginner watching this, this is what you want to do.
The first thing is that we want to see where we want the edge to be. If you have 2.5 centimeters and put it on 2.5, obviously you're going to slip off the edge.
So what you want to do is sew at 2 centimeters. On your sewing machine, very likely where your bobbin case ends is exactly 2 centimeters.
You also see that most sewing machines have numbers on them. That's for one centimeter seam allowance and two centimeters. All you have to do when you're sewing is line up with this line.
Don't look at the needle. It’s just there.
Also, you want to put your stitch length up to 3.5. All I have to do is line those up and it will catch if you've done it right.
Your eye should be on that point, not on the needle.
Gathering and Attaching the Skirt
Because we have two seams on either side, you can't really go wrong. I have my marker in here that this is my front, but just in case I forget it, I'm going to put a little arrow here as my front.
Now I'm going to pull from the underside. The reason I pull from the underside is very simple. Number one, it just pulls better, and number two, that's also the side that we're going to see when we pin this into the skirt.
The bobbin threads are always a little bit looser anyway, so it's easier to pull them.
Now all I have to do is find my gigantic arrow which shows me which is the front. That goes onto the front.
I can stick this on now and do a figure of eight around the pin. I can see exactly what I need to do.
This is exactly twice the amount of the front width and the back width, so that's a slight gather. On the first little dress, I had more than that. I had three times the amount, which is a really good amount of gather.
So that is something you can take as your rule of thumb.
If you want a light gather, you do about one and three quarters of the width. If you want a decent gather, which is what I'm doing here, then you can take twice the amount.
Final Top Stitching and Closing
I've sewn them in, removed the lower threads, left the top ones in, cleaned it all up a bit, and overlocked it so it's all looking good.
I can just shake this out a bit. Let's have a look.
Ta-da! It's actually really, really pretty. If you have a look here, you can see it's fairly even.
If I said, “Oh actually, I don't think I caught it right,” nothing is easier than fixing that now.
When we do the top stitching, we can just roll it down to the point we want. I'm actually going to roll it down a little bit myself because I think that looks much nicer.
Back to the sewing machine. Let's do this last bit on this dress.
I’m looking at my presser foot and making sure the edge stays even all the way around. I work my way around and can perfect it if it hadn’t come out perfect to begin with.
One important thing is you really don’t look at that needle. That is not where your guide is.
Brilliant. I am chuffed to bits with this. This is gorgeous.
Conclusion
So that’s it for today. Don’t forget tomorrow we have no sew along. It’s a catch-up day for anybody that hasn’t started yet, so you can get everything to the stage that we’ve got here, which means getting everything together.
The actual sleeves, which we will be doing together, will be on Day 4.
I’ll see you in a couple of days and I hope you enjoyed this.
Again, all the YouTubers watching this, the links are below in the description where to get the pattern. Also don’t forget that the Sewing Academy I have has loads of free video courses where you can learn how to sew.
For every pattern I do, you’ve got videos both here on YouTube and additional videos that you don’t get on YouTube. They’re much more detailed, especially the newer courses I’ve done, like the intricate courses for bolero jackets and that sort of thing.
So anyway, without further ado, thank you, goodnight, and I hope you had a lot of fun watching this.
Bye for now.
Transcript for the video: Virginia Blouse Sew-Along The Sleeve Options
Hi everyone, welcome to Day 5 of my sew along where we are going to put all the sleeves in and make them. The sleeves we are making include a plain set-in sleeve with a beautiful ruffle at the hem, utterly irresistible little puff sleeves with a Turner, and some flutter sleeves. If you like flutter sleeves, this is a really easy option for you. We also have plain sleeves where we are going to add a facing and insert lace, which is also really cool.
I hope you are really going to enjoy this. Without further ado, let’s start on our first sleeve.
Putting sleeves in is something people often find really difficult, and that’s why we are going to take it super slow and do a variety of four sleeves so you can see how it is done and not be scared anymore.
Plain Set-In Sleeve with Lace Facing
Here is a plain set-in sleeve with a facing, and that looks really nice. Of course, every time you make something like this you think, could I have done something different, for example could I have made this distance a little bit smaller. In the pack I am going to make some alterations to what I think would actually be really stunning, but for now I leave it exactly as it is. I think it is very cute.
This is the actual sleeve we are making. I have inserted some lace into it and topstitched it from the outside. What is different here is that we sew it on and then roll it to the outside, which is different to what you normally do, so you have to be a bit careful. This gives you a beautiful little sleeve.
Attaching Lace to the Facing
Let’s get started. The first thing to do is add lace to your facing. I have already cut some lace so I can place it on, and I am only going to do it foot width from the outer edge.
Make sure the lace is the correct way up, even if it is the wrong way, it is not really going to matter that much. Place it on and stitch right along at a foot width seam allowance from one end to the other.
After sewing, press the seam allowance down. I prefer to iron from this side because I can see if I need to adjust anything. You can shimmy it slightly if it is not perfectly aligned. This helps you get a really clean result.
Closing the Sleeve Seam
Now we close the sleeve seam. The only pin I would place is where the lace starts so it does not move.
Cut back any excess lace carefully, then press the seam flat. Make sure to remove all threads for a clean finish.
Always check your overlocking carefully, as there is an upper and underside, which helps you identify the right and wrong side if you get confused.
Attaching the Facing
Now we attach the facing to the sleeve. This is slightly different from usual because the right sides are facing differently than expected.
Turn the sleeve so the right side is on the outside, then slide the facing in so the wrong side meets the right side. This allows it to roll to the outside later.
Place a couple of pins to hold it in place.
Sew from the inside all the way around using a foot width seam allowance. Then press lightly.
Understitching and Finishing the Facing
Now we under stitch. This is very important because it ensures the seam rolls to the inside and does not show on the outside.
Stitch the seam allowance to the facing, then roll it out and press lightly. You do not need heavy pressing here, just a gentle shaping with steam.
This helps the sleeve sit beautifully and professionally.
Inserting the Sleeve
Now comes the important part: inserting the sleeve.
Every sleeve has markings for the sleeve head. These may vary depending on the pattern, so always check how it falls. The sleeve should never fall towards the back, it should always fall slightly forward.
Start by placing the sleeve at the correct side, matching underarm seams first, then match the sleeve head to the shoulder point.
At the lower end, keep it fairly flat. Use your hands to shape the sleeve first before pinning.
Pin gradually while rotating around the armhole, making sure everything sits smoothly.
If there is too much ease or too little, adjust by redistributing or adding slight adjustments.
Sewing and Checking Fit
Once pinned, sew from the inside of the sleeve. Use a steady foot width seam allowance.
After sewing, check the sleeve carefully. Make sure the sleeve head is smooth and nothing is pulling backwards.
Then overlock the seam neatly.
Pressing the Sleeve
Next, press the seam correctly. Never iron heavily from the outside.
Instead, use steam and gently shape it with your hand. This keeps the sleeve rounded and natural rather than flat.
A light steam press gives a very professional finish.
Flutter Sleeve Introduction
Now we move on to a flutter sleeve, which is one of the simplest sleeves you can make.
This is a very easy option and has lots of movement. You can also use bias binding on the edge for a nice finish.
Sew the binding onto the edge, then fold it over and secure.
Attaching the Flutter Sleeve
Attach the flutter sleeve by sewing it into the armhole. Because the right and wrong sides are the same, you cannot really go wrong.
Overlock the edge and press to one side.
Then insert gathering stitches where needed and gather evenly between marked points.
Pin the sleeve carefully and distribute gathers evenly.
Sew slowly and evenly, making adjustments as you go.
Finishing the Flutter Sleeve
After sewing, remove pins and overlock the seam.
Press gently from the outside using steam and your hand to keep the flutter soft and natural.
Avoid flattening it too much so it keeps its movement.
Ruffle Sleeve Overview
The plain sleeve with a ruffle is very simple. Sew the sleeve, attach the ruffle, gather it, and join both together.
Make sure you mark your points so everything aligns properly.
Puff Sleeve Construction
Now we move on to the puff sleeve, which is the final sleeve.
This is one of the easiest sleeves to construct. First, attach interfacing to the facing.
Add a guide line at 1.5 centimeters from the edge to help position the ribbon accurately.
Sew slowly along this guide line.
Then attach the ribbon carefully, following the line for accuracy.
Final Assembly of Puff Sleeve
Attach the facing, then sew with a one centimeter seam allowance.
Check alignment carefully before stitching.
Close side seams and press them open.
Add gathering stitches and pull evenly, usually about four centimeters on each side.
Attach the cuff and distribute gathers evenly.
Sew and overlock the seam, then press lightly with steam.
Final Sleeve Insertion
Insert the sleeve into the armhole as before, matching notches and sleeve head points.
Pin carefully and sew slowly.
Overlock the seam and press lightly using steam and hand shaping.
Final Thoughts
This concludes the sleeves for this sew along. I am really pleased with how they turned out. I am still deciding on final details like buttons, but overall the dresses are looking very pretty and elegant.
Thank you for following along, and I hope you enjoyed making these sleeves.
Transcript for the video: Virginia Blouse Sew-Along The Closure
Hi everyone, this is the last day of our sew-along in front of the Virginia Flowers dress. If you have missed it and still want to watch it, all the videos are in the playlist, and the link is below if you are watching this on YouTube. If you are watching this in the Facebook group, you know where to find everything. You can also find all the videos in the Academy when you are on the Virginia course. The Virginia course is a pattern sewing course that goes from H1 to H12, and all the information is in the description box.
So let’s get started.
Positioning the Button Stand
The first thing I want to show you is where to place the button stand. Sometimes people place it straight down, and that might be correct. However, I have seen cases where this creates a slight pucker. What you want to do is try it on a child or a dummy and check where it naturally sits.
In my case, it sits exactly straight, but sometimes it may need to be slightly adjusted depending on the fabric. Once you find the correct position, place a pin to mark it.
Now let’s attach the three buttons. Use your needle to find the furthest straight point across and that will guide where the button should sit. This ensures the front closes properly and sits correctly.
Thread Knot Technique
Here is a quick reminder of how to make a knot at the end of a double thread.
Place the thread behind the needle, press it with your index finger, wrap it a few times, then hold it with your thumb and pull through. This creates a secure knot. Remove the pin and you are ready to sew.
Installing Kam Snaps
Now I am using Kam Snaps, size three, which I got from Joann’s.
I already marked the correct position using a pin. I usually place the male (sharp) side on one side and the socket side on the other.
To install:
- Go through with the awl exactly where marked
- Place the snap in position
- Press firmly to secure
Always make sure your markings are accurate before applying pressure.
A useful trick is to press the fabric slightly to create a mold first, then confirm placement before final installation.
Fixing Length and Adding a Fake Hem
I also decided to shorten the dress because I felt the length was too much and created an awkward hem.
I measured two inches from the edge and marked it all the way around using a textile marker. Then I folded it up to create a fake hem, which gives a petticoat-like effect.
After pinning, I stitched it in place while carefully maintaining the two-inch guide.
Adding Lace and Ribbon Detail
After trying it on, I felt the hem still looked a bit plain, so I added lace underneath the folded edge and overlocked it in place. Then I topstitched it close to the edge.
It still felt a little unfinished, so I added a dark blue velvet ribbon over the seam and stitched it down on both sides. This completely lifted the look and made it much more polished.
Final Dress Improvements
Now the dress looks much better and more balanced. It just needed that extra detail to bring it together. This is a good reminder that you can always improve your work, even after you think you are finished.
It only needs a final press and it is ready to wear. I am very happy with how it turned out.
Button Placement on Final Top
On the top version, I decided to use Kam Snaps instead of buttons. I marked the top and bottom positions first, then placed the middle snap based on alignment.
To install:
- Mark positions carefully
- Use the awl to create holes
- Push snaps through and secure
This creates a clean and modern fastening.
I really like the red snaps as a contrast. It makes the garment stand out beautifully.
Final Embellishment Ideas
The lace section still looked a bit plain, so I added another layer of lace underneath and stitched it through. This added depth and detail without overcomplicating the design.
Sometimes small suggestions from viewers really help improve a design, and this was one of those moments.
Buttonholes and Sewing Machine Settings
Next, I created buttonholes using my machine’s automatic setting (number 33).
Important points:
- Set top thread tension to around 3
- Mark buttonhole placement 1.2 cm from edge
- Ensure even spacing before sewing
If the machine stops mid-process, reset and check fabric alignment. This can happen if the sensor is triggered.
Cutting Buttonholes Safely
To cut buttonholes safely:
- Use embroidery scissors
- Place a pin at the end to avoid cutting too far
- Avoid using seam rippers as they can damage fabric
This helps prevent mistakes and keeps everything clean.
Final Dress Reflection
This dress turned out beautifully. It has a soft, vintage feel, almost like Little House on the Prairie, but more refined.
I am really happy with the final result, especially the buttons and finishing details. It has grown into something very special.
Closing of the Sew-Along
This marks the end of the sew-along. We created several versions and learned a lot of techniques including sleeves, lace insertion, snaps, hems, and finishing details.
If you want to learn patch pockets, there is already a full course available in the Academy, and more lessons may be added in the future.
Thank you for following along. On Friday, the winner of the sew-along will be announced, based on the best dress and best photograph submitted.
Thank you for watching, and see you again soon for another workshop or sew-along.
This pattern was a joy to have in my shop. I love that there were many arrangements and styles. The pattern is clear and easy to follow. It was a joy to make my daughter and my nieces, shirts that match one another. I will be back and I will recommend this shop to my friends and family! Thank you Marina! I am happy that, even though I bought this pattern back in 2021, and am now leaving a response, I have nothing but positive things to say about this business!
Great little top; my granddaughter loved it and she picked her own fabric!
Very cute pattern. Can’t wait to make! After making these… the pattern runs very very small in the neck, arm holes and shoulders.
Lovely top and great utube video. Will purchase more of Frock and Frolics patterns.