Zu Produktinformationen springen
1 von 7

BAUMROCK

BAUMROCK

Filled Circle
Empty Circle
Empty Circle
Empty Circle
Empty Circle
Normaler Preis $0.00 USD
Normaler Preis Verkaufspreis $0.00 USD
Sale Ausverkauft

Bring ein bisschen Weihnachtszauber in dein Zuhause mit diesem KOSTENLOSEN Schnittmuster für einen Weihnachtsbaum‑Rock. Mit seinen lustigen Schneemännern und fröhlichen Bäumchen verleiht er deinem Baum einen modernen, festlichen Look – und die Vorlagen eignen sich auch wunderbar für andere Deko-Ideen.

Marina’s Video ist natürlich auch dabei, einfach herunterscrollen und zuschauen.


Was ist beim Schnittmuster dabei?

  • Sofortdownload
  • DIN A4 & US Letter Größe
  • Ausführliches eBook
  • Video-Tutorials

Design

  • Schneemann-Applikation
  • Erhältlich in zwei Größen

Stoffverbrauch

  • Hier kann man mit grobem Leinen als Unterlage experimentieren
  • Filz für die Applikation
  • Grundlegende Nähutensilien
  • Verzierungen

Verfügbare Größen

Das Schnittmuster muss nicht skaliert werden, du kannst es also einfach ausschneiden, zusammensetzen und mit dem Nähen beginnen.

  • 1,20 m (45 Zoll)
  • 90 cm (35 Zoll)

Bitte beachten

  1. Dies ist ein digitales Schnittmuster oder eine PDF-Datei, kein physisches Produkt. Die Zustellung erfolgt elektronisch über einen Download-Link an die beim Kauf verwendete E-Mail-Adresse. Zusätzlich kann das Schnittmuster von deinem Kundenkonto heruntergeladen werden.
  2. Um sicherzustellen, dass das Schnittmuster in seiner tatsächlichen Größe gedruckt wird, wird die Verwendung von Adobe Acrobat Reader empfohlen.
  3. Kleine Betriebe: Ich freue mich wenn meine Schnittmuster dir helfen, tolle Bekleidung für deine Kunden zu nähen. Industrielle Produktion ist untersagt.

Kunden werden ermutigt, Frocks & Frolics zu verlinken, wenn sie Projekte, die mit meinen Schnittmustern erstellt wurden, in sozialen Medien teilen.

@frocksandfrolics
#frocksandfrolics

Vollständige Details anzeigen

SCHRITT-FÜR-SCHRITT ANLEITUNG

Thumbnail
SCHRITT-FÜR-SCHRITT-ANLEITUNG
Thumbnail
RENTIER-DEKO
Thumbnail
NIKOLAUSSTIEFEL
Thumbnail
GESCHENKTÜTE

VIDEO TEXT

Introduction: Tree Skirt Project Overview

Transcript for the video: Tree Skirt Step-by-Step Instructions

How to make a tree skirt. This is Marina from Frocks and Frolics, and I’m going to show you exactly how we’re going to do this.

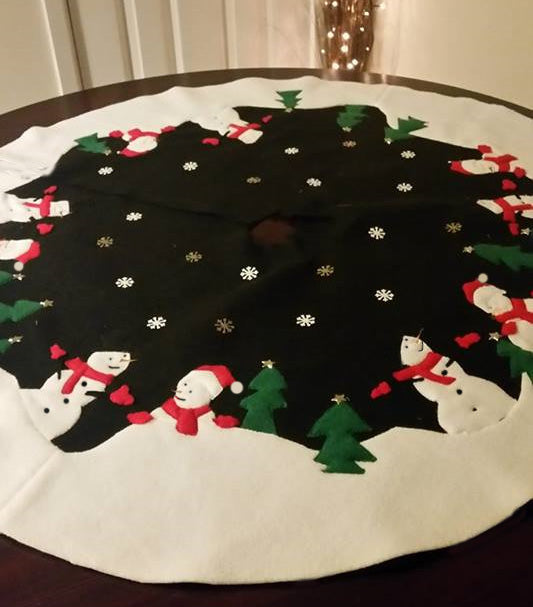
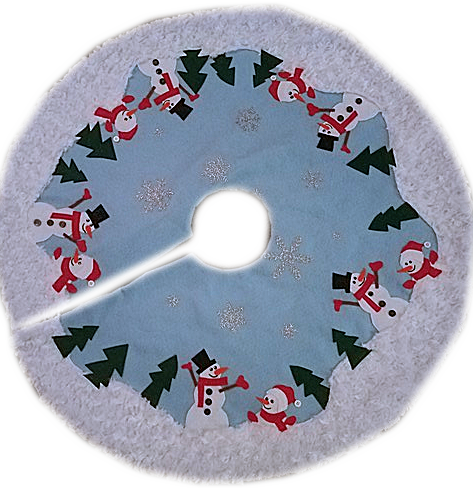
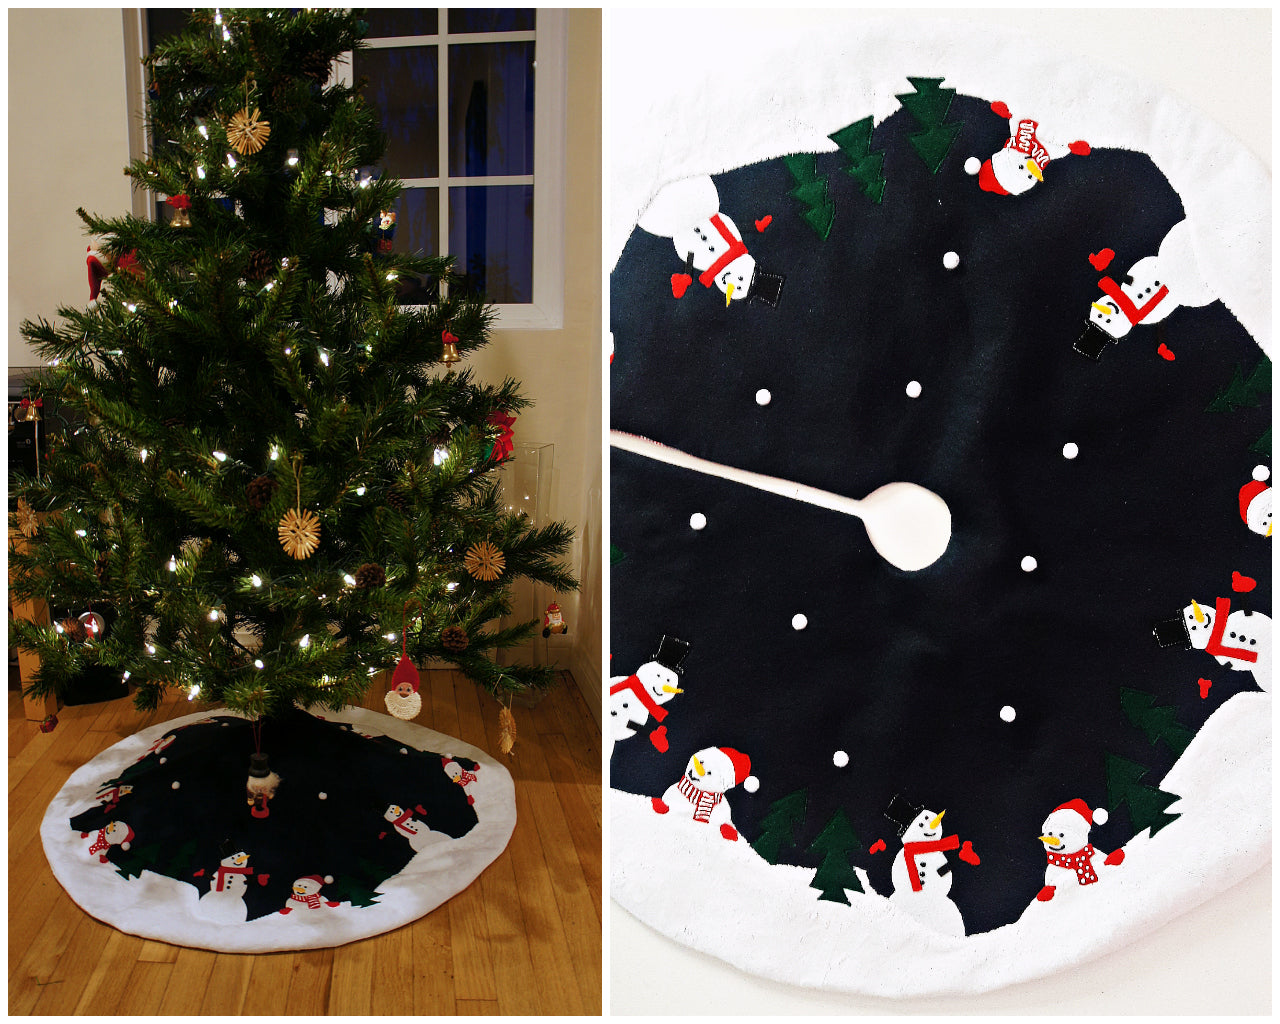
So we need red and white, and then we’ve got little black hats and yellow carrot noses. We need green fir trees, and then I have a really dark blue for the night sky. We’ve got fur for the trim, that’s the snow, and then we’ve got a really beautiful check lining.

I think that’s always fantastic for Christmas. And some wadding—you want some really slim wadding or batting. This one is way too thick, so I’m going to rip mine in half. You can actually do that with wadding; it’s not difficult. You can just rip it, and then it’s not so thick. I just couldn’t find anything else.

We also need Wonder Web, or Pellon in the United States, and that’s an adhesive film that is ironed to the fabric so that we can position it easier and just iron pieces on that we need. I’ve also got some textile 3D paint from Lumiere and Marabu, and we’re going to do the faces with that.

So let’s get started.

Pattern Preparation and Checking Scale

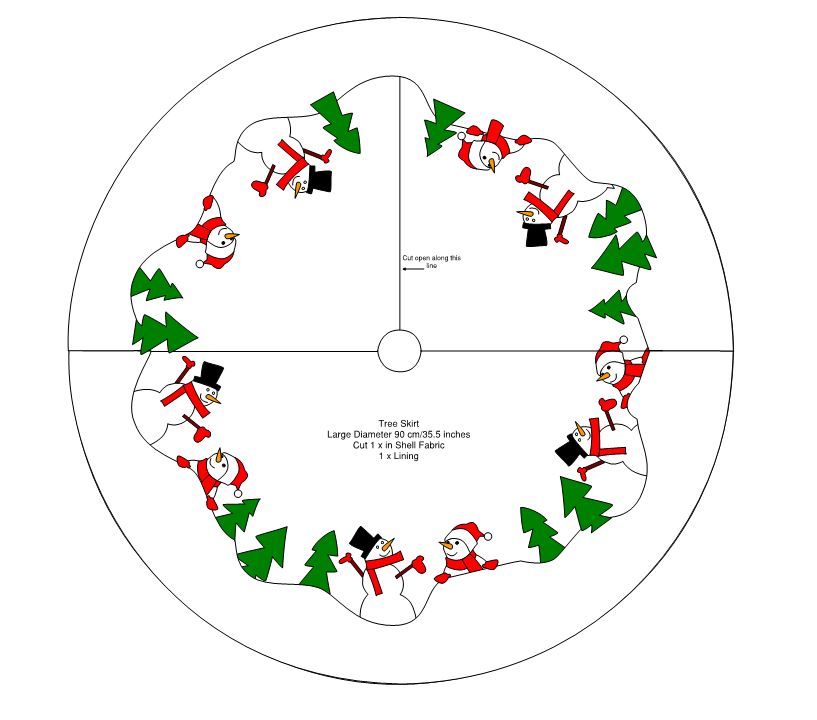
First of all, you need to check that you’ve printed off your pattern correctly. You need to measure the scale, and it needs to be 5 centimeters or an inch on the first page.

You’ve got trees, and you’ve also got a little diagram that shows you how everything needs to be applied. You don’t want to cut out the trees—you leave them on the paper. They’re just going to be traced off. The same goes for the small snowman and the larger snowman.

What we do need to cut out is the tree skirt and the trim. So you want to cut everything out first, and then we’re going to join your pieces together in alphabetical order: A, B, C, D, and E.

Then you put those together, and then you put the second row together. It’s always the same system with my patterns.

And there you go—we’ve got the tree skirt together already.

We are also going to correctly put together the trunk, again in alphabetical order. We need the circle once, the felt once, and the lining once.

Cutting and Layering the Fabric

So layer it all up, put your tree skirt over the top, and cut out one half. Then flip over your tree skirt to cut the other half out.

Then open the tree skirt, and in one of the areas—preferably where you have a straight grain on your lining—cut out the little circle in the center.

That’s basically it. We can start.

Move off the lining; you keep that to the end. The wadding and the felt I’m going to join with a few pins in strategic places just so it can’t go anywhere.

Now I’m going to cut my fur trim as well. I’m cutting it on the fold, so make sure the seam allowance stands over if you’re doing that. Otherwise it will be a little bit too big.

Now I place it on top of my felt and cut it open in one area as well. Make sure that the center front of your trim lies exactly opposite of the slit, so that it works with my little diagram.

Tracing and Preparing Motifs

Now we’re going to start tracing everything onto the Pellon. Smooth side up, we’re going to trace out all the things as the pattern tells you to.

All the trees need to be cut four times, so you want to move it over until you have four and keep tracing them out. It’s a bit time-consuming, but this is the quickest way to do this. I’ve seen people cut out the little trees—don’t do that.

Now I’ve traced them all out. Whatever I’ve got left over from my felt I keep safe, because there are little scraps I can use again.

I’m going to do the same with everything else. I’m tracing my carrot noses five times, then putting that away, and then tracing the next bit. I do each one of those bits five times.

It’s a lot of pieces, so you don’t get confused. You might want to put them into boxes or compartments so you can’t mix them up.

Before you cut out, here’s a little trick: lift the paper off slightly from the side and then cut the first part out so you can easily lift it off. Don’t just rip it all off at once, because it can pull the felt.

Cutting Out and Organizing Pieces

Now I’ve cut everything out and it’s absolutely perfect.

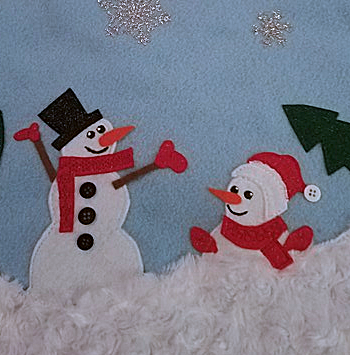
Make sure the paper backing has been removed, and I’m going to put the big snowman under first—everything that disappears underneath the snow goes on first.

Then I add all the little bits for the snowman, from the mittens to the twig arms, everything. I place them where they need to go and iron them into place so they can’t move.

Next we iron on the little snowman, again placed behind the snow. One of the trees also disappears behind the snow, so we iron that on too.

Now we’re going to slip stitch the trim all the way around. Because we’ve got rounded edges, we need to snip it so we can turn it without tension. Then it’s a lot of slip stitching.

Make sure everything is positioned correctly, especially that the snowman is low enough so it is covered properly.

Assembling and Stitching Details

Now I put my mittens over the top and iron those on, then the rest of the snowman pieces as well. I’m using an ironing cloth to protect the fabric.

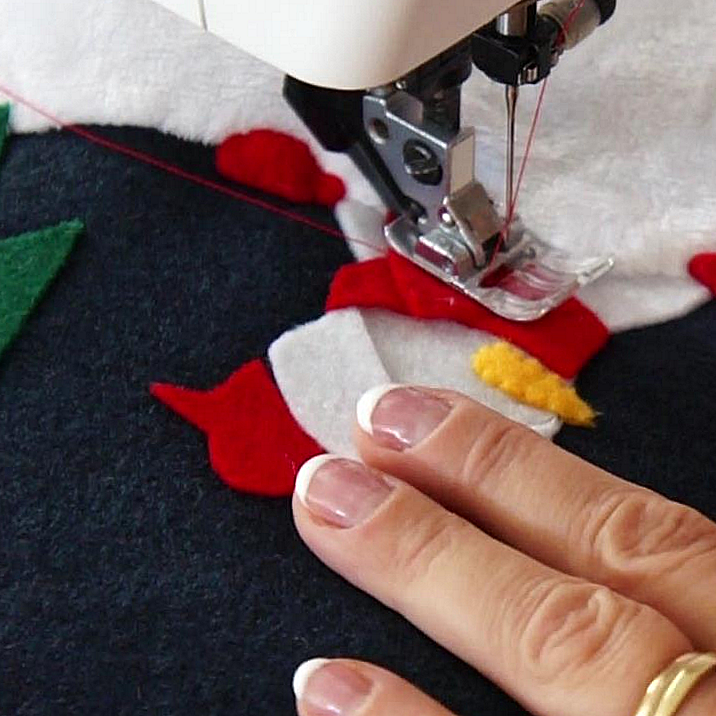
Next we stitch all the little details with matching thread. These bits are too small for the sewing machine, so I slip stitch them by hand.

After that, we go over to the sewing machine and stitch around all the rest of the pieces. Try to stitch continuously where possible. Always keep the needle down when turning corners.

For the hat, I actually used a triple stitch because the contrast needed to stand out better. You can also count stitches if needed to keep it even.

Then I added little bobbles on the hats, which I think are really cute.

Adding the Lining and Turning the Work

Finally, we put the lining over the top, right sides facing each other. I pin vertically at all the seams so I don’t have to remove them while sewing.

We stitch all the way around, leaving an opening gap. After that, we cut back the corners and trim excess wadding so it’s not too thick.

We also snip around the center so it can turn without tension.

Then we pull everything through the turning gap. Don’t make the gap too small.

Now we slip stitch the opening closed. Felt is very forgiving, so you won’t see small mistakes.

We press everything from the underside with lots of steam so it becomes flat and smooth.

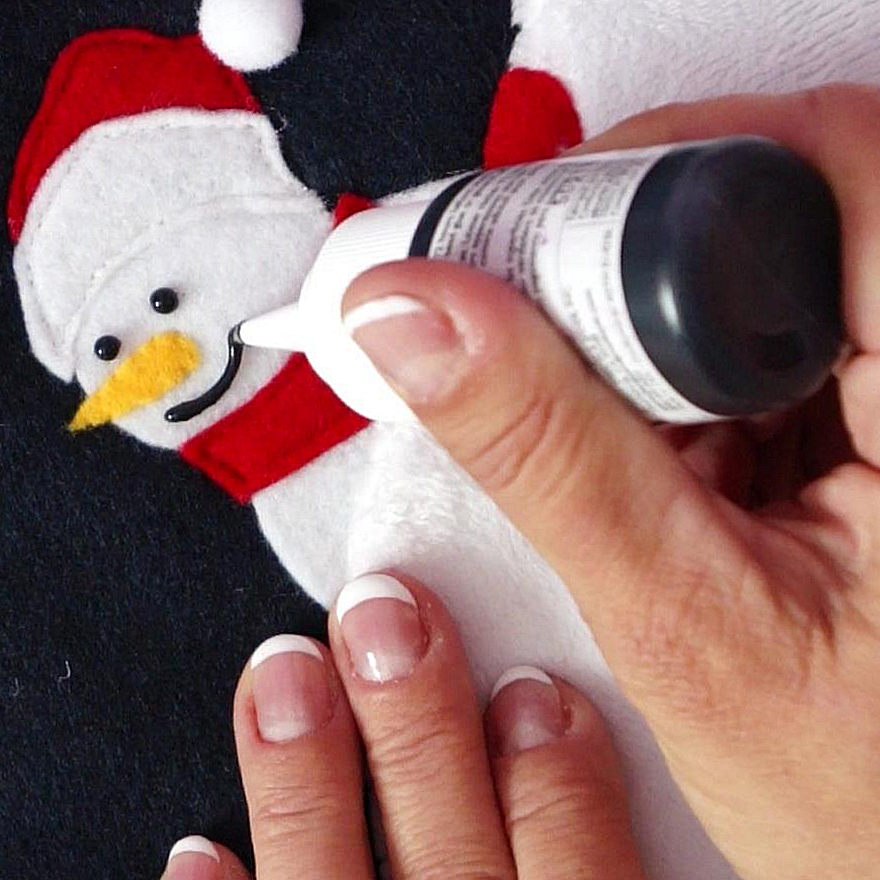
Finishing: Painting Details and Final Decoration

Finally, I add the faces using Marabu textile liner in white and Lumiere 3D paint.

Make sure to practice first. Go lightly over the felt rather than scraping it. Work quickly for smoother lines.

The white can sink into the fabric, so make it slightly thicker. The black works beautifully.

Then I paint the eyes and details, let everything dry overnight, and finish by ironing to set it.

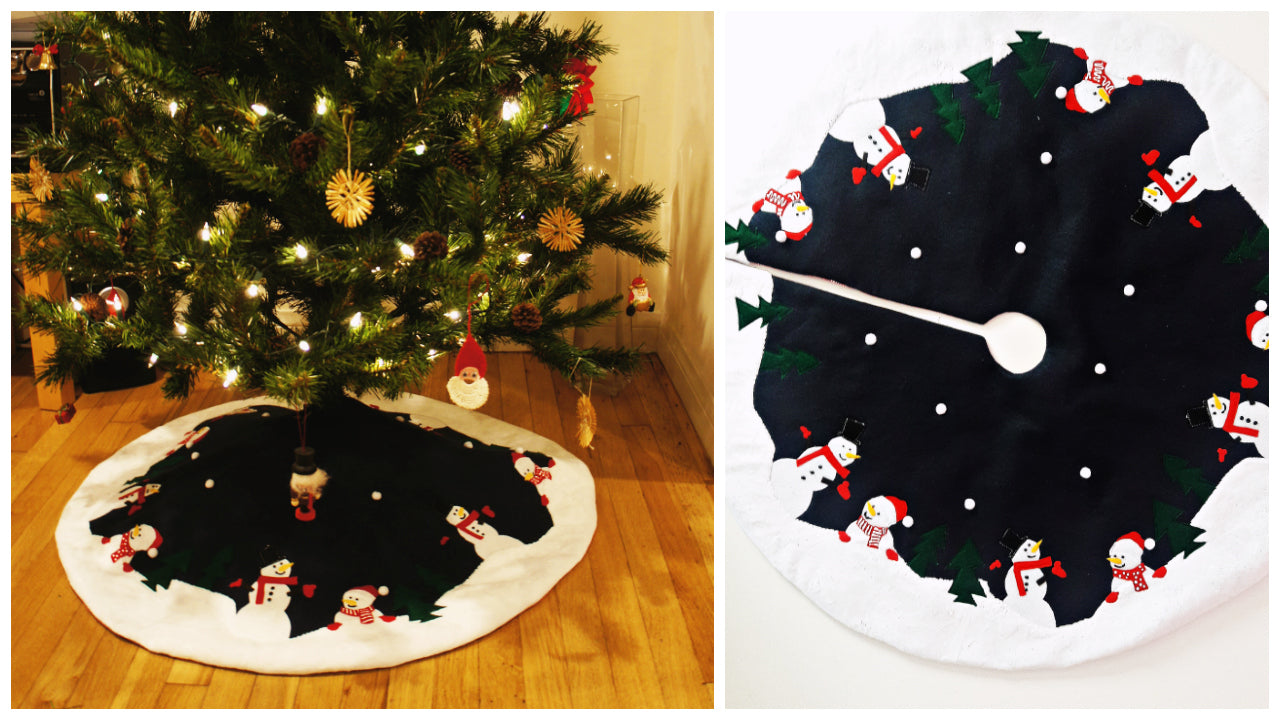
And that’s it—your tree skirt is done and ready for Christmas.

Transcript for the video: Tree Skirt - Reindeer Decoration

Hi, I’m Marina from Frocks and Frolics, and I’m going to show you how to make a super cute reindeer.

The link to the blog post and also to the Academy, where you can watch all the other videos, is in the description.

Here’s my super cute little reindeer with a bit of fluff at the end, a little bear, and a ribbon to hang him up with, which is really cute. I hope you really enjoy this, so let’s get started.

Materials Needed

What you need for this:

You need only about 1/3 of a yard at the very most, or actually just scraps will do, around 30 centimeters.

You will also need:

  • A wider ribbon to hang him up
  • A smaller ribbon for the little bell
  • A little bit of fluff for the tail
  • Felt for a little saddle with a bell

Cutting the Pattern

First thing to do is to download your pattern and cut it out.

I’m going to show you a really cool little trick to get all these shapes really nicely done.

Instead of cutting the reindeer out first, we are going to sew all the way around the reindeer, just next to the paper. We are leaving:

  • A turning gap where the saddle goes
  • Another gap on top of the antlers so we can insert a ribbon later to hang it up

You only sew up to there, and you should use a really small stitch, maybe 1.5 at the most, so when we go around the curves nothing will fray.

As you can see here, I’ve sewn all the way around, and now I’m cutting my reindeer out instead of cutting first and then trying to sew a small seam allowance.

Turning and Stuffing

Next, snip all your curves on the reindeer so that when we turn it, there’s no tension.

I’ve got a ribbon here about 25 centimeters or 10 inches, and I’ve attached it to a safety pin. Then I go through my turning gap and bring it out at the top of the antler where I left that tiny gap.

Take the safety pin out, then stitch across that little edge.

After that, turn it carefully. Make sure everything is fully turned.

Now I’ve got the ribbon in place.

You can use small scissors to help push everything out properly, especially into the antlers. Start with small bits of stuffing—don’t overstuff it at once. Work into the far corners first, then fill the middle.

Closing the Gap

Once stuffed, close the turning gap using a slip stitch from either side.

Don’t worry too much about it being perfect because we’re going to put the saddle over the top anyway.

Adding Details

Now sew on a little bit of fluff for the tail.

Next are the eyes. The eyes are sewn straight through the reindeer so they are pulled in nicely. Put one bead on each side so you can really pull it tight and secure it.

Then add a super cute little bell around him and tie a bow.

At this point, your reindeer is basically done, and you could leave him like this and just hang him up.

Adding the Saddle

I decided to add a saddle because it really makes it extra nice.

Pin it in place, then sew using a blanket stitch all the way around. That means you create a loop with each stitch and keep it consistent all the way around for a decorative edge.

Make sure to secure the beginning properly so it lies flat.

Finish off by securing your thread.

Final Touches

Finally, add a big ribbon around the reindeer and tie another bow.

And there you go—finished!

If you want to read the blog post, there is a link below in the description. It also links to the Christmas stocking we will do, and there will also be a nice gift bag tutorial.

Bye for now.

Transcript for the video: Tree Skirt - Christmas Stocking

Hi everyone, this is Marina from Frocks and Frolics, and we are going to make a super cute stocking for your tree where you can put all those little treats inside.

It’s not very difficult, and the patterns for it are all free. You can get those from the Academy—the link is in the info box.

Cutting the Pattern Pieces

First of all, you need to cut out your stocking.

My stocking is a little bit small, so I would suggest adding a little bit of seam allowance to make it slightly bigger.

You need to cut:

  • Your stocking twice
  • Your lining twice
  • Your boot and heel cap twice

Sewing the Lining

First of all, we are going to sew together our lining, but we are leaving a gap in the side so we can turn the stocking later.

Adding the Boot and Heel Caps

Now we are going to sew on the boot caps using a blanket stitch. On my machine, that’s stitch 30.

Sewing the Stocking Together

Next, we join the two pieces of the stocking together, right sides facing in.

Sew all the way around, but don’t forget to leave the top open. Do not sew the stocking shut.

Snipping the Curves

Now that both stocking pieces are together, we need to snip all the curves, otherwise they will not turn easily.

Assembling the Lining and Outer Stocking

Now we put one stocking inside the other.

Right sides need to be facing again, and you can see the lining has the seams to the outside.

Join the top of the stocking and sew all the way around. This might be a little fiddly, so I would really recommend making this stocking a little bigger than I did.

Turning the Stocking

Once this is done, go to the opening and turn your stocking inside out.

Closing the Gap

Finally, we close the gap that we left open.

Turn the seam allowance to the inside, pin it, and stitch it down with a sewing machine.

Final Touch

Finally, add a ribbon on top. You can choose any ribbon you like—I just had a small white one to hand.

Closing Message

Pop over to the Academy and the Handmade Christmas course, where you will find even more templates, including another gift bag and the beautiful stuffed reindeer.

Thank you very much for watching, and I’ll see you over there. Bye for now.

Transcript for the video: Tree Skirt - Gift Bag

Sometimes the gift wrap is as nice as the gift that’s inside—that’s exactly what we want to do with our gift bag.

This Christmas you get this fantastic pattern pack, which has all sorts of things in it like reindeers and Christmas stockings. In this video, we’ll show you how to make the little gift bag.

Cutting the Fabric Pieces

First of all, we fold over the body of the gift bag.

Then you’ll see that long strip there—actually, don’t have them together, have them separate. It works much better.

They are cut on the fold again, and they make the trim at the top. Then you’ve got a strip of fabric as well, which will make the loops.

Preparing the Decorations

With your free pattern pack this Christmas, you get all sorts of shapes like gingerbread men, hearts, and stars—and that makes your life so much easier.

I’m going to show you how to do the little appliqué on this.

You can see I’ve numbered all of them so you know which one goes on first.

Use three different types of felt for this. Cut them out and then apply them to one side of your fabric.

I would pin them on first exactly in the position they need to go, then lift off the ones you don’t need and start applying them.

Here you can see I’ve got them all on. I’ve also pinned down the hands. Actually, the face was wrong—don’t do the face first, it’s not number three.

Finally, to finish it off, I’ve added a wooden bead for the eye, which I think is quite sweet.

Adding the Trim

Now we are going to put the trim on.

Like I said, don’t cut it in one piece—cut it into two bits. It’s much easier.

Apply one trim to one side and the other trim to the other side.

Making the Loops

I’ve cut my fabric for the loops and ironed it towards the middle, then top stitched on both sides.

Cut them into 4–5 cm strips so you have enough loops (I’m using about 5 cm).

Space them out evenly and place them on either side of the bag.

Make sure they are not too close to the edge, otherwise they will end up too close together when the seam is closed.

Then stitch across, and you can now close your bag.

Assembling the Bag

When you look at the sample on the left-hand corner of my frame, you’ll see the top loops are lower down.

You could turn up the loops at that point and sew them in completely, but if you’re doing it like me:

  • Sew the side seams first
  • Trim back seam allowances
  • Zigzag or overlock so it doesn’t fray

Now you can turn the trim to the inside.

Turn it up about 1 cm and pin it so it covers the seam, then top stitch into place.

I went fairly close to the edge.

Remove the pins and turn the bag inside out.

Finishing the Loops

Now turn up the loops and pin them back in again.

Then top stitch them, and that’s almost done.

It’s very quick depending on what you add. If you do the appliqué, it will take a couple of hours. If you do simple stars and flowers, it might only take 30–40 minutes.

Either way, whoever receives the bag will be really pleased with it.

Closing Message

That’s it—pop over to the Academy and the Handmade Christmas course, where you’ll find even more templates.

Thank you very much for watching, and I’ll see you over there. Bye for now.

DAS KÖNNTE DIR AUCH GEFALLEN

Dungies

SHOP NOW

Bobby Dazzler

SHOP NOW

Bubble Gum

SHOP NOW

Lollipop

SHOP NOW

Jelly Bean

SHOP NOW