Zu Produktinformationen springen
1 von 22

LILY KLEID

LILY KLEID

Filled Circle
Filled Circle
Filled Circle
Empty Circle
Empty Circle
Normaler Preis $8.50 USD
Normaler Preis Verkaufspreis $8.50 USD
Sale Ausverkauft

Das Lily Sommerkleid ist ein süßes, liebevoll entworfenes Schnittmuster für Mädchen. Du kannst Lily als luftiges, ärmelloses Kleid, als entspannte Tunika oder als süßes Cropped--Top für warme Tage nähen. Hinten hat es einen zarten Schlaufen--und--Knopf--Verschluss für einen hübschen Handmade-Touch.

Und mit dem kompletten Video Tutorial kannst du Schritt für Schritt mit Marina mit nähen — einfach nach unten scrollen und loslegen.


Was ist beim Schnittmuster dabei?

  • Sofort-Download
  • Digitale PDF Schnittmuster
  • DIN A4 Format
  • eBook
  • Video-Anleitungen

Design

  • Drei dekorative Falten
  • Drei Längen: Hüfte, Taille, Knie
  • Schlaufenverschluss
  • Ausschnitt und Armlöcher mit Besatz

Stoffverbrauch

STOFFEMPFEHLUNG
Leichte bis mittelschwere, gewebte Stoffe aus Baumwolle, wie zum Beispiel Sateen, cord oder Chambray.

STOFFVERBRAUCH

  • Obermaterial: 1m

KURZWAREN

  • Vlieseline: 30cm
  • Garn: 1 Rolle
  • Knöpfe: 1 x
  • Schlaufe: entweder vorgefertigt, ein Haargummi ist ein ganz guter Ersatz für eine selbst genähte Schlaufe und in vielen Farben erhältlich.
  • Dekorative Rosen: 3x
  • Spitze für den Saum (3-4 cm breit): 1,2 m

Verfügbare Größen

Größe: 92-152, Alter 1-12

Bitte beachten

  1. Dies ist ein digitales Schnittmuster oder eine PDF-Datei, kein physisches Produkt. Die Zustellung erfolgt elektronisch über einen Download-Link an die beim Kauf verwendete E-Mail-Adresse. Zusätzlich kann das Schnittmuster von deinem Kundenkonto heruntergeladen werden.
  2. Um sicherzustellen, dass das Schnittmuster in seiner tatsächlichen Größe gedruckt wird, wird die Verwendung von Adobe Acrobat Reader empfohlen.
  3. Kleine Betriebe: Ich freue mich wenn meine Schnittmuster dir helfen, tolle Bekleidung für deine Kunden zu nähen. Industrielle Produktion ist untersagt.

Kunden werden ermutigt, Frocks & Frolics zu verlinken, wenn sie Projekte, die mit meinen Schnittmustern erstellt wurden, in sozialen Medien teilen.

@frocksandfrolics
#frocksandfrolics

Vollständige Details anzeigen

SCHRITT-FÜR-SCHRITT ANLEITUNG

Thumbnail
DAS SCHNITTMUSTER
Thumbnail
LILY: DAS KLEID
Thumbnail
LILY: DIE BLUSE
Thumbnail
WIE MAN EINE STOFFROSE NÄHT

VIDEO TEXT

Lily Dress Pattern Overview

Transcript for the video: Lily Tunic - The Pattern

It's been a long time since the original Lily dress was designed, so this version includes several updates to make the pattern easier to work with. Some adjustments have been made based on feedback, especially around the pleats and overall construction clarity. Length options have also been added, along with a hem trim and revised facings.

Printing and Checking Your Pattern

Once you've printed your pattern, the first step is to check the scale. If the test square measures 1 inch or 5 cm, the pattern is correctly scaled and you can proceed with cutting out the pieces.

You’ll notice dashed lines on some pieces—these are attachment lines, meaning another pattern piece needs to be joined there. Cut out all pieces carefully.

Each section is also marked with colored flowers. The back pieces use a purple or dark pink flower, while the front pieces use a white flower. The sections are labeled in order from A to D, so you simply tape them together to reconstruct each full pattern piece.

Length Options and Cutting Lines

There is a cut line included for a shorter version of the dress. Although the back may appear significantly lower on the pattern, this is due to the front twist—it is only slightly lower in reality.

There is also a separate line for adding a hem trim. If you choose to include the trim, you must cut along this line; otherwise, the proportions will look incorrect because the trim is designed to roll from the inside to the outside.

Facings and Construction Variations

The back facing is 1 cm shorter due to the back seam allowance.

For the front pleats, you have two construction options:

If you want open pleats that spring open at the top, use the longer front facing and sew only the lower section, leaving the pleats free at the top.

If you prefer pleats that are sewn all the way to the top, use the shorter front facing. This version creates a cleaner, more structured twist.

You can also prepare a template for marking pleats if you are making multiple garments. This helps improve accuracy and consistency.

Understanding the Shape and Side Seams

The side seams may look unusual at first compared to the front and back pieces. This is intentional due to the front twist design, which reduces bulk compared to the original Lily dress while still creating shape.

Once pleats are added, the side seams will align properly, and the front and back seam lengths are designed to match. This consistency is important for a professional finish.

There is also an additional notch indicating where a closure can be added. A closure is optional, but without one you should check whether the dress can still comfortably go over the head and adjust the back depth if needed.

Optional Additions

A pocket has been included in this updated pattern due to popular request, even though it was not used on all sample dresses. A small bow pattern is also included as an optional detail.

Design Variations and Styling Examples

One version of the dress is sewn fully closed at the top and finished with decorative rosettes, including detailing at the hem and back.

Another variation leaves one side open while the other is sewn shut, creating a twist effect that works especially well with striped fabrics, as the lines naturally flow into an A-line shape.

Additional versions include decorative buttons with rouleau loops, and a simplified style with lace trim at the hem and minimal detailing.

Final Notes

This updated Lily dress pattern is designed to give you more flexibility in length, finishing, and styling while making the construction process clearer and more structured.

Thank you for watching, and enjoy creating your version of the Lily dress.

Lily Dress Variation

Transcript for the video: Lily Tunic - The Dress

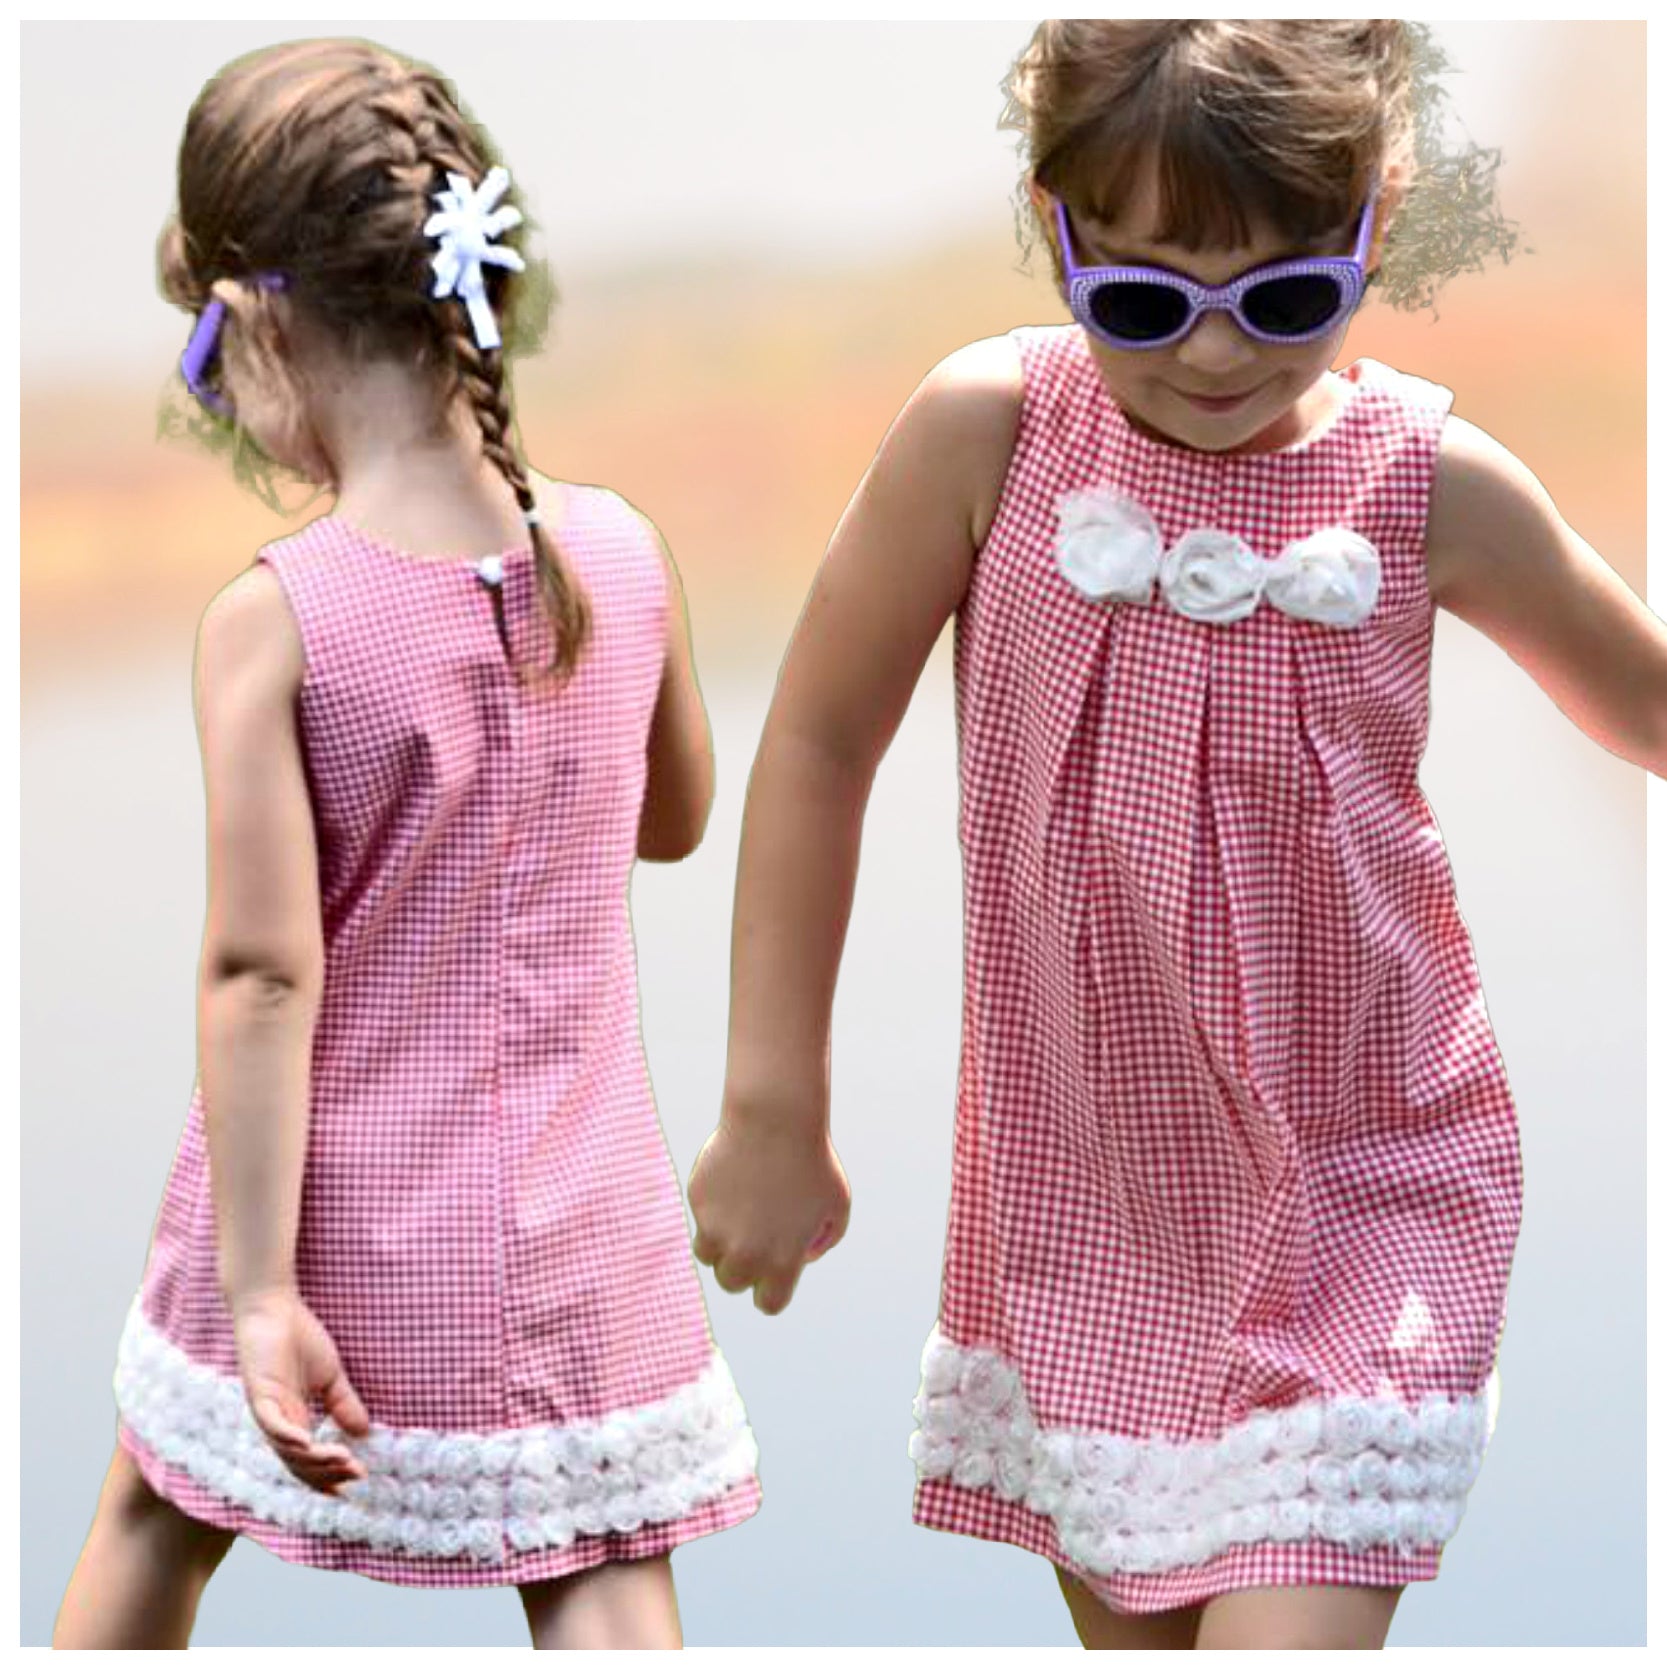
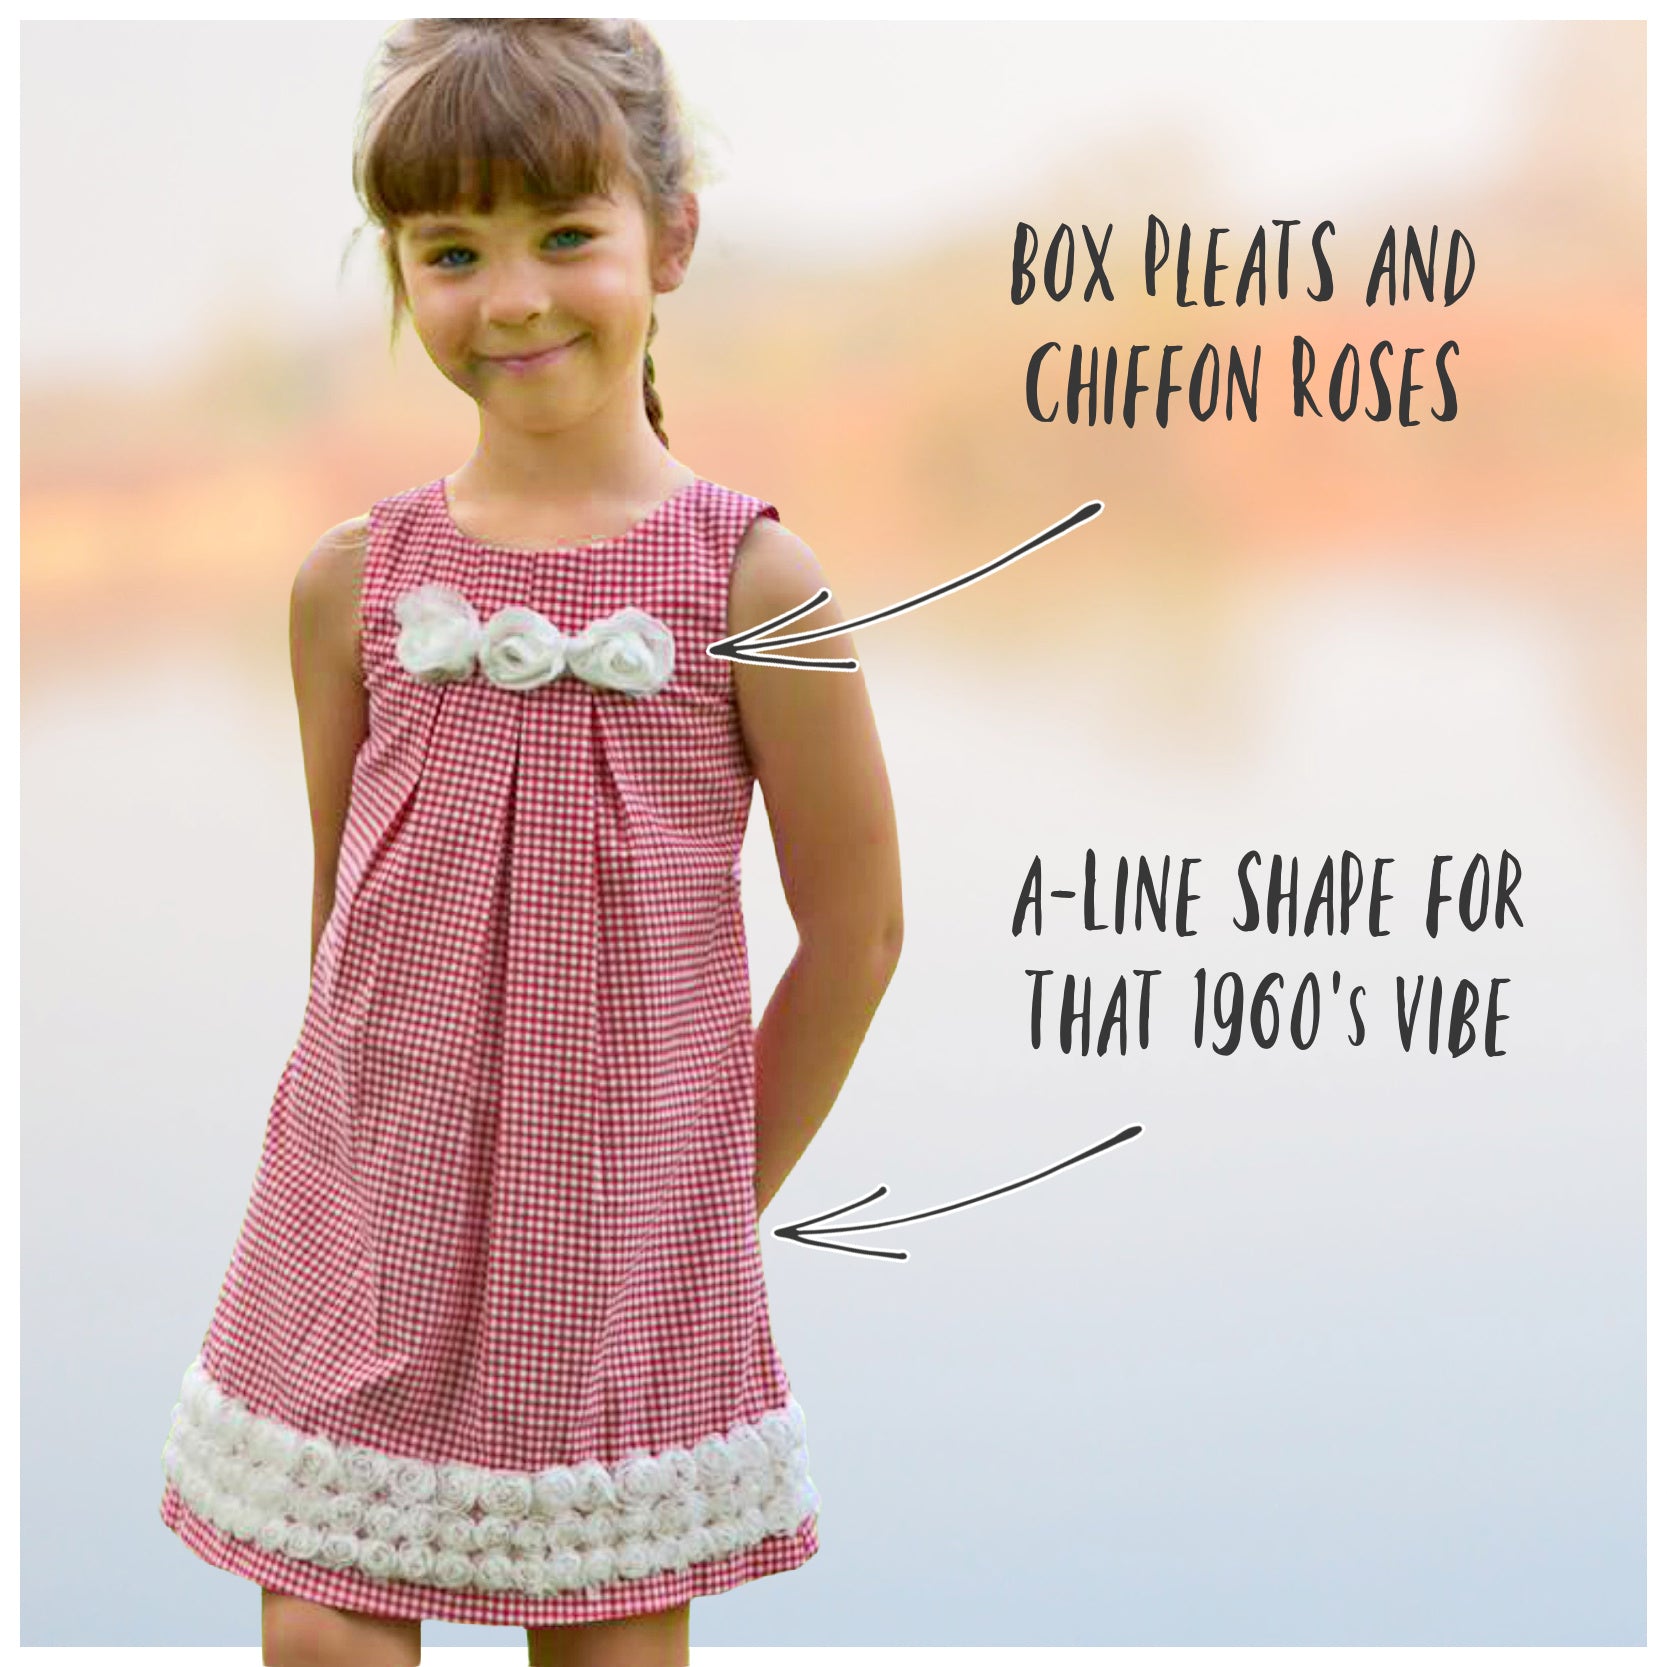
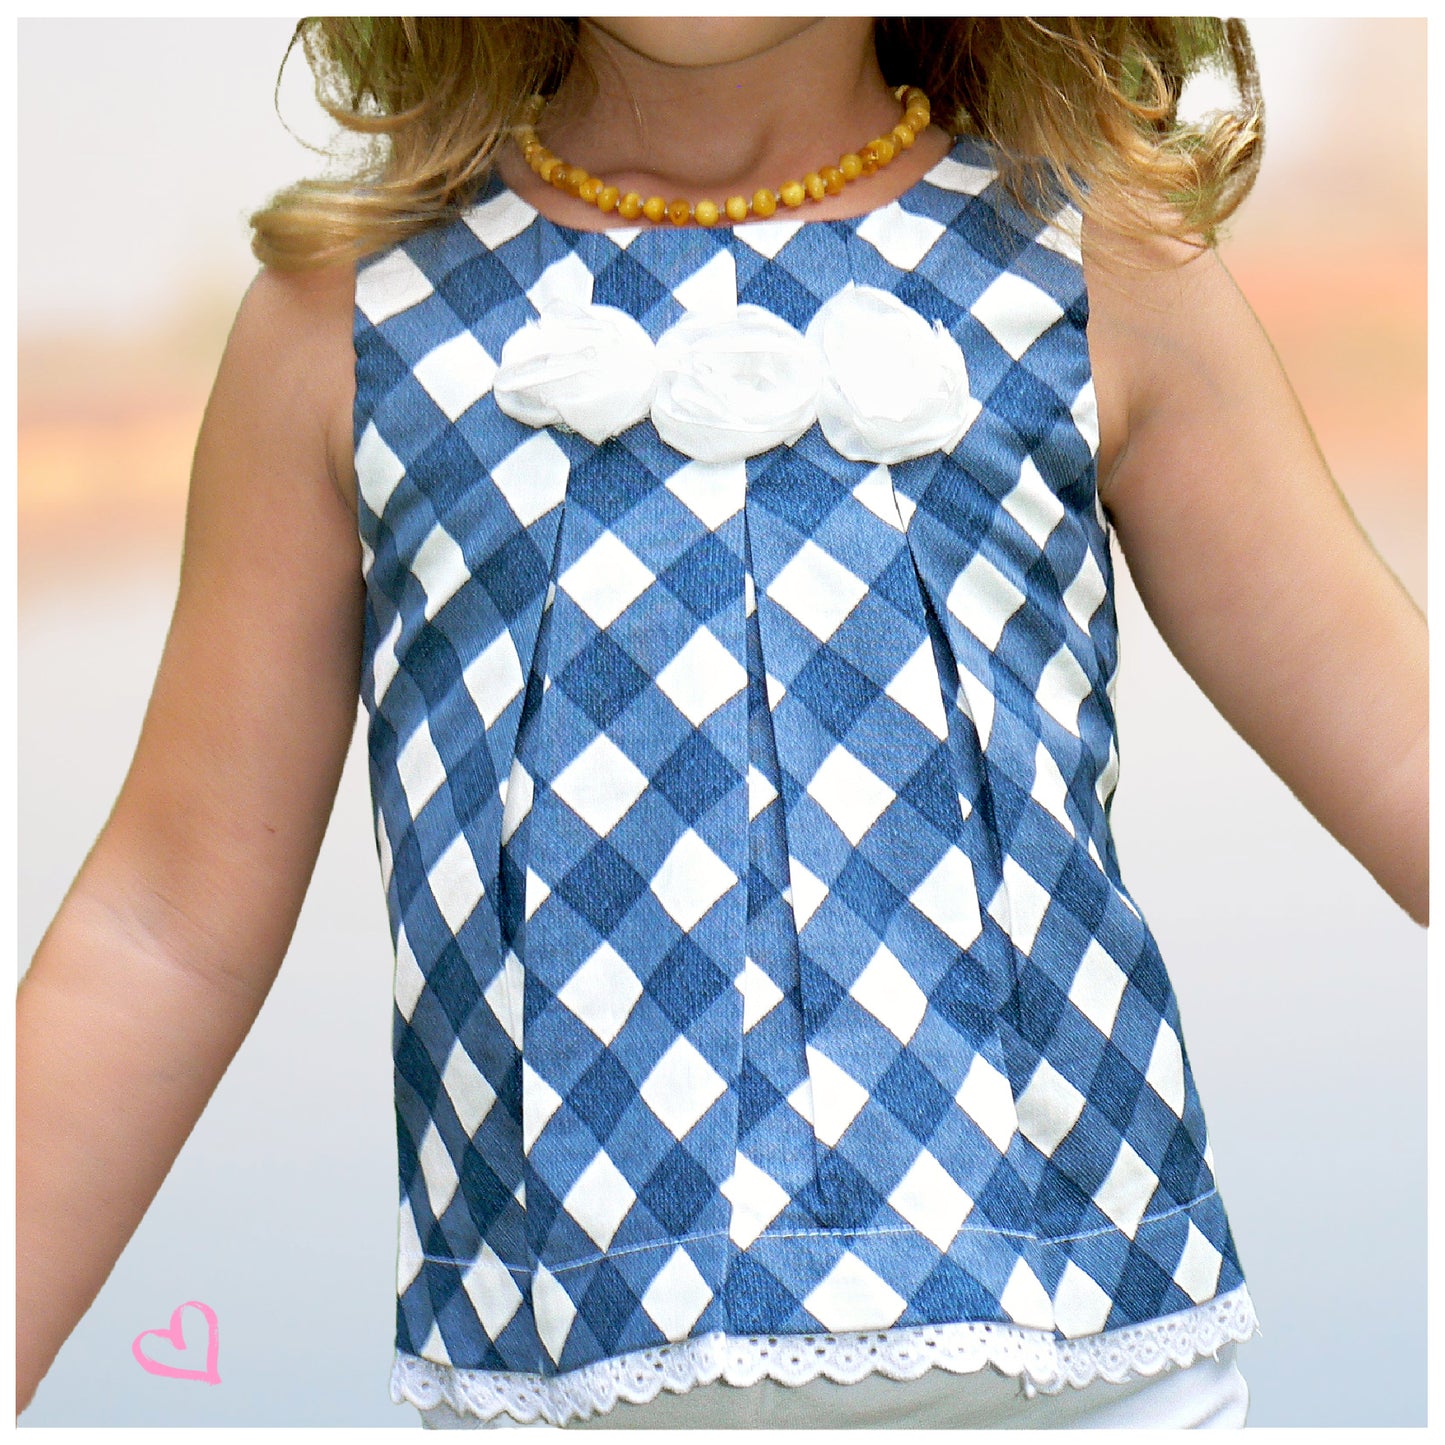
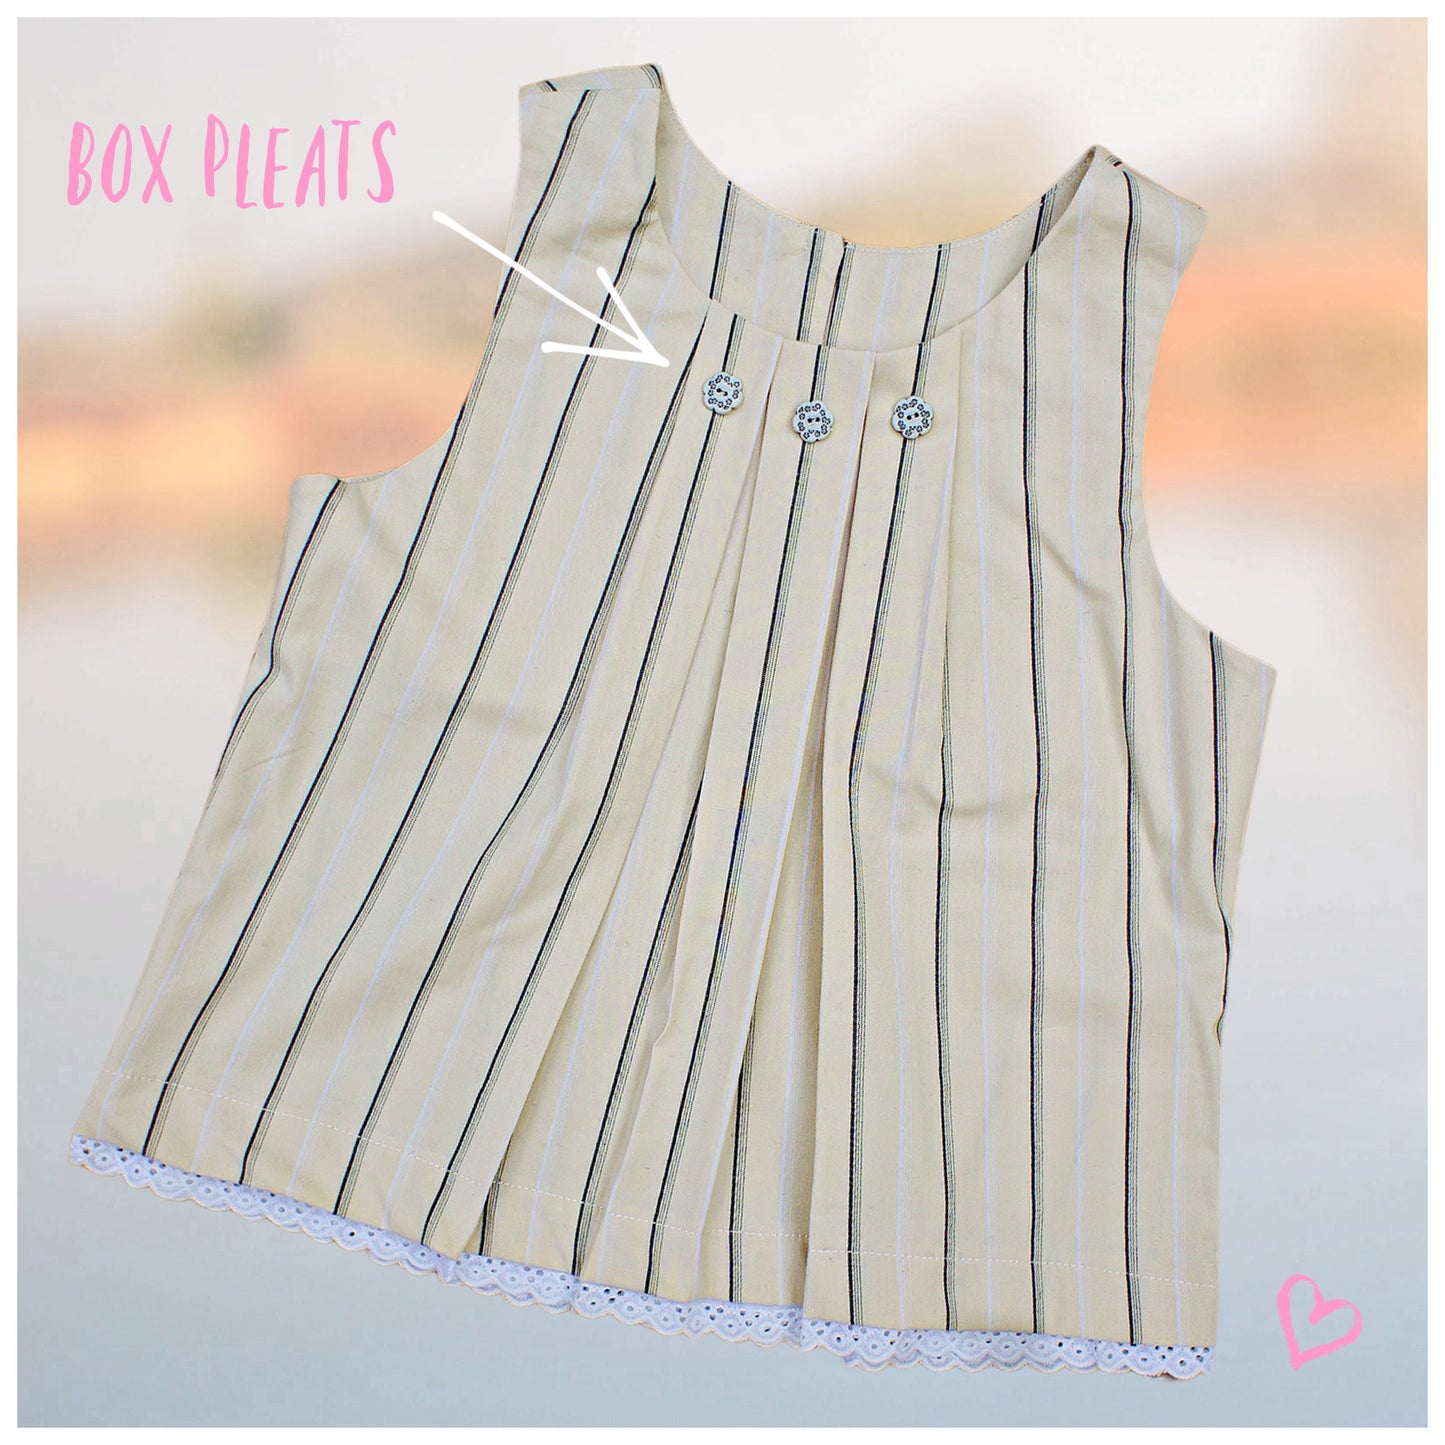
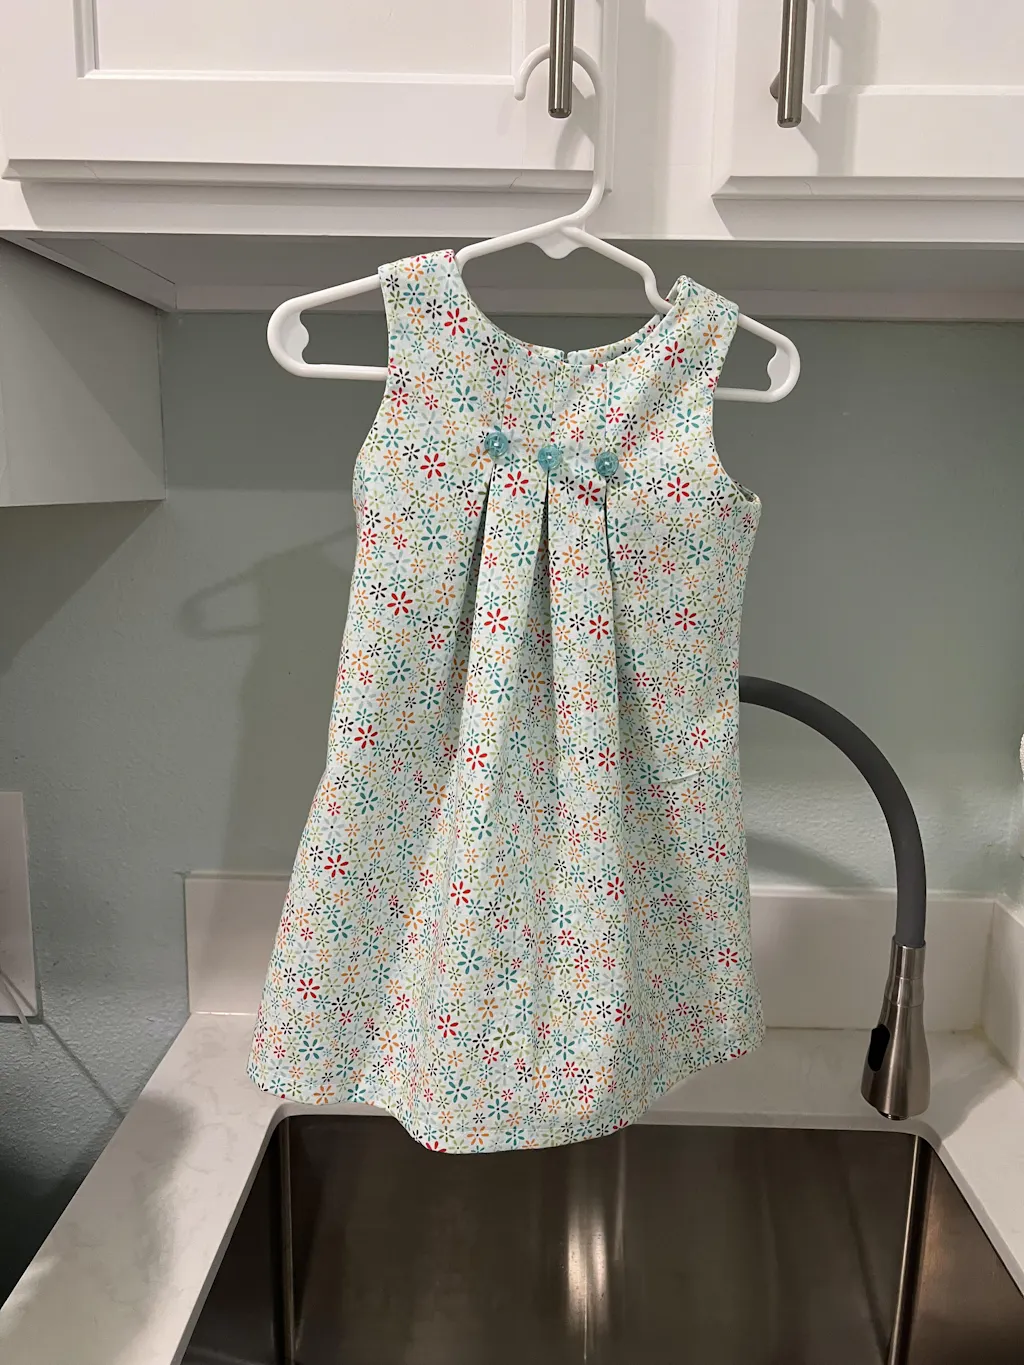
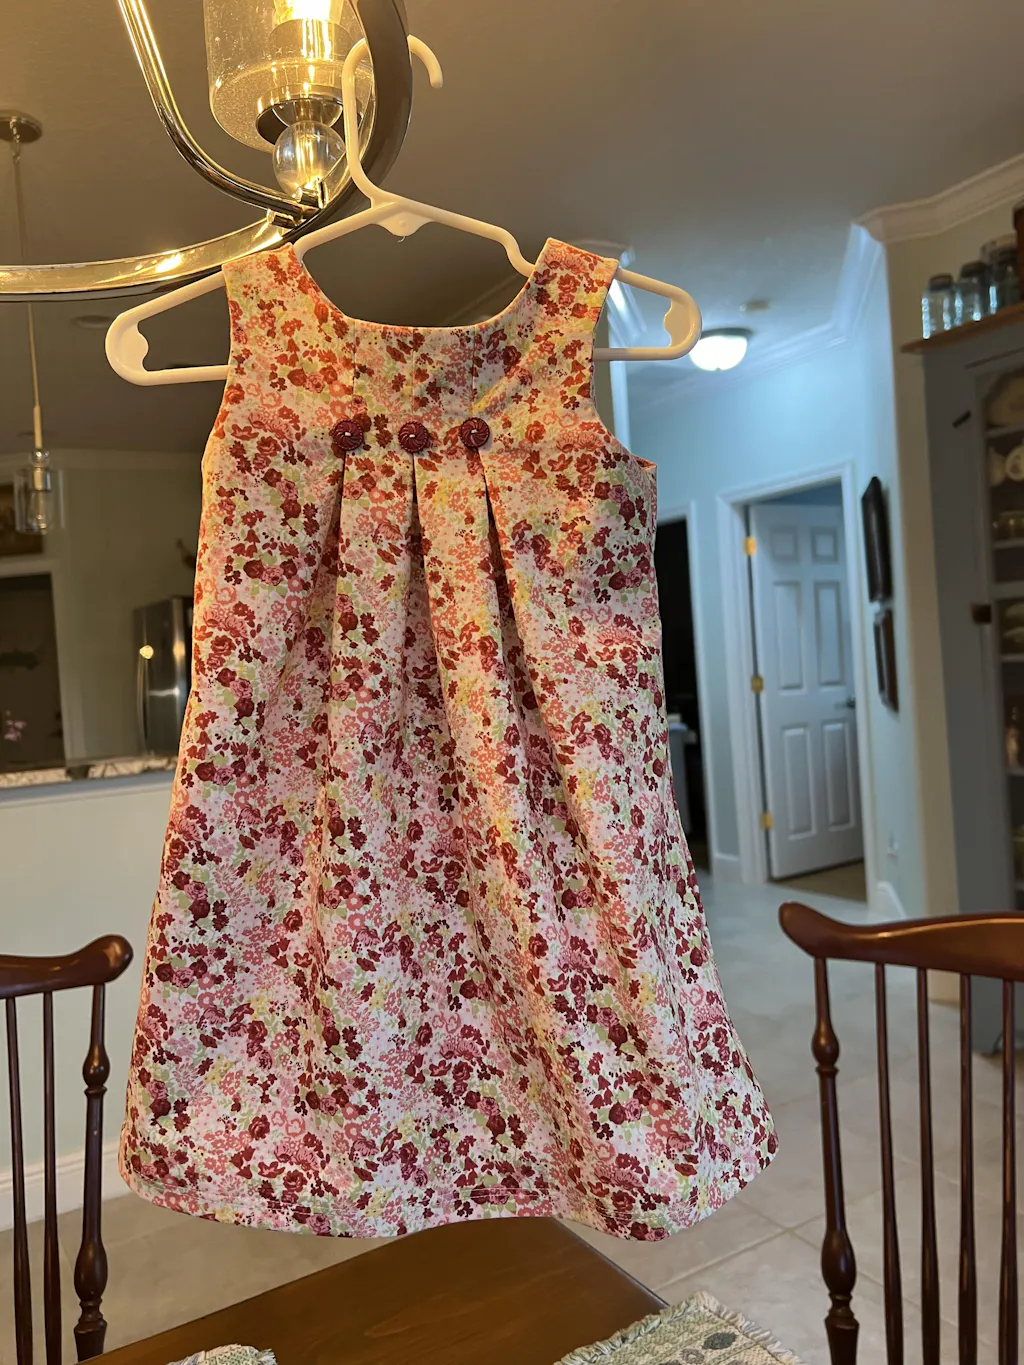
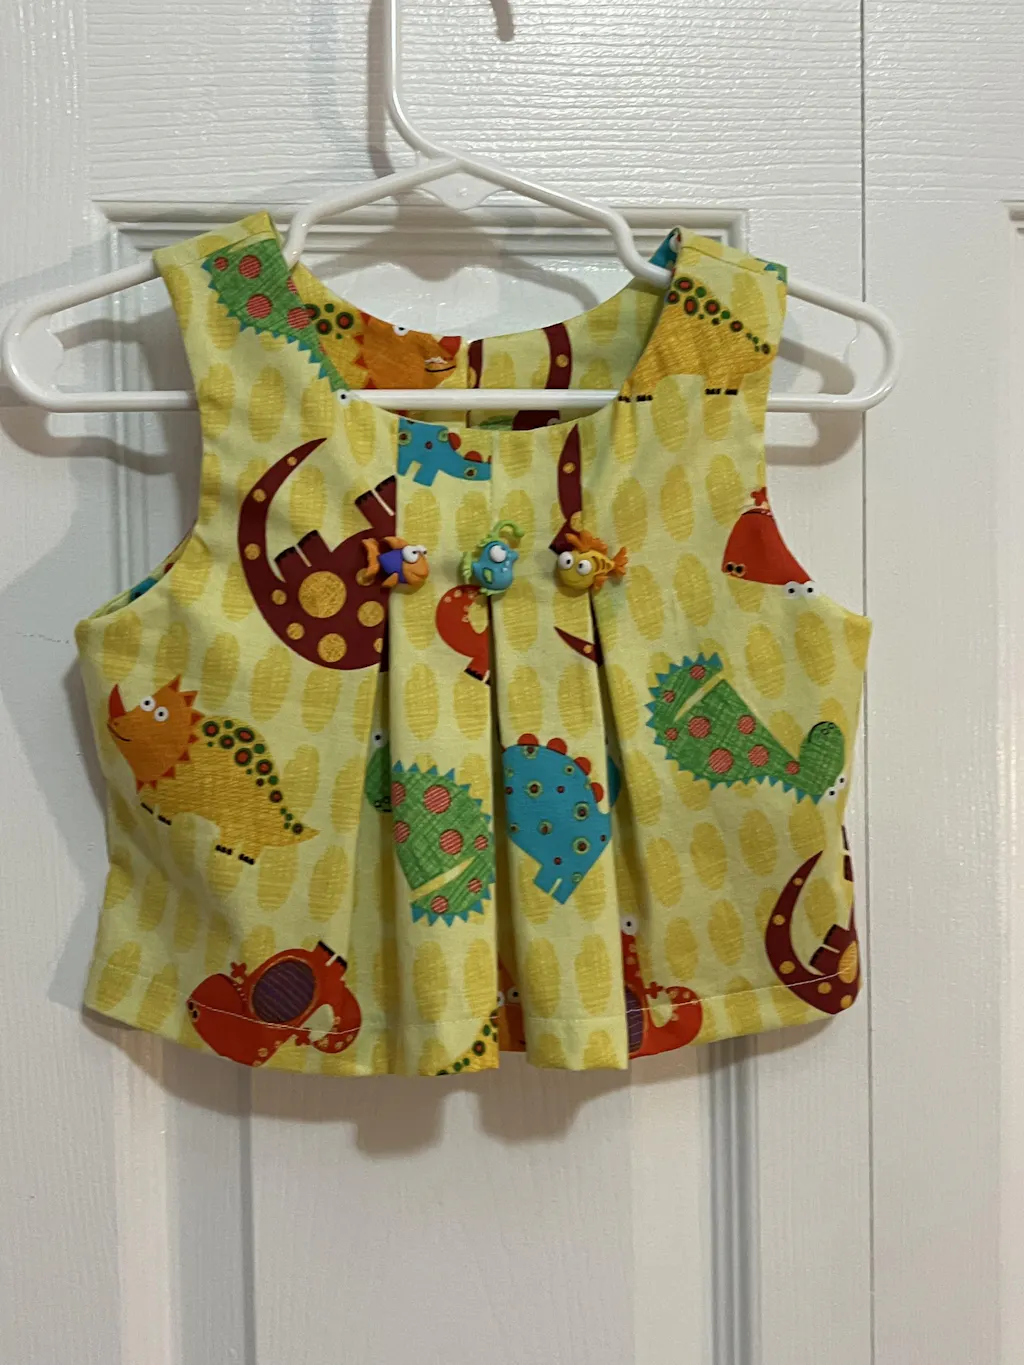
This is a simplified version of the Lily dress designed for beginners who want an easier construction process without making rouleau loops. The main focus here is on using a hem trim and understanding a slightly more straightforward assembly method while still keeping the signature pleated design.

Pattern Adjustments and Cutting

For this version, you will need to cut off the section marked “cut here” if you are using the wide hem trim option. This means both the front and back pattern pieces are shortened accordingly.

You will still be working with the pleated front, so the front piece, back piece, facing pieces, and hem trim are all required. In total, you will be cutting three pieces for the front section (including the long front piece and hem trim), plus the back piece and back facing.

The fabric is placed on the fold, where the selvedge edges meet. Position the pattern pieces carefully to maximise fabric usage. For beginners, it is recommended to use a fabric without directional print, as this makes layout and cutting significantly easier.

Facings are cut from the same fabric in this version to maintain consistency, especially since a white contrast hem trim is used. This also prevents the design from looking unbalanced.

Efficient Fabric Layout and Cutting Technique

When cutting, keep the pattern on the right side and cut with the fabric on your left. This gives better control and accuracy. You may cut in sections and rotate the fabric as needed to improve handling and reduce mistakes.

If fabric width allows, pieces can be cut individually and then folded separately to form the required pattern sections. This helps reduce waste and allows leftover fabric for smaller projects such as bows or trims.

Always mark key points such as the center front and center back notches before removing pattern pieces. These markings are essential for later construction steps.

Hem Trim Preparation

The hem trim requires careful layout. Open the fabric and refold it as needed to create two workable folds. This allows you to cut long continuous strips efficiently.

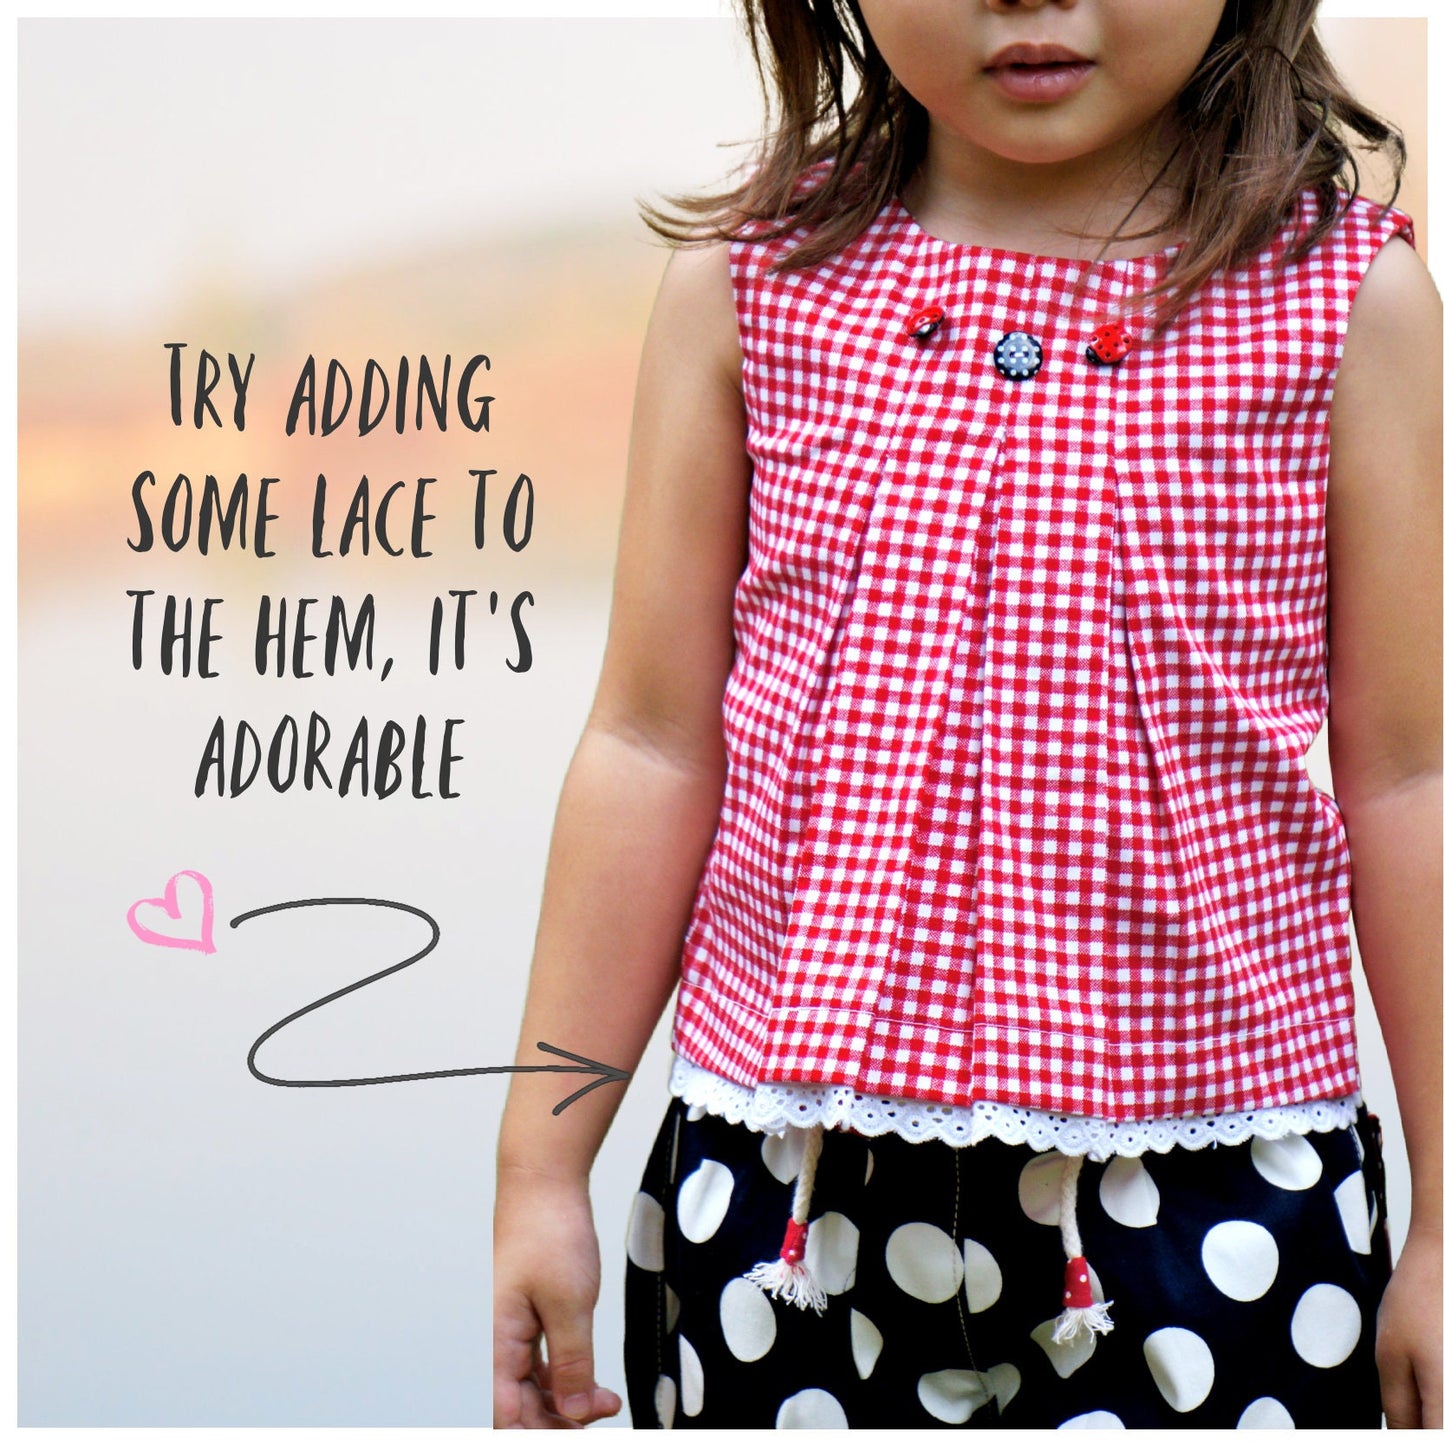
Make sure the hem trim pieces are cut accurately, as they will define the final shape and flow of the dress hem.

Basic Construction Steps

Begin by closing the shoulder seams on both the outer fabric and facings. For lightweight fabrics, applying iron-on interfacing to facings is strongly recommended to add stability.

Sew all seams using a 1 cm seam allowance and press them open.

Attach the facings to the dress with right sides facing. Pin carefully around the neckline and armholes, ensuring accuracy before sewing. After stitching, trim seam allowances down to approximately 3 mm to reduce bulk and avoid excessive clipping.

Press the seams upward before turning. This helps create a cleaner edge when the facing is flipped.

A simple turning method can be used by inserting a safety pin into one side and pulling the fabric through to the correct side. Repeat on the opposite side for even turning and alignment.
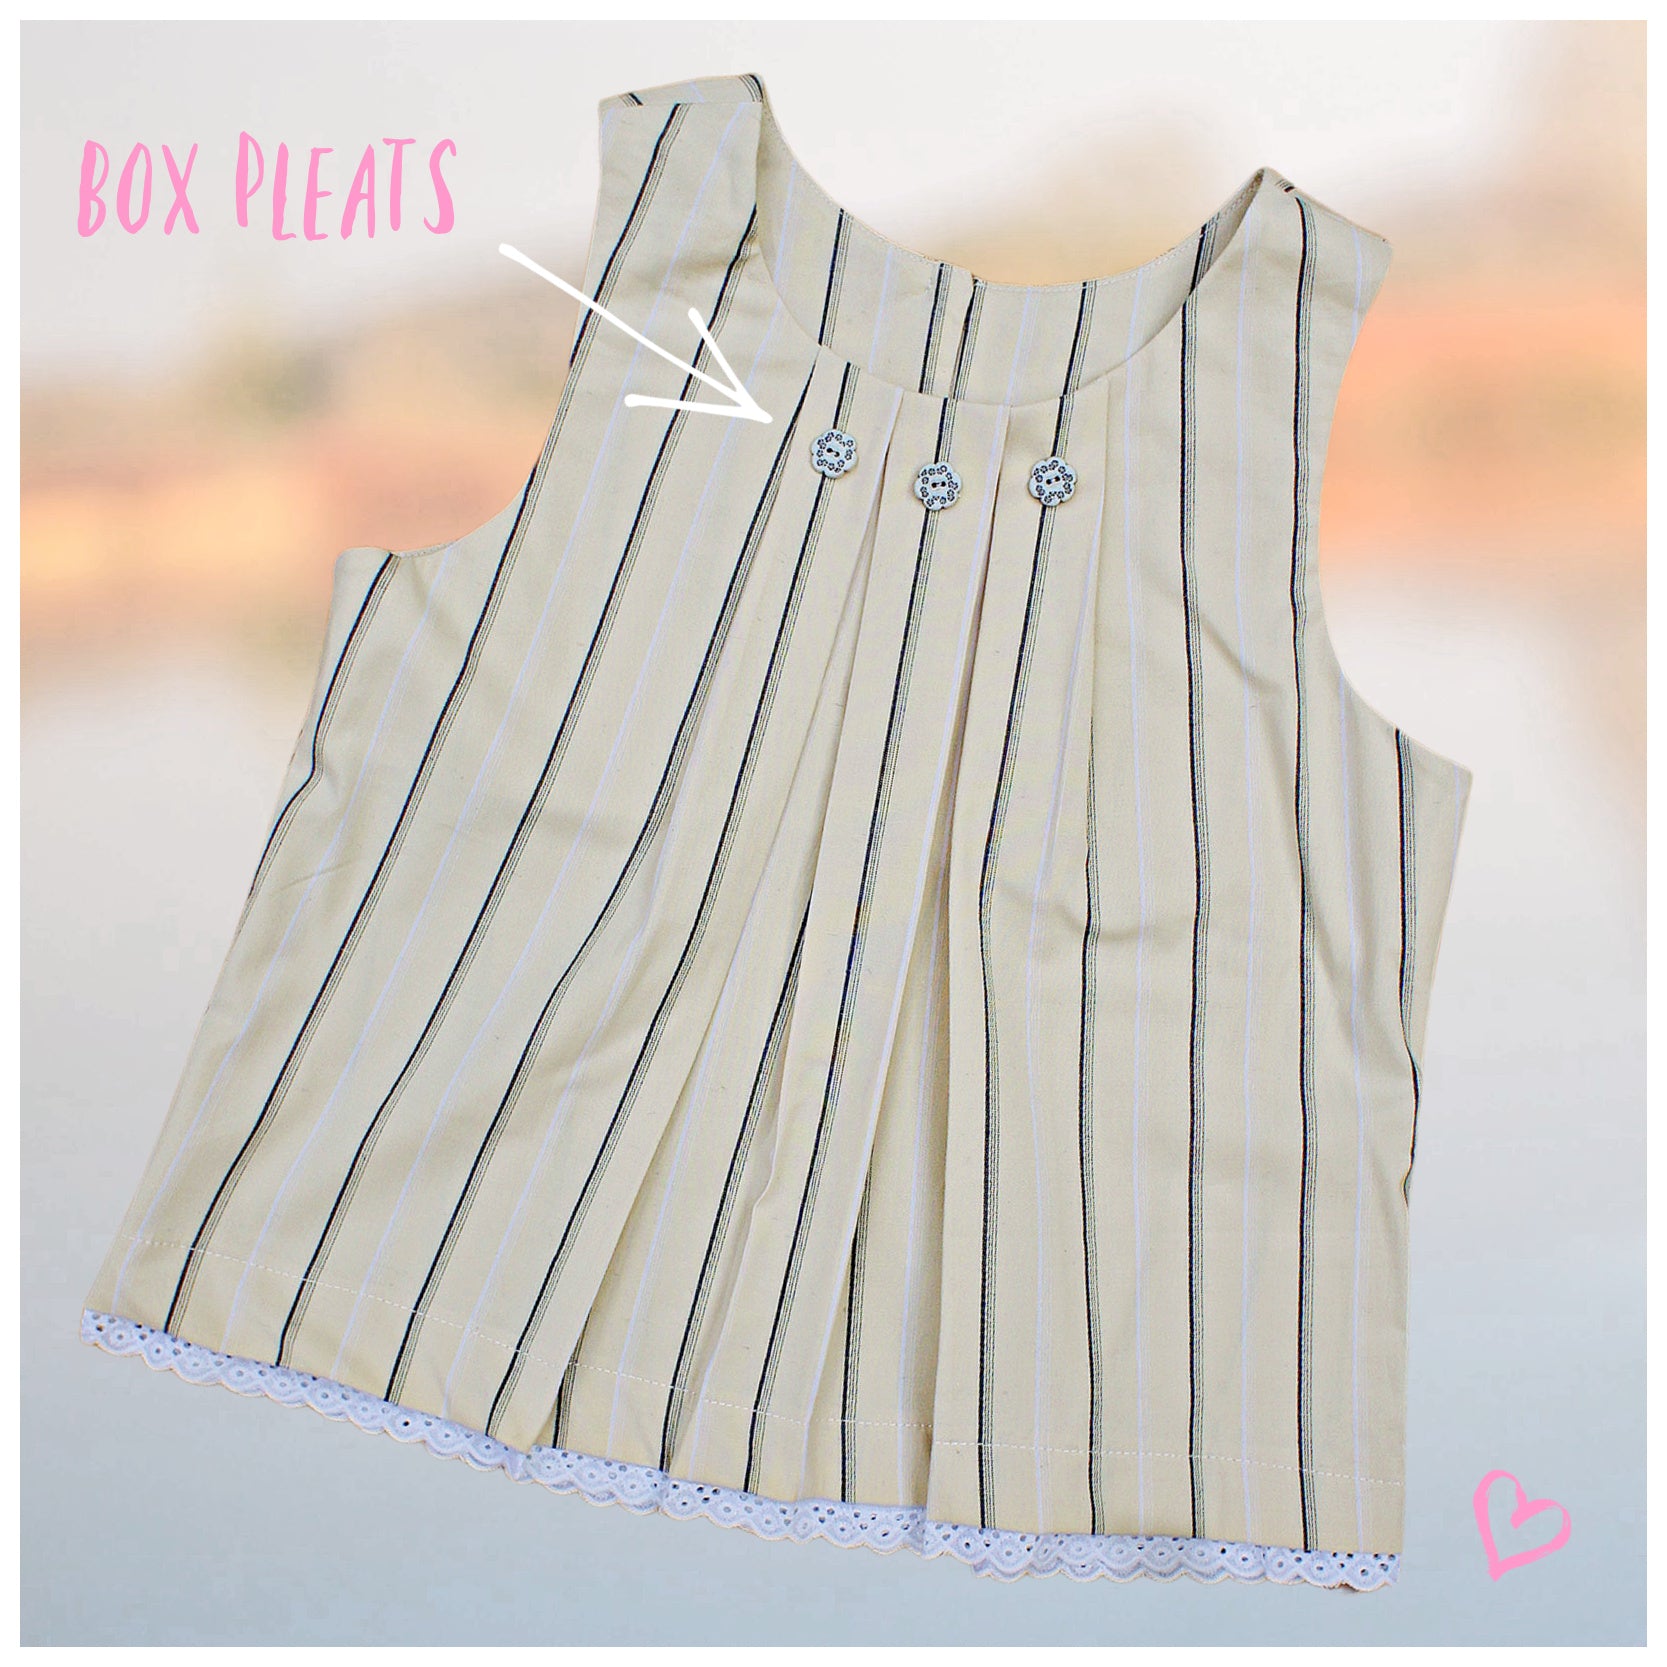
Pleat Construction

Mark the center front and pleat positions clearly. You can use a template or mark directly with pencil or tailor’s chalk.

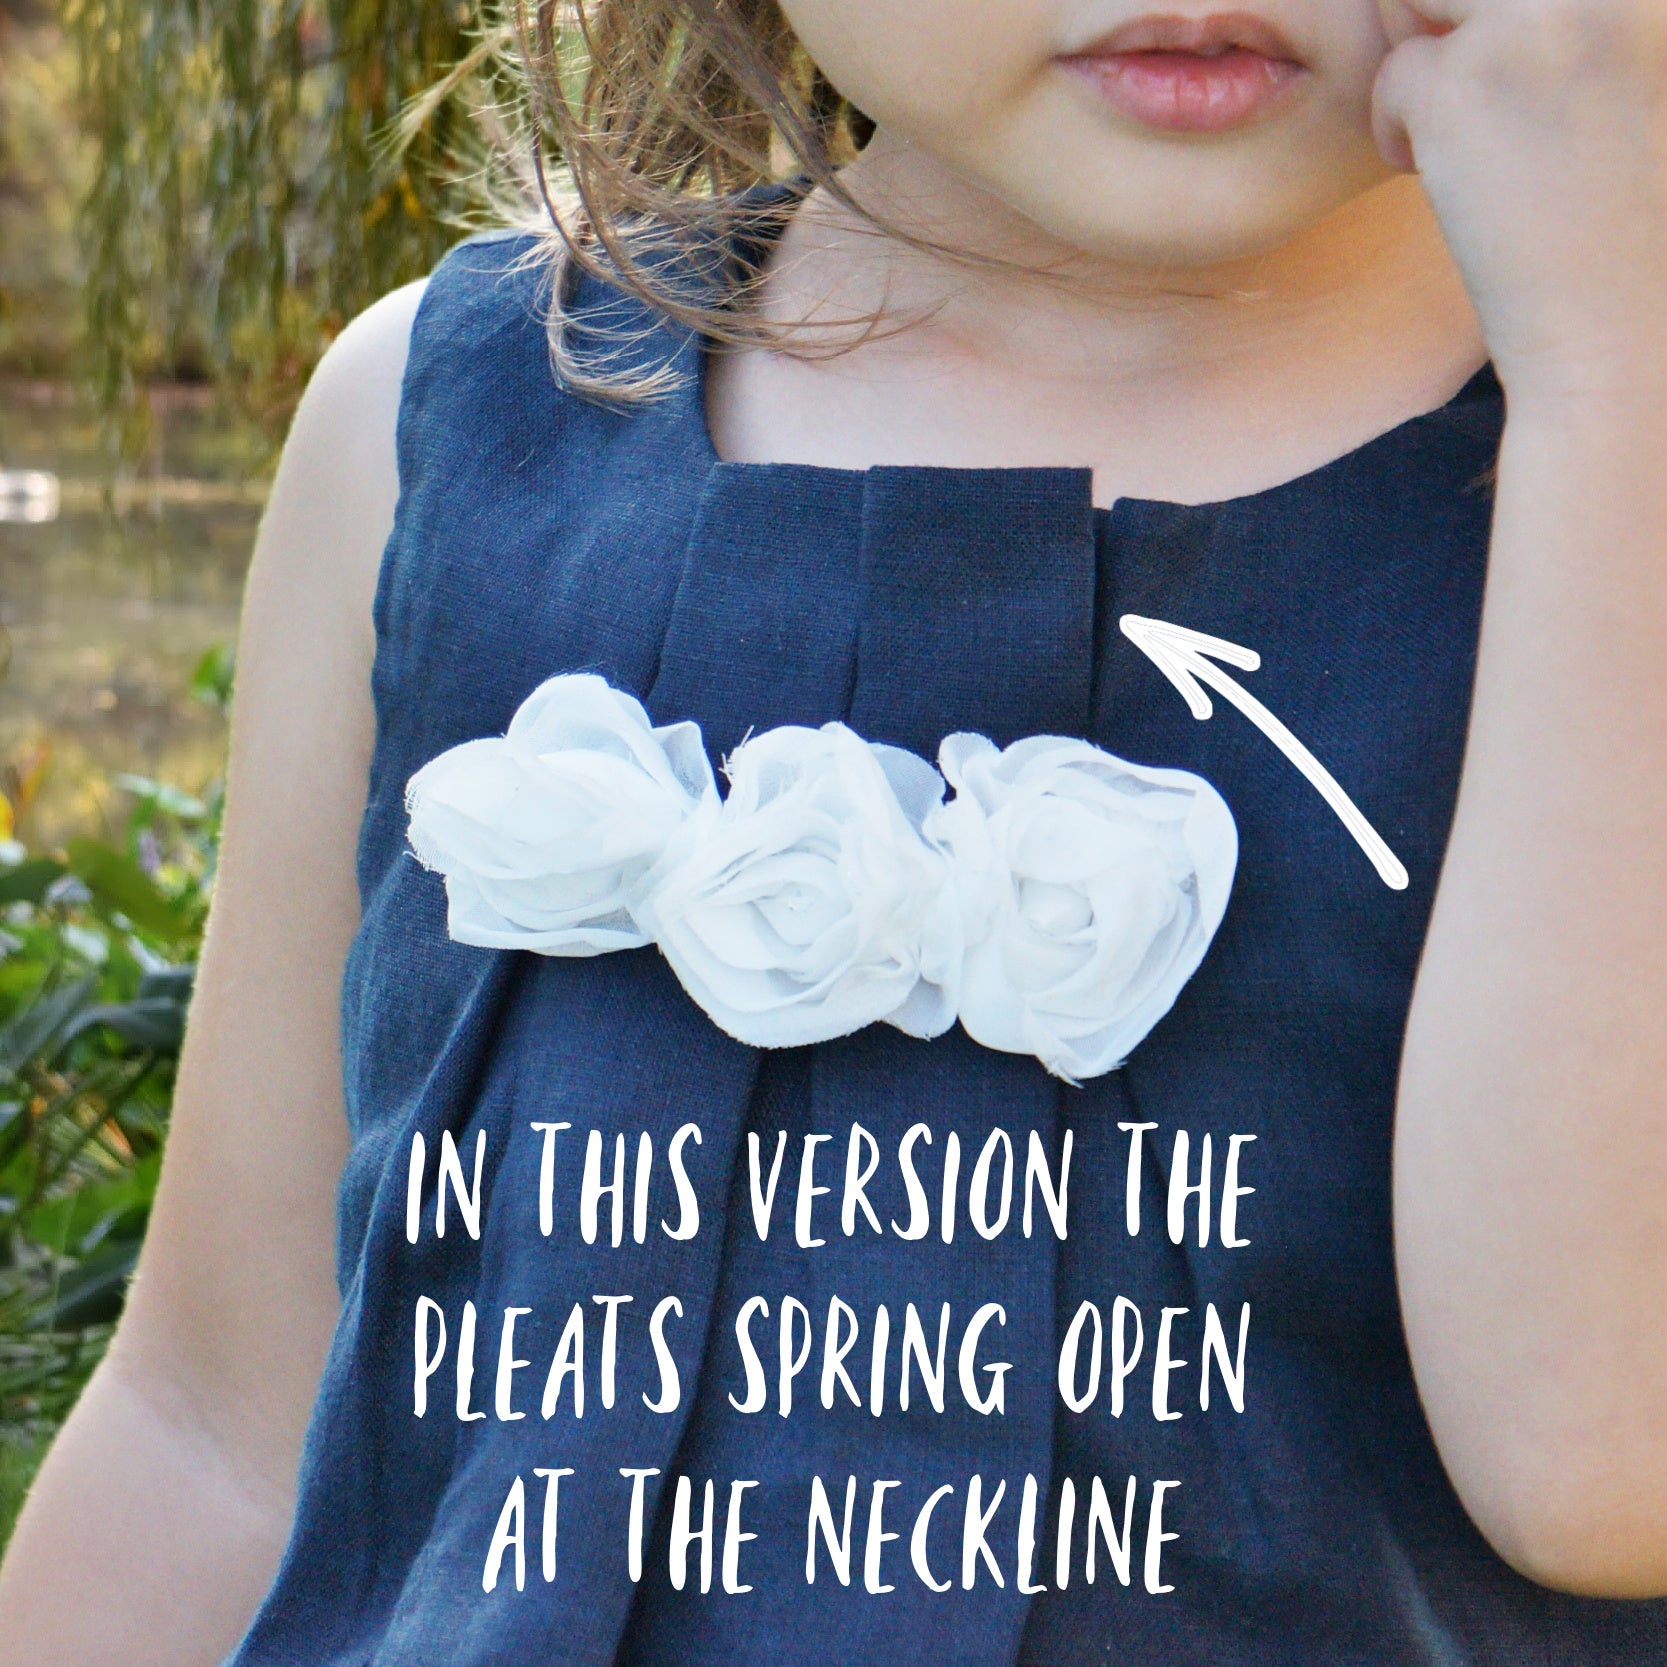
Fold pleats so that the marked lines align precisely, then pin in place. Each pleat can be stitched partially, typically leaving the top section unsewn if you want a softer, open effect.

For this version, pleats are designed to open slightly at the top, allowing ease of movement and better fit when pulling the dress over the head. However, pleats can also be stitched fully if a more structured look is preferred.

Press pleats carefully once sewn to ensure they are even and well-defined.

Checking Fit and Alignment

Before final stitching, check that pleats align correctly with side seams. A useful check is to align the facing seam with the center pleat—this ensures the dress is balanced and prevents the front from becoming too wide or gaping.

If misalignment occurs, adjust pleats before proceeding further.

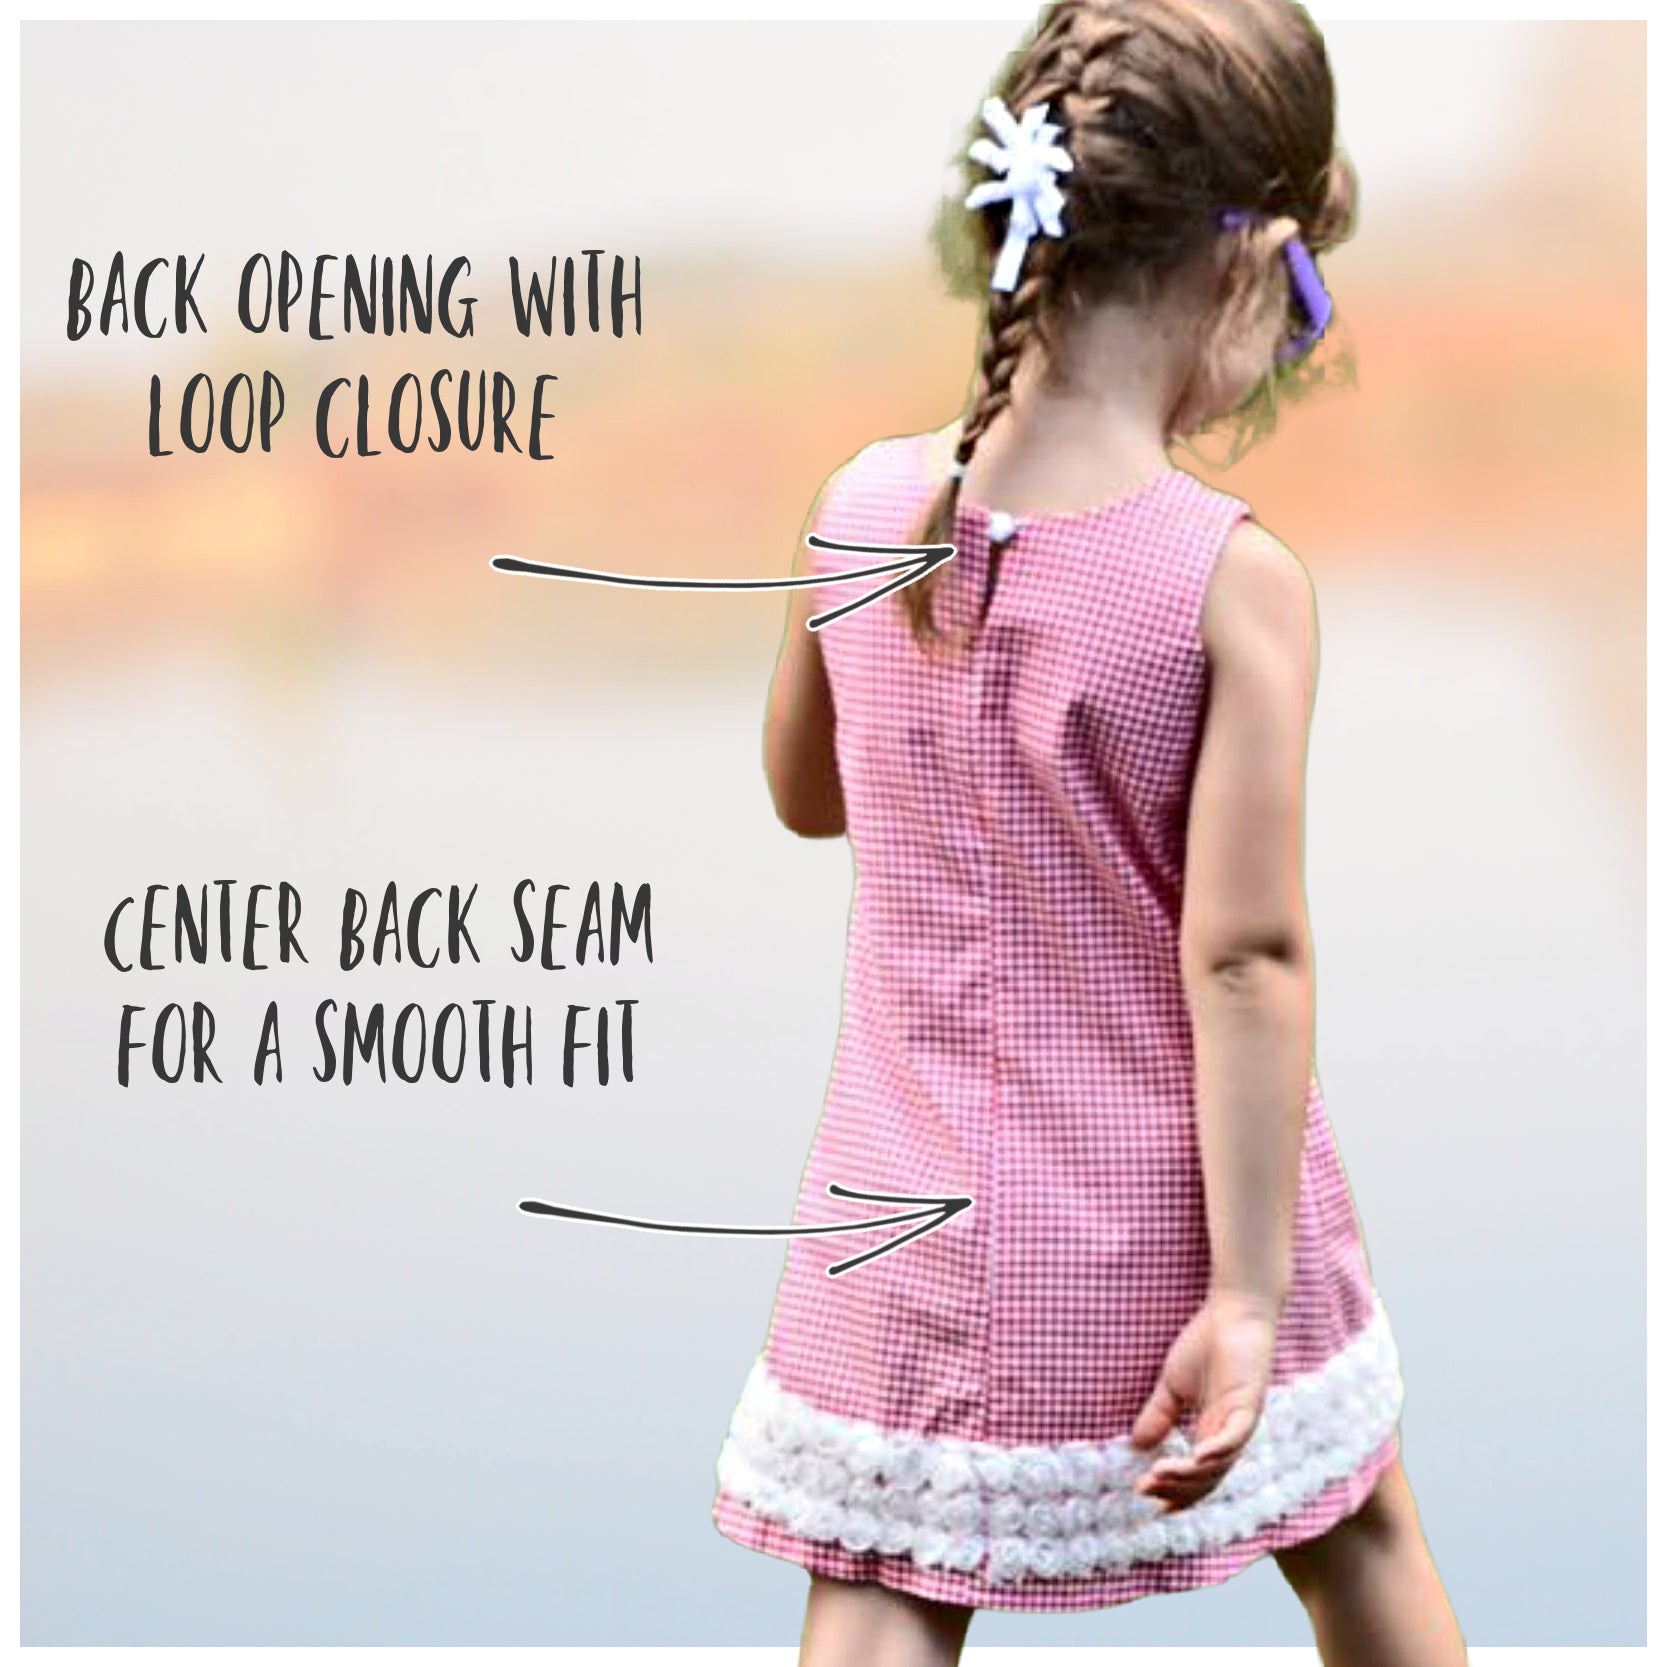
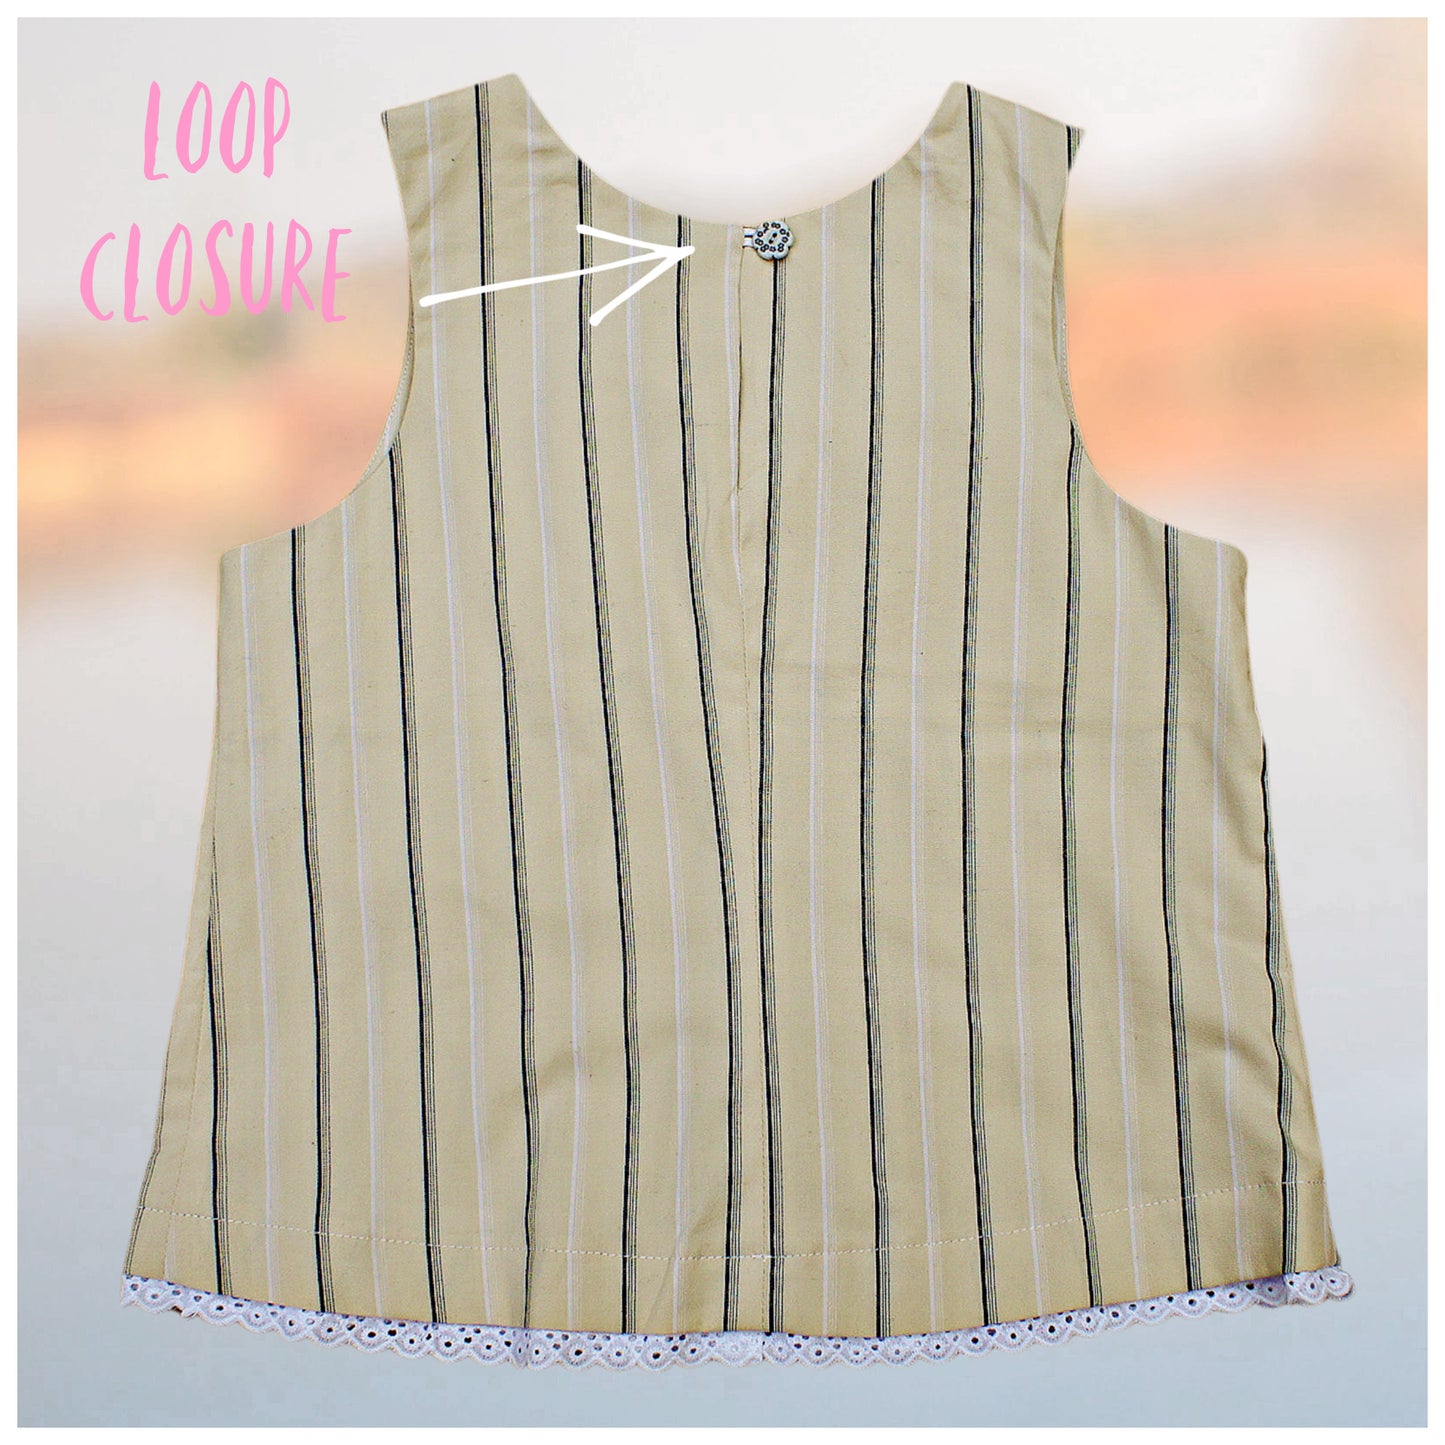
Side Seams and Finishing Fit

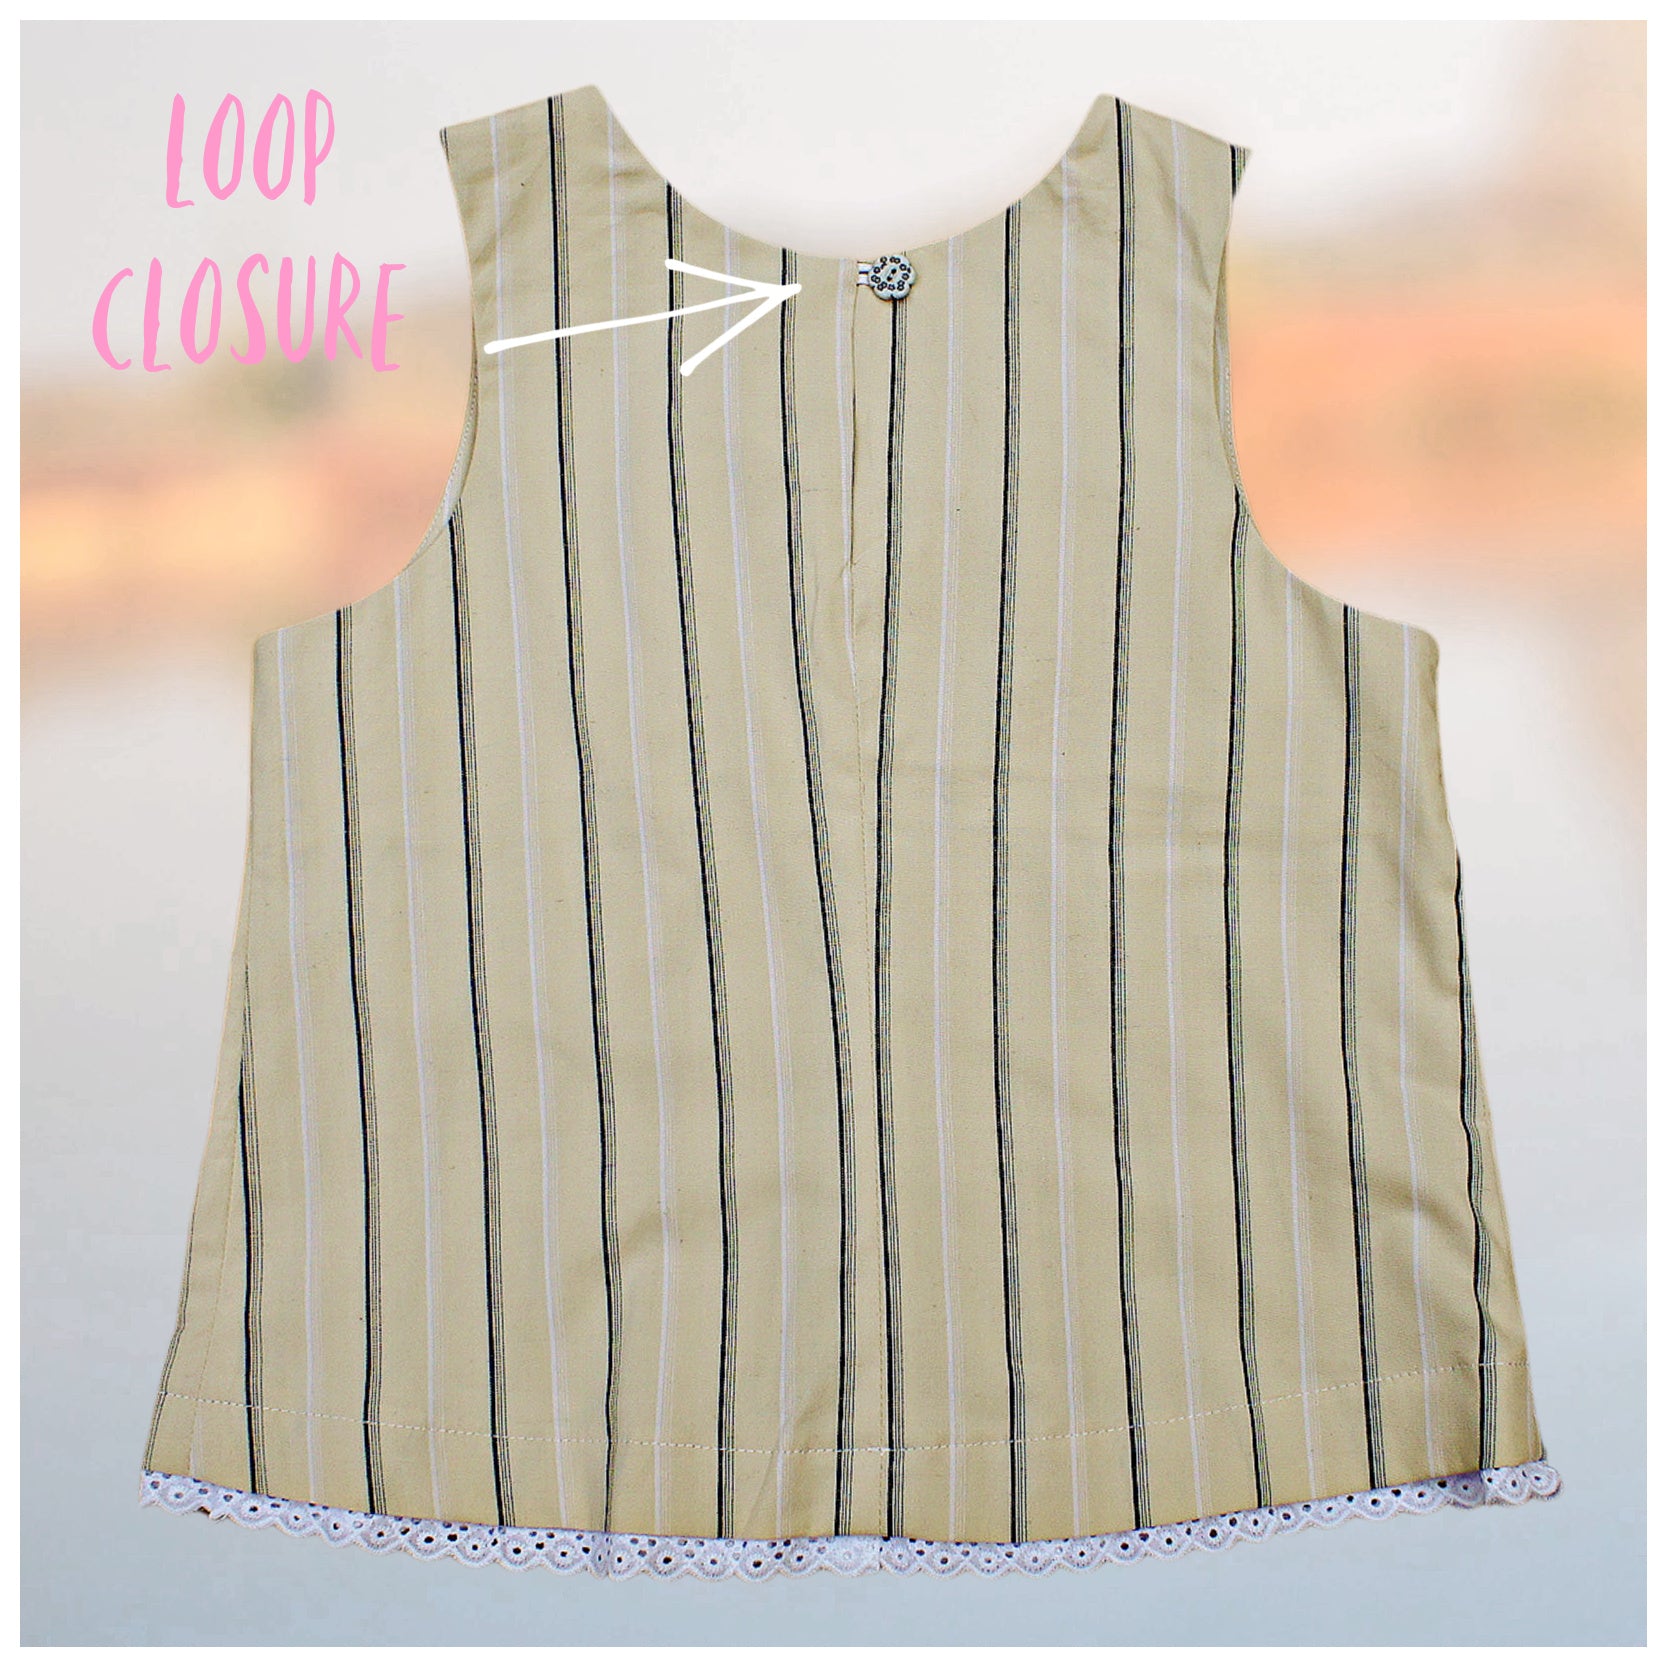
Close the side seams and center back seam using a 1 cm seam allowance. Overlock or finish raw edges if needed.

Be aware that neckline size may still be slightly snug, especially in smaller sizes. Always check fit before completing final finishing. Adjust the neckline lower at the back if necessary to improve comfort.

Hem Trim Construction

Sew the hem trim separately first, joining ends with a 1 cm seam allowance. Press seams open.

Turn in the top edge of the hem trim before attaching it to the dress. This helps achieve a cleaner finish.

Align hem trim with the dress right sides together, matching side seams, center front, and center back. Pin carefully all the way around.

Sew with a 1 cm seam allowance.

To prevent the hem from rolling outward, understitch the seam allowance to the dress fabric. This helps the hem stay in place and creates a crisp edge once turned.

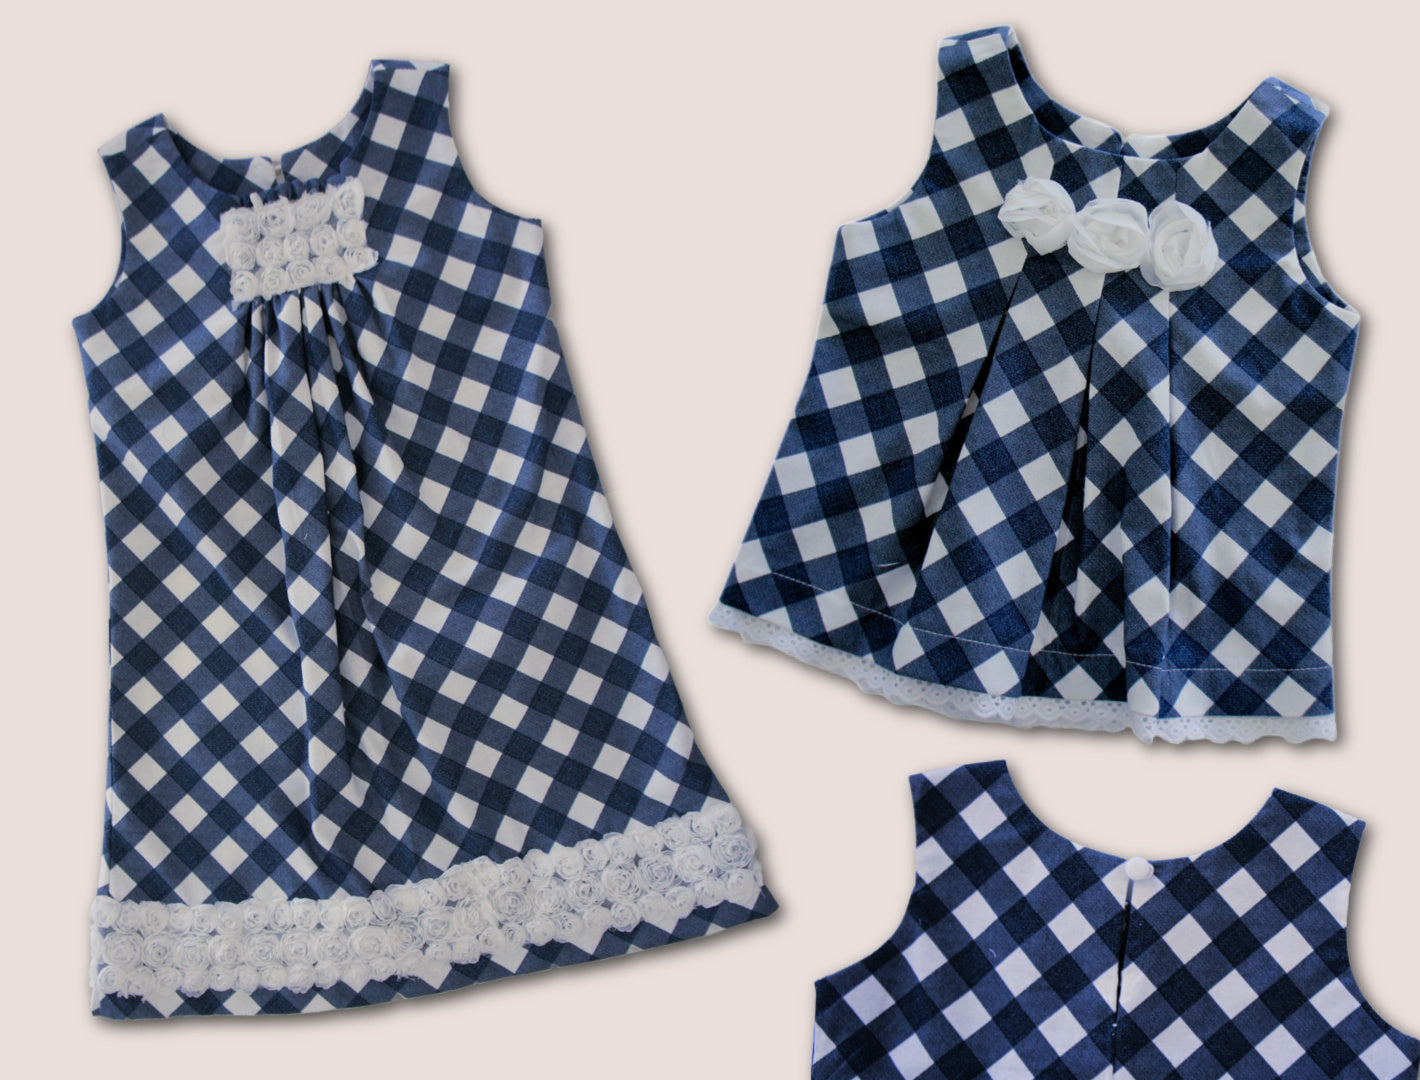
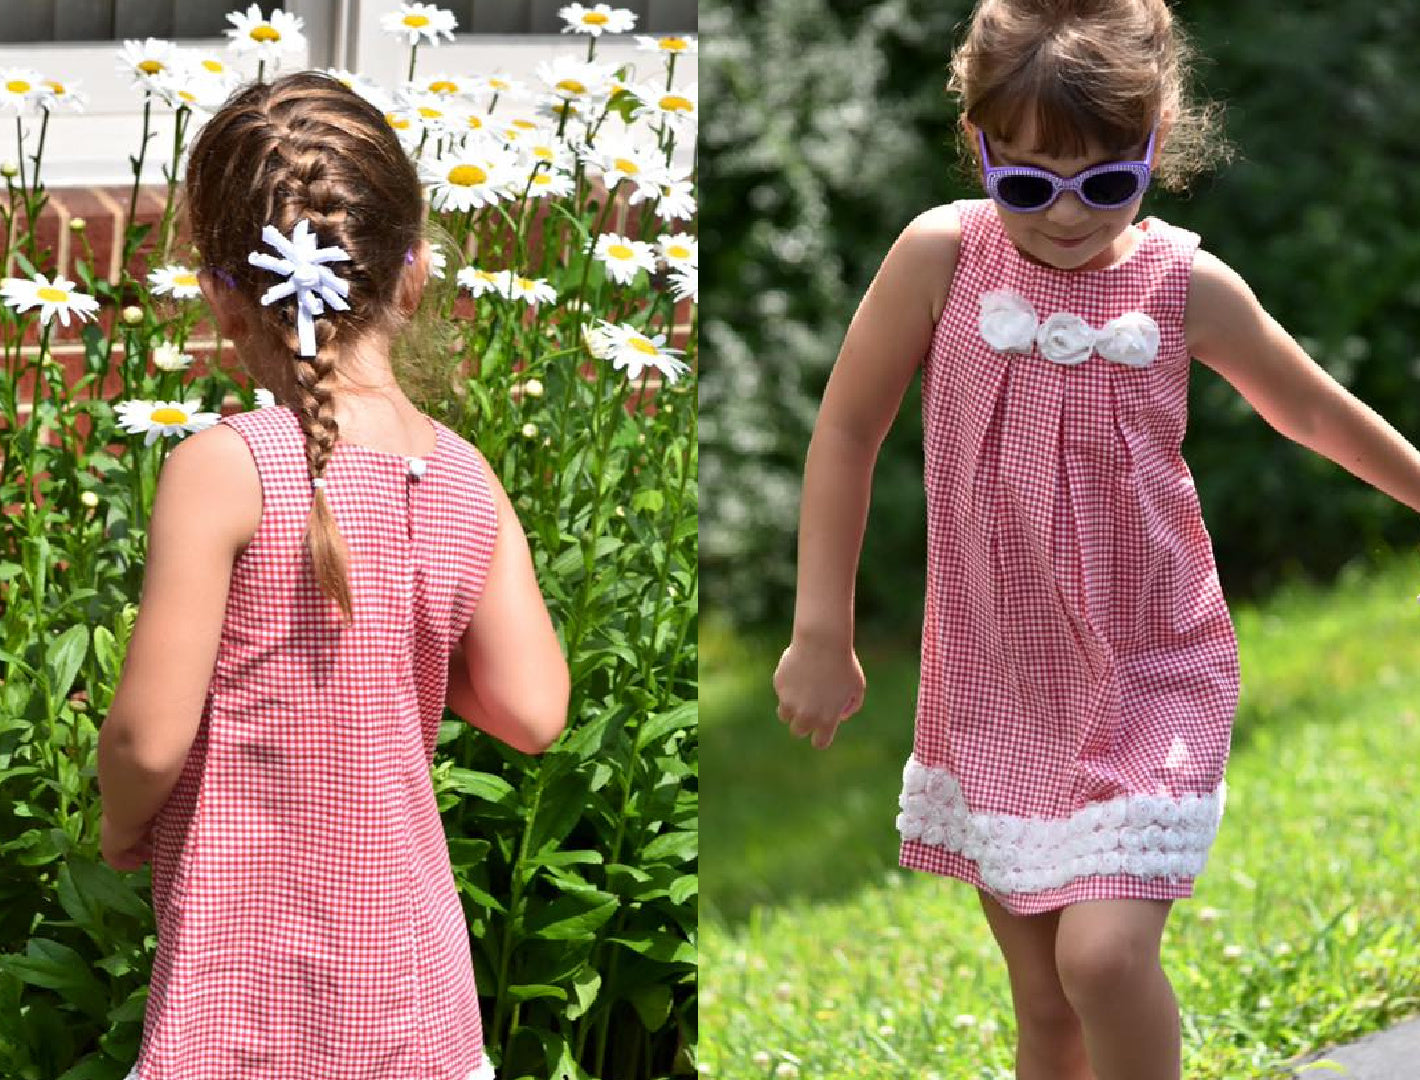
Final Assembly and Decoration

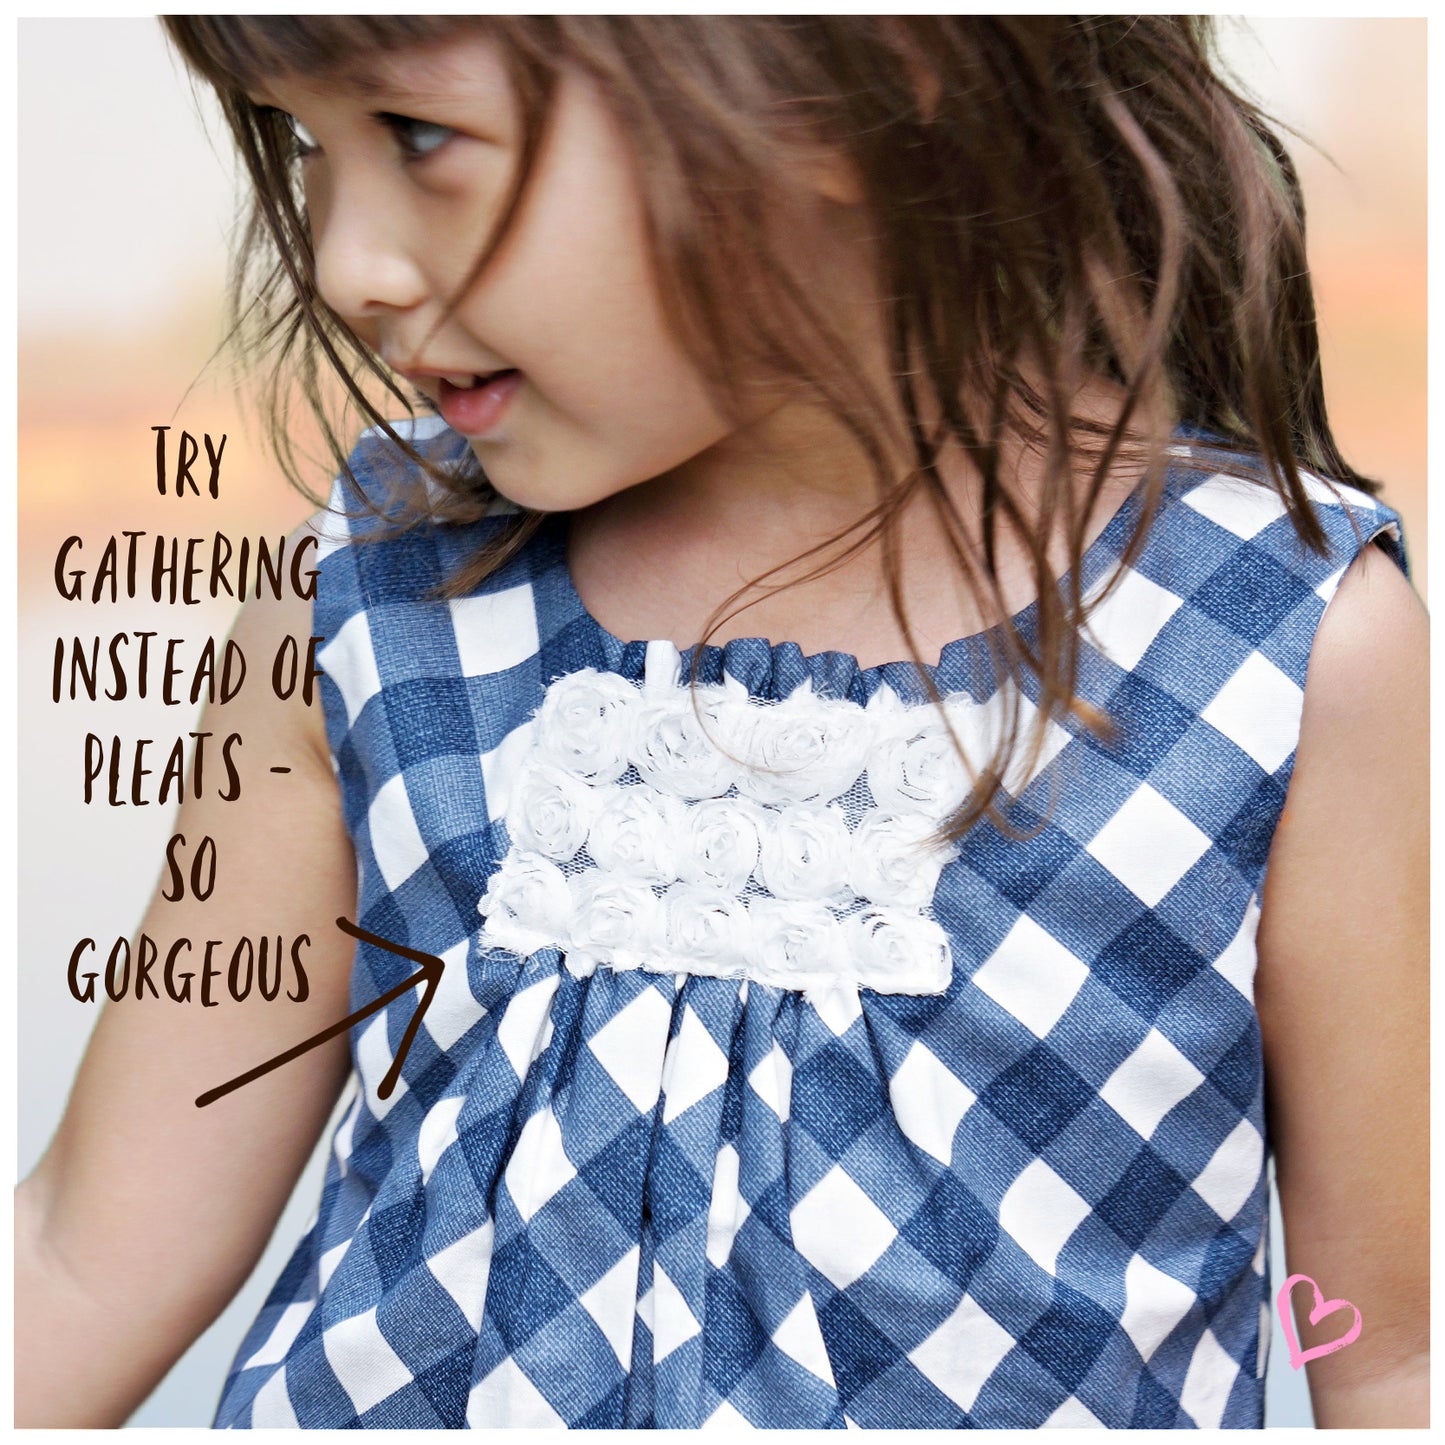
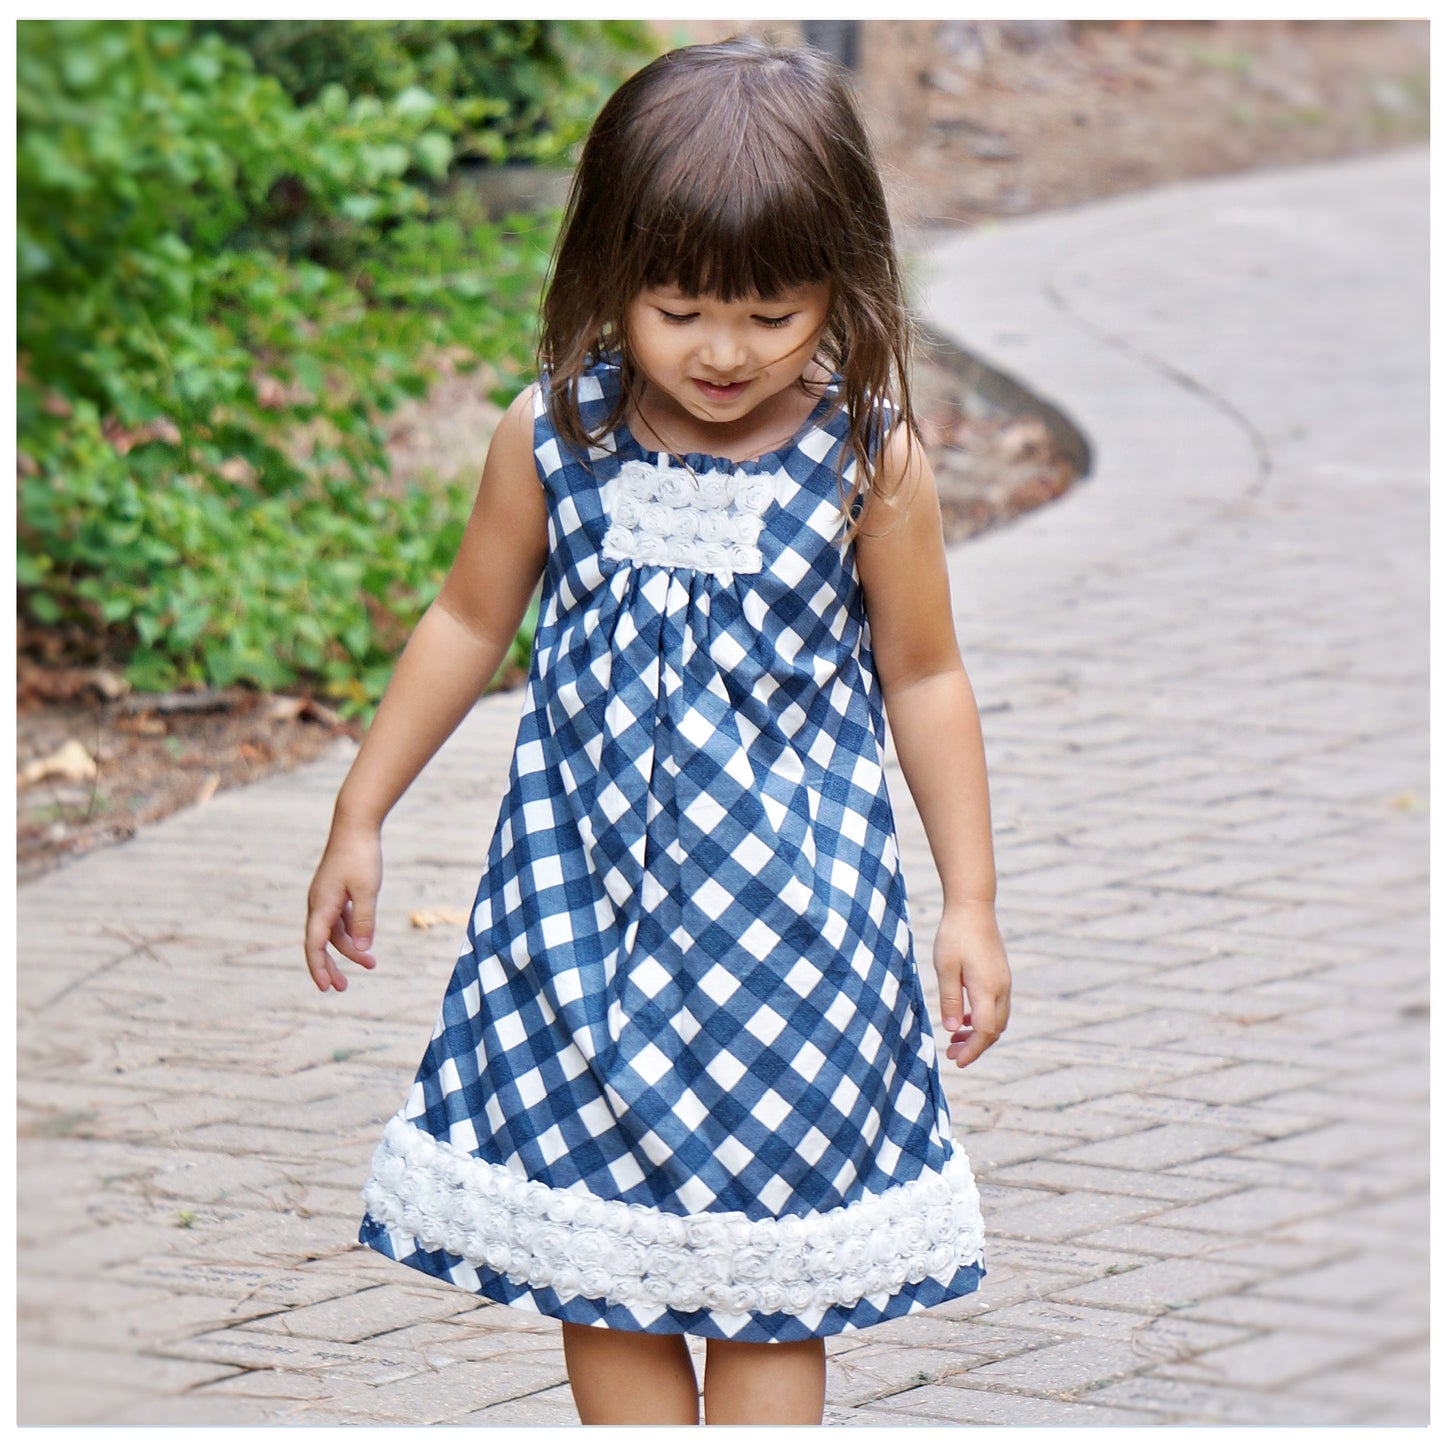
Top stitch the hem in place after pressing. Once the base dress is complete, you can add decorative elements such as rosettes, fabric flowers, or bows depending on your preference.

A simple Shabby Chic flower can also be made by layering fabric shapes, gathering them at the center, and adding beads or embellishments. This can then be sewn onto the dress as a focal decoration.

Final Notes

This beginner-friendly Lily dress variation simplifies construction while still retaining the elegant pleated silhouette and signature twist design. It is ideal for those who want a manageable introduction to structured dressmaking without complex closures or advanced techniques.

Lily Blouse Overview

Transcript for the video: Lily Tunic: The Blouse

Welcome to the Lily crop top. This is a quick and beginner-friendly variation of the Lily dress designed to be simple, fast, and ideal for lighter sewing projects. You will need approximately half a meter of fabric, along with interfacing, a ruler loop (either handmade or pre-made), a cover button, and optional embellishments such as roses, embroidery, or eyelet lace.

Pattern Preparation and Cutting

Begin by cutting the pattern pieces for the front and back, including the facings. The front and back should be shortened according to the “short top” marking on the pattern.

The back piece is slightly longer than the front, though the difference is minimal once sewn.

Before construction, iron interfacing onto all facing pieces to give them structure and stability.

Pleat Construction

Start by forming the pleats on the front piece. Align the center notch with the fabric fold and pin from the top down to just above the armhole (approximately 3 inches). Secure with a pin to mark where stitching will end.

Repeat this process for the remaining pleats, ensuring they are evenly spaced and consistent in depth. While slight variation in outer pleats can add softness, consistency in measurement is important for balance.

To verify accuracy, temporarily place the facing over the pleated front—if everything aligns, the pleats are correctly positioned.

Shoulder Seams and Embellishments

With right sides facing, sew the front and back shoulder seams using a 1 cm seam allowance. Press seam allowances open.

Next, attach decorative elements such as roses or embroidery. These are typically positioned around 2 to 3 inches below the neckline. Hand-stitch securely in place and remove any visible netting or backing for a clean finish. The back will later be covered by facings, so internal stitching does not need to be perfect at this stage.

Attaching the Facing (Neckline First)

Attach the facings with right sides together, pinning the shoulder seams first, then the neckline.

Sew the neckline using a 1 cm seam allowance. Once complete, trim seam allowance down to approximately 3 mm to reduce bulk.

Understitching for a Clean Finish

To prevent the facing from rolling outward, understitch the seam allowance to the facing only in the pleated section.

This is done by stitching on the facing side, starting where the decorative elements begin and continuing across the pleats before stopping. This creates a crisp edge that naturally stays in place.

Armholes and Turning the Garment

Sew the armholes with a 1 cm seam allowance, ensuring edges are aligned throughout. Trim seam allowances after sewing.

To turn the garment, use a safety pin inserted at the back seam and carefully pull the fabric through to the front via the shoulder. Repeat on the other side. This method only works if a center back seam is present.

Press the garment thoroughly after turning to smooth out edges and curves.

Ruler Loop and Back Closure

Position the ruler loop just below the facing. Fold the facing over and stitch the center back seam down to the marked snip point, leaving an opening for the head.

Repeat on the other side, sewing from the top down to the same point.

Once complete, close the remaining center back seam from the hem upward, aligning carefully at the meeting point.

Facing Finishing and Side Seams

Overlock all facing edges and close the side seams from facing to hem. Press seams toward the center back.

To reduce bulk at the top, make a small snip in the seam allowance and redirect the facing seam toward the front. Secure with stitching either by machine or hand.

Fold under the facing edges and secure them with hand stitches for a clean interior finish.

Button and Final Closure

Attach a button at the top of the back opening. Position it slightly higher rather than centered to ensure a proper fit and comfortable closure.

Hem Lace and Final Decoration

Attach eyelet lace or embroidery lace along the hem to create a layered “petticoat effect” that peeks out underneath the top layer.

Align lace with the center back seam, overlap edges neatly, and sew all the way around. Overlock the seam and roll the hem so the lace sits just at the edge.

Pin vertically and adjust gently to avoid puckering. Light steaming can help set the shape.

Final Finishing

Secure the facing to the inside of the garment with small hand stitches where needed. Add final decorative elements such as bows, embroidery, or lace accents.

This top is a fast project—approximately 40 minutes to an hour once you are familiar with the steps—and works beautifully in checks, stripes, or linen variations.

Final Notes

The Lily crop top is designed to be simple, versatile, and beginner-accessible while still maintaining a polished handmade finish. It’s an ideal introduction to pleats, facings, and soft decorative detailing.

How to Sew a Fabric Rose

Transcript for the video: Lily Tunic - How to Sew a Fabric Rose

To make a fabric rose, you need a piece of fabric measuring 13 inches long and 3½ inches wide. Fold it lengthwise in half and press it with an iron for a clean crease. Tuck in one end neatly, then at the open end sew gathering stitches using the widest stitch setting on your sewing machine. Pull the top threads to gather the fabric until it forms a ruffled strip. The tighter you gather it, the denser and fuller the flower will be. You can also adjust the size by using a longer or wider strip for a larger rose.

Forming the Rose Shape

Start rolling from the front, keeping the folded edge aligned neatly as you form the petals. Roll evenly until you reach the end, then tuck in the rough edge to finish the shape. Use the gathering threads to wrap and secure the rose in place so it holds its form.

Securing the Rose

Thread a needle with double thread (no knot at the end) and stitch through the base to secure everything. Trim any excess thread if needed, then wrap and stitch again several times to reinforce the structure. About five to six passes will hold it firmly in place.

Finishing the Flower

Gently open out and shape the petals with your fingers to create a natural rose effect. And that’s it—your fabric rose is complete.

Uses and Fabric Options

This rose can be used on dresses, tops, or accessories. It doesn’t need to be bridal; you can use almost any fabric such as striped cotton, linen, chiffon, or satin. The possibilities are endless.

Thanks for watching, and I’ll see you next time. Bye!

DAS KÖNNTE DIR AUCH GEFALLEN