Zu Produktinformationen springen
1 von 7

SCARLETT ROCK

SCARLETT ROCK

Filled Circle
Empty Circle
Empty Circle
Empty Circle
Empty Circle
Normaler Preis $0.00 USD
Normaler Preis Verkaufspreis $0.00 USD
Sale Ausverkauft

Scarlett ist ein Stufenrock im Western‑Stil, mit klassischer Passe und bequemen Gummibund. Dank der schwingender Silhouette ist Scarlett das perfekte Mädchenrock‑Schnittmuster zum Spielen und sich schick machen.


Dazu ist Scarlett ist wunderbar anfängerfreundlich. Das ausführliche eBook und die Schritt‑für‑Schritt Videoanleitung (einfach nach unten scrollen und auf Play drücken) sorgen für ein gutes Gelingen.

Was ist beim Schnittmuster dabei?

  • Sofort-Download
  • Digitale PDF Schnittmuster
  • DIN A4 Format
  • eBook
  • Schritt für Schritt Video-Anleitungen

Design

  • Stufenrock
  • Der obere Rock ist ein Tellerrock
  • Gummizug in der Taille mit flacher Vorderseite
  • Optional lange Schleifenbänder

Stoffverbrauch

STOFFEMPFEHLUNG
Leichte gewebte Stoffe wie Leinen, Baumwolle, bedruckt oder unifarben, Spitze und
Verzierungen nach Wahl.

STOFFVERBRAUCH

  • Obermaterial: 75 cm – 110 cm
  • Gummiband: 40 - 47 cm
  • Vlieseline: 10 cm
  • Passendes Nähgarn

Verfügbare Größen

STOFFEMPFEHLUNGEN & STOFFVERBRAUCH

Bitte beachten

  1. Dies ist ein digitales Schnittmuster oder eine PDF-Datei, kein physisches Produkt. Die Zustellung erfolgt elektronisch über einen Download-Link an die beim Kauf verwendete E-Mail-Adresse. Zusätzlich kann das Schnittmuster von deinem Kundenkonto heruntergeladen werden.
  2. Um sicherzustellen, dass das Schnittmuster in seiner tatsächlichen Größe gedruckt wird, wird die Verwendung von Adobe Acrobat Reader empfohlen.
  3. Kleine Betriebe: Ich freue mich wenn meine Schnittmuster dir helfen, tolle Bekleidung für deine Kunden zu nähen. Industrielle Produktion ist untersagt.

Kunden werden ermutigt, Frocks & Frolics zu verlinken, wenn sie Projekte, die mit meinen Schnittmustern erstellt wurden, in sozialen Medien teilen.

@frocksandfrolics
#frocksandfrolics

Vollständige Details anzeigen

SCHRITT-FÜR-SCHRITT ANLEITUNG

Thumbnail
EINFÜHRUNG IN DAS PROJEKT
Thumbnail
SCHRITT-FÜR-SCHRITT-TUTORIAL
Thumbnail
SCARLETT-PUPPE: SCHRITT-FÜR-SCHRITT-ANLEITUNG

VIDEO TEXT

Transcript for the video: Scarlett Skirt - Introduction

Introduction

Welcome to the introduction to the Scarlet. I'm going to show you here how to make this dual layer skirt.

Hemming the Skirt

We're going to hem it with a three-centimeter hem, and it's just turned up once, so you're going to learn how to do that. I'm also going to show you how to gather both of those layers together. Of course, you could also work them singularly.

Waistband and Elastic

Then we're going to put the elastic in the integrated yoke and waistband, which is really great because you can decide how wide you want your elastic to be, and that's then plus one centimeter of how much you turn it in. That gives you a great option to play about with the different lengths. It's much easier than having a separate waistband.

Checking the Pattern

So now we're going to just quickly check that we've printed off our pattern correctly. It needs to be five centimeters or one inch here on the scale, and then you have an assembly plan which tells you how it goes together.

Especially if it's a more complicated pattern, that's quite important. Of course, you don't really need it here—it's rectangles and we're putting them together A on B and B on C. Very, very simple.

Measurements Option

Now a few of you might say, well I don't really need a pattern for this, I'd be happy with measurements. And so I've provided those to you as well in this pattern.

So you could just go on page six of the instructions and find all the measurements. Please bear in mind that those measurements are for fabric cut on the fold, both in centimeters and inches.

Pattern Pieces Overview

So you could just do that if you wanted to. Now I've put all my pieces together, so let's have a quick look at this.

This is my yoke and waistband in one, and I'm going to fold it over and turn in the lower edge or serge it—that's up to you. The important thing is that the tunnel that we're creating for the elastic is actually a centimeter wider than the actual elastic. That's all there is to it.

For smaller children, I'd recommend the elastic to be 2.5 centimeters—that's an inch or an inch and a quarter. For older children, sort of eight-year-old, 10-year-old, 12-year-old, you can make your waistband four or even five centimeters wide. That's quite nice too.

Skirt Layers and Adjustments

Then you have the upper and lower layer of the skirt. They just go on top of each other, and again you could play around here with the lengths if you like. Just make sure you get them out on the fold, and we have got a three-centimeter hem on that.

If you want to find out how long the whole thing is, then overlap the yoke and the skirts by two centimeters and measure down from the waist just to get an idea. Don't forget to take off the seam allowance for the hem.

Then you can see, well maybe I want to make it shorter or a little bit longer. Depending on your taste, you can vary the skirt like that—really easy.

Example

And I've got a little example here. This is what Melissa made for daughter Charlotte. She made the top layer a little bit shorter than the lower layer like that. And of course you have plenty of options to do that.

That's why I think it's always nice to have a pattern, even if it's a bit daft to print off rectangles, because you can see at a glance that maybe you want to have different proportions if that's what you choose to do.

Pattern Instructions Overview

The instructions are always the same, at least for all my newer patterns. You get a cover, and then you get a content page. Then we move on to telling you how to print off your pattern.

There's also a link for a free Adobe download and an explanation of your pattern. Of course, not really necessary—very easy—but normally you would really like your pattern explained.

Then we have the size chart, fabric requirements, and notions. This page you have already seen—that's the layout plan or chart that tells you exactly how much you need.

Construction Pages and Resources

Then we have got a few pages that tell you how to put together your skirt in diagram form, a page that gives you the link to Facebook and shows you a few examples of what other people have made.

And then finally, don't forget we have got an Amazon shop, so if you want to have a look, check it out. When you go shop on Amazon, support a small business and come in via my link.

Materials

The fabric I'm using is from Michael Miller, the Rosalinda collection, and a little bit of ribbon from Ofraé.

We have the upper layer here in the Rosalinda collection fabric, and you need to cut it twice. There's only one pattern for the upper layer and one pattern for the lower layer. You need to cut the upper layer twice on the fold and the lower layer twice on the fold.

Then we've got the waistband, which we are cutting twice. The lower layer here is in a really light shirting fabric, again it's on the fold, and there's only one pattern piece for that.

I've got rickrack and ribbon to adorn my skirt as you know. I'm using rickrack for the top layer and then ribbon for the lower layer. And also, of course, we need your elastic.

Getting Started

And now we're ready to go and sew our skirt.

Introduction and Waistband Preparation

Transcript for the video: Scarlett Skirt Step-by-Step Tutorial

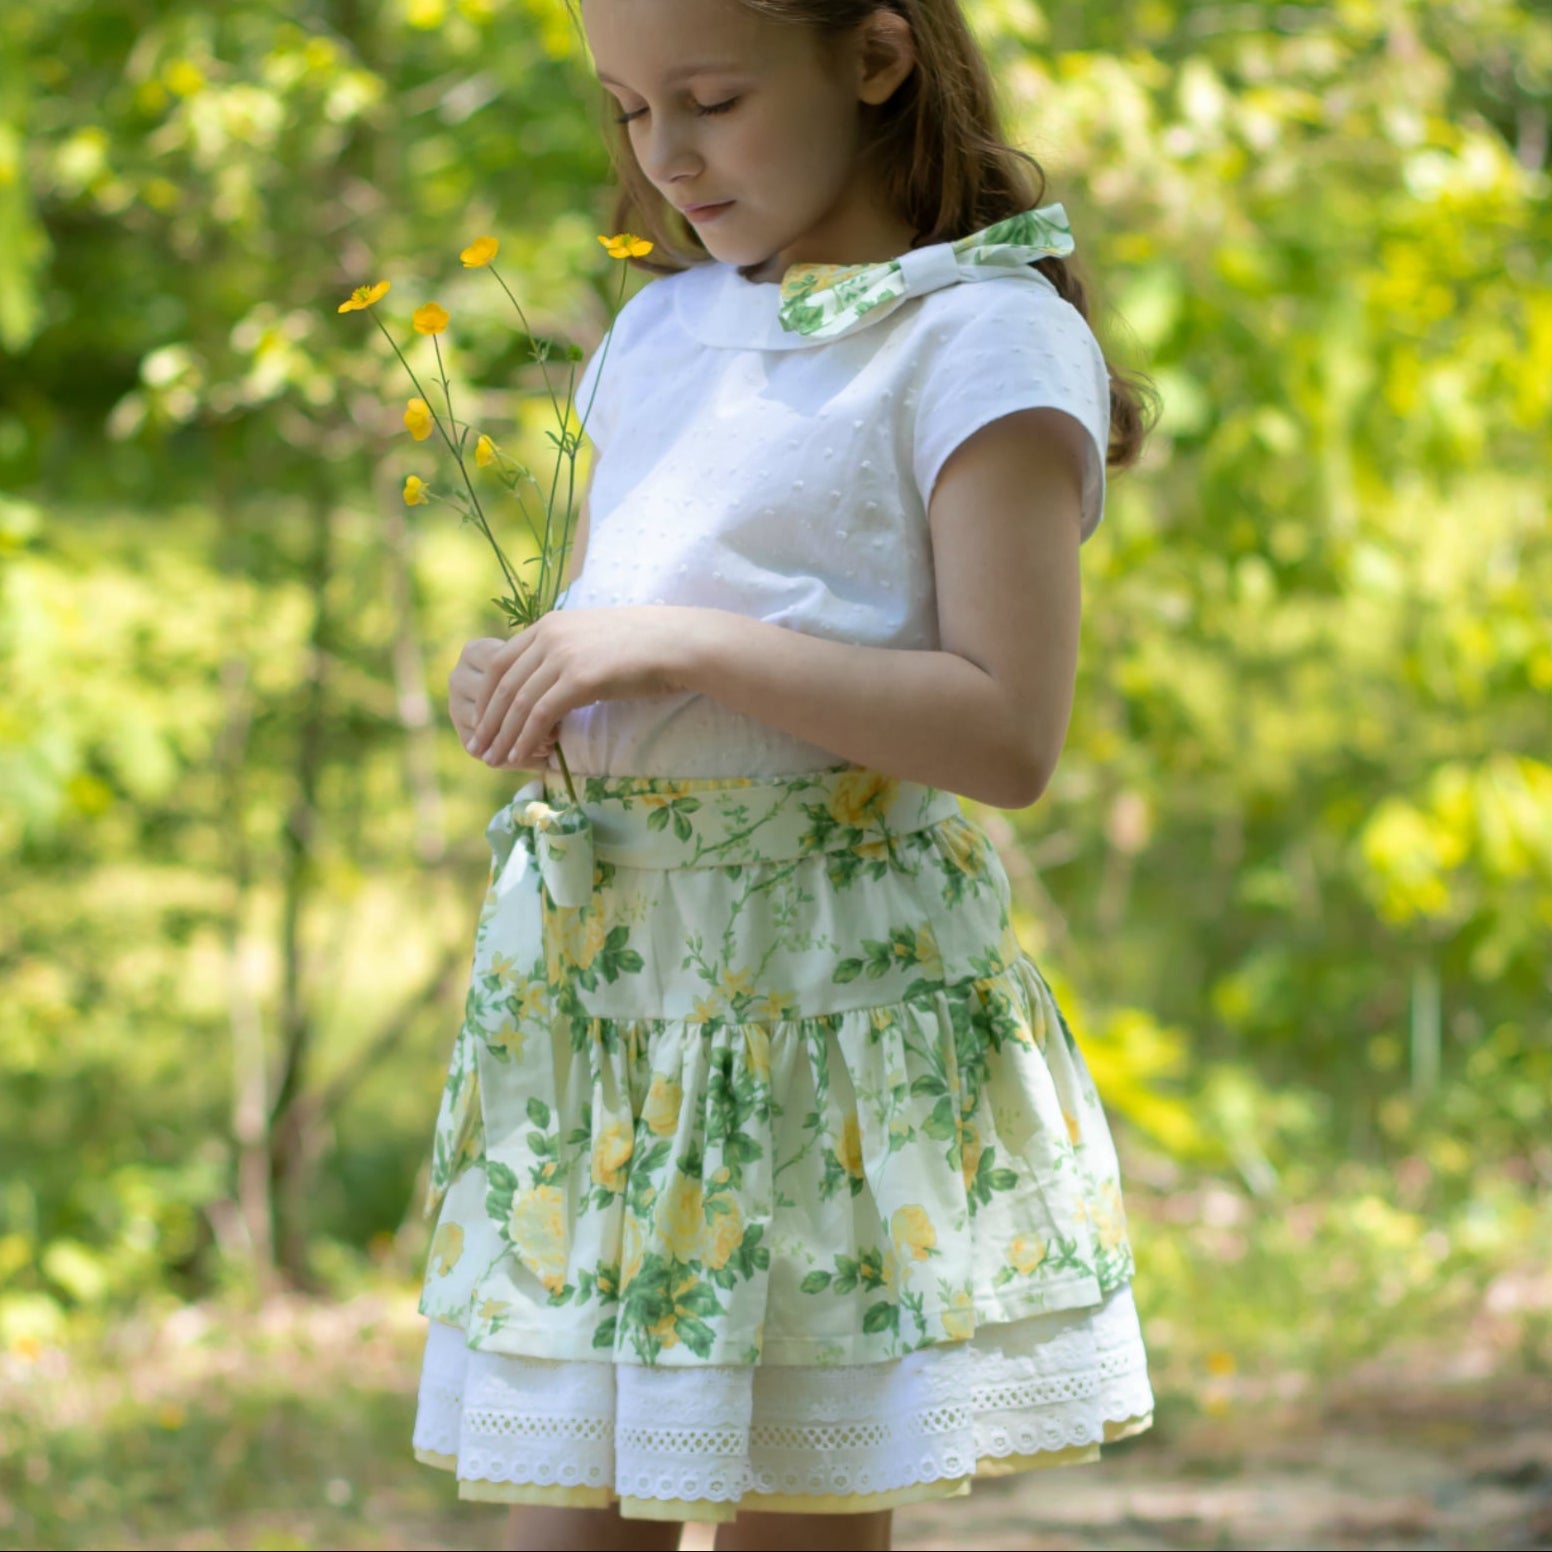
Welcome to the introduction to the Scarlett. I'm going to show you here how to make this dual-layer skirt.

The first thing I need to do is finish the edges of my waistband. Then we're going to sew the waistband together first with a one-centimeter seam allowance on either side. Line up the fabric edge on edge and sew at one centimeter. Lock in your stitches at the beginning and the end, then do the other side as well.

Now we can head over to the ironing board and press the seam flat first, then press it open. This is a habit you should get into—do it every time and you'll get beautiful seams. Do the same on the other side.

Creating the Elastic Tunnel

Next, we're going to work on the tunnel for the elastic. First, iron over the top edge by one centimeter, then fold it over to create the tunnel.

For smaller children, I would use a three-centimeter or 1¼-inch elastic. For older children, you may want to use a four-centimeter width. The tunnel needs to be one centimeter wider than the elastic, so for my four-centimeter elastic, I make the tunnel five centimeters wide.

So I iron over the edge by one centimeter, then fold it down and measure carefully to ensure it is consistent all the way around. Press well.

Now I add pins and mark a turning gap for topstitching. You don't have to mark it, but it helps if you might forget.

Sew all the way around close to the edge, locking stitches at both ends. Use stitch length 2.5 or 3. Line up the folded edge with your presser foot guide and sew steadily. Keep it even and support the fabric if needed. Your tunnel is now complete.

Checking the Pattern

Now we move on to the skirt.

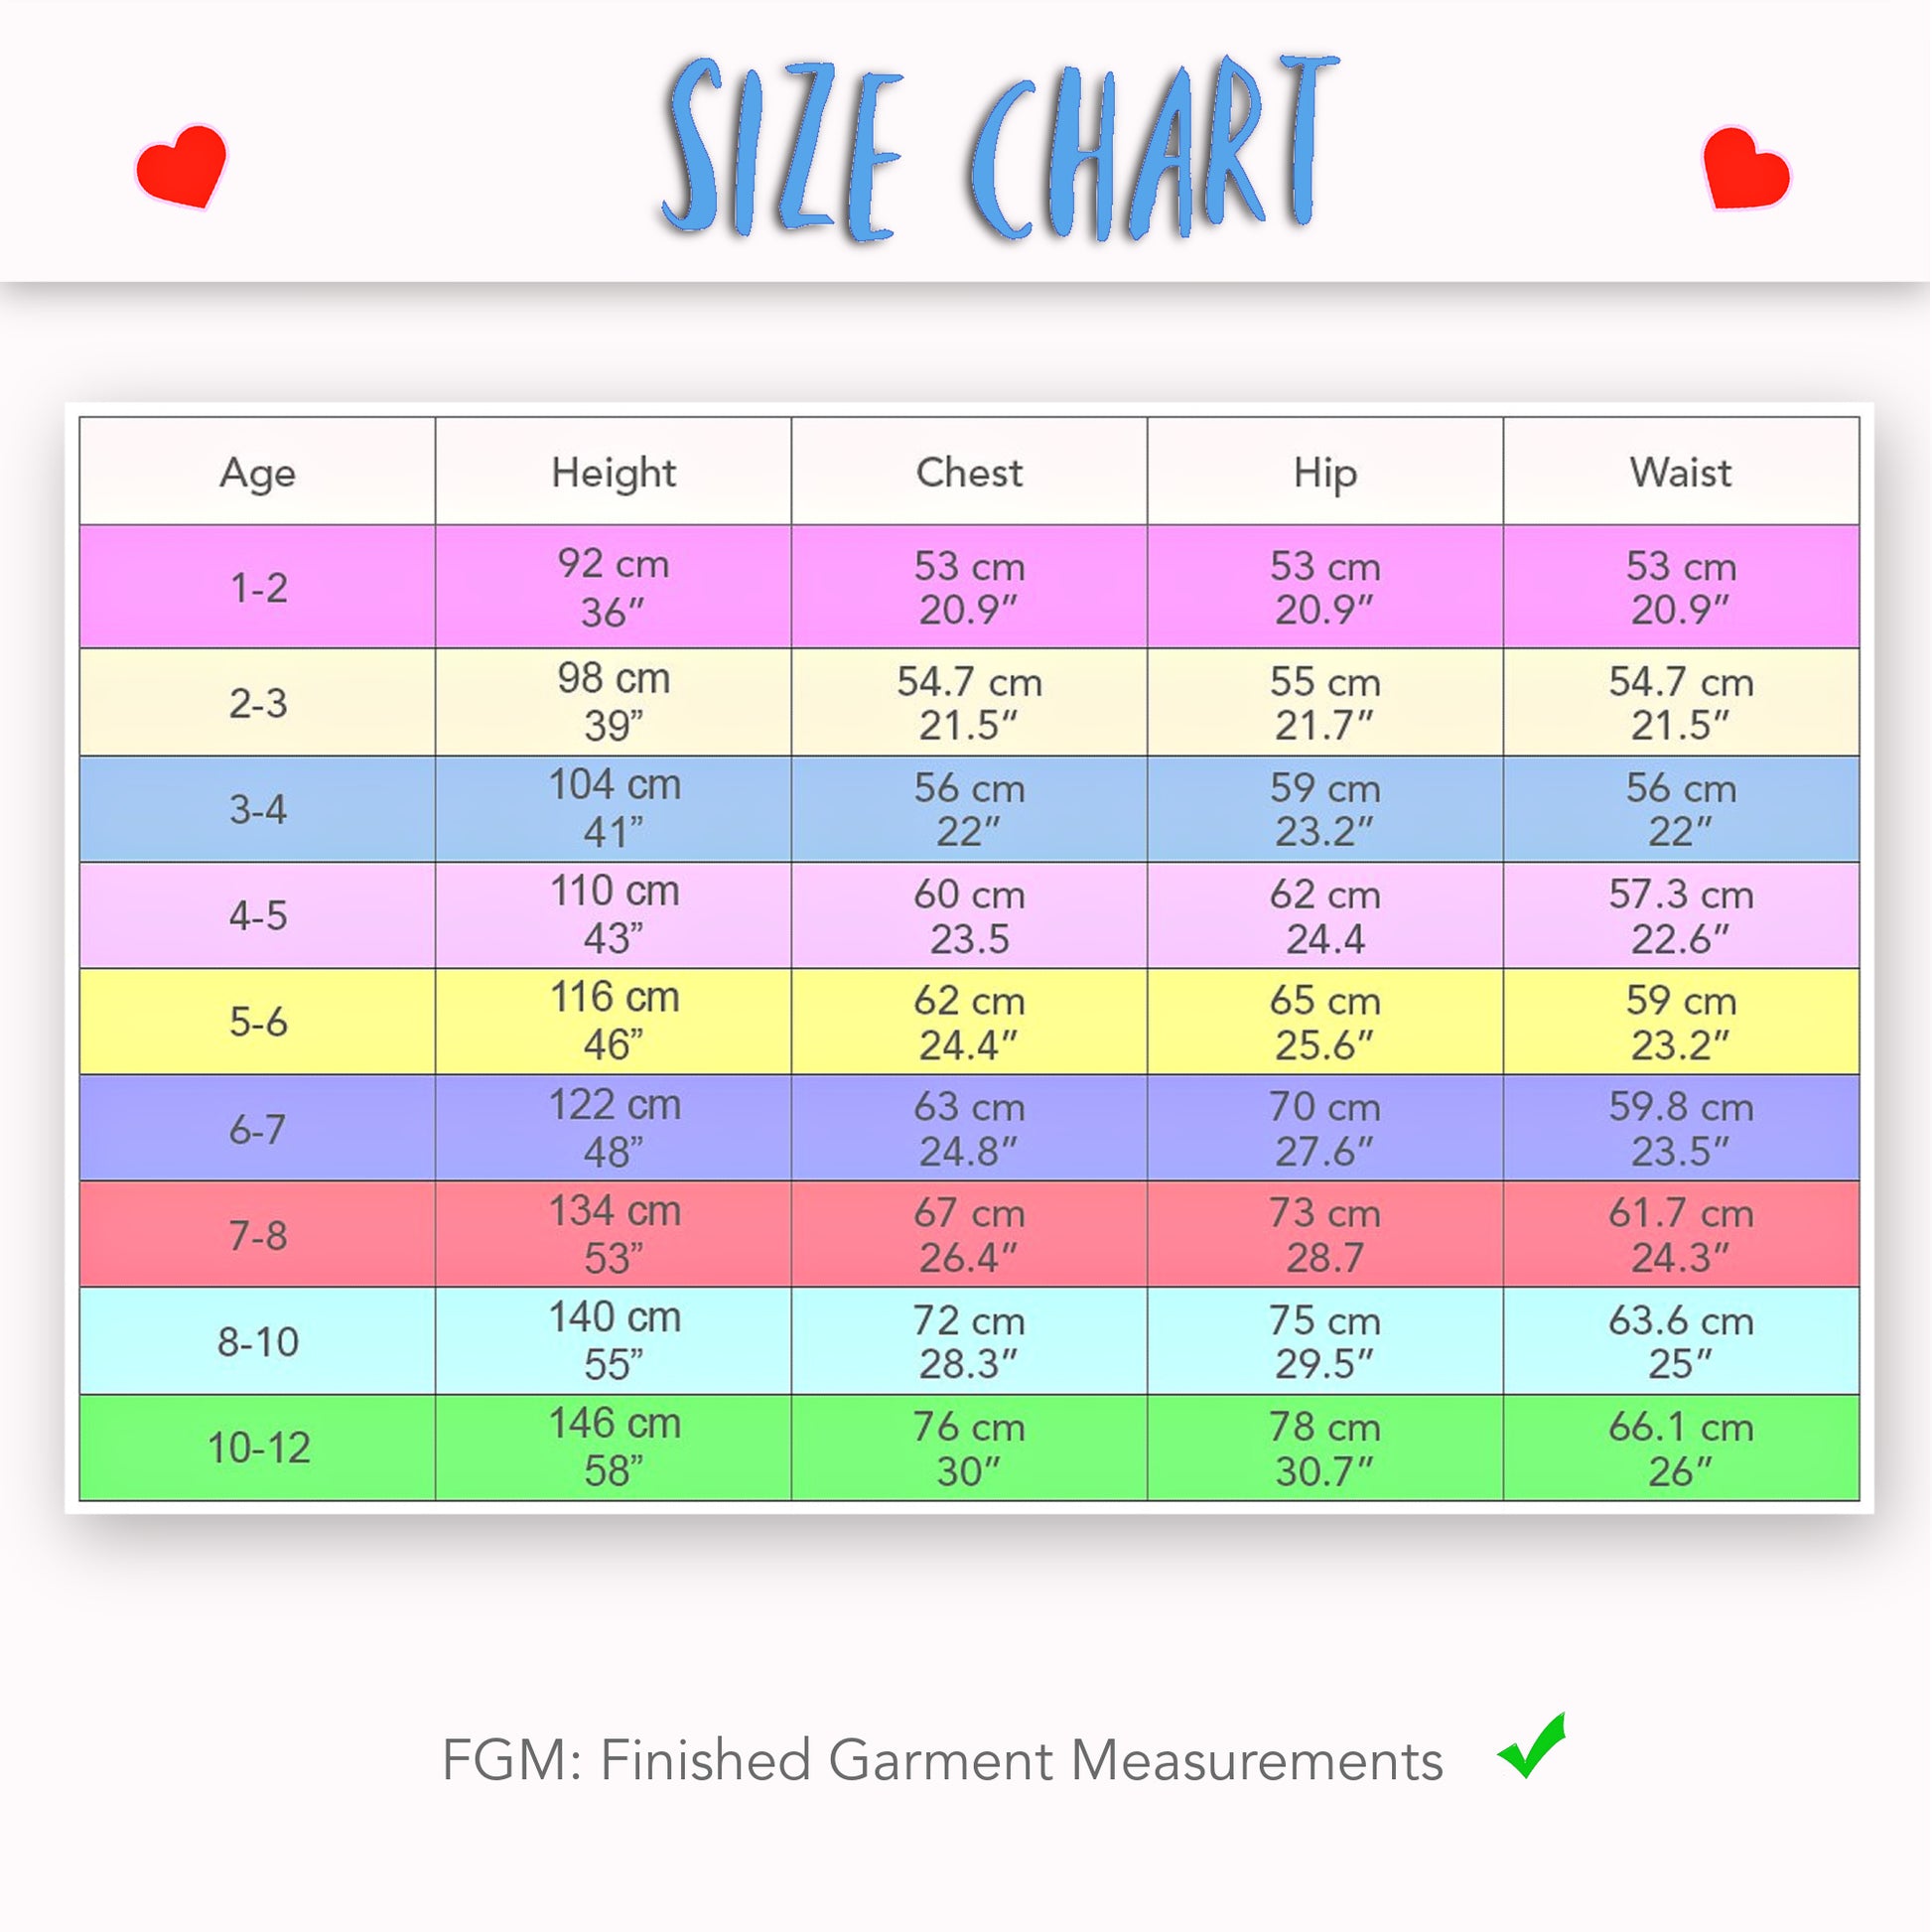
First, check that your pattern has printed correctly. It should measure five centimeters or one inch on the test square. You also have an assembly plan showing how everything goes together.

In this case, it's simple rectangles: A on B and B on C.

Some of you may prefer measurements instead of a pattern. Those are included as well on page six of the instructions, both in centimeters and inches, for fabric cut on the fold.

Skirt Pieces and Setup

This is my yoke and waistband in one. Fold it over and either turn in the lower edge or serge it.

The key point is that the elastic tunnel is one centimeter wider than the elastic itself.

For children, elastic widths vary:

  • 2.5 cm (1–1¼ inch) for smaller children
  • 4–5 cm for older children

Now the upper and lower skirt layers go on top of each other. You can adjust lengths if you want. Just make sure they are cut on the fold.

We use a three-centimeter hem.

To estimate length, overlap the yoke and skirt by two centimeters and measure down from the waist. Don’t forget to account for hem allowance.

Design Example and Flexibility

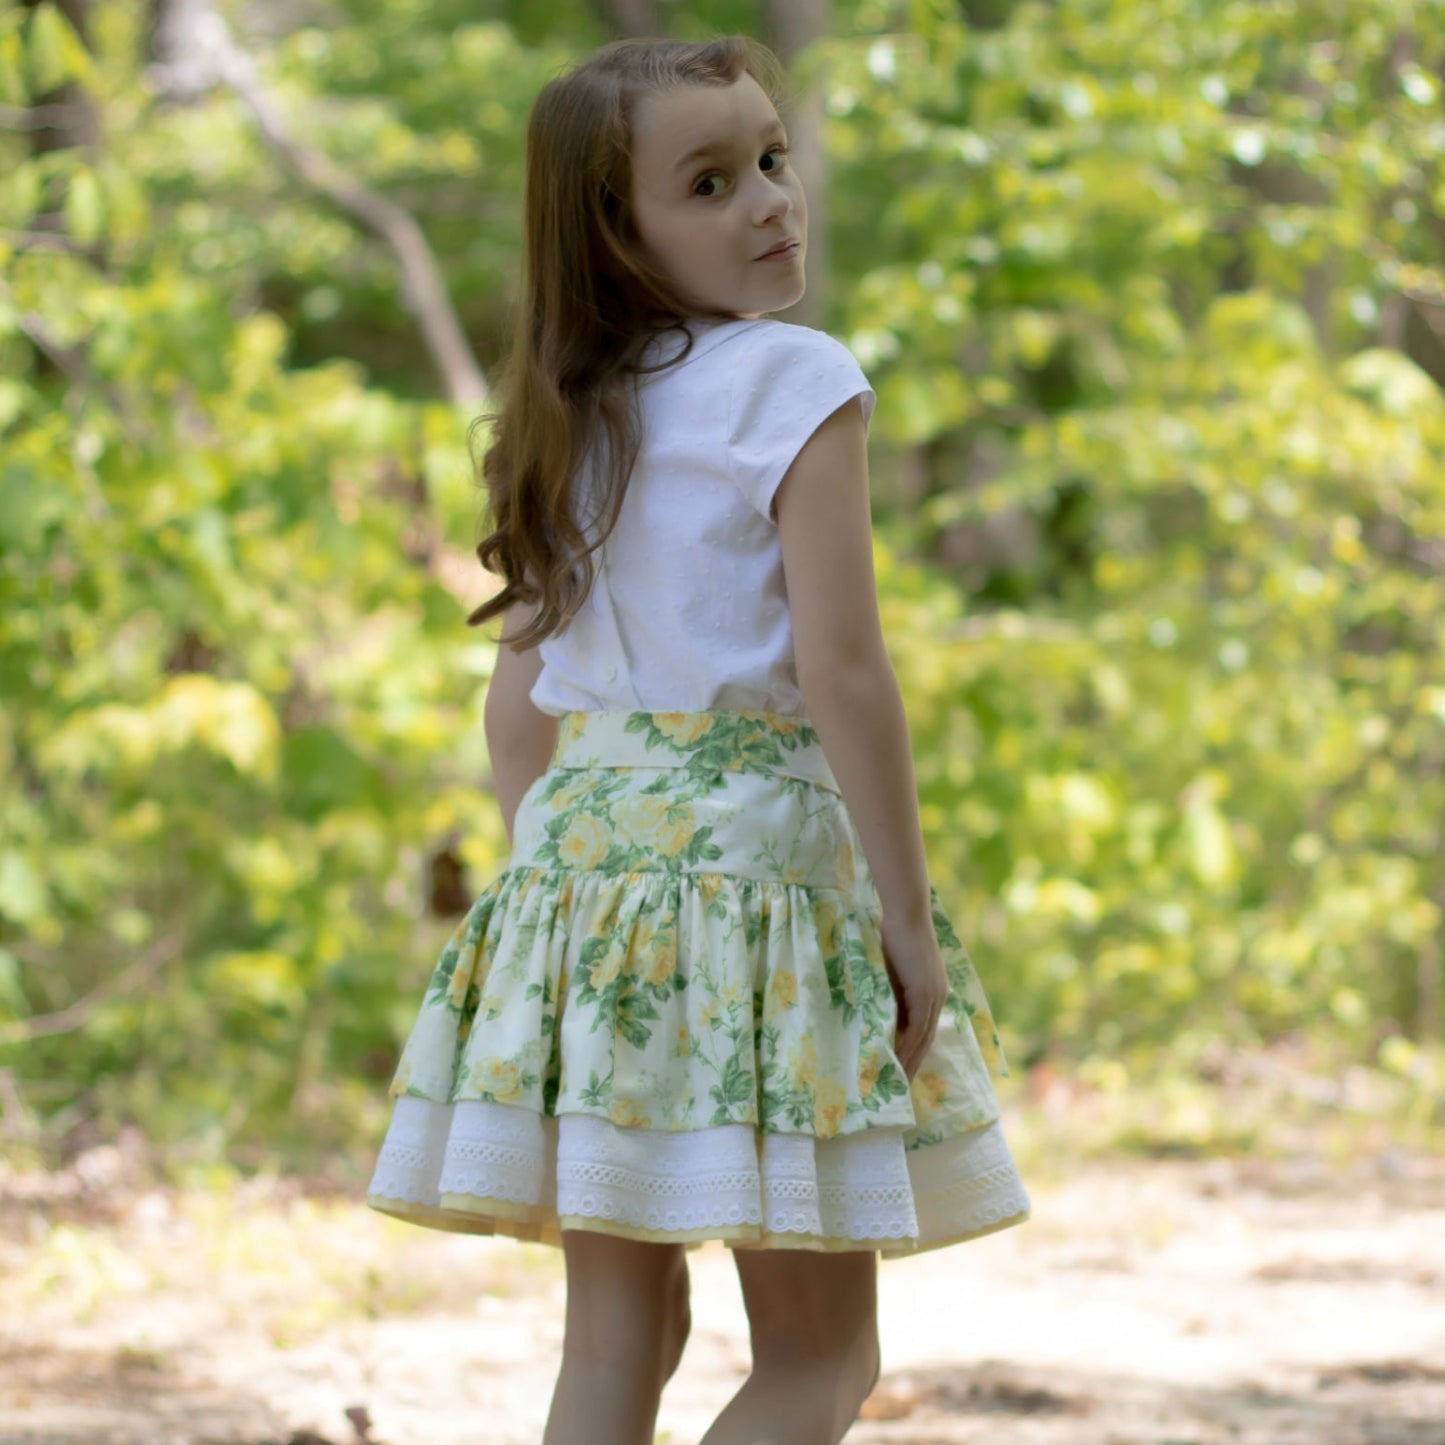
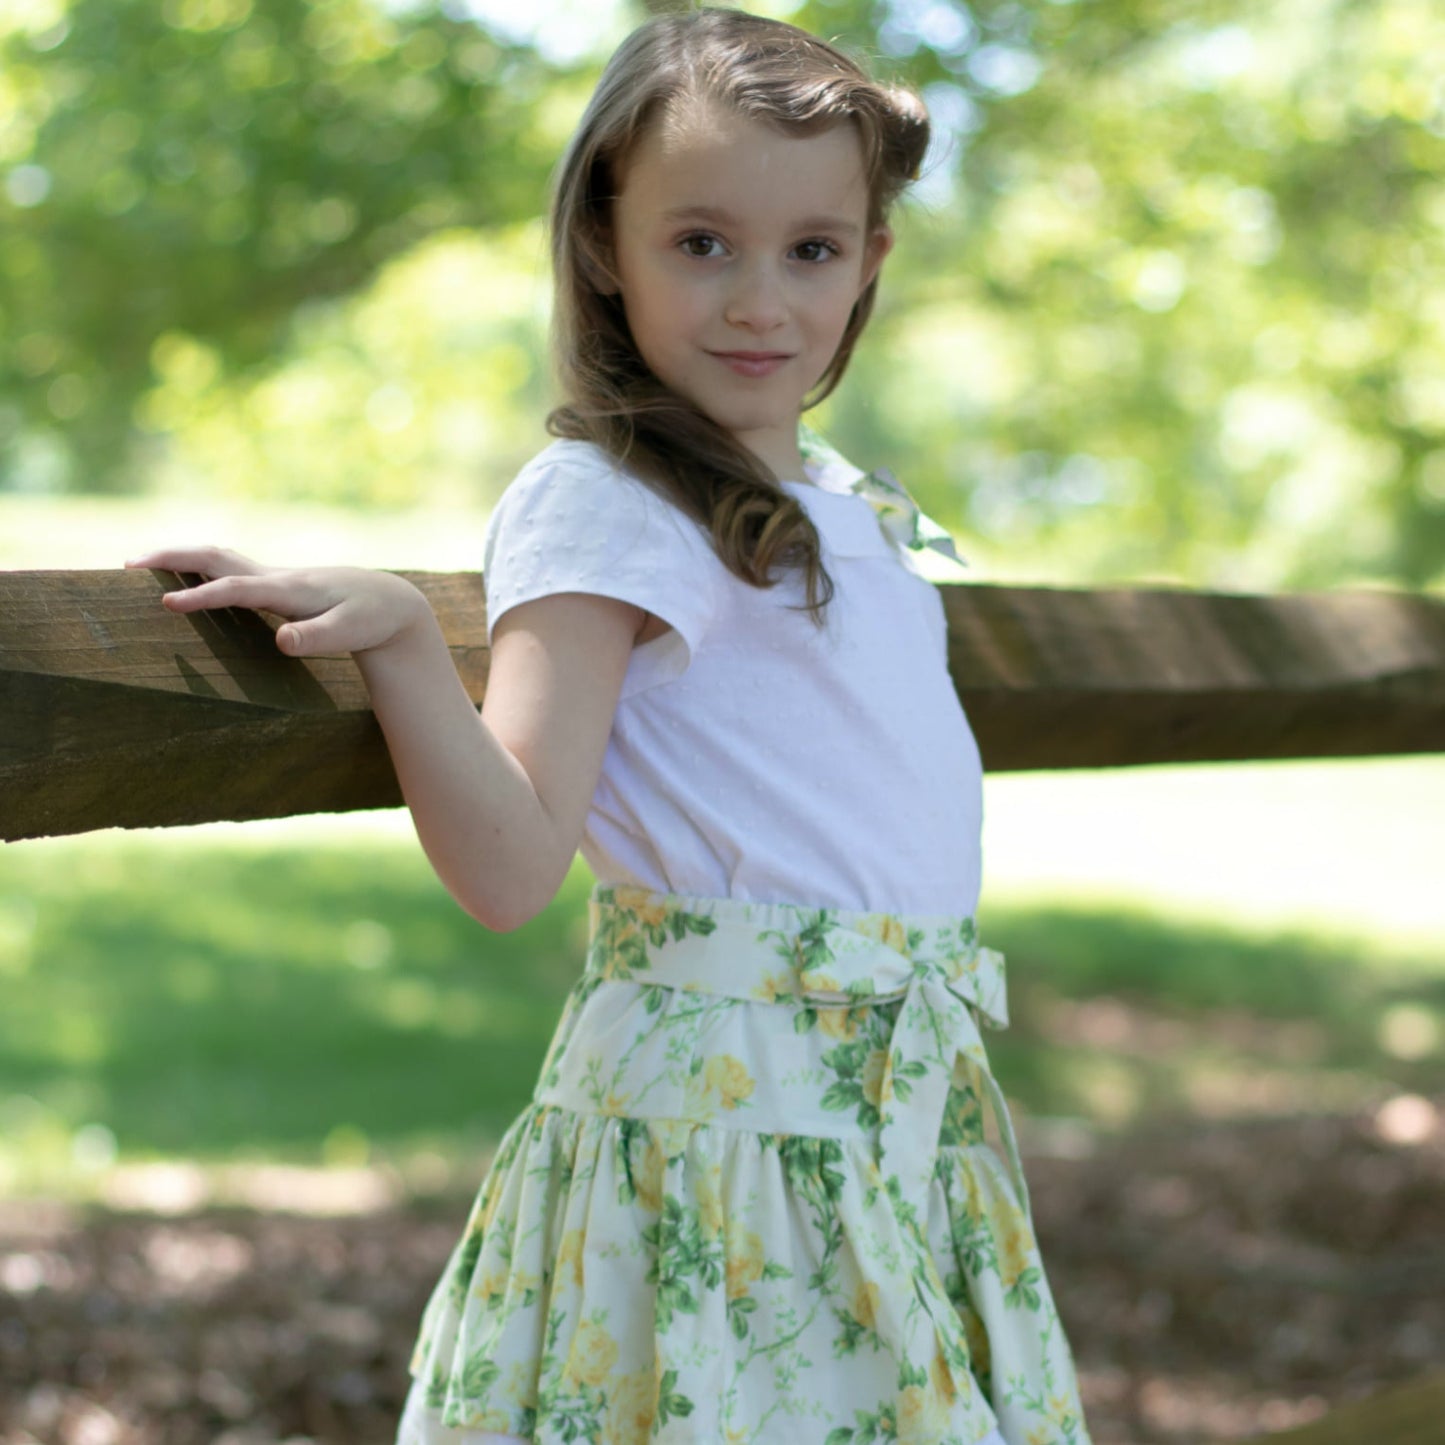
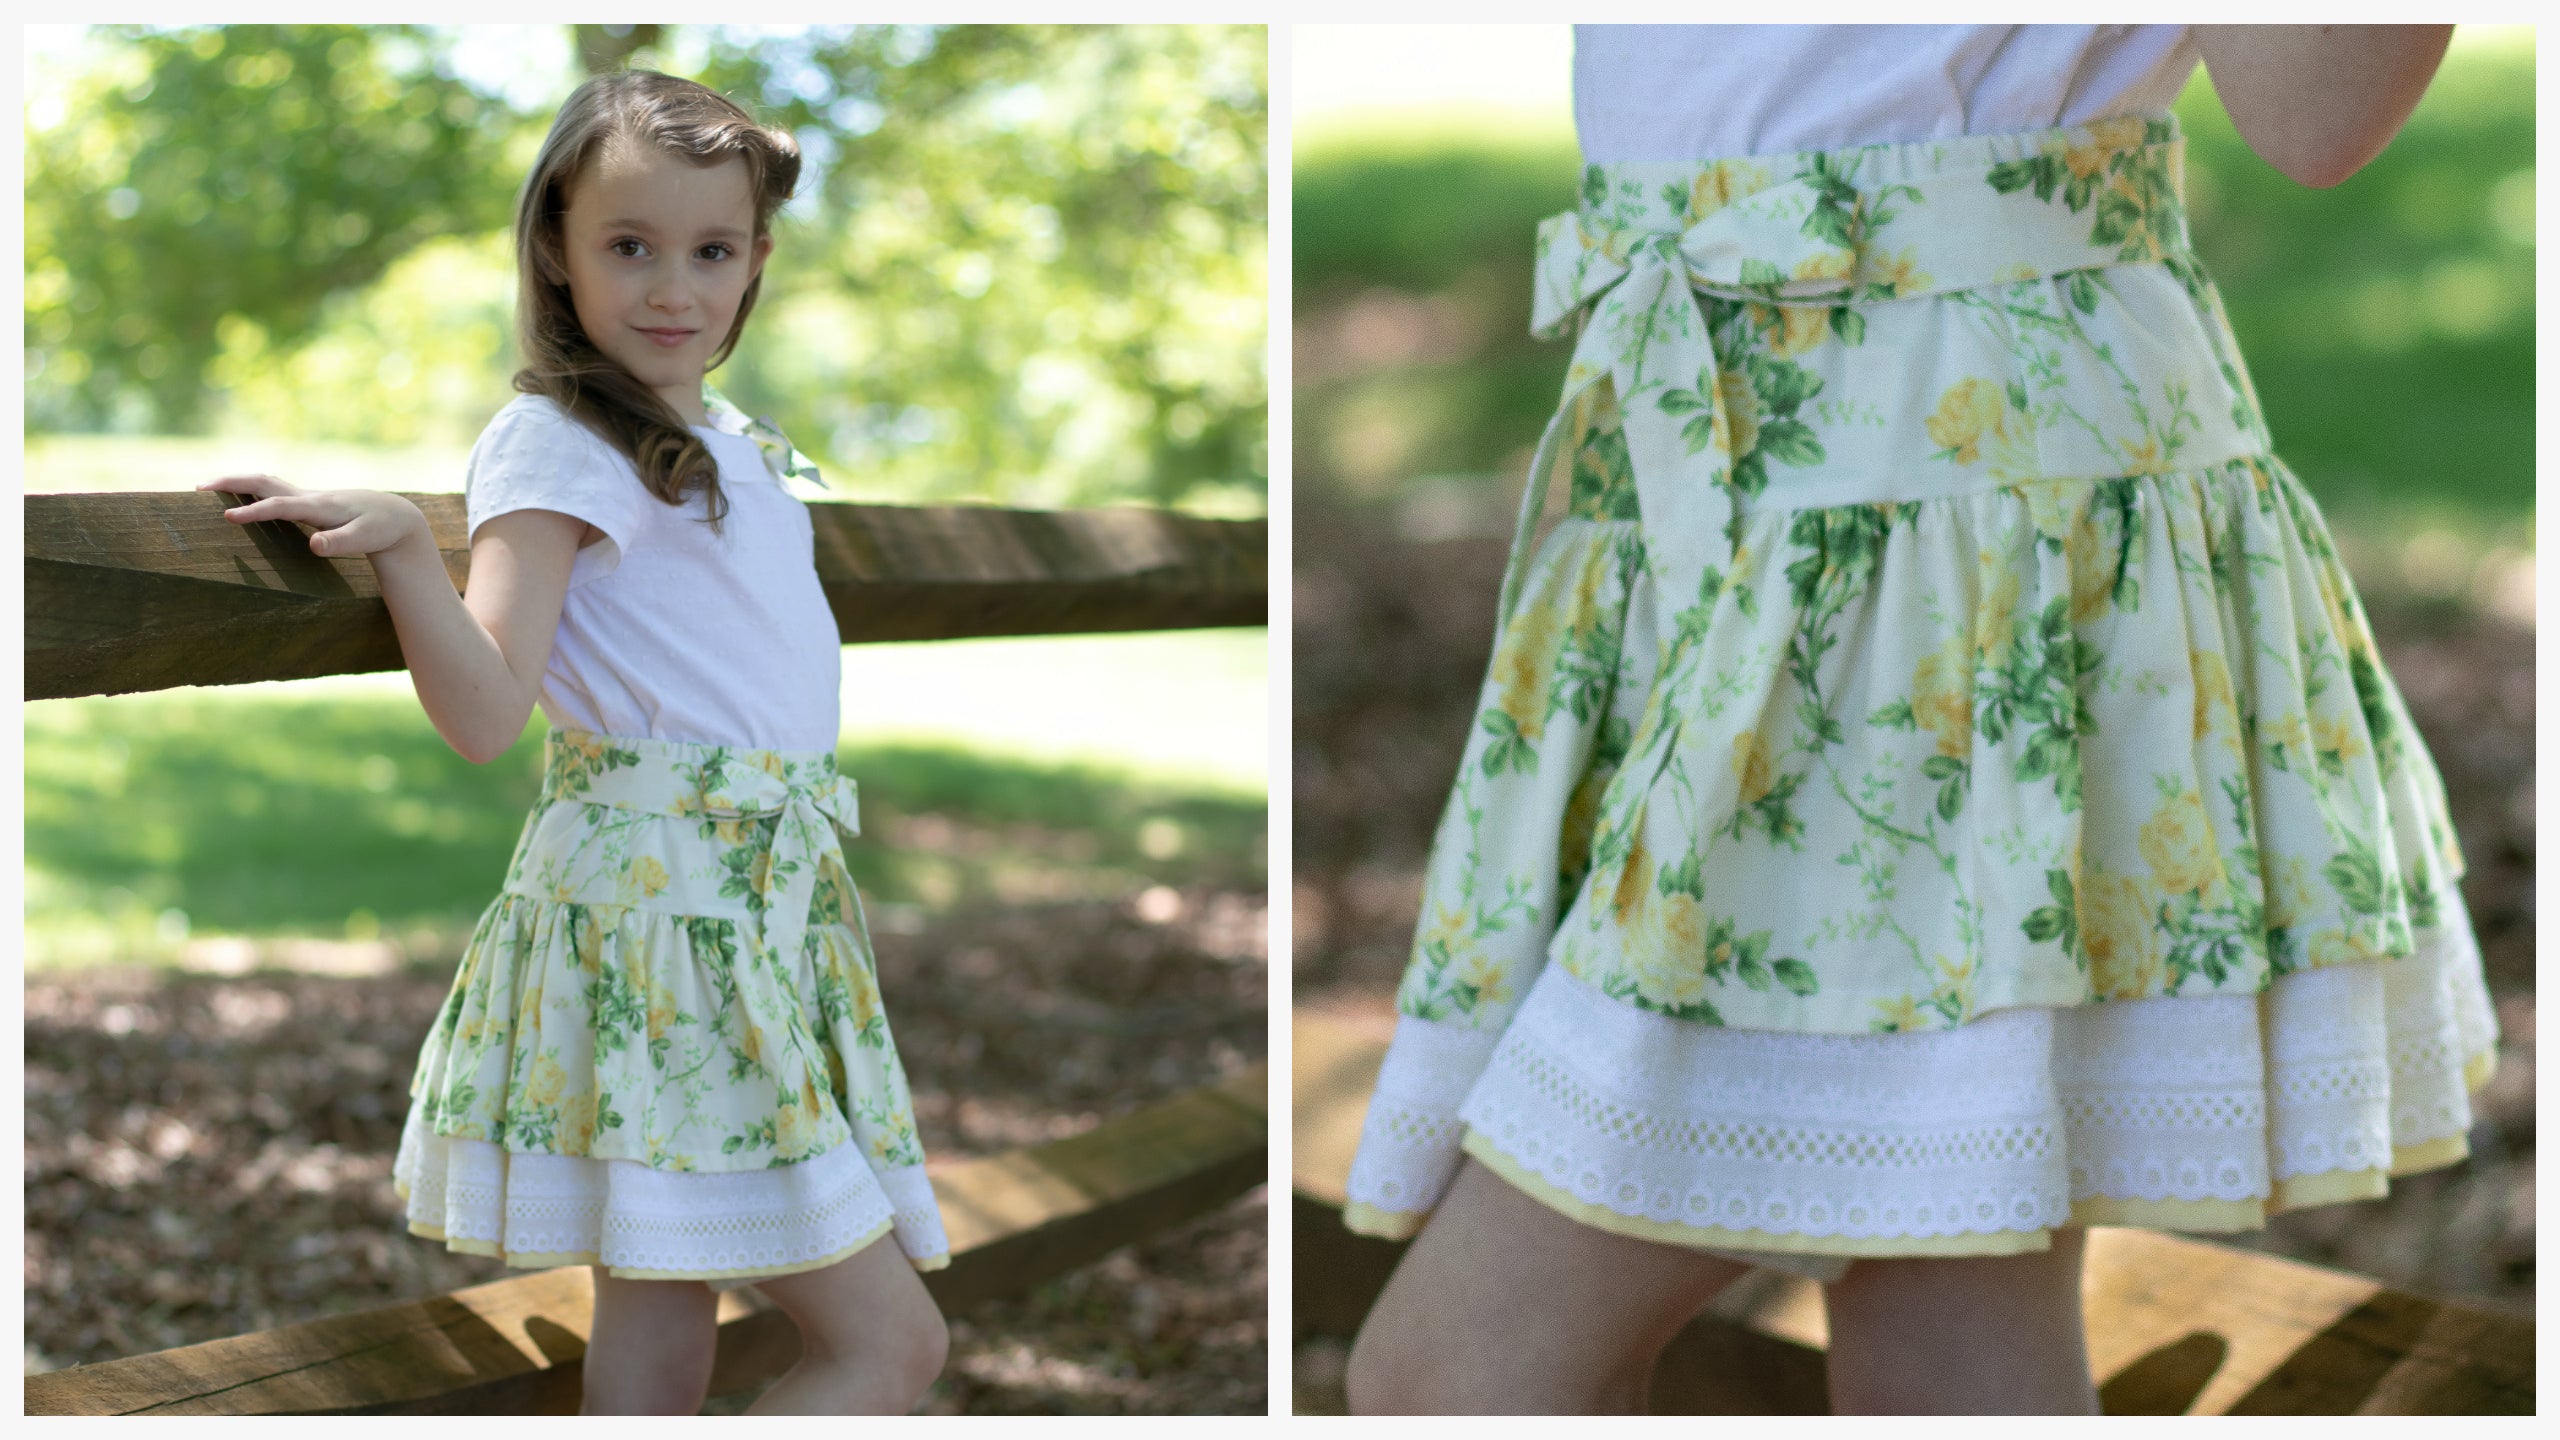
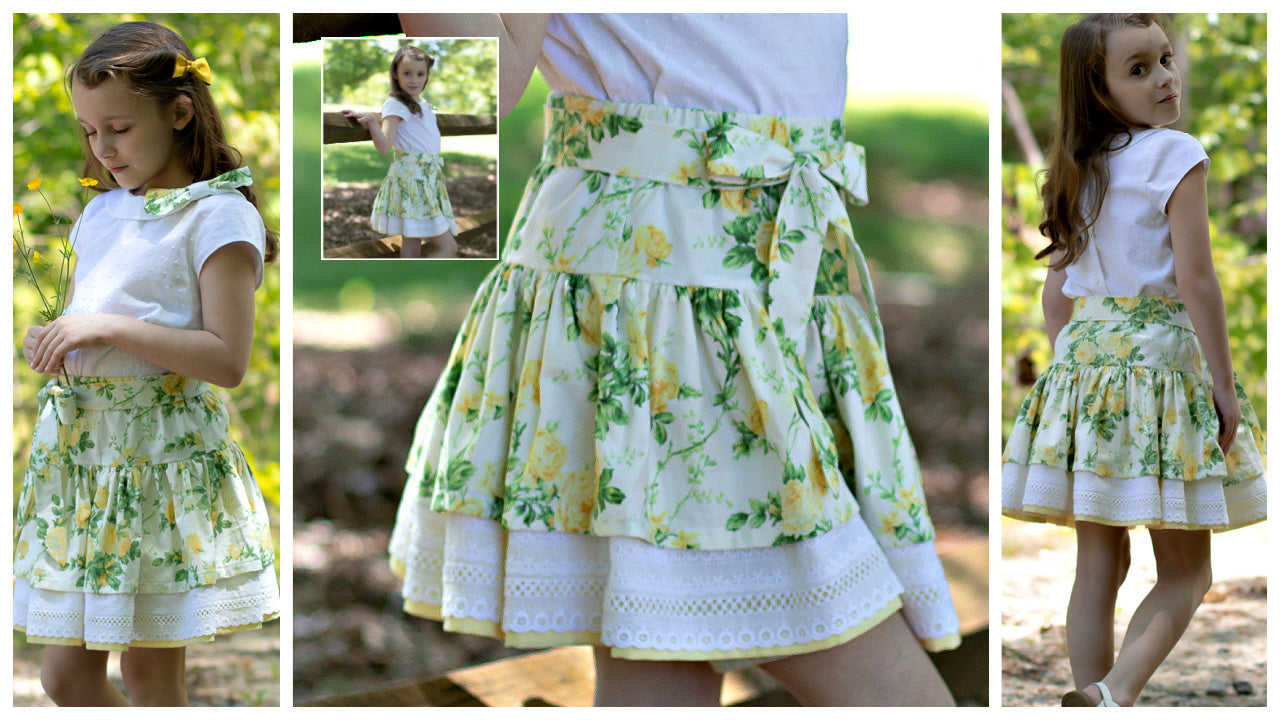
Here is an example made by Melissa for her daughter Charlotte. The top layer is slightly shorter than the lower layer.

This is why having a pattern is useful—even if it looks like simple rectangles—because you can adjust proportions easily.

Pattern Instructions Overview

The instructions follow a consistent format: cover page, contents page, then printing instructions. There is also a link for a free Adobe download and an explanation of the pattern.

Then we have the size chart, fabric requirements, and notions. You’ve already seen the layout plan showing exactly what you need.

After that, there are diagram pages showing how to construct the skirt, a Facebook link with examples, and an Amazon shop link if you want to support the business.

Materials

The fabric I'm using is from Michael Miller, the Rosalinda collection, plus some ribbon from Ofraé.

  • Upper layer: Rosalinda fabric, cut twice on the fold
  • Lower layer: lightweight shirting fabric, cut twice on the fold
  • Waistband: cut twice
  • Decorative trims: rickrack and ribbon
  • Elastic for waistband

Sewing the Skirt Side Seams

First, close the side seams of the skirt. You can serge the edges first or sew and then serge—depending on fabric thickness.

With right sides together, sew the side seams using a one-centimeter seam allowance. No need to pin if you're confident.

Repeat for all side seams on both layers. Then press seams in one direction on each layer so they oppose when assembled, creating a flatter finish.

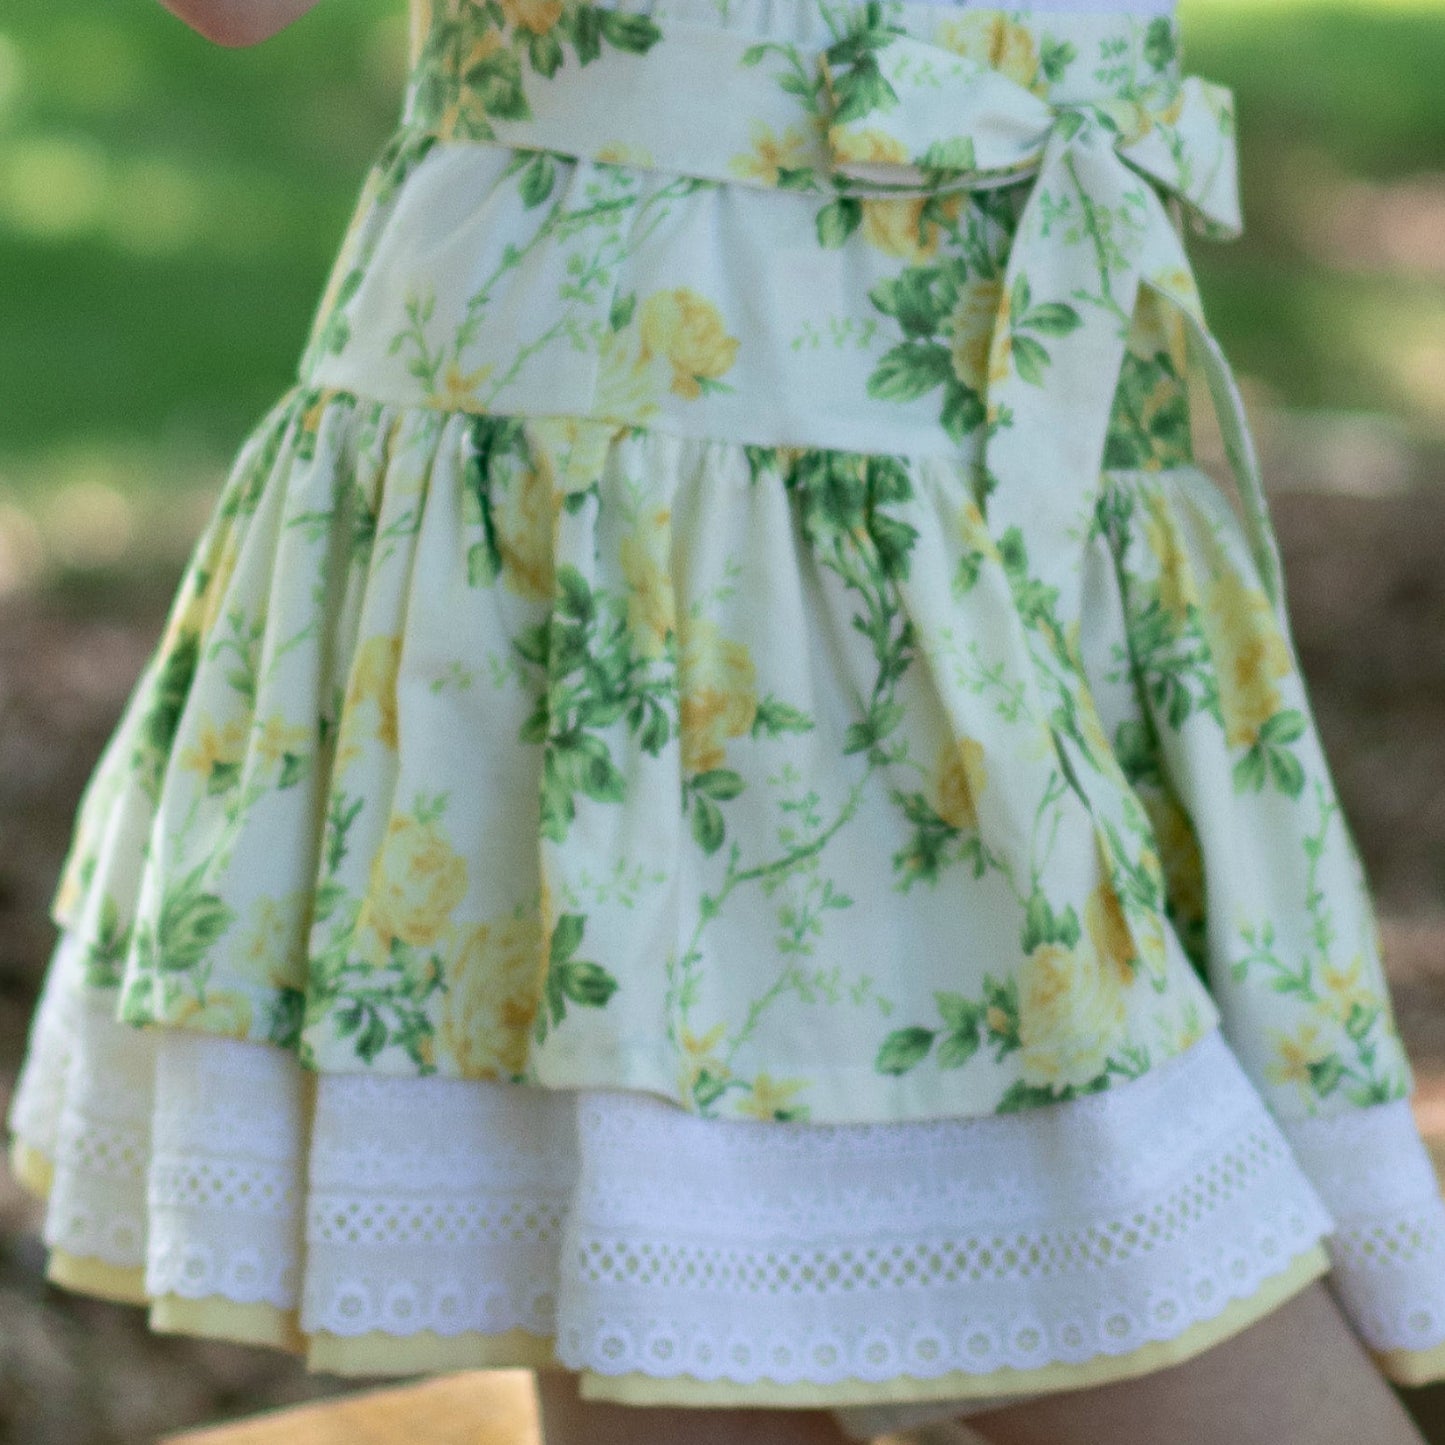
Hemming the Skirt and Decorative Trim

For the hem, you can either press first or sew directly. I press up one centimeter first, then turn up the full hem at the machine.

As a beginner, I recommend pressing first or finishing the edge before turning up the hem.

Sew the hem at two centimeters, checking measurements as you go. You can use stripes or fabric lines as guides instead of constant measuring once you gain confidence.

For the lower layer, you can also turn and sew without pressing first if preferred.

Adding Rickrack and Ribbon

Now we add rickrack. Use the existing stitching line as a guide and sew straight through it—no zigzag needed.

Trim and secure the ends neatly.

For ribbon, I recommend positioning it slightly higher for a cleaner look. Align it carefully along the hem and sew so the stitching sits near the outer edge of the ribbon.

Repeat around the skirt, securing ends neatly.

Preparing and Aligning Skirt Layers

Before assembling, check both skirt layers are even. Trim if needed so lengths match.

Mark the center front and center back on both layers. Align side seams.

Place the lower skirt inside the upper skirt.

Make sure seam allowances face opposite directions for a flatter finish.

Gathering the Skirt

Now add gathering stitches.

Use the longest stitch length on your machine. Leave long thread tails at the beginning and end—this is very important.

Sew two rows of gathering stitches around the top edge. Do not pin.

Pull the threads gently to gather the fabric, working slowly to avoid breaking threads.

Distribute gathers evenly. If working with thicker fabric, you may prefer to gather each layer separately or add pleats instead.

Once gathered, match center fronts, center backs, and side seams.

Attaching the Waistband

Place the waistband right side out and attach the skirt. Align side seams, center front, and center back.

Adjust gathers evenly before sewing.

Stitch through the gathers with a one-centimeter seam allowance.

Remove pins carefully before sewing over them.

Finish by overlocking the seam, ensuring no pins remain to avoid damage.

Finishing the Gathers and Topstitching

Remove lower gathering threads carefully by cutting and pulling in short motions.

Topstitch the seam allowance upward using stitch length 3 or 3.5 for a cleaner finish.

Pull fabric gently while sewing to keep the seam flat.

Avoid pressing with an iron—instead, use steam and your hand to shape the gathers for a softer, more professional finish.

Inserting the Elastic

Thread elastic through the waistband tunnel.

For younger children, use 3 cm or 1¼-inch elastic; for older children, 4 cm works well.

Secure both ends with pins placed horizontally, then stitch vertically over them using a normal straight stitch.

This makes future adjustments easy.

Closing the Waistband and Final Finishing

Close the turning gap and ensure elastic does not slip inside the casing.

Adjust gathers so they sit evenly around the waistband.

Give everything a final check and shape the volume in the lower skirt.

Avoid heavy ironing—use steam and hand shaping for best results.

Your Scarlett skirt is now complete.

Final Showcase and Goodbye

Here are some examples from the collection featuring different tops and skirts modeled by various makers, including the Scarlett skirt paired with the Beatrice blouse and other variations.

And that's it—your skirt is finished.

See you soon. Bye for now.

Transcript for the video: Scarlett Doll Step-by-Step Tutorial

Hi, I'm Marina from Frocks and Frolics, and matching with the Western blouse, I'm going to show you how to make the Scarlett skirt for a doll.

In this video, we're going to do the Scarlett skirt. Now of course, the Scarlett skirt is the freebie on the website, and so is this one, so you can try both for your doll and for your girl.

There isn't much difference really in the skirt—the instructions are almost entirely the same as with the girls’ version. I hope you enjoy this, and if you like it, then go get the pattern from frocksandfrolics.com. It is free, just like the video, so go ahead and make one.

Pattern Overview

Let's have a look at what we need to make this little skirt.

For this skirt, you've got three parts:

  • The waistband
  • The lower skirt
  • The upper skirt

Waistband

The waistband comes in one piece and also forms the tunnel for the elastic.

We are going to fold over the top edge and stitch it through—that becomes the tunnel.

We want to serge the sides and the top edge, and leave the lower edge as it is.

Lower Skirt Layer

The lower part of the skirt is cut two times on the fold, and it's actually twice the width of the waistband.

We serge the sides and the lower edge, and leave the top edge as it is.

Upper Skirt Layer

The upper skirt is cut twice on the fold as well, and it's exactly the same length as the lower layer.

They fit perfectly on top of each other.

Again, we serge the edges and leave the lower edge as it is.

Assembly Overview

This is what it looks like when everything is layered together.

You also need elastic, which will sit inside the waistband tunnel.

When making a pattern like this yourself, always make sure you allow enough room for the elastic—about 5 mm extra, or even 6–7 mm for wiggle room.

Sewing the Side Seams

The first step is to close the side seams.

We start with the waistband, placing right sides together. You can pin if you want, but it's not really necessary.

Do the same for the upper layer and the lower layer—close all side seams.

Seam allowance is 1 cm, but for a gathered skirt it doesn't matter too much if it's slightly more or less.

Pressing and Preparing the Waistband Tunnel

Now press the seam allowances open.

Next, we create the elastic tunnel by folding over the top edge.

For me, it's about one inch—this gives a little room.

We will also topstitch this edge later.

Pin all the way around at a consistent distance.

Originally, I left the turning gap at the lower edge, but it's better to leave the opening in the side seam instead—so mark that if you prefer.

Then topstitch the tunnel, both top and bottom edges, through the serged line.

Topstitching Tips

Take off the sewing machine plate and use the arm—it makes sewing around the tube much easier.

Stitch all the way around, locking stitches at the beginning and end.

You can also topstitch the upper edge to help the elastic sit better. It's optional, but it gives a nice finish.

Hemming the Skirt

Next, turn up the hem slightly above the serging line.

Use your presser foot as a guide and sew all the way around.

Presser feet have helpful guide lines—use them.

Joining the Skirt Layers

Now we assemble the skirt layers.

Place the upper layer on top of the lower layer, right sides facing out.

Match seam allowances first, then align edges. Add pins if needed.

Since both layers are the same length, they should fit perfectly.

Adding Gather Threads

Next, insert gather threads.

Use the longest stitch length on your machine.

Sew one line close to the edge, and another one foot-width apart.

Pull bobbin threads only to gather the fabric evenly.

This step takes time, but gives a beautiful result.

Attaching the Waistband

Now attach the waistband.

Make sure seams sit either at the center front or center back so they don't stack awkwardly.

Gather the skirt to fit the waistband.

It helps to pin center front, center back, and side seams first.

Sewing the Waistband

Sew from the inside if possible—it helps control the gathers better.

You can also sew using the machine arm for easier movement.

Stitch between the two gathering lines.

Then finish with the serger.

Finishing the Waistband Seam

Topstitch the seam allowance into the waistband.

Use a longer stitch length (3 or 3.5).

This helps the seam sit neatly and professionally.

Inserting the Elastic

Now insert the elastic through the tunnel.

Sometimes the safety pin gets stuck in the seam allowance—if that happens, use scissors to gently lift the fabric so you can guide it through.

Use a strong metal safety pin if possible—they’re more reliable.

Securing the Elastic

Overlap the elastic ends and secure with two rows of stitching.

Hold it flat while sewing.

Then tuck the elastic back into the waistband.

You can close the gap if you want, but it's optional.

Final Touches

You can add a bow if you like for decoration.

And that's it—the skirt is finished.

Closing

I hope you enjoyed this. It’s a very simple project once you get the hang of the gathering.

If I’ve made you interested in doll clothes or girls’ clothes, visit frocksandfrolics.com and check out the vintage collection for summer.

See you soon for another project with Frocks and Frolics.

DAS KÖNNTE DIR AUCH GEFALLEN

Isabella

SHOP NOW

Beatrice

SHOP NOW

Connie

SHOP NOW

Audrey

SHOP NOW