Zu Produktinformationen springen
1 von 11

PRINZESSINNENKLEID

PRINZESSINNENKLEID

Filled Circle
Filled Circle
Filled Circle
Empty Circle
Empty Circle
Normaler Preis $8.50 USD
Normaler Preis Verkaufspreis $8.50 USD
Sale Ausverkauft

Ein zauberhaftes Ballkleid für märchenhafte Abende. Dieses Prinzessinnen Kleid Schnittmuster, von  ‘ Die Schöne und das Biest’  inspiriert, begeistert mit einem eleganten Oberteil, feiner Spitze und einem Tudor-Ausschnitt. Der Rock fällt in schimmernden Lagen, handgemachte Chiffon Rosen setzen romantische Akzente.

Mit klaren Schritten und einer einfachen Videoanleitung kannst du das Belle inspirierte Kleid mühelos nachnähen – scroll einfach nach unten und nähe mit Marina mit.


Was ist beim Schnittmuster dabei?

  • Sofort-Download
  • Digitale PDF Schnittmuster
  • DIN A4 Format
  • eBook
  • Video-Anleitung

Design

  • Variante 1: Oberteil mit Jersey-Rückenteil, kein Reißverschluss nötig, klassischer Bahnenrock
  • Variante 2: Oberteil mit Reißverschluss, eingereihter Rock
  • Kurze Ärmel mit Tüllauflage
  • Spitzeneinsatz (Vorderteil)
  • Optional: Tülldekor Auflage für den Rock und die Schultern
  • Optional: Dekorative Chiffonrosen

Stoffverbrauch

STOFFEMPFEHLUNG
Für den Bahnenrock und das Oberteil verwendest du am besten einen festeren Duchesse-Satin um Faltenbildung zu vermeiden. Für das Rückenteil aus Jersey, eignet sich ein Interlock mit 5-6% Lycra oder Elastan am Besten.

STOFFVERBRAUCH

  • Eingereihter Rock: 2-4m
  • Bahnenrock: 1,4-1,8m
  • Oberteil: 30-60cm
  • Tüllrüsche Bahnenrock: 2,40m
  • Tüll Schulterschal: 70 cm

KURZWAREN

  • Spitze Vorderteil: 0,5m
  • Optional: Verdeckter Reißverschluss: 40cm
  • Tüll: 2,8m
  • Passendes Garn: 1 x
  • Rosen: 5,5 m 5-8 cm breites Chiffonband. Je breiter das Band je größer die Rosen.
  • Ein Reifrock ist nicht unbedingt notwendig, ist aber beim Bahnenrock zu empfehlen.

Verfügbare Größen

Größe: 90-152 (Alter 1-12)

Bitte beachten

  1. Dies ist ein digitales Schnittmuster oder eine PDF-Datei, kein physisches Produkt. Die Zustellung erfolgt elektronisch über einen Download-Link an die beim Kauf verwendete E-Mail-Adresse. Zusätzlich kann das Schnittmuster von deinem Kundenkonto heruntergeladen werden.
  2. Um sicherzustellen, dass das Schnittmuster in seiner tatsächlichen Größe gedruckt wird, wird die Verwendung von Adobe Acrobat Reader empfohlen.
  3. Kleine Betriebe: Ich freue mich wenn meine Schnittmuster dir helfen, tolle Bekleidung für deine Kunden zu nähen. Industrielle Produktion ist untersagt.

Kunden werden ermutigt, Frocks & Frolics zu verlinken, wenn sie Projekte, die mit meinen Schnittmustern erstellt wurden, in sozialen Medien teilen.

@frocksandfrolics
#frocksandfrolics

Vollständige Details anzeigen

SCHRITT-FÜR-SCHRITT ANLEITUNG

Thumbnail
EINFÜHRUNG IN DAS SCHNITTMUSTER
Thumbnail
KLASSISCHER GEFALTETER ROCK MIT JERSEYRÜCKENTEIL
Thumbnail
GERAFFTER ROCK & REIßVERSCHLUSS
Thumbnail
BONUS: CHIFFON ROSE

VIDEO TEXT

Introduction to the Belle-Inspired Princess Dress

Transcript for the video: Princess Dress - Introduction to the Pattern

Hi everyone, I’m Marina from Frocks and Frolics, and we are kicking off a series of videos that I am super excited about.

This is fairy tale land for me. For the first time—everyone who knows me knows I’m not the most frilly person—but I have definitely caught princess fever, and I hope you will too.

This first project is a Belle-inspired princess costume, and I’ve included loads of options for you. We’re going to look at the pattern in a minute, but something that was very important to me was making sure you can make this dress whether you have a little sewing experience or a lot.

I’ve included an option with a zipper closure at the back, and another option where you don’t need any closure at all because the back is substituted with a jersey panel, allowing the dress to stretch on over the skirt.

Both options are there for you.

This is a time-consuming project, but the results are absolutely stunning.

Printing and Preparing the Pattern

The first thing you need to do is print the pattern using Adobe Acrobat DC.

Don’t try to print it from an iPad, tablet, or similar device. While some people have told me it worked for them, others have had issues.

I recommend reading Debbie’s article on the So Sew Easy website. She has an excellent guide explaining how to print PDF patterns correctly and why pre-installed tablet systems can sometimes cause scaling problems.

Once printed, check the test square:

  • The metric test square should measure 5 cm.
  • The imperial test square should measure 1 inch.

The pattern is not a traditional multi-size pattern. I fit as much as possible onto each page to save paper, so the pieces may appear scattered across multiple sheets.

Use the layout plan to identify which pieces belong together.

For example, on the skirt you might see:

  • A, B, C, D, E, and F
  • Then G and onward

Assembling the Pattern Pieces

Each pattern piece includes attachment lines that make assembly straightforward.

For example:

  • Front A attaches to Front B.
  • Front lining A attaches to Front Lining B.

Grab some tape and assemble all the pieces according to the layout guide.

Once assembled, you’ll have all the pieces ready for cutting.

Understanding the Skirt Panels

Let’s look at the skirt first.

It is a long panel because it will be pleated, and you need approximately ten of these pieces.

You can either:

  • Gather the panels at the sides, or
  • Create traditional pleats.

When laid out on fabric, the skirt is actually more economical than it appears.

If you are inserting a zipper, leave an opening for it. Otherwise, simply sew all the skirt panels together.

Most people choose the jersey-back version because it is much easier.

Creating the Pleats

The skirt pieces include arrows showing the pleat direction.

Simply fold the pleats according to the markings and sew the panels together at the sides.

When sewing from the lower edge, be careful that the pleats do not fold underneath themselves. Pin everything securely before sewing.

Otherwise, you may find yourself unpicking a lot of stitching later.

Making the Gathered Skirt Version

I often get questions about the gathered skirt version.

The pattern includes a rectangular measurement, but the front dips slightly.

To create this dip, use the separate tip pattern piece.

Place it onto your skirt pattern and blend the line from the side seam into the tip.

This ensures the skirt front aligns perfectly with the bodice front.

When using the full fabric width, there can be a lot of gathering. To reduce bulk, I often create a slight taper at the side seams.

Measure out approximately 12 cm at the top and draw a gentle line downward.

As you approach the hem, blend back out gradually so the hem remains straight and easy to sew.

For the gathered version:

  • Cut the front on the fold with the tip piece.
  • Cut the back with the side reductions.
  • Leave a zipper opening if required.

Decorating the Center Front

The front bodice joins with the center front insert.

This section is perfect for:

  • Lace overlays
  • Embroidery
  • Decorative trims

I often use inexpensive lace from local markets.

When applying lace, leave the seam allowance free at the top edge. If you place lace all the way to the top, turning and lining the bodice becomes difficult.

I learned that lesson on my first sample dress.

If you want to add embroidery, embroider the fabric first and then cut out the center front pattern piece.

The center insert is then decorated further with lace overlays to create the beautiful V-shape that gives the dress its princess look.

Adjusting the Waistline and Fit

The front lining is cut as a single piece and does not include the center insert.

One thing to notice is that the design has a low waistline.

This works beautifully with the pointed front, but you can raise the waistline if you prefer a different look.

The pattern is also available in both regular and slender fits.

The difference between them is approximately 4 cm.

For tall and slender children, you can reduce the width further if needed. Just remember to redraw the armhole curve using the original pattern piece so the proportions remain correct.

If you adjust the outer bodice, make the same adjustment to the lining and back pieces.

Back Bodice Options

The pattern includes two different back pieces:

Zipper Back

The zipper version:

  • Uses a concealed zipper.
  • Includes a 1 cm seam allowance.
  • Provides a more formal finish.

Jersey or Spandex Back

The jersey-back version:

  • Allows the dress to stretch on.
  • Requires no zipper.
  • Is much easier to sew.

Be careful not to confuse the two pattern pieces.

The zipper back is larger than the jersey-back version because the jersey panel stretches to fit.

If using the gathered skirt with a knit back, simply make the skirt about 6 cm wider and gather it to fit the stretch panel.

Sleeve Options

The dress includes several sleeve variations.

Sleeve Option 1: Puff Sleeve

This version uses:

  • A sleeve lining.
  • A gathered outer sleeve.
  • Optional tulle overlays.

The sleeve cap is gathered and attached to the lining, creating a classic princess puff sleeve.

I often add gathered tulle and extra lining layers so no seams are visible.

Sleeve Option 2: Shoulder Drape Sleeve

This option features:

  • A straight upper section around the shoulder.
  • A gathered lower section.
  • Bias-bound edges.

It creates a beautiful draped effect and gives the dress a completely different look.

You will need:

  • Two sleeve lining pieces.
  • Two upper sleeve pieces labeled “Sleeve Option 2.”

This was one of the more challenging design elements to develop, but the result is gorgeous.

Making the Bias Binding

The binding piece is simply a rectangle.

Unlike traditional bias binding, we want this section to remain stable and not stretch.

Fold both edges inward, leaving a slight gap at the center. This makes it much easier when folding the binding over the sleeve edge later.

Final Thoughts

When you purchase the pattern, you also receive access to the accompanying video tutorials.

The instructions may seem extensive, but this dress has been around for years and has been made by countless sewists.

I’ve received so many messages from people telling me how much they love this pattern and how special the finished dress turned out.

I hope you’ll join the Facebook group, share your creations, and enjoy making this dress as much as I enjoyed designing it.

You can find the pattern link in the info box or in the description. It’s also available on Etsy, but I recommend purchasing it through my website because you’ll automatically be added to the video course there as well.

That means everything stays organized in one place while you work through the project.

Thank you very much for watching this very long introduction, and I’ll see you in the next project soon.

Music

Transcript for the video: Princess Dress - Classic Pleated Skirt & Jersey Back

Hi, this is Marina from Frocks and Frolics. We are sewing a Princess Belle costume in this tutorial, and it's the first in a series of super gorgeous fairy tale costumes.

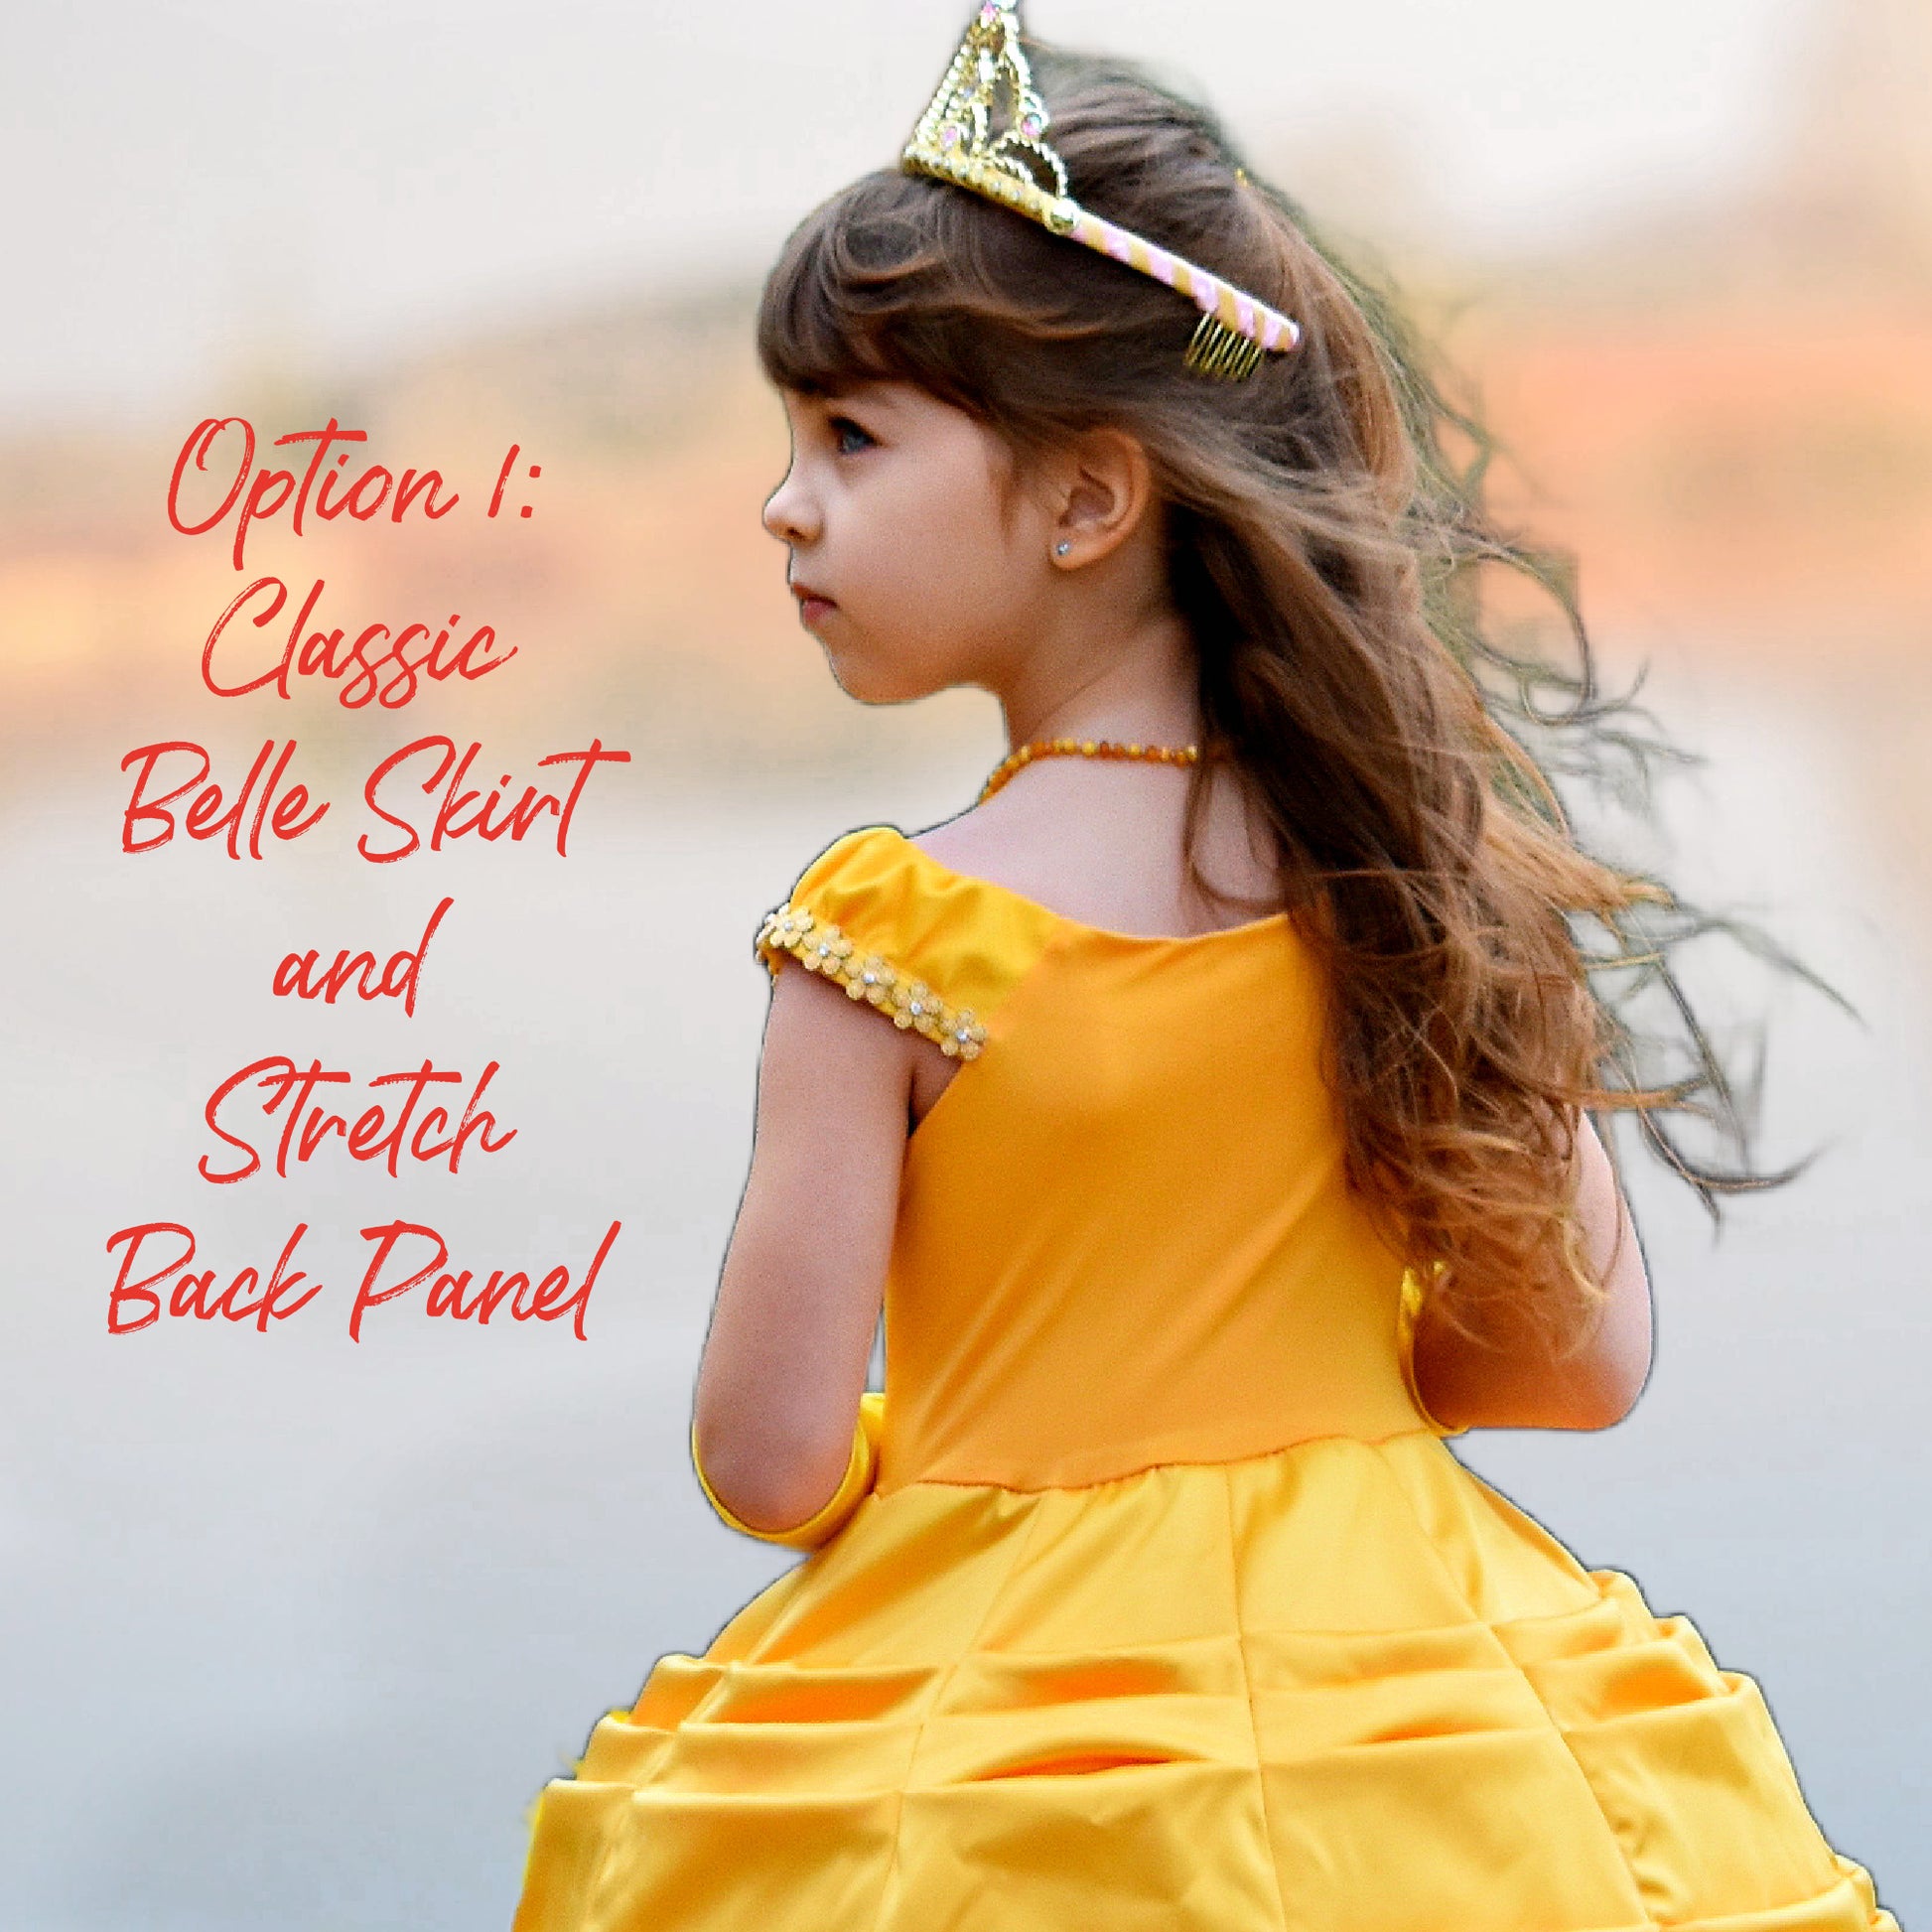
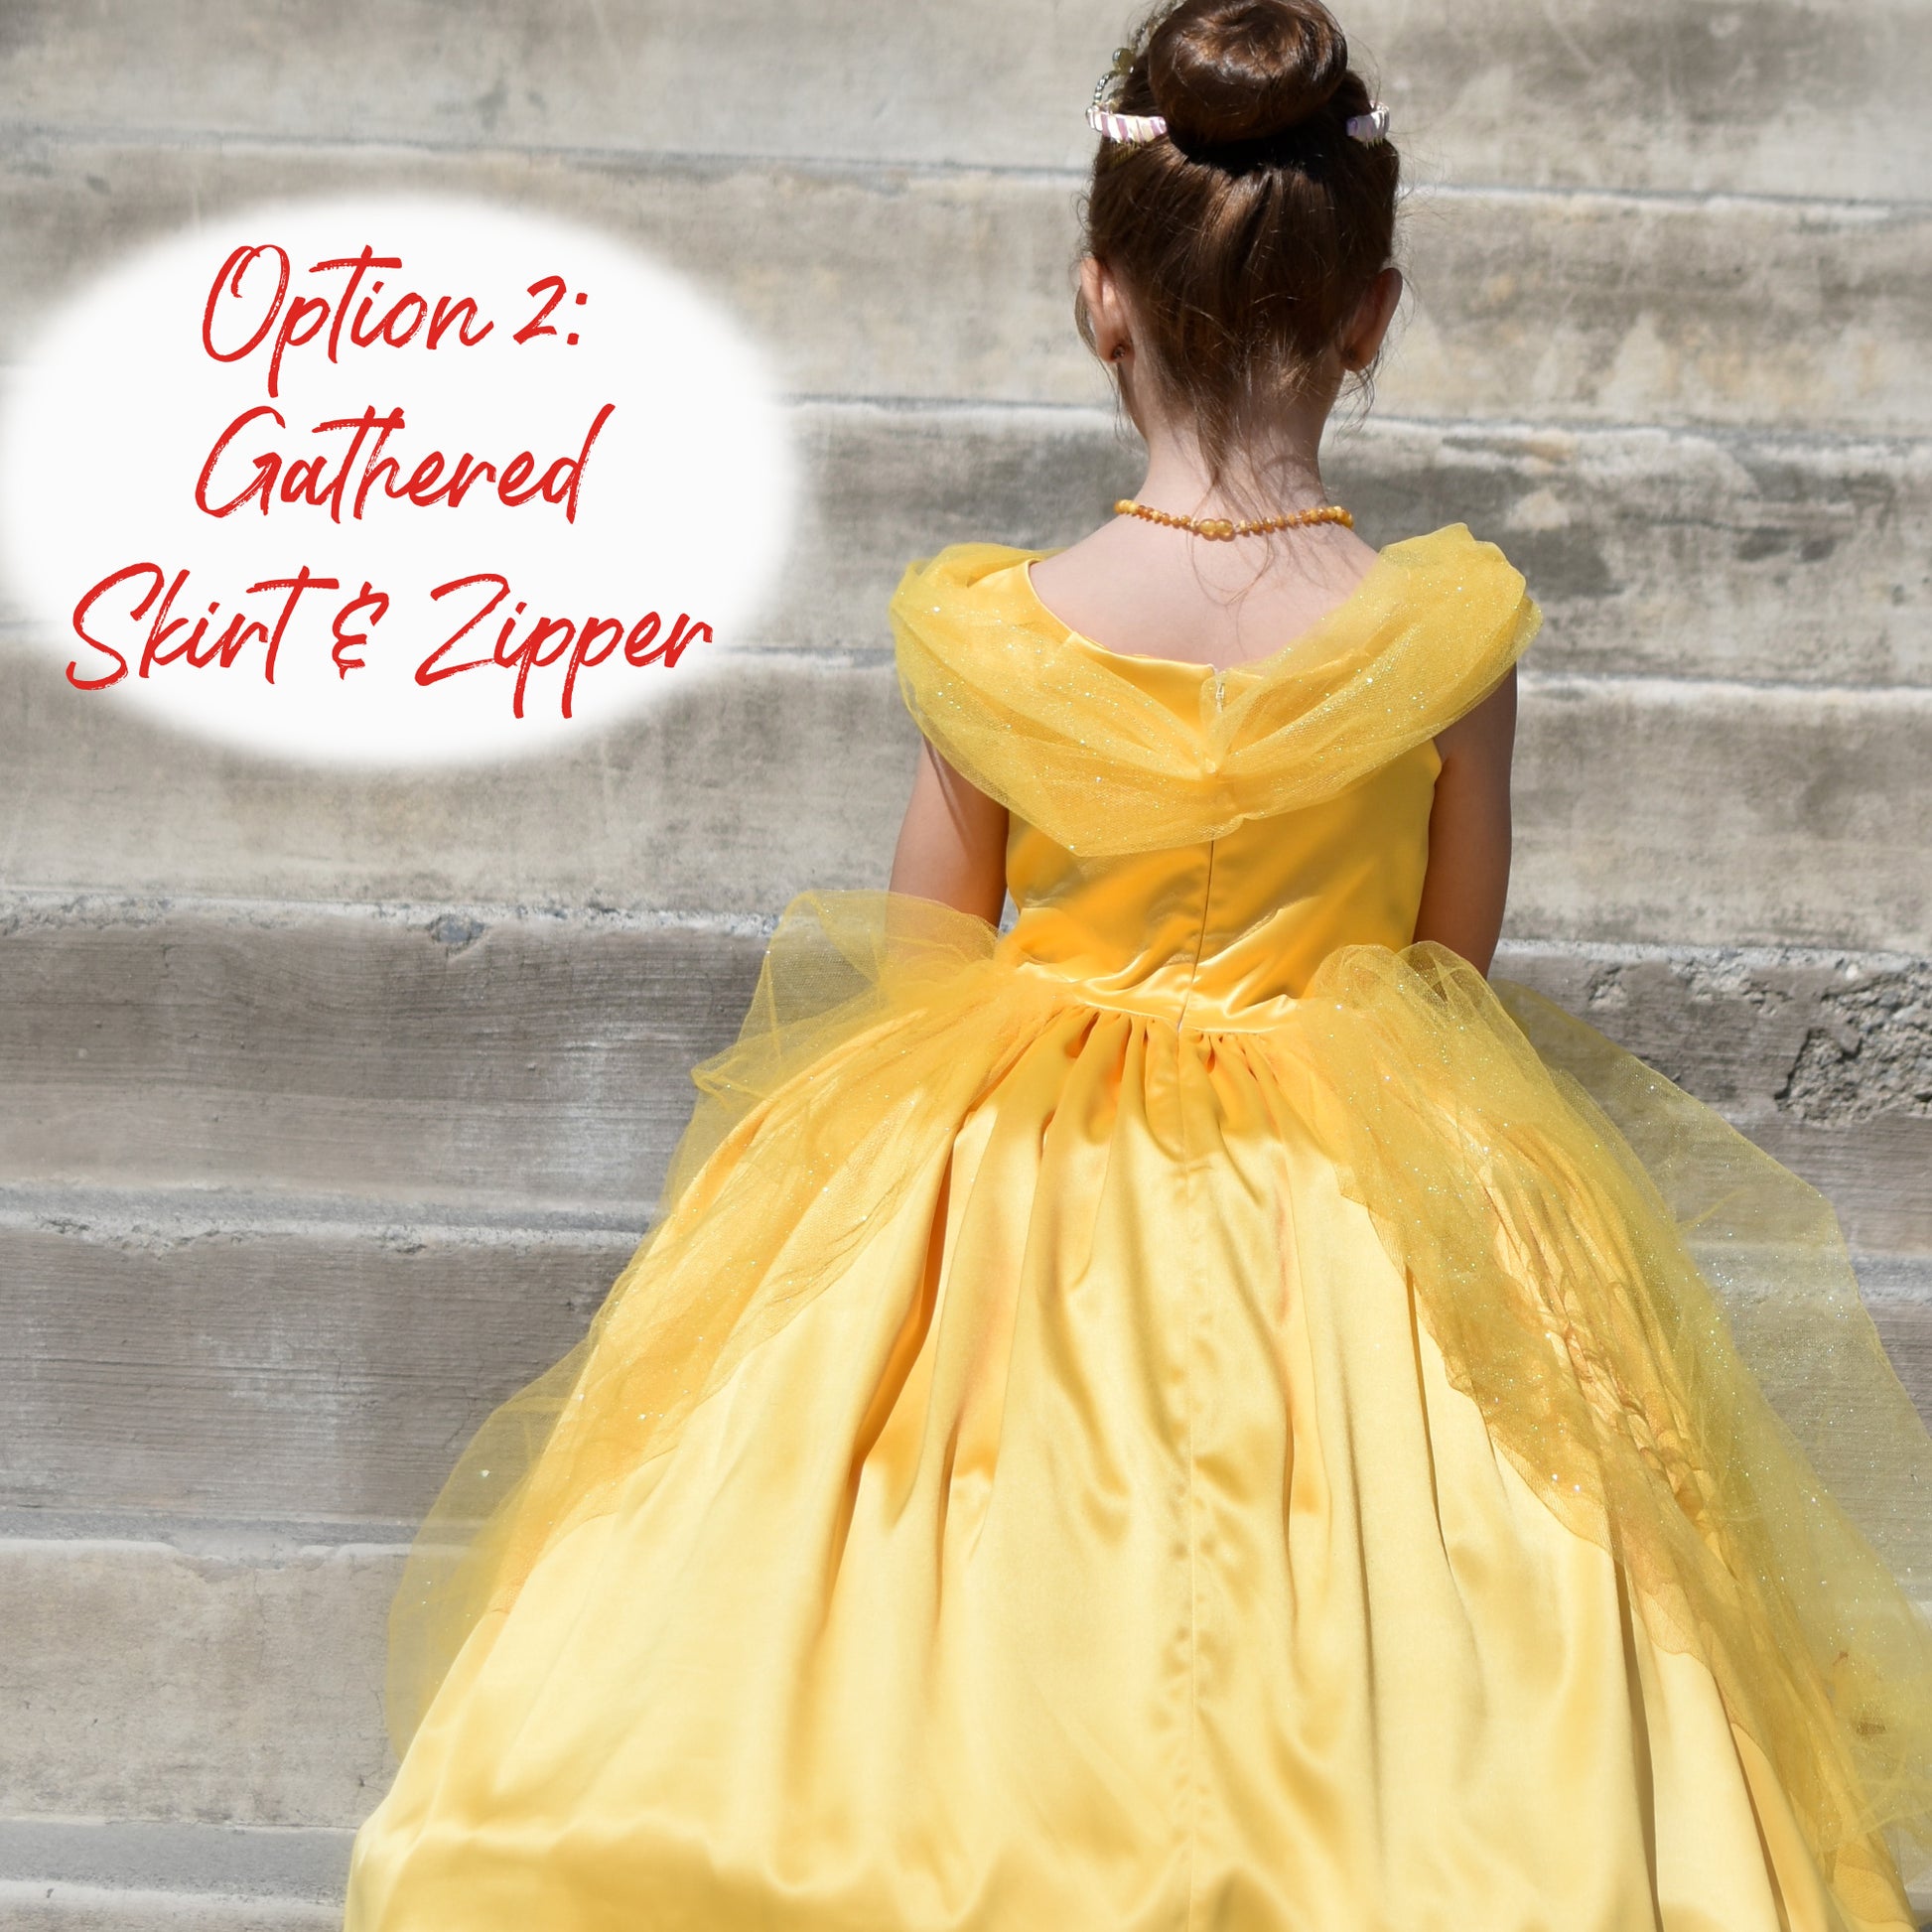
This pattern has multiple options, so you can make it with a zip fastening or a knit back, which I'll show you in this video. For the pattern, you need to hover over the top right-hand corner of the video, click on the info button, and then magically you have the YouTube playlist and the link to the website.

Don't forget that we want to really Instagram this time. I need to Instagram, and we're going to do it together, so #FrocksAndFrolics, #PrincessBelle, and #PDFPattern, please everyone. Don't forget to include @FrocksAndFrolics so other fairy tale sewers can find the pattern and, even more importantly, find this YouTube channel.

You can see it here. It's there on Instagram, and everyone can find these fabulous videos and get sewing themselves.

So let's get started now with the actual dress.

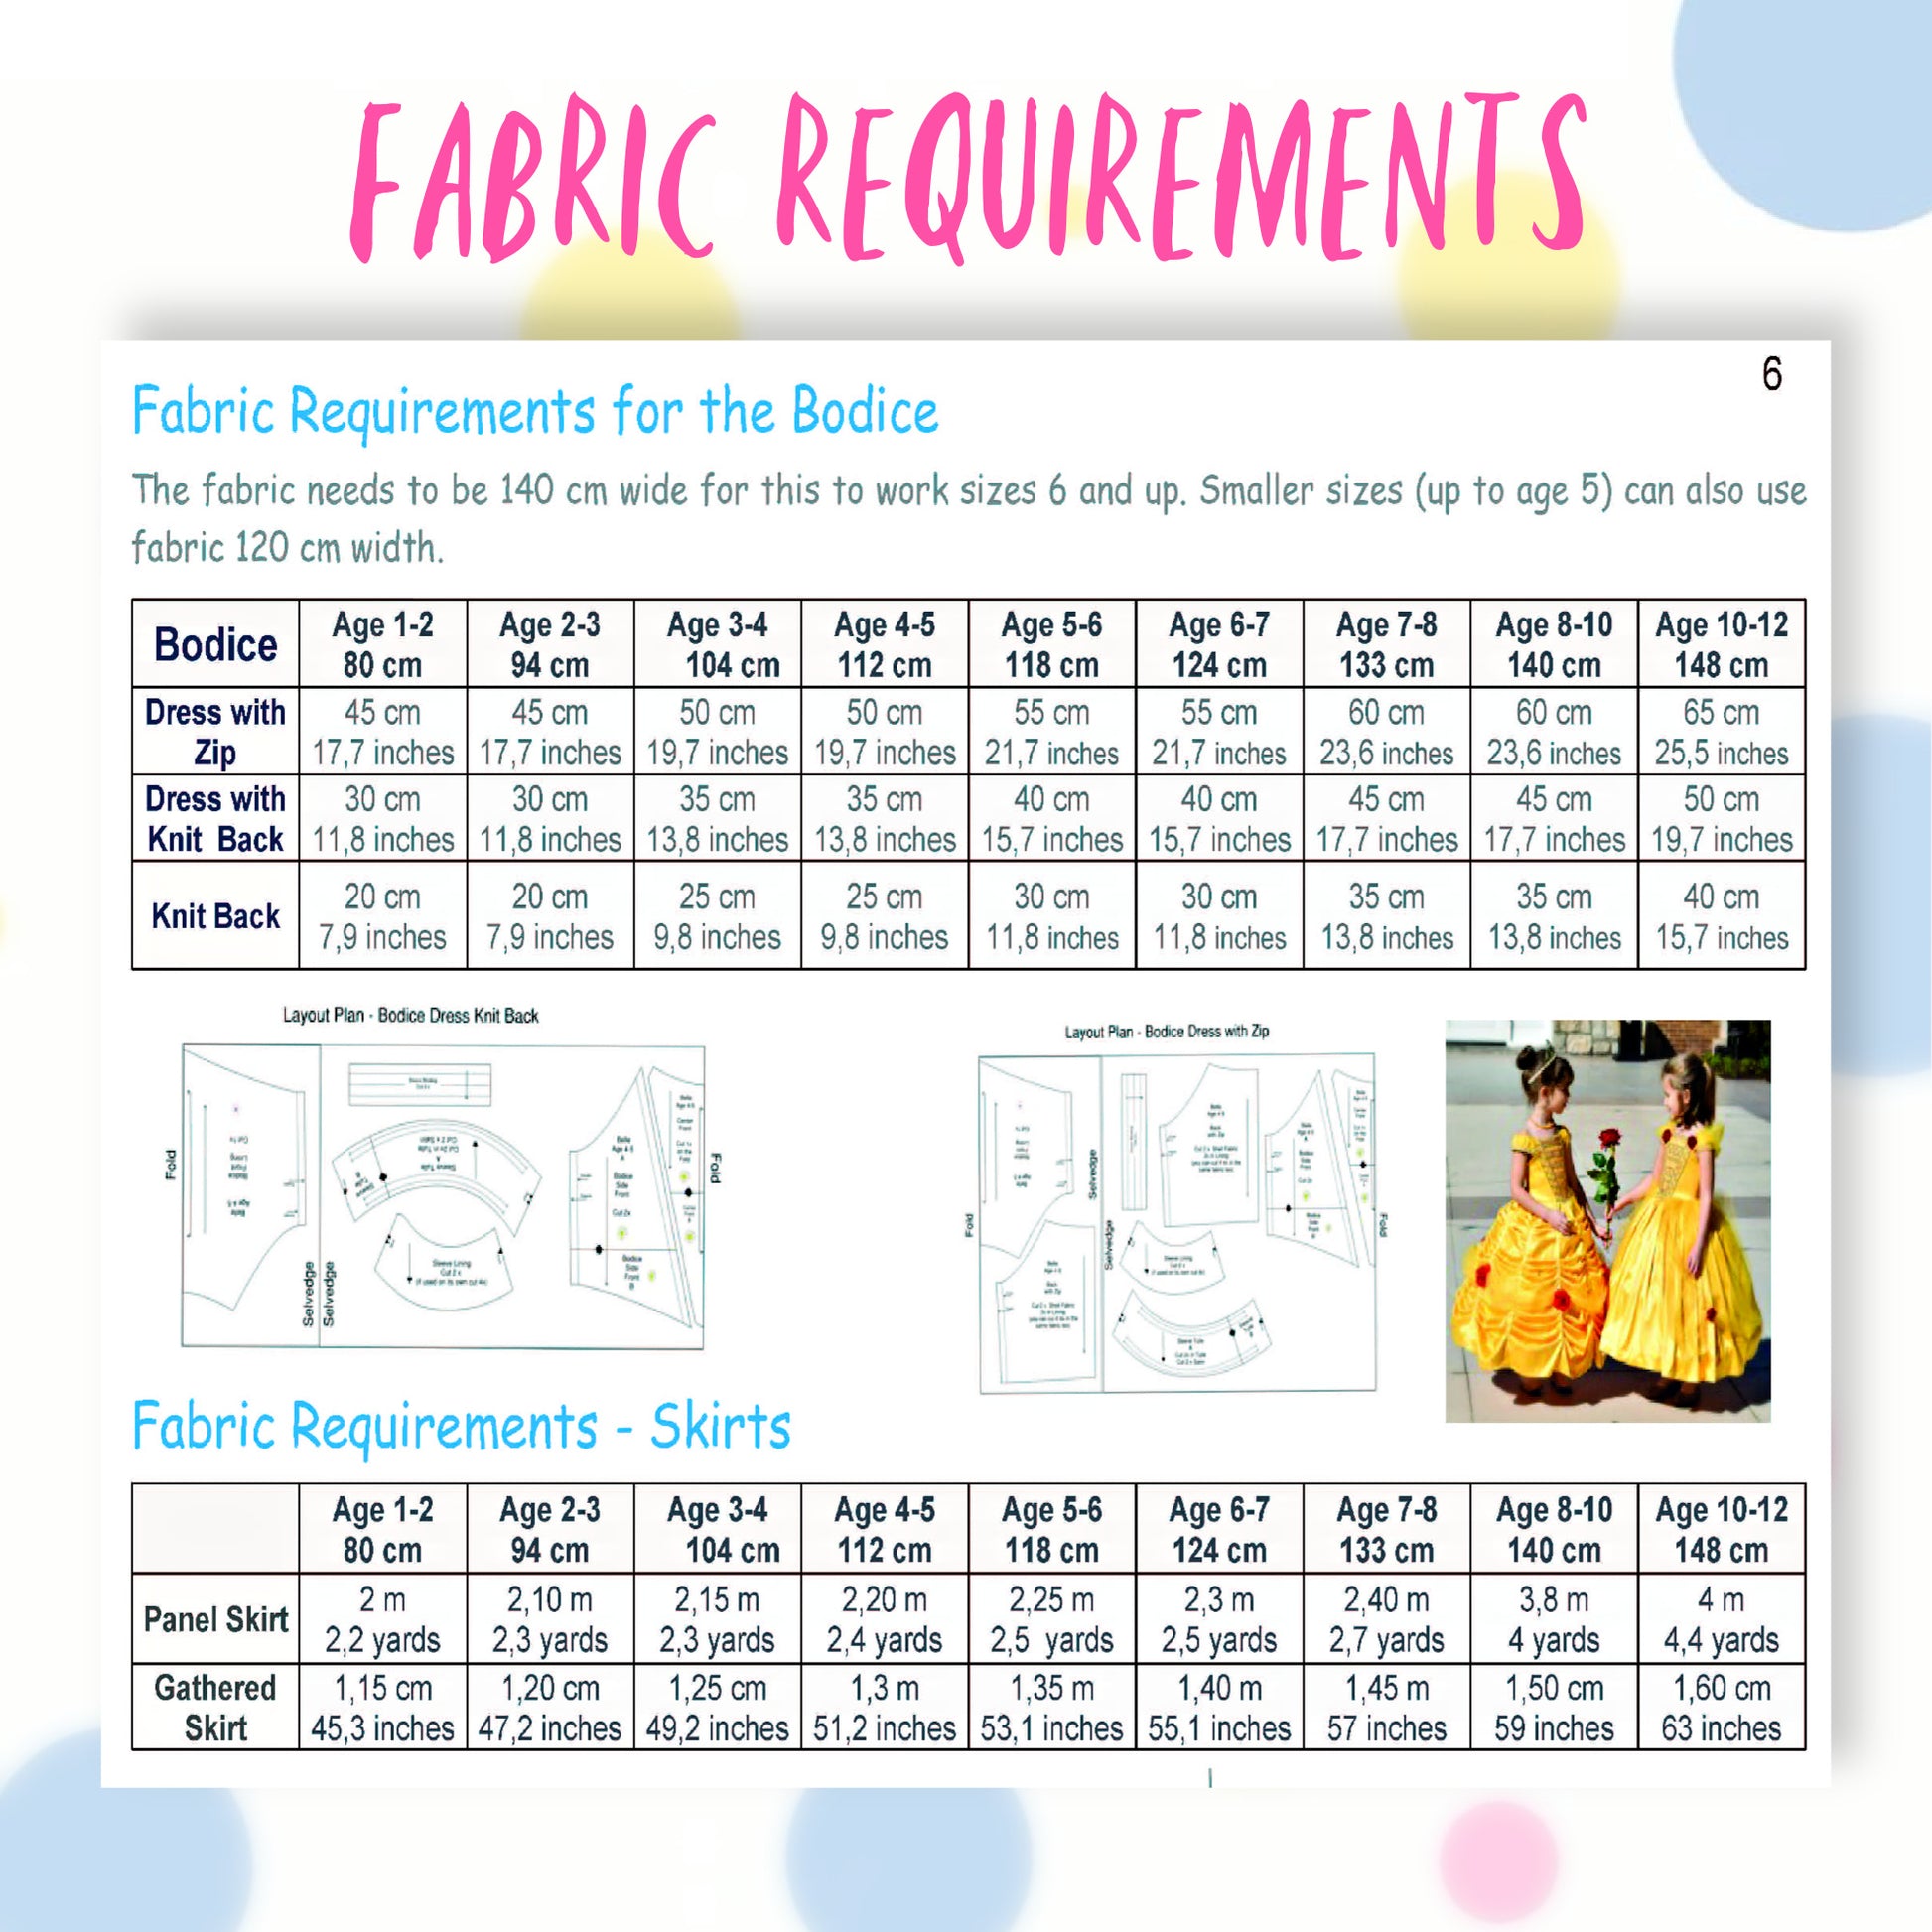
Pattern Pieces and Materials

I'm really excited.

You need the following:

  • Side panel – cut 2 on the fold
  • Center front panel – cut 1 on the fold
  • Lining – cut 1 on the fold
  • Back – cut 2 on the fold
  • Ten long skirt panels
  • Sleeve lining
  • Puff sleeve option
  • Binding
  • Tip template to make sure we have the skirt at the right height

The fabrics I've used for this are actually polyester double crepe satin, but you can use something cheaper as well. That's absolutely fine.

You will also need:

  • A knit or spandex fabric for the back with really good recovery
  • Lace with a defined edge for the center panel
  • Lace with two defined edges for the bodice overlay
  • Sleeve embellishments
  • Soft tulle to cover the sleeves and part of the skirt

We have a really lovely ruffle there.

Preparing the Front Bodice

Let's get started with the bodice.

The first thing is to put the lace on. You can also see here, blended into some of my diagrams, the written instructions.

You need to make sure that the lace is down 1 cm from the top so that you have the space to then put the lining on. Here I'm just folding mine over and putting it on like that to fill it all up.

You could put it lower down. You could even alternate it. I did that on the other dress with the two-edged lace. That's up to you.

When you stitch it on, you can do that with a straight stitch or a slight zigzag, but the important thing is that you really have the right color thread. I have thread specifically to match my lace, and it looks absolutely stunning.

I love these little dresses. I have to say, that was so enjoyable.

Now I'm going to close the seam here, so side panels onto front panel. You can see here at the top that 1 cm that we absolutely need for the lining.

We're going to stitch this in with a 1 cm seam allowance. There you go.

You also want to hold it with a pin so that it doesn't shift, all the way down. Then you want to press it. Maybe you want to put an ironing cloth over it in case you have a polyester lace. I'd really recommend that because you really don't want your lace to burn.

Adding Decorative Lace

Then I put the two-sided lace over the top.

Of course, you can add more. You could add another layer, a different lace altogether, embroidery, or anything you like.

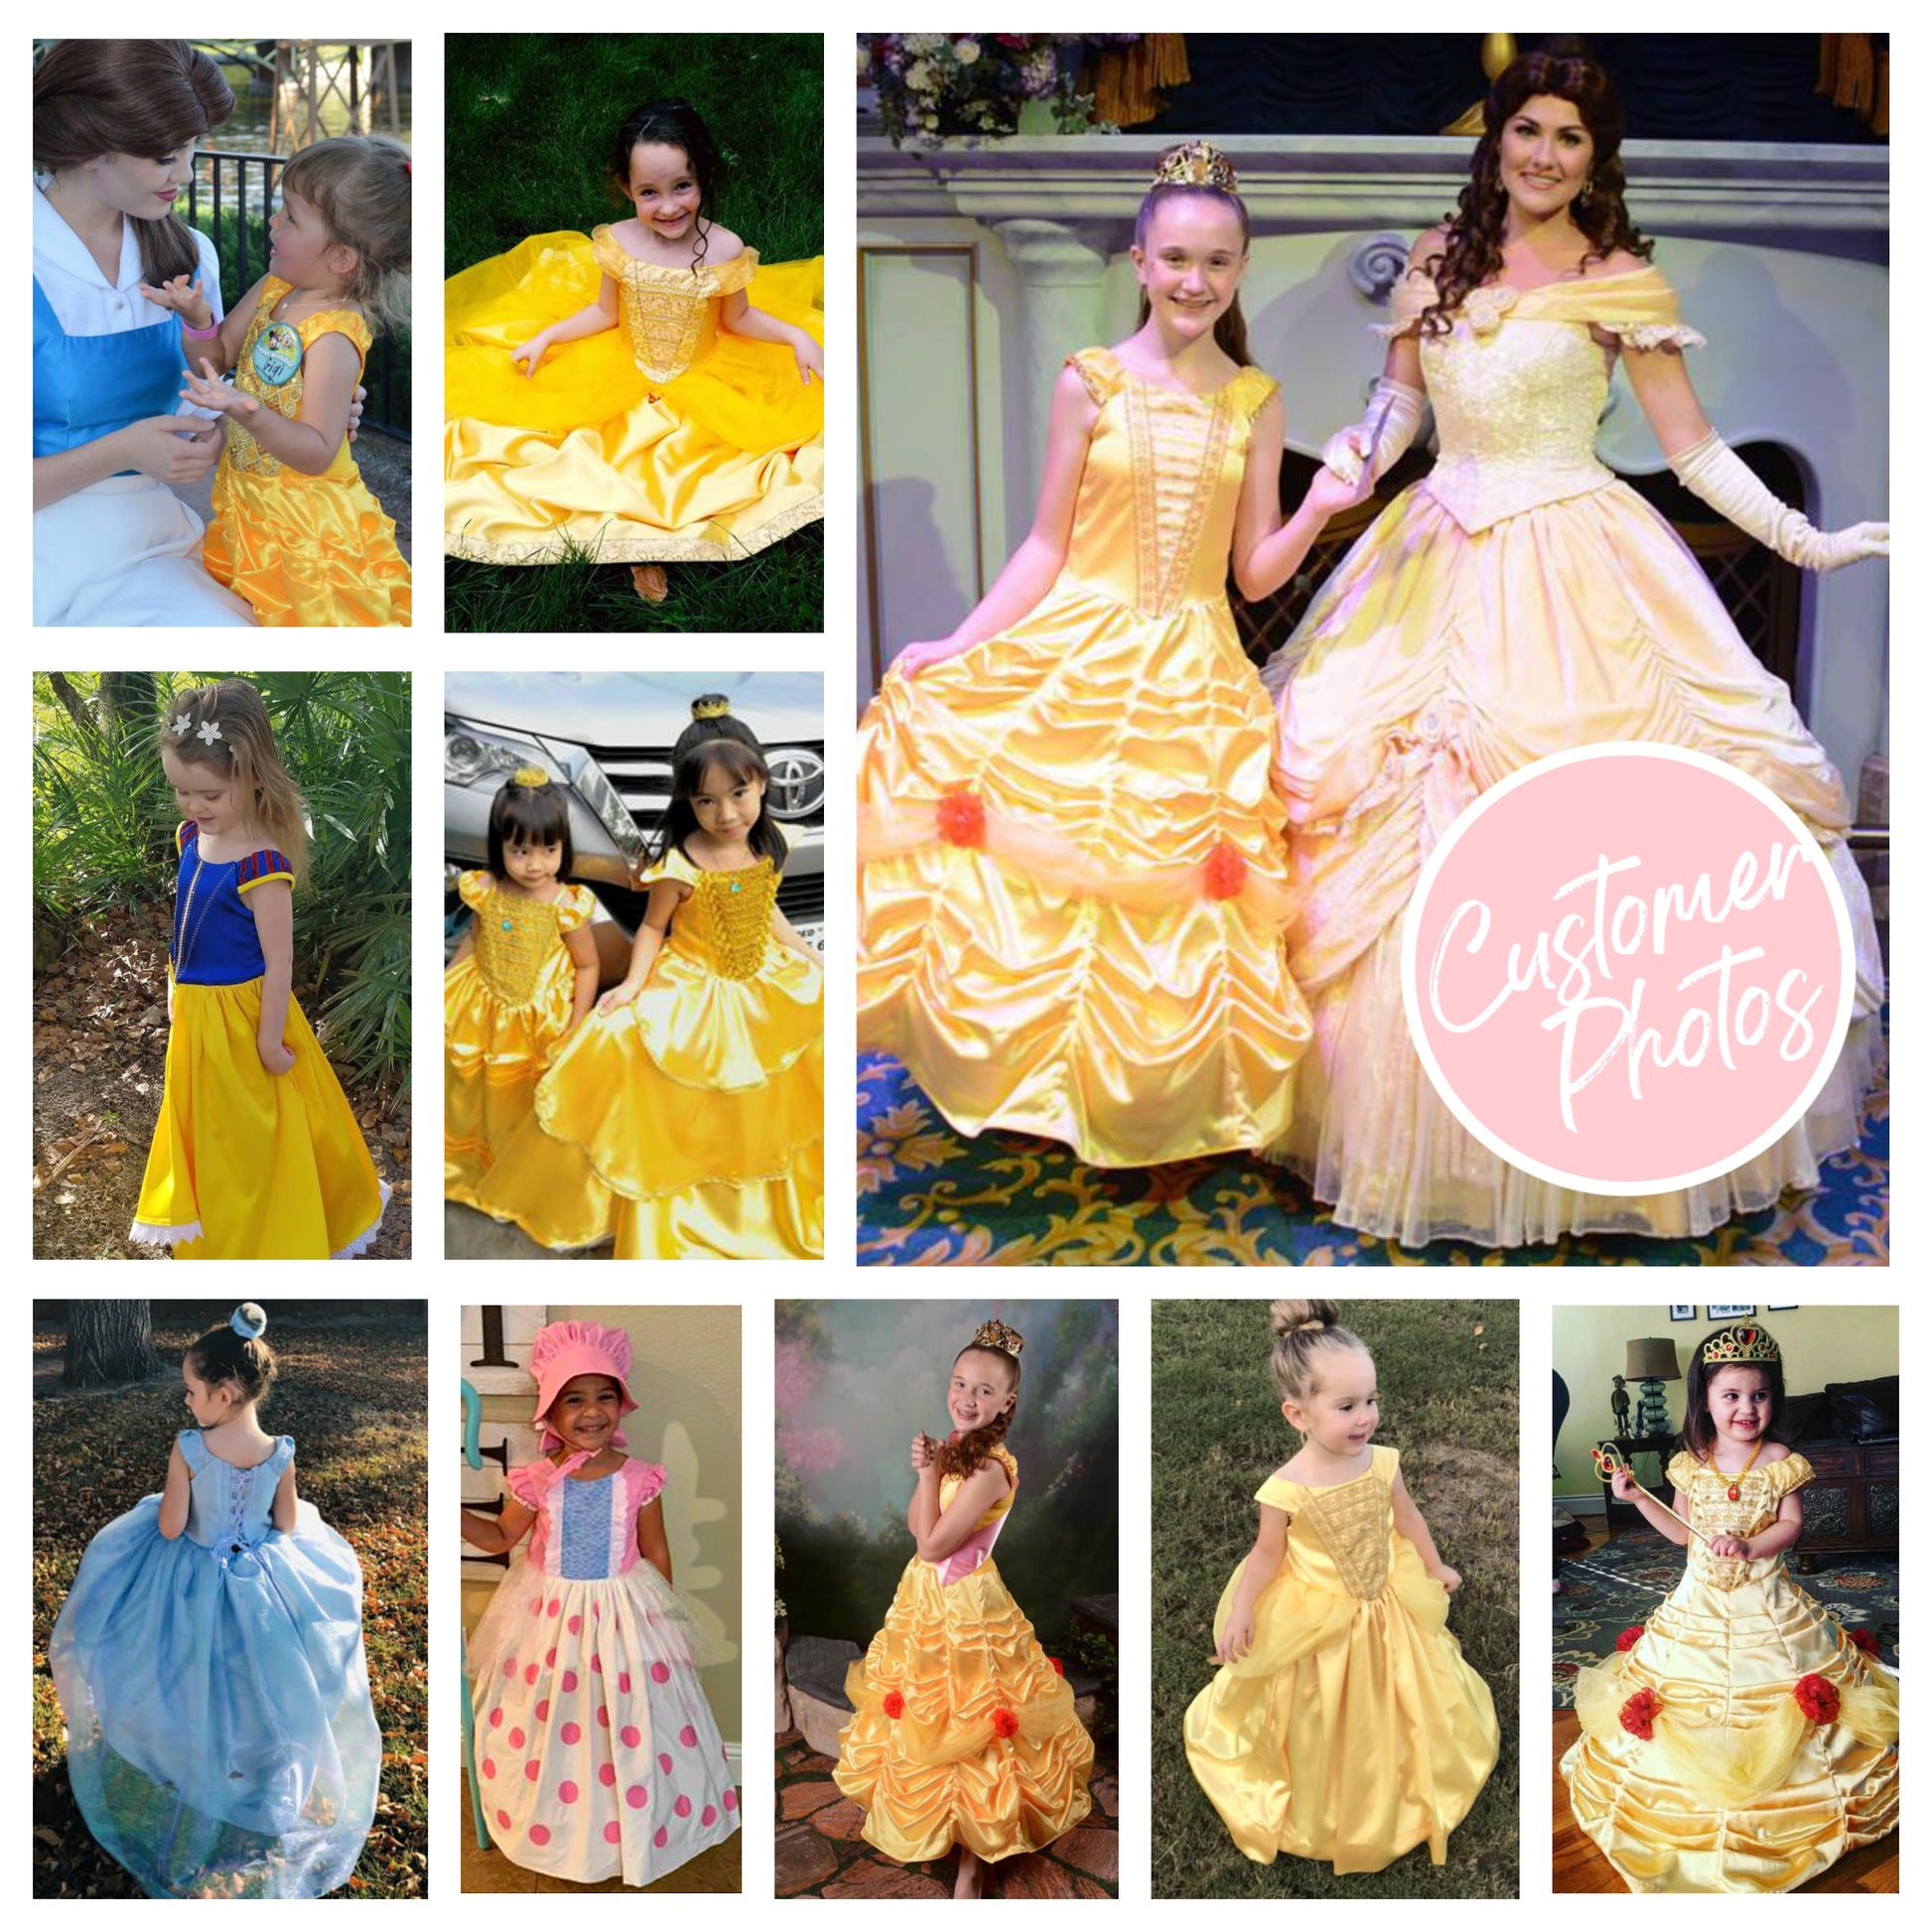
Once you've done your lovely version, please post it on Instagram: #BellCostume, #FrocksAndFrolics, and all that, so that I can definitely copy what you're doing for the next time.

I think people come up with such wonderful ideas, whether that's pearl embroidery, pintucking, lace, or whatever.

Anyway, you're going to sew on this two-sided lace edge, and then there we go—we're cutting off the edges that we need.

Lining the Bodice

Now it's time to line it.

That can be done using exactly the same fabric as the shell, a lining fabric, or the knit fabric. I would say that if you're using a stretch fabric for the shell, which is what I did—my satin has a slight stretch—then the lining should have a slight stretch as well.

That's why I used the knit fabric for this particular one.

Then you cut it back and snip it so that when you turn it, you have no tension there. That's really important.

Now I always like understitching because the edge then looks a lot better. However, when you understitch this baby, the problem is that when you put your sleeve in, you have to tuck that seam allowance under, and not everyone is very good at that.

If you're a total beginner, you may want not to understitch this top edge because it actually makes things a little bit harder.

Preparing the Back Bodice

Do the same on the back—exactly the same. Right sides facing each other with your spandex fabric, and then we're going to sew across the top.

When you're working with spandex fabrics, quite often what happens is your machine will leave out stitches. It doesn't happen with regular jersey on my machine at all, but on this one it did.

So I got a super stretch needle, and when I used that, of course it didn't leave out stitches.

There's no need to do a slight zigzag or anything. This stretches as you go, so just do it with a normal stitch.

You can see that here.

Then I understitched it on the back. Again, I would not necessarily do that if you're doing this for the first time. That's up to you.

See how it works.

Do the same again—cut it back, snip it, and then give it a jolly good press.

Constructing the Sleeves

Next we're going to do the sleeves, and we're going for the Option 1 sleeve where the tulle and the satin are gathered onto the sleeve lining.

You always cut that sleeve lining, and then it ends up fitting on there.

I've put a layer of tulle over my satin, which you don't need to do. You don't need to have a layer of tulle at all if you don't like it.

Then we're going to put gather stitches on both edges.

The sleeve has three different options:

  • Lower edge gathered into the binding
  • Both edges gathered
  • Entirely plain with a wraparound overlay

The wraparound overlay is shown in the other video, so definitely check that out as well.

The written instructions explain everything in much more detail.

Attaching the Sleeve Lining

Now we want to take the lining and, with the right sides facing, make sure that the two snips match.

The back must face the back. It's easy to get this wrong and put the front onto the back.

Gather the top edge and put it onto the lining with the right sides facing each other.

You can see here we've got two snips matching two snips. That's really important.

We're going to sew along here with a 1 cm seam allowance all the way along. Make sure your gathers are nice and even.

The final pattern actually came over a little bit more to the side. I decided that would be better.

I mean, it looked great how it was, but I'm a bit of a perfectionist. I like it to be absolutely super perfect.

Understitching and Finishing the Sleeve

Now we're going to understitch.

Make sure that you pull the fabric apart and stitch the lining to that seam allowance all the way to the other side.

Then we're going to fold it over and give it a good press.

Again, I'm using my pressing cloth because I don't want to burn any of that netting underneath. That would be a real shame.

In one of my samples I actually did that, so be careful.

Now that it's turned, we're lining it up with the edge of the lining again and sewing that top sleeve down.

What looks really complicated when it's finished is actually quite a simple technique.

Adding the Binding

With that together, we're going to put the binding on, right sides facing, starting on the underside of the sleeve.

We sew that on with a 1 cm seam allowance.

It's very important that you always start binding from the underside or inside and then roll it to the outside. That way the final stitch is the visible one.

Take out your gather threads and understitch this.

You can do a whole sleeve without ever getting up from the sewing machine.

Turn it over, turn it up, pin it if you like, and make sure you remove the pins as you sew so your stitching stays even.

The turn-up is about 1.2 cm. It's a little bit wider than 1 cm and looks really lovely like that.

Inserting the Sleeves into the Bodice

Now my sleeves are gorgeous and glittery and just beautiful.

I'm going to put them in just like you can see here. They're sandwiched between the layers.

It's a very simple technique.

Open out the front bodice and put the sleeve with the front snip—the single snip—right into the corner at the top.

You can use pins or stitch it in first if you like.

Then we're going to wrap the lining over the top.

This is where I'm saying that if you've understitched it, you also need to tuck that seam allowance under.

Now I'm going to close the underarm.

One thing that is important when you're sewing: always sew from the side that's easier to sew. In this case, that's the satin side rather than the jersey side.

Sew all the way down with a 1 cm seam allowance.

Finishing the Bodice

At the top I had to tack in that seam allowance, which is why I said not to necessarily understitch if you're a beginner.

Next we're going to cut this back, making sure that it can lie really flat, and then we're going to snip below the sleeve section.

Now we're going to understitch it.

The tension is released and it's dead easy.

Again, we're stitching the seam allowance onto the lining.

Once that's done, give it a really good press.

The front is now finished, and the back works exactly the same way.

My front is now done and I can attach it to the back.

On one side I've already done it, and on the other side I'm repeating exactly the same process.

Once both sides are complete, the bodice is finished.

You do want to snip on the underarm either side of that seam so there's no tension.

All you need to do now is put some vertical pins in so that your bodice edge is secure. Then we can put that aside and come back to it once we've done the skirt.

Preparing the Skirt Panels

The skirt has ten panels.

All these pleats are facing upwards, and we're going to mark them.

It's very important to use a marker pen. I originally used snips on my first skirt and I unpicked this skirt six times before I came up with the right technique.

Please do use a marker pen. Don't use snips like I did.

You can miss a snip very easily. You can't miss a marker pen.

The other thing is to overlock the panels once you've pleated them. That gives them more stability and makes them easier to work with.

Of course, you could use gathers instead of pleats if you prefer.

Joining the Skirt Panels

Now we're going to sew all the panels together.

They'll line up beautifully if you've marked them correctly.

Make sure you pull your fabric slightly to the side so that nothing falls underneath while you're sewing.

Pleats like to tuck themselves under, so keep an eye on them.

Once sewn, place the skirt over the edge of your ironing board and press the seams.

Use plenty of steam and lightly steam the surrounding area so the skirt holds its shape better.

Using the Tip Template

Next we need the tip template.

Fold your skirt so the center front is on the fold.

Put the tip template on and cut away the excess.

That way we make sure that the tip looks really good and isn't dipping down.

Then find the side seams, which will be two and a half panels from the center front.

Mark them, and from one marking to the other across the front, put gather threads in.

Attaching the Front Bodice to the Skirt

These gather threads will go onto the front bodice.

You can sew the front bodice on in two stages if you want a really perfect tip.

I actually did that on the zip version, and the tip is nicer, so it's worthwhile watching that tutorial too.

Gather the threads to fit and sew the front bodice onto the skirt.

Once sewn, remove the gather threads.

Attaching the Stretch Back

The back is simply stretched on.

Mark the center, mark the sides, and then divide those sections in half.

Use a triple stitch, jersey stitch, or slight zigzag stitch. You don't want this seam to break.

Stretch the entire section as you sew from side seam to side seam.

Make absolutely sure that you're stretching enough so that someone can get in and out of the dress.

Before overlocking, make sure there are no pins left in the seam.

Once overlocked, you can give it a light press.

Sleeve Embellishments

Next we're going to add the embellishments to the sleeves.

You can use pearls, lace, or anything else you like.

Just make sure that whatever embellishment you use is securely sewn on and visible from the outside.

Wrap your thread around the connector on the embellishment and secure it well.

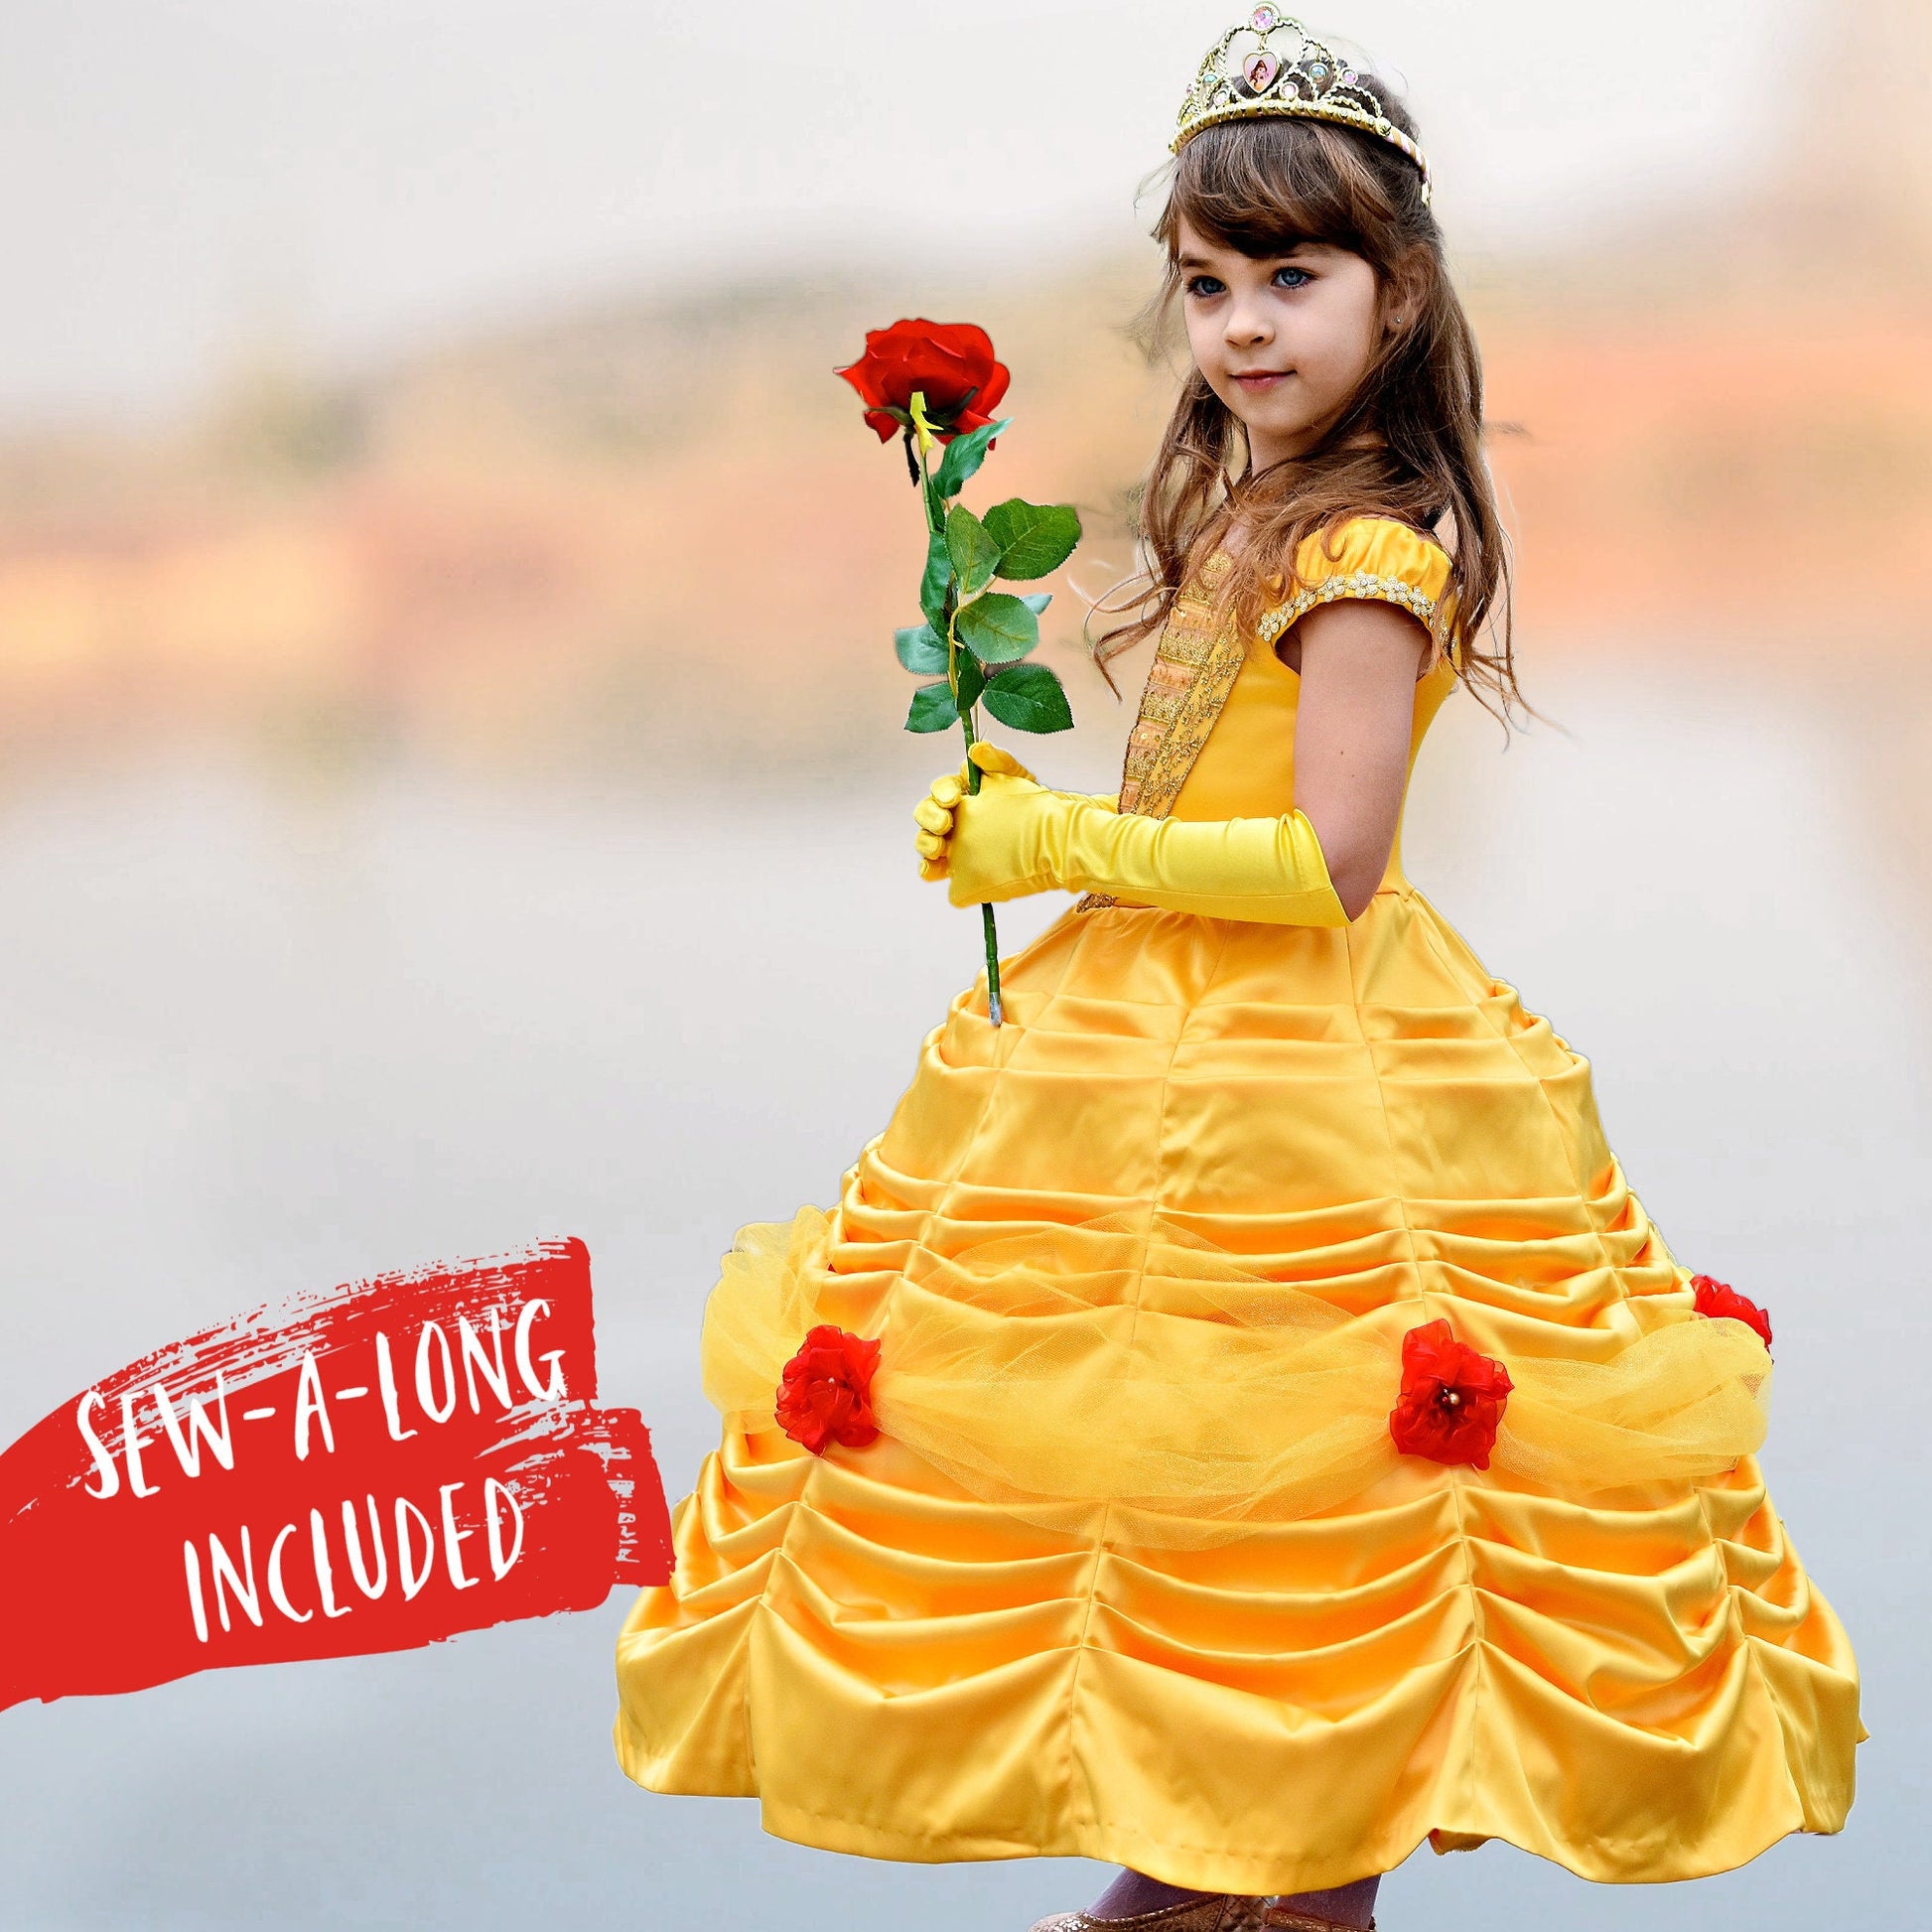
Creating and Attaching the Ruffle

The last thing we want to do is put the little ruffle on.

You need just over 2 yards of fabric, 80 cm wide.

I'm gathering this together so that I get a nice point.

Then I'm going to measure out 40 cm (16 inches), which is the same for all sizes, and stitch across it.

No gather threads—just use your fingers and create five little scoops.

The center scoop goes over the center front, as shown in the picture.

At the back, simply overlap them.

Once we've sewn them to the skirt, we can trim off the excess.

Let's stitch them on.

It doesn't have to be pretty because we're going to cover it with a rose anyway.

Making and Attaching the Roses

Now I'm going to attach the chiffon roses.

There's a separate video showing you how to make them.

You can make yourself a little gadget with some long nails. It's really not very difficult—just wrap the fabric round and round.

I'm putting three pearls on top and attaching the rose.

I made five roses for this dress.

Secure your thread and stitch through the rose several times so it doesn't move.

Make sure none of the stitching is visible, and use thread that matches the rose.

It doesn't have to be red, but for a Belle dress I think that's just right.

I actually got totally excited about making this dress. I'm not normally into fairy tale dresses, but I've changed my mind now.

Blind Hemming the Dress

Now I'm going to do a blind hem.

The reason I'm doing a blind hem is because I don't want a machine hem on this. I think it cheapens the look.

I also don't want to hand hem it because that takes too long.

Fold under where you've pressed up the 1-inch hem allowance.

The little wheel or blade needs to sit right next to that fold.

It will just catch a tiny amount of the fabric, then make a few stitches on the hem and catch the fold again.

That's basically it.

Final Thoughts

You have made a beautiful Belle costume.

Don't forget that you can also watch the tutorial for the other Belle dress, which is equally beautiful and a little more complicated because it has a zip.

There's also the written instruction guide, which goes into much more detail about the pattern and all the options available.

Thank you for watching, everyone. I'll see you next time for another fairy tale dress.

Bye for now.

Introduction

Transcript for the video: Princess Dress - Gathered Skirt & Concealed Zip

Hi, this is Marina from Frocks and Frolics, and we are making the second in the Bell Dress series. This is the dress with a gathered skirt and a zip closure. You can also make it with a panel skirt with ruffles or pleats and a jersey back, which of course makes it much, much easier to sew because you don't have a back fastening.

If you want to get this pattern or find all the links to the YouTube playlist, etc., then just hover over the top right-hand corner in the video and click on the info button. That will open up the link to the playlist, and it will also show you the link to the website and the listings page.

I would like everyone to Instagram this once they've done it, please. That would be so fabulous. It's #FrocksAndFrolics, #BellCostume, and #BellPDFPattern. That will make it easier to look at what everybody else has done, and other people can find the Bell costume easier. Then also please include @FrocksAndFrolics on it, and people can click on that link and find the YouTube channel there on my Instagram, and they can go to the website too.

Materials and Pattern Pieces

For this dress, I'm using again that wider lace and also slimmer lace, and roses by the meter, which is a bit cheaper.

Now let's have a look at the pieces I've cut out. I've cut out the lining in the same fabric as the shell, so the front is in one piece cut on the fold. Then I've got the outer shell with the center piece and the sides. The back has got two pieces because we have a zip, and I've cut that out twice altogether—four times.

For the sleeve, we've got the binding and then just the lining sleeve, and we cut that not two times but four times so that it's completely flat.

The skirt is just cut from two rectangular pieces, which we need to work on a little bit and then overlock on the side seams.

When you want to cut those, cut two rectangular pieces according to the instructions. Then take your tip template and put that onto the fold of one of those pieces. Taper it towards the side seam and cut that away. That will ensure that the dip in the bodice looks really nice.

A lot of these rectangles, once they're all gathered up, have way too much gather and become too heavy. You want to measure over at least 12 cm or 4–5 inches. You can even go 6 inches, and then taper that in towards the hem about three-quarters of the way down. That ensures that we don't have quite as many gathers at the top and that it's not quite as heavy and easier to get into.

We're also using some tulle again as an overlay, which I think is really, really beautiful.

Adding the Lace and Lining the Bodice

Let's get started by putting the lace on.

If you watched the base video, which is a little bit slower than this, I'm just rushing through this part which we already know. We're going to put the lace on, overlapping onto the center panel. In this case, I've actually alternated the laces. I think that is really stunning.

At the top, we left that 1 cm so that we can line it more easily. Then we're closing the sides with a 1 cm seam allowance.

Once that's done, you can overlay that with another lace and sew that down on either side.

Now we want to line it. The first step is to make sure that you don't catch the lace because that's straight and that bit is curved. Pin that down and then sew across it with a 1 cm seam allowance.

Then we want to snip it and turn it. Unlike what I normally do, I didn't understitch this because it actually makes it harder to get the little cap sleeves in. If you are a beginner, that is a bit fiddly, so I've just ironed it. As you can see, that looks totally fine. There's no understitching necessary.

Constructing the Sleeves

Close the top edge of the sleeve next. Then we turn it, understitch it, and here it goes.

Attach the binding from the side that has the understitching—that's the underside of the sleeve. We always start like that. Sew it on with a 1 cm seam allowance all the way around.

Then we are going to turn this, roll it to the outside, turn it in, and stitch it down.

That is a beautiful little sleeve, and we can insert it into the front. With right sides facing each other, make sure that the snip on your sleeve is the single snip that indicates the front. Make sure it goes right into the top corner.

You can pin it, just as in the base video with the ruffle skirt, which is a little bit slower. You roll over the lining and literally sandwich that together, sew it, and then cut across the corner so that it can turn nicely and stay flat without being too thick.

Snip the curves so there is no tension, and then turn it. Look how beautiful that comes out. So simple, really. It looks stunning.

Closing the Neckline and Side Seams

Now close the neckline, but only a little bit. We want to leave some of it open so that we can put the zip in.

Open it out and place the center backs together as they need to be. Fold over that one side. If you haven't understitched it, it doesn't really matter if you get this wrong because either way will work.

Close it in exactly the same way that we did the front piece. Cut it back and snip it so that there's no tension, then turn it.

You can see all my little diagrams blended in. I've got a few more, and they are all in the written instructions.

Roll that over and out. You could simply press this, or you could understitch it. For the underarm, I would understitch it because it sits a lot nicer.

Understitch just to where the sleeve starts on both sides.

Now we want to do the side seams. Put it together as it needs to be, with back and front on top of each other. Grab the inner layer lining and open it out. We are sewing from one side to the other.

Iron that seam open on both sides and snip either side because you always get a bit of tension there, and we don't want that.

Then turn it right side out and give it a good press.

Creating the Tulle Drapes

Put the bodice to the side and we're going to do the tulle real quick.

This is just another rectangular piece. Gather it up on either side and stitch across it. On one edge, you could add something like ric-rac or even binding. People do that, and I think some of the Disney costumes have that in the film.

On the other side, insert a gathering thread and gather the whole thing up.

You need two of these—one goes over the right hip and one over the left hip.

I'm gathering this up so it fits onto the bodice. Lots of gathering to be done here. Then you swing that over and attach it only to the top layer of the bodice because we're not sewing this on in one piece like we did on the other Bell dress.

I would start right next to the lace you've put on, slightly away from the point. Leave a little bit at the back opening as well so we can put the zip in and so this doesn't become too thick or get in the way.

Secure your thread and make sure it hasn't bunched up or flipped the wrong way. Make sure it's nice and straight, then pin and sew it. Do the same on the other side.

Constructing the Gathered Skirt

Now we can put the bodice aside and work on the skirt.

Overlock the side seams first, then sew them together and press them open.

Insert two gathering stitches along the top edge—one foot width from the edge and another foot width next to that.

You can see how much fabric that is because we're taking the whole width of the fabric, which could be 150 cm. That's why we tapered the side seams earlier.

Place the bodice right sides facing onto the skirt.

Find the center of the bodice and place that on the center front of the skirt. Pin that in place.

I'm working this in two phases. First, I sew from the center front all the way to the center back on one side. That helps me get a really good dip in the bodice.

You need to keep adjusting the gathers because we have this dip. It's not quite as easy as sewing straight across.

Then sew the other side in exactly the same way.

Perfecting the Bodice Dip

Once the skirt is attached, snip the bodice seam allowance at the bottom, but not too much. Leave 2–3 mm so it doesn't fray.

You can already see how nicely that dip comes out.

To get this tip absolutely perfect, thread up a needle. Fold one bit of seam allowance from the gathered skirt over the other at a right angle and stitch it securely.

That gives you a really pronounced dip. The tip is beautiful. It's a technique you can use for any princess-style dress.

Check that all your layers have been caught correctly before removing the gathering threads.

Installing the Invisible Zip

Next, snip the waist seam so that we have two separate parts because concealed zips are difficult to install if the seam is too thick.

Take a fabric marker and position the zip. Flip it over so the teeth are facing upward and sew it to the edge of the dress.

Mark the waistline and where you want the zip to end. Mark the same points on the opposite side so everything lines up correctly.

Sew in the groove to install the zip. Zip it up and do a final check.

At the top, sew slightly higher and slightly over the previous stitching so that the zip can't rip out.

Once the zip is in, press it open and press from the right side as well.

Finishing the Lining

Fold the lining back at the top and fold the zip over it. Pin everything in place.

When stitching across the top, sew just a little bit lower than the edge. If you sew directly across, sometimes the zip pushes upward and creates a little bump. Sewing slightly lower compensates for that.

Turn it and check both sides. It should look perfect.

Now slip stitch the lining.

Hide your thread first, then work a tunnel stitch by picking up a little bit of the zip tape and then a little bit of the satin directly opposite. Continue all the way around.

One thing I want to point out is that in the front, I've snipped my seam allowance so that it isn't tight and can retain some stretch.

Hemming the Dress

Finally, we're going to do the hem.

Press it up by 1 inch or 2.5 cm.

Use a blind hem foot for this hem. The guide will sit alongside the folded edge, catching just a little bit of the skirt fabric and then a little bit of the hem.

When it's finished, you should only see tiny pinpricks from the outside. Once it's pressed, the stitching should hardly be visible at all.

Adding the Tulle Shoulder Overlay

Now we're going to do the tulle overlay for the shoulders.

Fold the tulle in on itself. Then pleat it until it matches the width of the sleeve.

Make sure that the open side is facing the inside, not the outside.

Sew very close to the edge. Then wrap the tulle around to the other side and stitch in the ditch right next to it.

Trim away any excess.

It's beautiful. You could leave it like that, but I would strategically tack it to the sleeve in a few places.

At the back, I've gathered it slightly, though that isn't necessary. You can leave it higher if you prefer.

Repeat the same process on the other sleeve.

Adding Roses and Final Embellishments

Next, gather the tulle right over the side seam and secure it with a pin. Add a few hand stitches.

Then attach the roses.

The important thing when sewing on the roses is that none of the tulle netting is visible. Pull it out of the way while sewing.

Do this on both sides and also add roses to the skirt.

Final Thoughts

That's basically it.

I don't think this dress is difficult to make. I love it because it is relatively easy. It is time-consuming, though, so don't think you'll be done in an afternoon.

It gives you so many options to play with, and if you follow these instructions, it will come out beautifully. That's half the battle with a lot of sewing patterns.

I hope you enjoyed this, and don't forget you can watch the written instructions, which tell you all about the pattern. You can also make the other skirt version, which shows you how to do the ruffles and work with a jersey back.

Thank you very much for watching, and I'll see you next time.

Transcript for the video: Princess Dress - Bonus Chiffon Rose

Hi, this is Marina from Frocks and Frolics. We're going to make a beautiful chiffon ribbon rose for a Bell costume today.

Follow me on Instagram and Twitter. The links are in the description box below or under the info button in the top right-hand corner of the video.

Materials Needed

You need:

  • 70 cm (26–27 inches) of the wider ribbon
  • 1 meter (just over a yard) of the slimmer ribbon
  • Matching thread
  • Three beautiful pearls for the center

Preparing the Rose-Making Template

I want to show you a little trick for making fabric roses.

This is just a piece of wood with some nails pushed through at regular intervals. The spacing here is 4 cm wide, and I can use this to create the flower you've just seen. In this case, for my Bell dress, that's exactly what I want.

First, I need to get my thread ready, and I'm going to start with the wider ribbon.

Forming the Rose Petals

I think this is really cool.

One thing you have to remember is that the ribbon should always be pleated when you place it through the nails. That way, when it comes out, it gives you this gorgeous little shape.

It also works if you twist it as you come around and back to where you need to go. Twist it around once, which makes good sense, and then fold it together. It doesn't really matter how, as long as it's nice and tight.

Then go through again so that it holds itself. I go through the next one, come back, and do the same again. I fold this up and go through there, then around this side again.

You can see it here. I'm just going to fold it up, make sure it doesn't slip out, put it over, and then go around that one. Twist it a bit if I want to. I don't think it really matters too much as long as the center is nicely ruffled.

You can buy gadgets for this sort of thing. As I mentioned, I looked for one because I had to make five roses and thought there must be a quicker way. Unfortunately, I couldn't find a gadget or even a video showing how to use one.

If you know of one, leave a comment underneath. I would love to get one of these gadgets and show you how it works.

Continuing Around the Template

I'm just going to keep going around here.

Another thing I wanted to mention is that the taller these nails are, the better.

Now the key is to get your hand or finger in there and really hold everything in place. I'm just going to stick my needle through there so it can't go anywhere. Don't let go of it.

Go through a few times and secure everything. My thread wasn't really long enough, so I'm going to secure it and then quickly thread another one.

Creating the Pearl Center

I want to create a center for my little flower.

I got these pearls from Joann's, and each one was only about a dollar, so they're actually quite inexpensive.

I've put my pearls in a little container to keep them safe. One thing I saw at Joann's, which I thought was really nice, was using three different pearls together.

So I'm going to use:

  • One gold pearl
  • One red pearl
  • One mini antique gold pearl

There we go.

I'm going to place those together here, and I think that's really pretty.

Attaching the Pearls

I'm just going to go through where I came out.

When you put on pearls, the key is to do it rather loosely. Don't pull the thread really tight because then the pearls have nowhere to go, and they always look like they weren't meant to be there.

The next thing we want to do is loop over and go through so we can position them correctly. I'm going to do that on the other pearls as well.

What that does is hide the visible thread.

You can see the thread here, so I'm going to go up, then over, and then back down.

Finishing the Rose

Now I need to secure the thread, and then the rose can go onto my dress.

I think it's really nice. You could also use these for hair clips and other accessories.

Excellent—only five more of these and I'm done.

Design Variations

When you look at the board and this flower, you can see that if these nails and these nails were placed further out and you only used them for the lower part of the flower, you would get a much more spread-out rose.

So have fun designing your own variations.

Conclusion

Do visit Frocks and Frolics for more learning videos and my awesome PDF sewing patterns.

Thank you, everyone, for watching, and I'll see you next time.

Bye!

DAS KÖNNTE DIR AUCH GEFALLEN

Blumenmädchen

SHOP NOW

Isabella

SHOP NOW

Prinzesinnen Kleid

SHOP NOW

Vivienne

SHOP NOW

Vivienne

SHOP NOW